By using it with WordPress MicroPayments, you can let users pay for access with their digital wallets.
Example
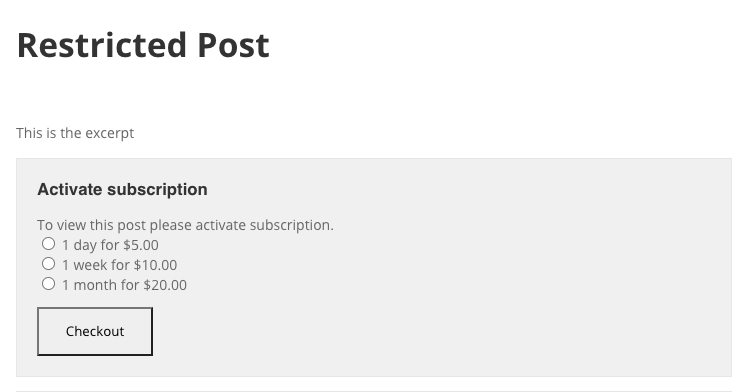
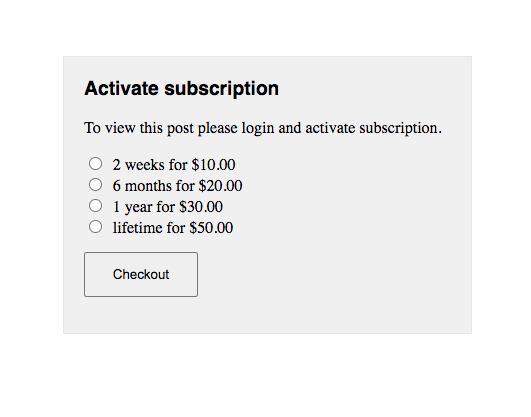
Before Payment
Pay Per Post subscription options with the MicroPayments payment system
After Payment
Accessing the restricted post
How It Works
To allow payments, the plugin uses either EDD (Easy Digital Downloads) or WooCommerce. Both plugins are free and grant access to payment gateways such as PayPal and Stripe (note that some gateways might be paid)
TIP: Can I Lock Only Posts? Or Pages Too?
You can lock any content type: post, page, and even custom post types from other plugins!
For the sake of brevity, we mostly use "post" in this article and in the plugin interface.
Use Case Assumptions
In this example use case guide, we'll cover how to charge users with points to have access to parts of your website, such as pages or posts.
We also consider you bought the plugin, but not installed it, and that you have not installed either EDD or WooCommerce.
Some shortcodes that are useful to place in the "My Wallet" page.
Apply [cm_user_balance] to show how many points the user has on his wallet.
Apply [cm_user_balance_value] to show how much money the wallet is worth.
Apply [cm_user_wallet] to show the latest transactions on the wallet.
Example of the wallet transaction history
MicroPayments Plugin OR EDD/WooCommerce
It's not possible to use both WordPress MicroPayments and direct payments WooCommerce/EDD at the same time.
If you have both installed, there will be settings for both, but in practice the WordPress MicroPayments will take over and users will only be able to pay with points.
Using MicroPayments at the same time with WooCommerce or EDD payment plugins
Choose - Charge For Accessing Each Post or For Whole Website
The first decision we have to make is how to charge users.
So let's head to the Pay Per Post Settings → General tab, where you can configure just that in the Subscriptions section.
Pay Per Post subscription models
Pricing Options
User purchases access for each post - Edit a post to set a price for it.
User purchases access for groups of posts - Create a price group, then edit a post to assign it.
User purchases access for either individual posts or groups of posts - Edit a post to either assign an individual price or a price groupEffectively, it's a combination of the previous two.
Example of setting up the pricing option for a post
Create Options For Prices
How It Works
Create a price option.
Assign it to a post.
(Optionally) Create a pricing group and bundle multiple posts into it.
In the plugin settings you can define several options: create groups and set its pricing. In the following example, both groups have different subscription tiers.
Setting up the Pay Per Post pricing groups with MicroPayments Platform plugin payment system
TIP: For Decimals, Use Periods
When setting prices with decimals, use periods (.), and not commas.
Good example: 2.99
Bad example: 2,99
TIP 2: Period Options
You can create options in: minutes, hours, days, weeks, months, years and lifetime
TIP: Section is Empty?
If there's no option to create a pricing group, ensure these plugins are activated:
WordPress Pay Per Post Plugin
WordPress MicroPayments
Displaying the 'CM MicroPayments Points' section when the plugin is activated
Select Price For Accessing Your Post or Posts
Time to determine which posts are locked behind a paywall.
First, create or edit the relevant post.
Editing a post
Then, scroll down to the CM Pay Per Posts: Micropayments Pricing metabox.
'CM Pay Per Posts: Micropayments Pricing' metabox in posts/pages
In-depth Look
Setting up the MicroPayments pricing option for a post
Which options (1 and 2) are available on each post depends on the settings:
Setting a price group
Optionally, set one price that will apply only to this post
Now, you should edit each content to set its pricings.
Example: Post With Multiple Pricings
First, we edit the desired post.
Editing a post
Then, we check the metabox CM Pay Per Posts: Micropayments Pricing and add the price option. In this case, there are two:
Pricing group "MicroPayments"
Individual price - lifetime access 20 points
Setting up the MicroPayments pricing option for a post
Now, users will be prompted to pay before accessing the content.
Pay Per Post subscription options with the MicroPayments payment system
Define What Is Shown Before Payment
Back in the General tab, you can choose what is shown to visitors before they pay.
Pay Per Post general settings
Show only part of the content (more options) - Specify how much of the content is hidden.
Hide only content - Hides the complete content.
Hide full page - Hides the full page, including content, header, and footer.
Hide specific page elements (more options) - Specify which elements of the page are hidden.
1) Show only part of the content additional options
a) Use post excerpt
If enabled, post excerpt will be displayed (if available) until the user pays for the access.
If disabled, the post content fragment will be displayed.
Excerpt Example
With the following excerpt
Adding excerpt to the post
The excerpt is shown before the pay box
Displaying the excerpt of restricted post
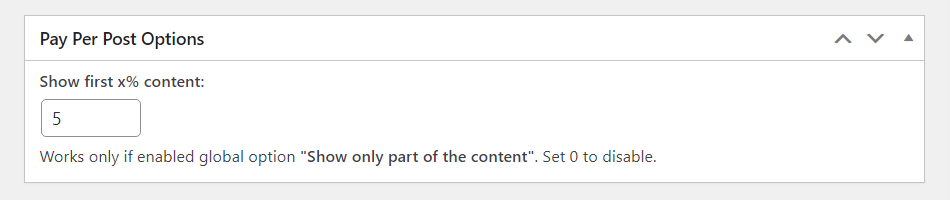
b) Show first x% content
Show a percentage of the post content. Only works if the option Use post excerpt is disabled.
It is possible to override the global option for setting up the % for each page. It can be done on the post editing page under the metabox Pay Per Post Options. If the value is set to "0", then the global value will be used.
Pay Per Post Options metabox
c) Apply fade out effect
Gradually hides the content, respecting the percentage value.
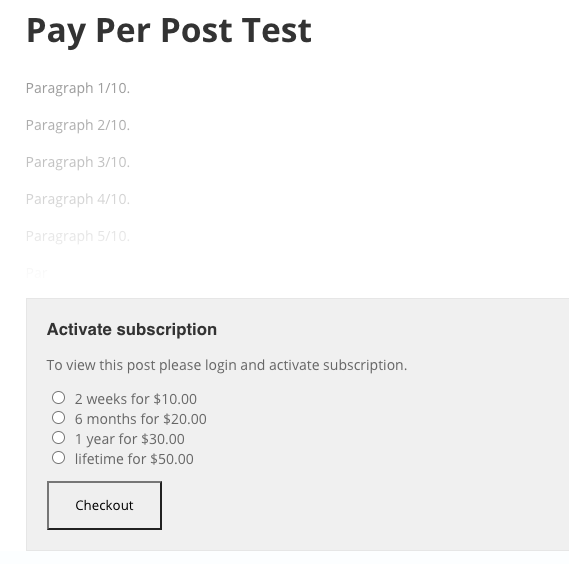
Example
50% content and fade out effect.
Example of the fade effect
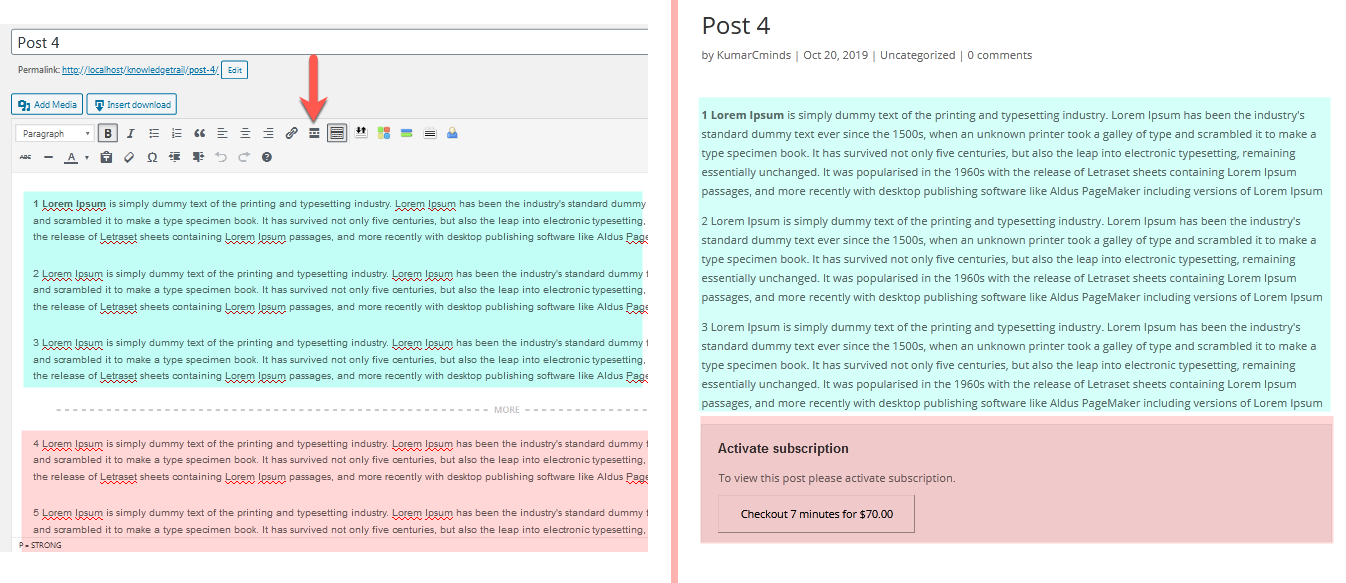
2) Hide Full Post in Frontend
If enabled, will hide the full post (starting from the Read More tag) until the user pays for the access.
Backend vs. Frontend Example
Hiding full post after the 'Read More tag'
3) Hide Full Page
Hides all elements of the page.
Example
Hiding full post
4) Hide Specific Page Elements
ID of Block (only one) to be replaced with payboxes
Set one element ID which will be replaced with payboxes. E.g. "main".
Accepts only one ID that is not inside the post/page content ID of Blocks to be hidden:
ID of Blocks to be hidden
Set the element ID which will be hidden. To add multiple, separate them by commas. E.g "main, content, footer".
The element cannot be inside the post/page content.
Note: Doesn't Include Post/Page Content
This feature does not apply to content inside the page/post. As such, in the following example the IDs box and content1 would not be hidden.
Hiding specific page elements
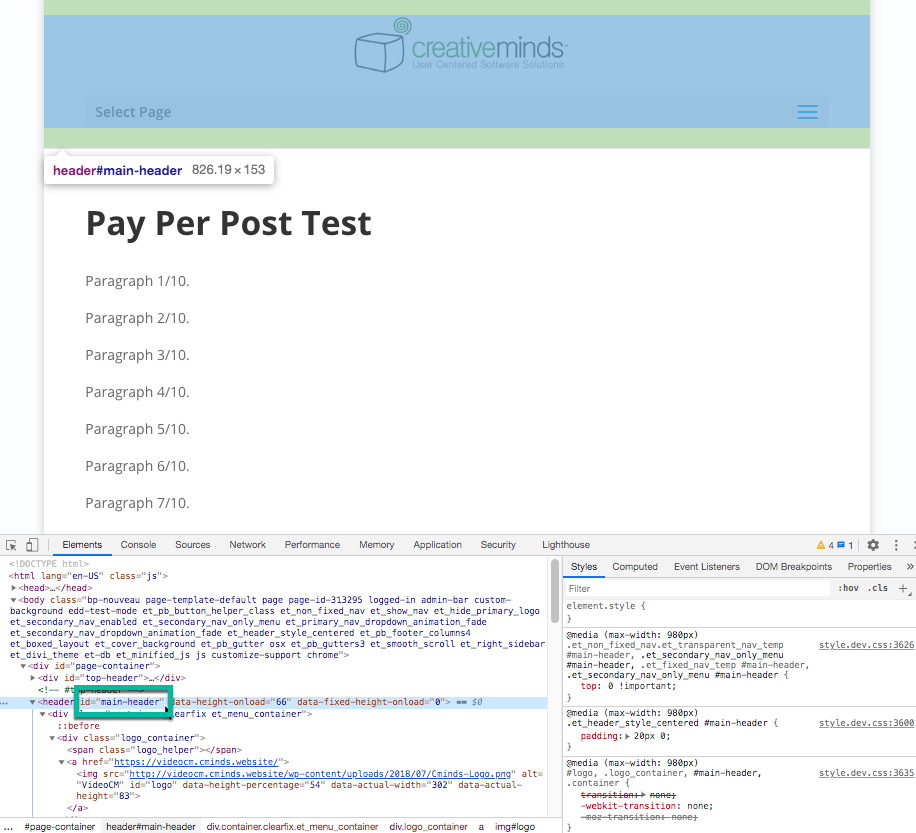
TIP: Finding ID
To find the ID of an element, use the inspect tool of your browser. Locate the element inside the elements list (called DOM tree), and copy its ID. Note that not all elements necessarily have IDs.
Full View
How to find an element ID
Detail
Example of the element ID
More Options
Also in this tab, you can set:
Hide comments before purchase - Hides also the comments of the post.
Show full post in preview - Shows the whole content when the post is seen as preview (for instance, draft). Useful for writers and editors
Reload Browser When Subscription Expires - If enabled, script will check in the background if the subscription is still active and reload the browser when it expires or user has been logged-out to disallow further reading post.
Allow Subscription Form for Guest User - Note that this setting only applies to the Direct Payment (EDD/WooCommerce) integration.
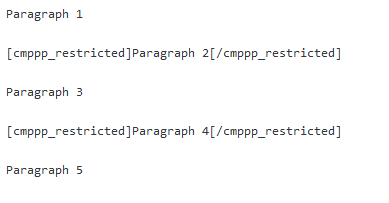
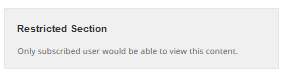
You can also o restrict only sections of the content - for instance, the second and third paragraphs of a post.
If the user is not a subscriber, he/she will see a "Restricted Section" box instead of the locked content. A paybox will be triggered at the end of the content. This is done via a shortcode.
How to Use the Shortcode
Locking the content is easy. Simply surround it with the shortcode, as shown:
[cmppp_restricted] any content [/cmppp_restricted]
Example
You can use the shortcode many times in the same content.
Back-end
Restricting parts of the content with shortcodes
Front-end
Example of partial post restriction
TIP: Customizing the Text
You can customize the text of the restricted section box
Restricted section box labels
This is done via the labels settings → Restricted Shortcode section.
You can allow users to receive some time after paying for access.
How it Works
Refunds are not moderated - they are automatically granted.
You can choose how much time the user has to request the refund.
Flow
User clicks the Refund button...
'Refund' button
...Chooses a reason...
Choosing a reason for refund
...Is refunded.
Successful refund
Setup
To set it up, click on the Refund tab.
Pay Per Post 'Refund' settings
Enable refunds - Turns on the feature.
Refund reasons - Create new refund reason by creating new field and filling unique flag (left field) and text label (right field).
Time limit to allow refund [minutes / seconds] - Set the time limit in minutes and seconds to allow refund for users that activated a subscription. After this time user won't be able to refund.
Once set user will be able to view a refund link on the post / pages he has been subscribed to. Once clicked he will need to mark the reason for the refund before it is applied.
Letting Authors Create and Sell Access to Content
The site owner can allow the content authors to create content on his site, sell the access to it and get their author's share. It can be users with the access to the back-end and the relevant capabilities to create posts/pages. There are a few default WordPress user roles - such as Author and Editor.
When creating or editing posts, these users will also see a metabox that allows to add the post to the pricing group or set up an individual price for this post:
Setting up the pricing for a post
The admin can define the author's share in the plugin settings. To do this, head to the Pricing tab:
Pricing tab
Scroll down and find the section Author's share. There are 2 options:
Author's share settings
Allow transferring points to author for his post/page - Enable this option if you want to transfer points to the post author's wallet for selling the access to his post/page.
Author's share - Set a % that the author will receive for selling the access to his post/page. Maximum value is 100. Note: this option appears only if the previous one is enabled.
Have a note that the value that is set in the Author's share field is default for all new users and for all existing users when you enable this feature for the first time. It means, when you set this value for the first time, and change it later - it won't be changed for already existing users. This value can be changed by admin individually for all users that are able to create content on your site.
To set different % for definite user navigate to Admin Dashboard → Users → All Users. Hover on needed user and click Edit.
Editing a user
Scroll down to the section CM Pay Per Posts. There you can change the % individually for this user in the option Author's share. Don't forget to click the button Update User to save the changes.
Setting up the author's share
Refund
If the user purchased access to the content created by some author, and the author got his share for this sell, the user still can make a refund. In this case, the points that the author received for this sell will be deducted from his wallet.
TIP: Converting Points to Real Money
The WordPress MicroPayments Plugin allows to convert virtual points into real money, so your authors can earn money by selling access to exclusive content. The plugin supports 2 methods of withdrawing money - via Stripe or PayPal.
It's important to notify both the admin and users when new subscriptions are active. The plugin always sends notifications to users and you can the admin alerts on or off.
Click on the Notifications tab.
Pay Per Post 'Notifications' tab
You can find there following notifications:
1) New subscription (For Customer)
Email template for 'New subscription (For Customer)'
Enable notifications - Check yes to enable subscription notifications. Subscription notifications are sent to users once they purchase/subscribe to a post or a group of posts.
2) Confirmation of purchase (For Customer)
Email template for 'Confirmation of purchase (For Customer)'
Enable notifications - Check yes to enable confirmation of purchase notifications. Purchase notifications are sent to users once they purchase/subscribe to a post or a group of posts.
3) Subscription is about to expire (For Customer)
Email template for 'Subscription is about to expire (For Customer)'
Enable notifications - Check yes to enable notification about subscription expiration. Subscription expiration notifications are sent to users in advance, a few days before the subcription expires - you need to define this amount of days in the following option.
Subscription expires in (days) - Enter here the amount of days before the subscription expires to send the reminder.
4) New subscription (For Admin)
Here you can configure New subscription notification for the admin.
Email template for 'New subscription (For Admin)'
Enable notifications - Check yes to enable subscription notifications. Subscription notifications are sent to admins once some user purchases/subscribes to a post or a group of posts.
Emails to notify - Enter comma separated e-mail addresses in the provided box for notifications of subscriptions to be sent to. This also sends notifications to admin or other users who should be notified about new subscriptions.
Using Placeholders
In both cases (customer or admin) you can customize the e-mail subject and template using placeholders:
Email subject
[blogname] - WordPress defined blog name parameter.
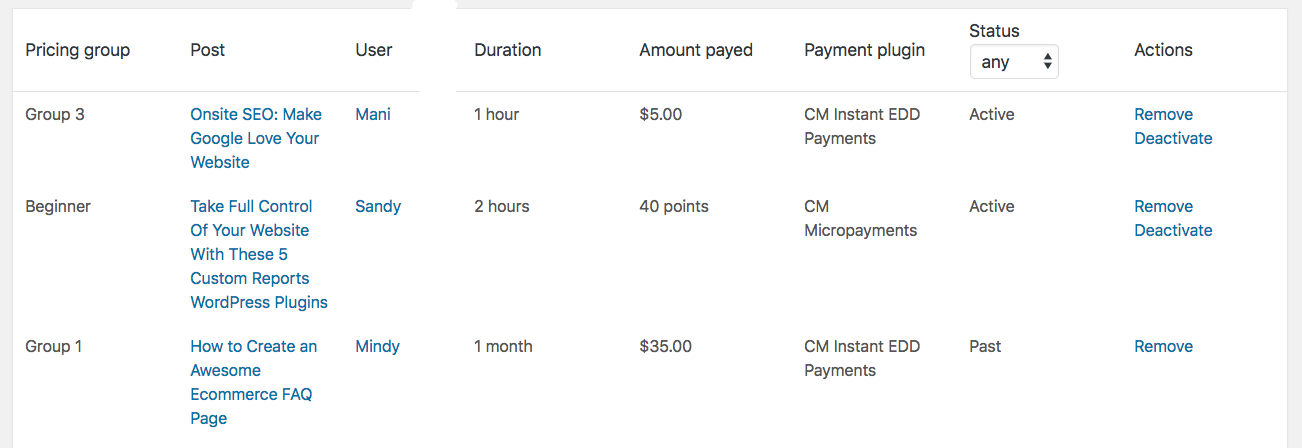
The admin can track all active subscriptions at any time.
Navigate to the Admin Dashboard → CM Pay Per Posts Pro → Subscriptions.
Navigation to Pay Per Post Subscriptions Dashboard
This page displays the subscriptions that have been added. Subscriptions are listed by pricing group, post, user, start, end, duration, points and action.
Pay Per Post Subscriptions Dashboard
TIP: Manual Subscription
Add New - Click the Add New button to add a new subscription to the page. This option support adding a subscription manually.
You need to indicate a post which already have a pricing group assigned to it, indicate the username and the duration. Adding a manual subscription let you also add non paying users to the subscription.
Adding a new subscription manually
Letting Users Manage Their Subscriptions (Shortcode)
Each user can also view his active and past subscription. You need to create a page which includes the shortcode [cmppp-subscriptions] .
Shortcode that lets users manage their Pay Per Post subscriptions
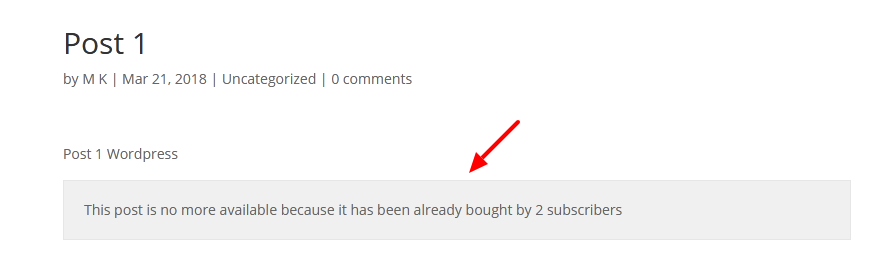
In the WordPress Pay Per Post plugin, you can restrict any post type, even the ones managed by other plugins. This means that you can restrict content from other plugins if it uses said post types.
We Can't Guarantee Compatibility
Note that is a general rule. We cannot guarantee compatibility with all third-party plugins, as that involves code we don't control.
The technical requirements are:
Plugin must register post_types - To show the post type in Pay Per Post's settings
Plugin's custom type must be editable from the Back-End - To enable the subscription metabox
Plugin must use the "the_content" filter on the Front-End - Only this content will be restricted
Choosing Post Types to Restrict
Head to General tab → Post types section. There, choose which post types to support.
This list fetches all post_types. If you can't find one related to a plugin, it means the plugin doesn't register its content as post_types.
Selecting post types to restrict with Pay Per Post model
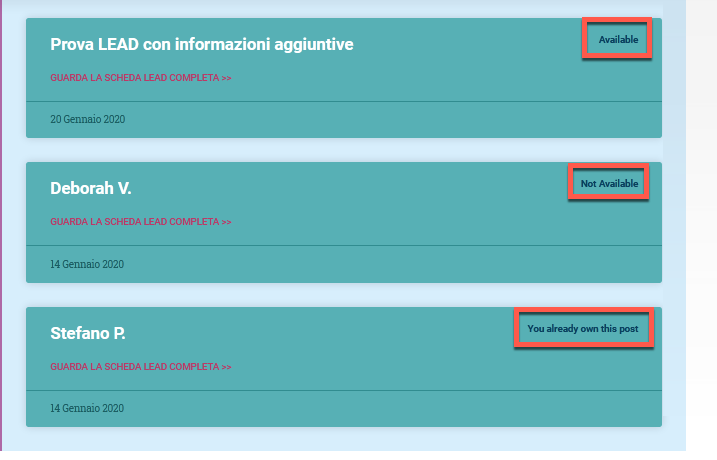
You can restrict the number of purchases for your posts. This means that only a set number of users can make a purchase.
Set Up
To limit the number of users that can make the purchase, navigate to the plugin settings. Under the General tab, you can find the section Post Availability.
Post availability settings
To activate, set the option Allow to set limit the post availability for users to Yes. Under Max user number limit, set the maximum number of users you want your post to be available for. Set the number above 0, because if you set it at 0 or below, there will be no limit.
If you want to show a message to your users once the maximum number has been reached, set Allow to set message with limit to Yes.
TIP: Modifying The Label
To set a custom message once the maximum number of users has been reached, from the labels tab. Under it, navigate to the Post Availability section.
You can set a general message, or a message that states the number of buyers that have purchased your post.
Post availability labels
Example
Example of reaching the limit of possible post access
Showing Availability via Shortcode
You can show if a post is available or not to the current user by using the shortcode [cmppp_availability postid="ID"]
The plugin will not work or will require special settings when used together with themes that don't implement the "the_content" hook/filter. They are a minority.
So far, this has been reported in the Elementor Page Builder and some other themes.
Elementor Fix
To block a page that uses the Elementor page builder, it's necessary to both: