WordPress Travel Map Plugin (CMMRM) + Custom Fields - Use Case - Building a Trails and Hiking Routes Site
Building a Trails and Hiking Routes Site
Note: This guide covers features from
- Pro version of WordPress Travel Map plugin - This document uses version 4.5.2
- Custom Fields Add-on
Video Use-Case
Introduction
The WordPress Travel Map plugin allows you and your users to create and showcase routes in Google Maps, including images and notes for each location.
The Custom Fields Add-on deepens the content by supporting fields such as "Danger level", "Highlights" and such - you can create as many as necessary.
Demo
A great deal of the footage in this tutorial comes the demo Knowledge Trail.
Access it to see live what you can achieve with the plugin.
Use Case Front-End
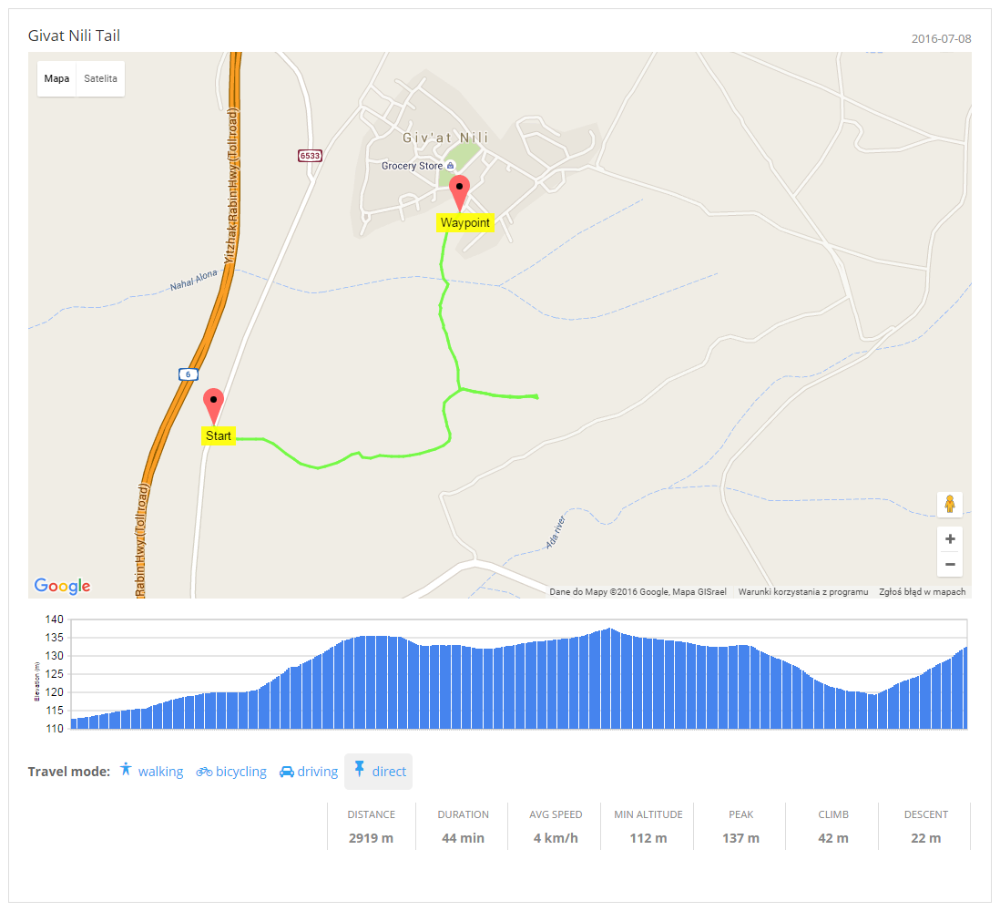
Route Page

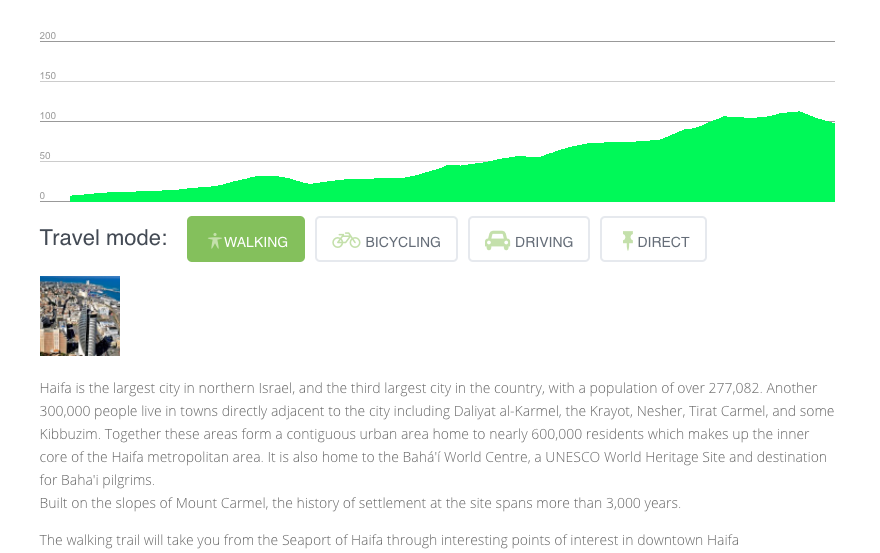
Detail: Altitude, Travel Mode, Notes
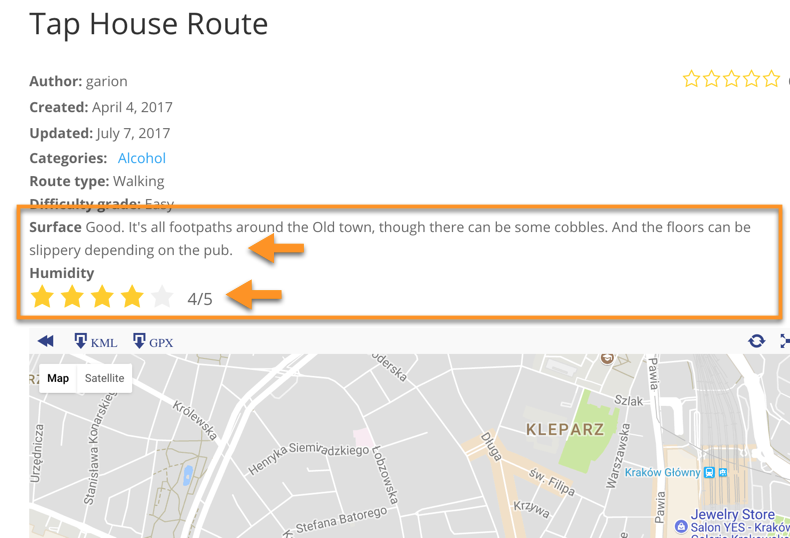
Highlighted Custom Fields
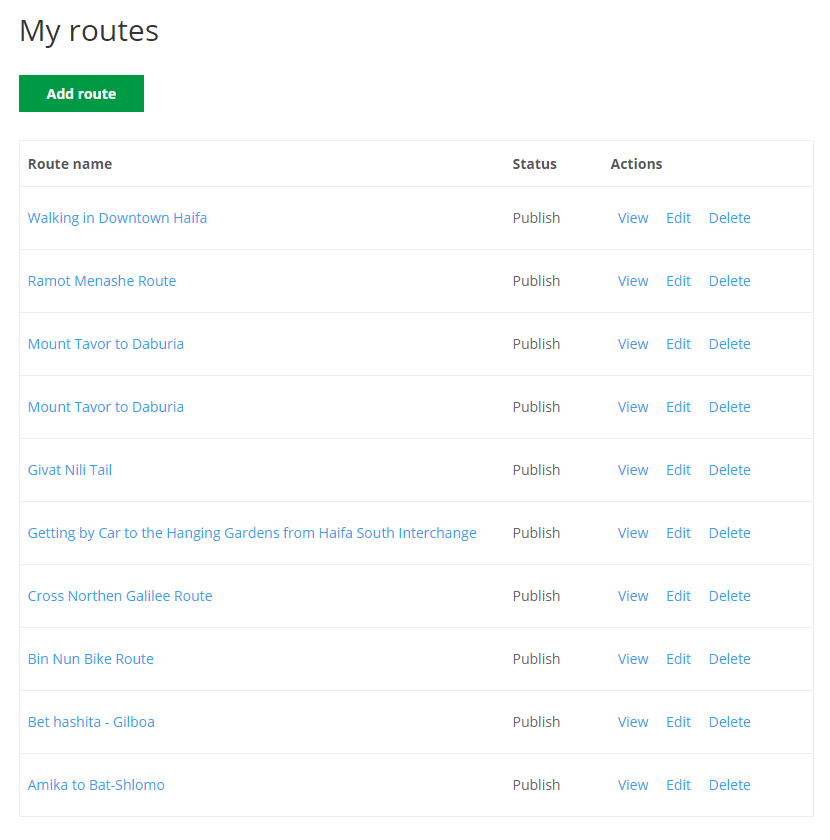
User Dashboard
Use Case Assumptions
In this example use case guide, we'll cover how to create a directory of routes with custom fields. We consider that you have already bought the plugin and add-on, but not installed them.
It follows:
- Installing the plugin
- Initial Setup
- Adding first route
- Visual options
- The index page
- User interaction
- Custom fields and taxonomies
- Main shortcodes
- Translating the plugin interface
- Extra
Installing The Plugin and Add-on
The process is the same for all CM plugins and add-ons.

- Download the plugin from your customer dashboard.
- Log in to WordPress and navigate to the WordPress Admin → Plugins settings.
- Click on Add New.
- Activate it and add the license.
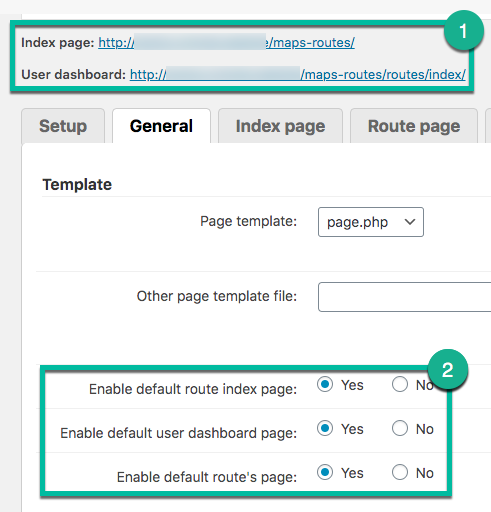
TIP: Automatic Index and Dashboard
Upon installation, the plugin automatically creates a page for the route index and another for the dashboard. Head to Settings → General tab to:
- Find shortcuts to these pages
- Enable or disable them
Initial Setup - API Keys
To show Google Maps on your site, you require to create and then add a Google Maps API key into the plugin.
Important
- Starting from July 2018, Google Maps, Routes, and Places require billing information, such as an associated credit card.
- The pricing system also changed, but in practice, the services are still free for limited use.
Google API Keys - Obtaining the Google API Key
To obtain the Google API key, follow these steps:
- Head to the Google Developers webpage.
- Log in to your Google account.
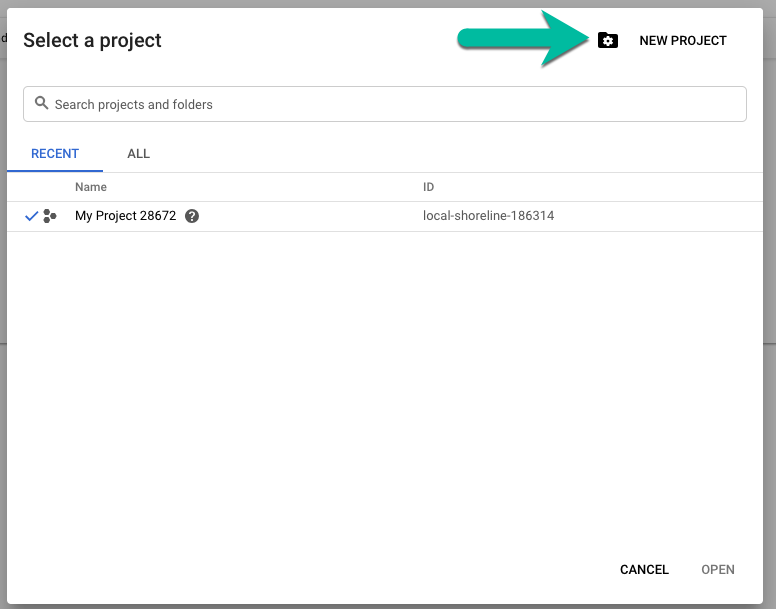
- Go to your project or create a new one.

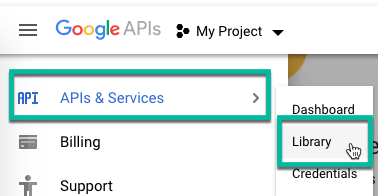
- Head to APIs & Services and then Library:
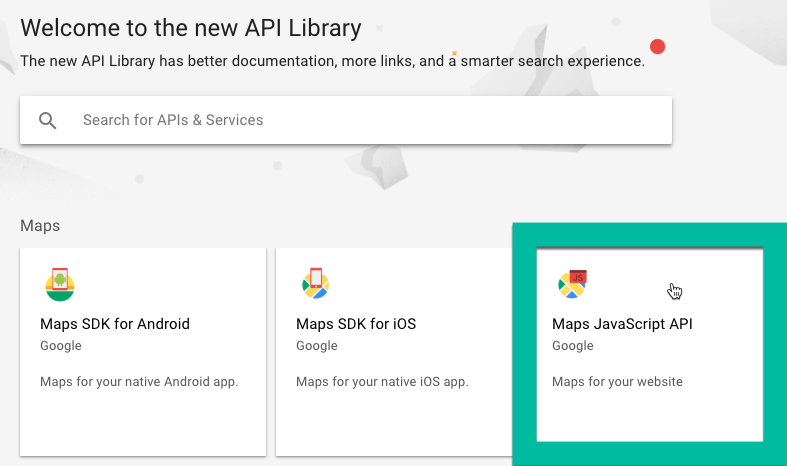
- Select one of the API from the list. You may have to search for it by using the search bar.
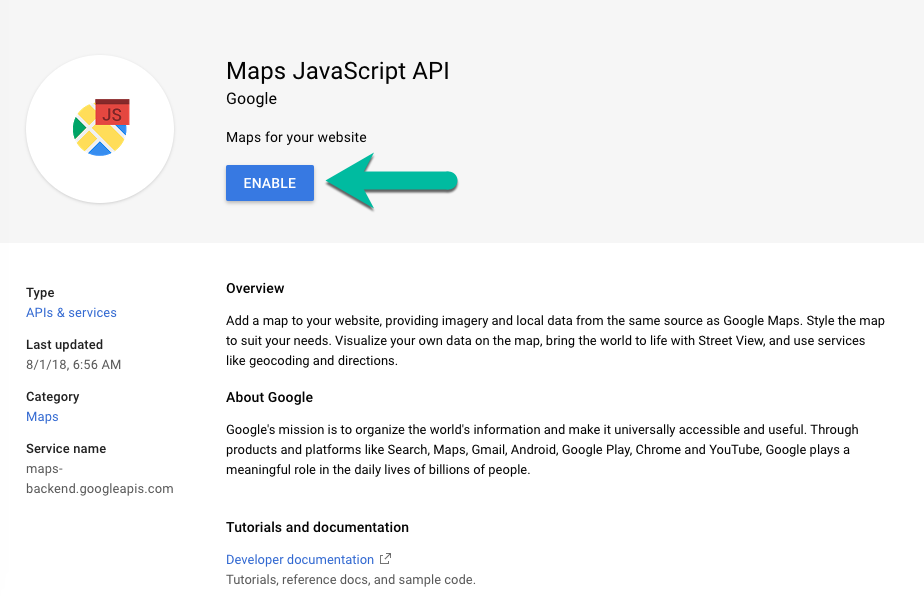
- This page is important. In it, you can enable the API and find resources about it. Click Enable:
- Repeat steps 5 and 6 for all the API keys you need to enable:
- JavaScript API
- Geocoding API
- Places API
- Static API
- Elevation API
- Directions API
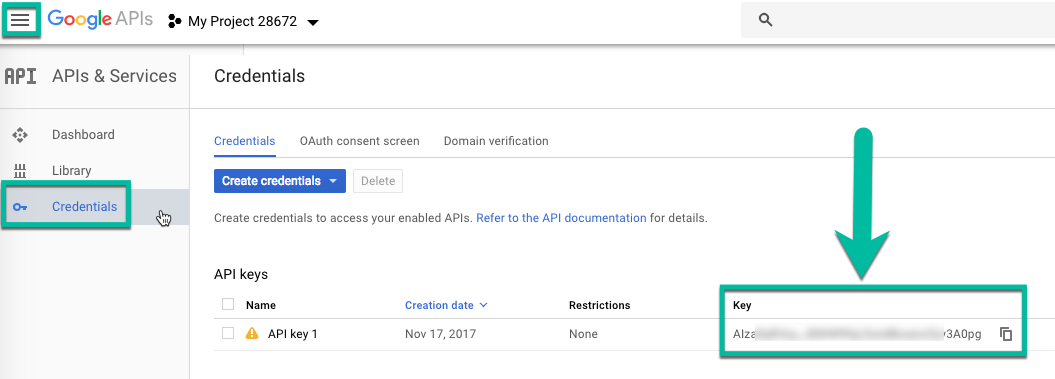
- After you have enabled all the API Keys, activate the sidebar menu and click on Credentials. You will find the API key there, ready to be copied and pasted into the plugin's settings.
Billing
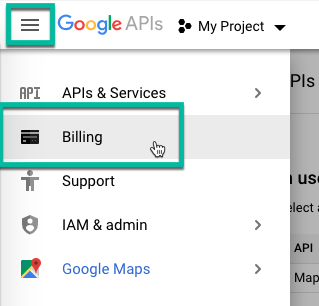
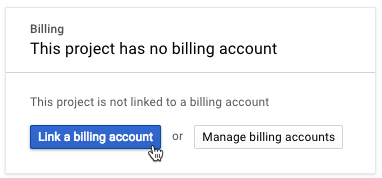
Also, if you have still not enabled billing, you can do so by activating the sidebar menu and then selecting Billing.
Then click Link a billing account and follow the steps.
Adding Key to Plugin
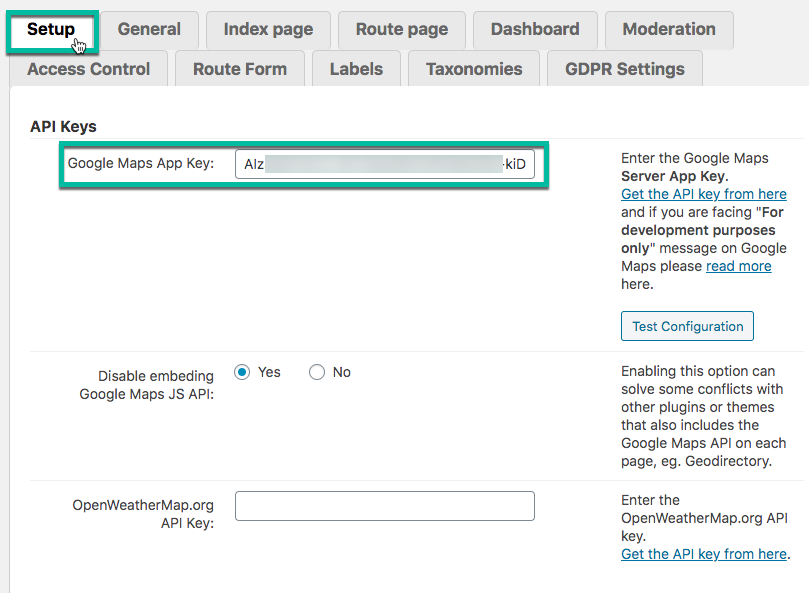
Once you have the key, adding it to the plugin is easy. Head to the Setup tab and copy it to the Google Maps App key field.
In the same setting, you can click Test Configuration to ensure the connection is working.
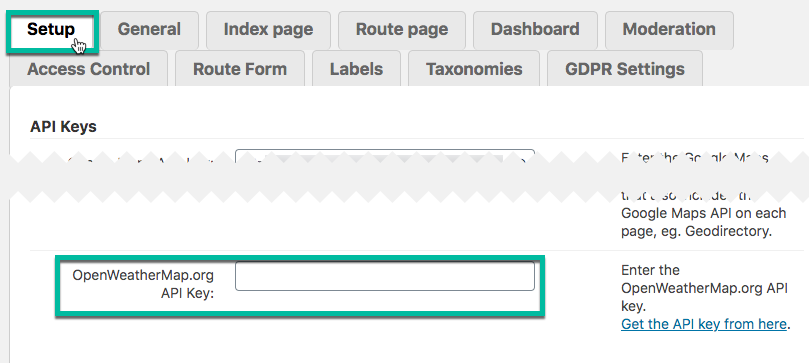
OpenWeatherMap API key
If you want to add weather details to your maps, you will need to enter an OpenWeatherMap.org API Key the same way you did the Google Maps one.
To obtain the API key create an account and login to http://home.openweathermap.org/.
Step-by-step
This guide will walk you through the process while creating a new account.
-
Click Create an Account.

Creating new account -
Enter your information:

Entering needed information -
Choose a purpose for which you will use the maps:

Choosing a purpose -
Click API keys and you will have access to the key. According to OpenWeatherMap, it can take a couple of hours for the key to be active.

Copying the generated API key


Once you have the key, add it to the plugin's settings.
Learn more: Map Locations and Routes - Getting Started - Adding API Keys (Google Maps and OpenWeatherMap)
Adding Your First Route
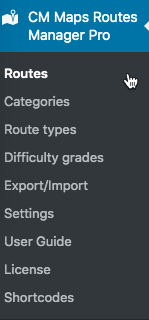
With the initial setup ready, head to WP Admin → CM Maps Routes Manager Pro → Routes.
Both you and your users can use a fully-fledged Front-end form to create and edit routes.
TIP: Security
By using a Front-end form, users don't need to access the WordPress Admin dashboard.
The plugin comes with a user-friendly route editor. As the admin, can use both editors.
TIP: Editing the Form
- You can change which fields appear and which are required from the Settings → Route Form tab. The changes will affect everyone who uses the form, not only the admin.
- Some other settings, namely default route behavior, are in the Dashboard tab.
- Labels can be translated from the Labels tab.
- Custom fields are located in the Custom Fields tab.
Front-end Form
The form is feature-packed, and you can edit everything related to the route from it.
Highlights
- Basic details - Name, description, status.
- Taxonomy and custom taxonomy link - Categories, tags, and any created custom taxonomy. Learn more below.
- Route settings - Will be applied to the details and map.
- Elevation graph - Settings that will affect the elevation graph - the chart showing, from start to finish, the change in altitude.
- Multimedia - Images and video.
- Import - Option to import the route points directly from an external file.
- Map - You can draw the route directly on the map, location by location.
- Location markers - Each point added to the map will result in a location with its corresponding coordinates. Each location can have description and multimedia items.

Learn more about each section: WordPress Travel Map Plugin (CMMRM) - Creating/Editing a Route
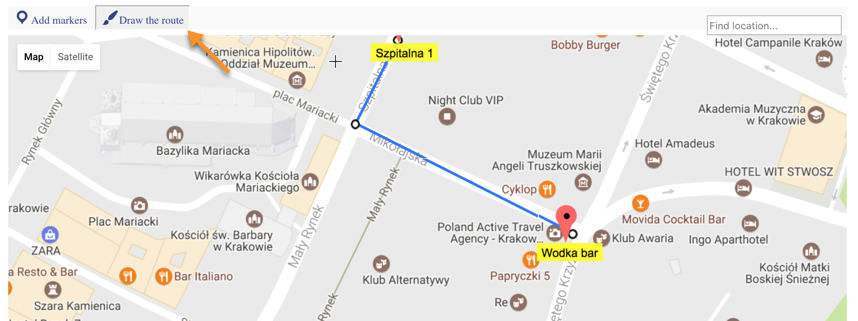
TIP: Drawing Route
When the "Draw the route" button is clicked it is possible to add routes to the map. Routes can be drawn along roads, paths or off-road for mountain hikes, sailing routes, etc. Routes don't have names, descriptions or images assigned to them and are only used for navigation.
To draw a route, click on the "Draw the route" button on the top of the map and start clicking on the map to add waypoints. Waypoints appear as open circles. You can draw waypoints sequentially just like locations. To change the location of a waypoint right click and hold it, then move it to the new location and release.
To add waypoints to a route Mid Route, move the cursor over the route until the hand appears. Then click the route. A waypoint should appear which can be moved as needed.

Learn more: WordPress Travel Map Plugin (CMMRM) - Drawing a Route
Route Page Visual Options
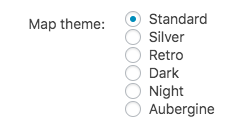
Theme
There are six themes to choose from.
Night Theme Example
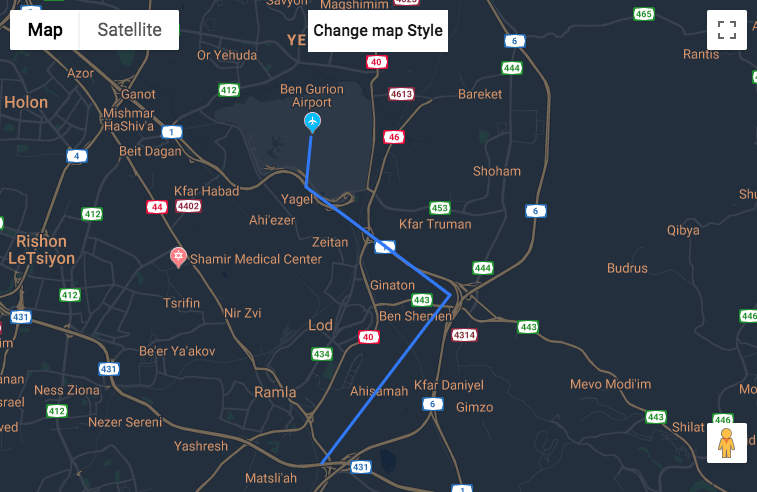
You can change the map theme from the General tab → Map theme option.
Learn more: WordPress Travel Map Plugin (CMMRM) - How To - Change Map Theme
Tiles/Layers
What is This Feature
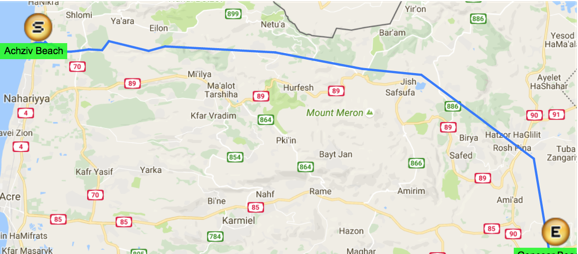
It's possible to offer additional tiles layers on your maps. These present additional information on top of the map.
By default, the plugin connects with the free OSM (Open Street Map) service. Examples of what it can achieve:
The settings are in the General tab → Map section.
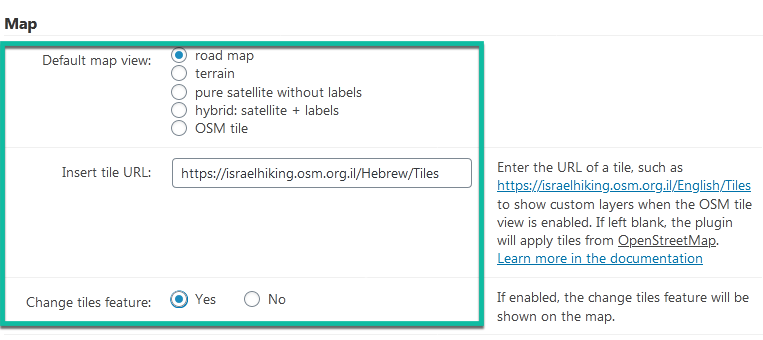
- Default map view - Choose what is the default view. Users can change this at any time.
- Insert URL for tile - Add the URL of the tile service of your choice. Check Tiles - OpenStreetMap Wiki for more examples.
- Change files feature - Lets the visitor turn tiles on or off while browsing the map
Learn more: WordPress Travel Map Plugin (CMMRM) - How To - Add Tiles/Layers To Map
Custom Icons and Colors
It is possible to add custom icons to maps and to customize the color of the route.
Example With Custom Icons
Custom Icons
Custom icons can be chosen from a predefined list of icons available for each location you define on the map using the location icon selection.
To add custom icons, first enable the settings Route Page tab → Appearance → Enable custom icon per location.
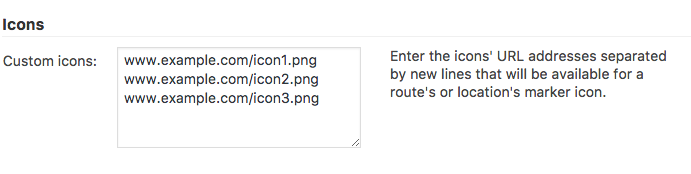
Then, go to Settings → General tab → Icons. There, the admin needs to add each separate icon using a unique URL and add a new line between the icon URLs, as shown:
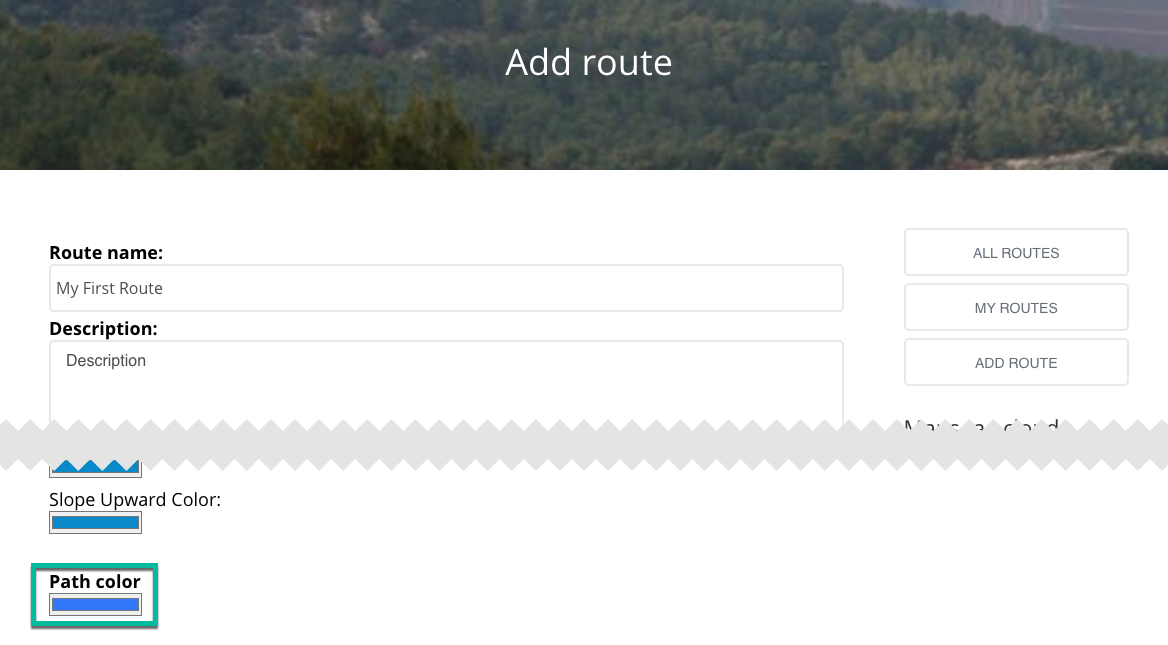
Custom Path Color
Setting the color of the route can be done either upon creating or later editing a route. The option is Path color.
Learn more: WordPress Travel Map Plugin (CMMRM) - How To - Custom Icons and Colors
The Index Page
The index page is perhaps the most important page of the plugin, and it can be extensively edited.
What Is The Index Page?
In the Index view, visitors can view all routes you have created. They can:
- Sort routes by categories, difficulties, and route types
- Search for specific routes
- View routes in Satellite or Map view
- Click on specific routes on the map to learn more, or see snippets of all routes or routes in a certain category below the map.

Learn more: WordPress Travel Map Plugin (CMMRM) - Index Page
Modifying Index Page
All edits are made from Settings → Index page tab.

Since there are a multitude of settings, we'll sum them up here. For a more extensive view, check WordPress Travel Map Plugin (CMMRM) - Settings - Index Page. You can change:
Layout
- Index page layout - Sets the Index page appearance as a list or as tiles.
- Index tile width [px] - Sets the width of tiles that appear on the index page if the "tiles" layout is chosen.
Pagination and order
- Routes per page - Limits the routes visible per page.
- Order routes by - Sets routes order by title, created date, views, rating, or user located proximity (this last option uses the web browser's geolocation).
- Sorting order - Sets the order of sorting to either ascending or descending.
- Search for whole words - Toggles whether to search for partial words or only to search for whole words.
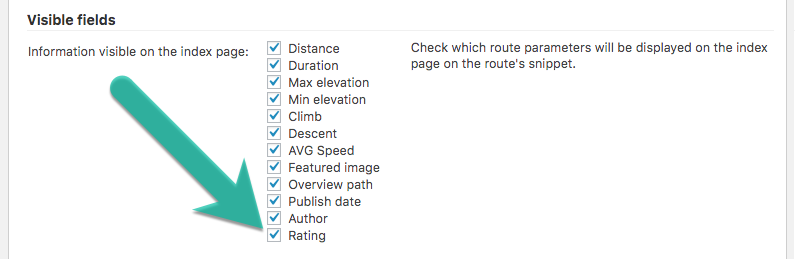
Visible Fields
- Information visible on the index page - Determines snippet information seen on the index page.
Appearance
- Text on top - You can enter text which will be displayed on the top of the index page, below the page title.
- Apply the route's color to its snippet background - Connects the snippet to the route by giving the snippet the same background color and the color chosen for the route.
- Show category description on the top - If disabled, the default "text on top" will be displayed.
Map
- Show map with all routes on the index page - Toggles whether or not to display the map including all the routes on the index page.
- Index map default latitude - The latitude of the default view on the index page map if no routes to show.
- Index map default longitude - The longitude of the default view on the index page map if no routes to show.
- Index map default zoom - The greater the number in the drop-down menu, the closer the zoom will be.
- Embed the map script in footer - Enabling this option can solve some JavaScript issues.
- Enable marker clustering - Toggles marker clustering on and off. Clustered markers display more clearly than overlapping markers.
- Enable info window on marker - Shows a tooltip when clicking on a clustered marker, listing each route
- Trails stroke weight - Define the stroke's weight for the trail, in pixels.
- Show fullscreen mode button - If enabled, the button shown below will appear in the top right corner of the map, allowing the route embed to occupy the whole window.
- Integrate with CM Map Locations plugin - In order for this feature to work, it requires the WordPress Interactive Map plugin to be activated.
- Starting point for a route - You can choose which point will be shown as the starting point for the route displayed. Choose between first pathway point, first location or all locations
- Route featured image - Sets the route featured image.
- Route default image - The web address of the route's default image.
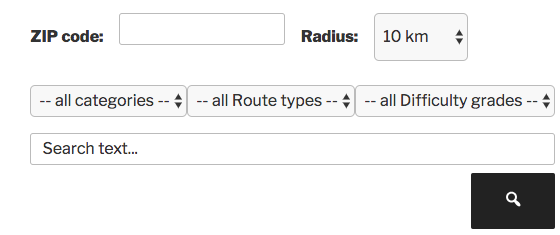
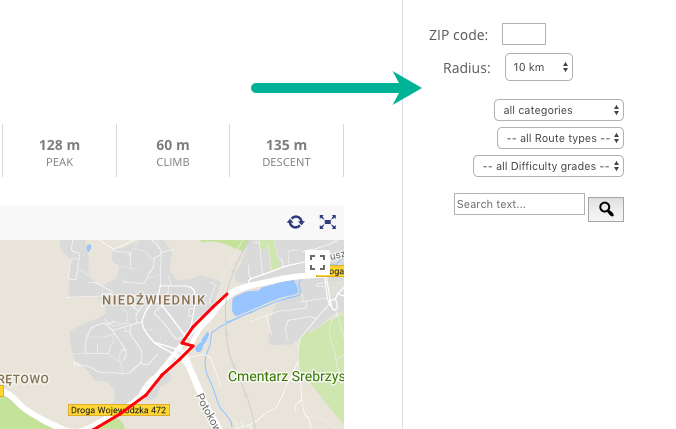
ZIP Code Searching
- Enable ZIP code radius filter - Enables or disables the ZIP code search bar
- Country code for the ZIP code searching - The ZIP filter works only within a single country.
- Minimum / Maximum radius - These two options configure the range of the ZIP search.
- Radius value step - The increments present in the search.
- Radius default value - The standard value in the index page.
- Enable geolocation - Fetches the zip code from the user's browser. It only works with https.
Geolocation
- Show user's position using browser's geolocation - Toggles whether or not to display the user's location using geolocation. Requires HTTPS.
- Enable find user location button on map - Displays the "Find Me" button. Requires the previous setting to be enabled.
- Center map to user's location - Uses the web browser's geolocation API to center the map in the user's location.
Learn more: WordPress Travel Map Plugin (CMMRM) - Settings - Index Page.
Reminder: Index Page Shortcut
The plugin settings has a handy shortcut for the index page.

User Interaction - Who Can Edit
The WordPress Travel Map plugin allows your users to collaborate, adding and editing their forms. In this section we'll discuss a series of features that affect this collaboration.
Reminder: Modifying the Form
You can edit what appears on the form and which fields are obligatory from the Route Form tab.

Learn more: WordPress Travel Map Plugin (CMMRM) - Settings - Route Form (Hiding Fields, Setting as Obligatory)
Who Can Access And Collaborate?
Head to the Settings → Access Control tab.
From here, you can edit who can:
- Access the index
- Access the route page
- Create routes
- Edit their own routes
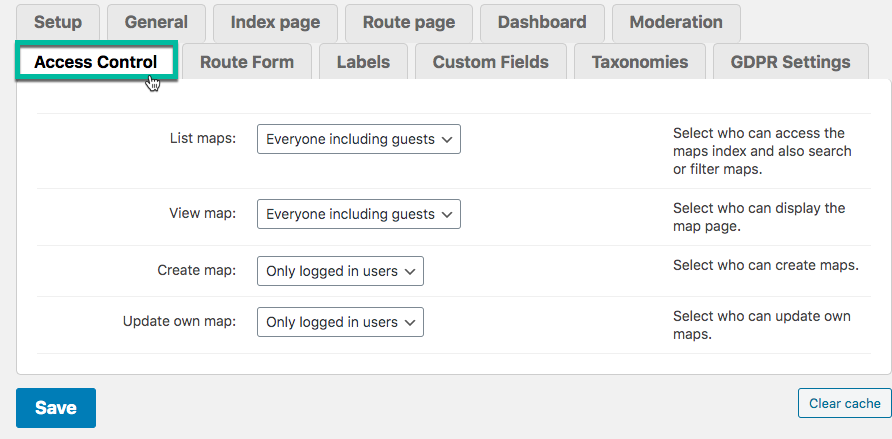
Options have choices
- Everyone including guests - Non-logged-in users (to let guests create maps, you need the Anonymous add-on).
- Only logged-in users - No matter the user role.
- Specific role - i.e. admin, editor etc. Note that only that role will have access - i.e. choosing admin will not grant the permission to other roles.
-
Custom capability - You should add a new capability in this field and then include it in one or more user roles. Learn more about roles and capabilities from WordPress.

Adding custom capability

Learn more: WordPress Travel Map Plugin (CMMRM) - Settings - Access Control
What Happens When User Posts? Moderation, Notifications and Terms of Service
You define what happens once a user has posted.
Moderation
Let's start with moderation - you can automatically approve the route or draft it until it's approved by you. Head to the Moderation tab.
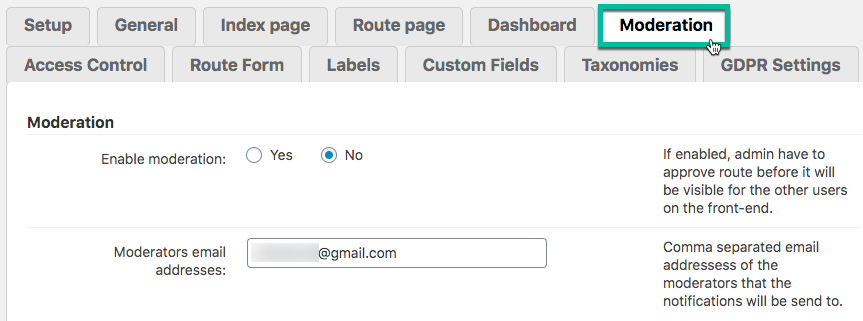
Here, enable or disable moderation and choose the email(s) address to receive the notice.
Learn more: WordPress Travel Map Plugin (CMMRM) - Settings - Moderation
Notifications
In the same tab, you can configure notifications. These will be sent to the moderator once a suggestion is received, and to the user once the status of their route changes (for instance, it has been approved).
Naturally, these settings only apply if moderation is enabled.
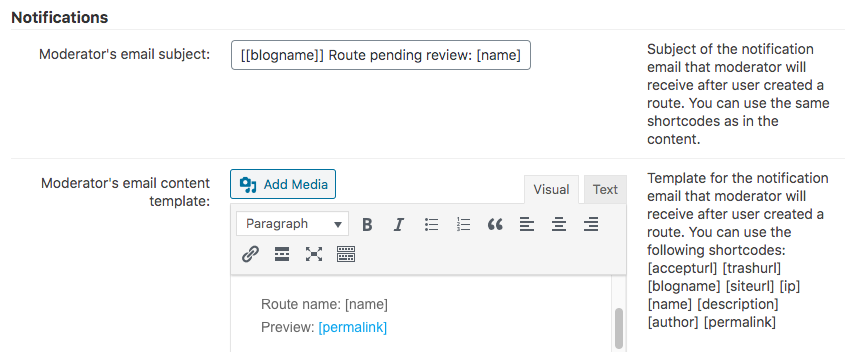
Both messages accept placeholders, such as [accepturl] [trashurl] [blogname] [siteurl] [ip] [name] [description] [author] [permalink].
Learn more: WordPress Travel Map Plugin (CMMRM) - Settings - Moderation
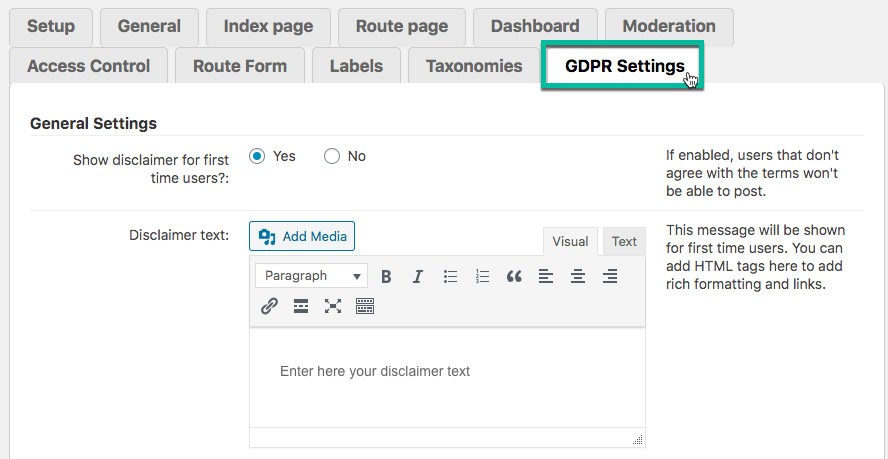
Terms of Service
Last but not least, you can show TOS to first-time users that try to add a route.
Example
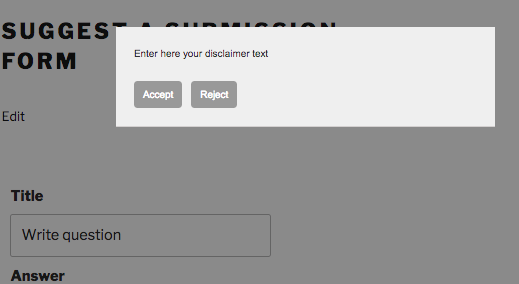
This is configured from the GDPR Settings tab.
Learn more: WordPress Travel Map Plugin (CMMRM) - Terms of Service
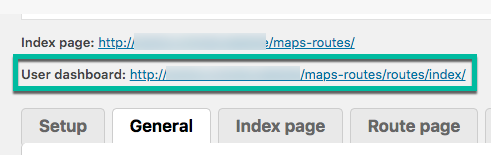
User Dashboard
Example
Reminder: User Dashboard Link
You can easily access this page via the shortcut on the plugin's settings
Alternative: Adding Dashboard Via Shortcode
You can add the user dashboard to other parts of the site by applying a shortcode.
- Shortcode: [my-routes-table]
- Attributes:
- controls - set "0" to hide the "Edit" and "Delete" buttons. The default is "1".
- addbtn - set "0" to hide the "Add route" button. The default is "1".
Reminder 2: Who Can Access It?
You can change which users can view/edit their routes.
Learn more: WordPress Travel Map Plugin (CMMRM) - Settings - Access Control
Custom Taxonomies and Custom Fields
What Are Taxonomies and Custom Fields?
Taxonomies are smart ways to categorize your routes. Examples are: Category (exists by default), Route Type, Route Notes. They are text fields.
Custom fields are even more flexible, as they can support different types:
- Single-line text field
- Single-line number field (note: this option was introduced in version 1.2.8)
- Single-line url field (note: this option was introduced in version 1.2.8)
- Multi-line text area
- Multi-line html area (note: this option was introduced in version 1.2.8)
- 5-grade scale
That allows for custom fields such as "Journal" or "Danger Rating". Custom fields require the Custom Fields Addon.
Adding a taxonomy is simple. Head to the Taxonomies tab and click Add new.
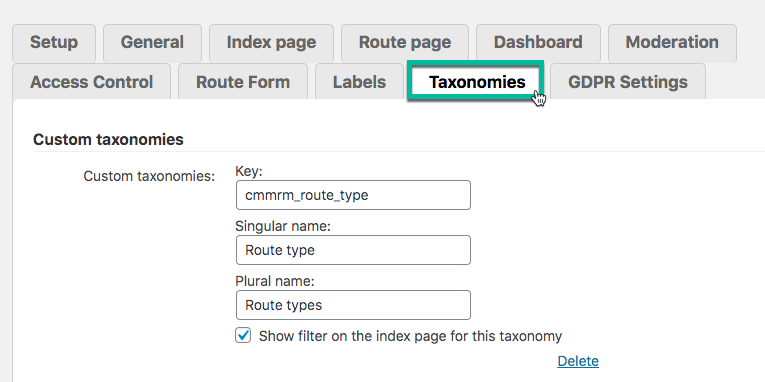
Each taxonomy created will also add a new link in the admin menu which will enable you to define the categories associated with this taxonomy.
You can also choose if to add the taxonomy dropbox to the filtering option showing all the available routes in the routes index page.
Custom Fields
Example

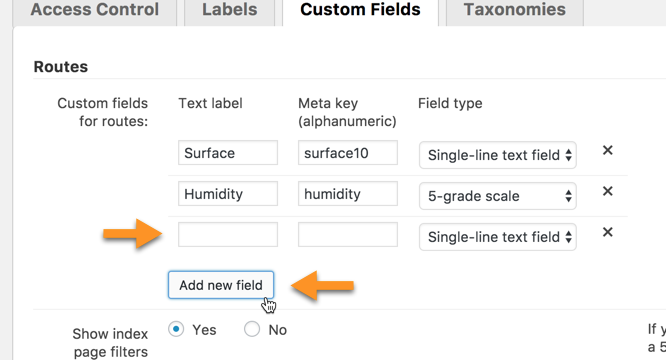
If the Custom Fields Add-on is enabled, you will also see the Custom Fields tab in the plugin's settings.
Click on the Add new field button below any previously created Custom Fields. A new blank row will appear.
Give the Custom Field a label, a meta key and choose its field type. The meta key is used when displaying a specific route's custom field in other parts of your site. Read about the shortcode below.
When the Text label, meta key, and field type have been set, scroll down and click on the "Save" button.
Editing Custom Field
Editing an existing Custom Field is done in the same way.
The only difference is that the "Text label", "meta key" and "Field type" of an existing Custom Field are selected and then modified.
Deleting Custom Fields
To delete a custom field, simply click on the x icon near it.

Learn more: Route Custom Fields - Creating and Managing Custom Fields
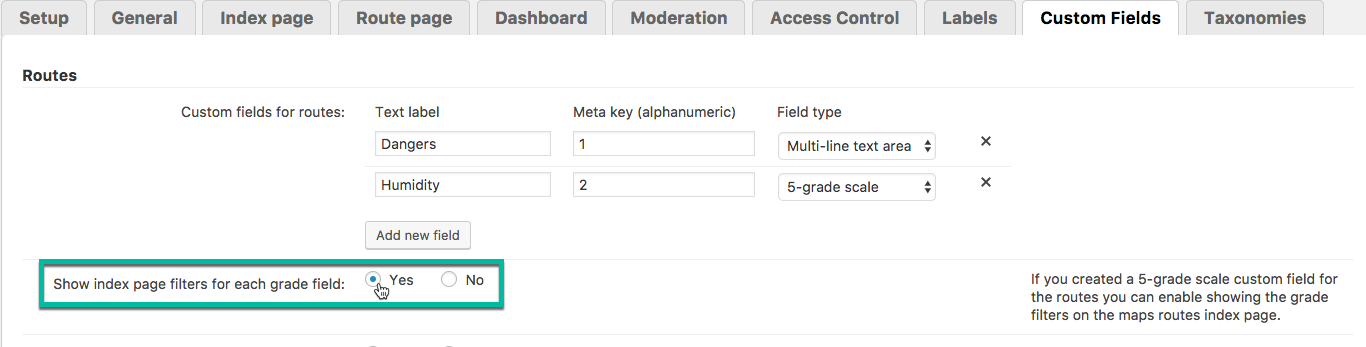
TIP: Filter By 5-Grade Custom Field
This add-on enables you to filter routes based on custom 5-grade scales you have created. It's not possible to filter searches by other types of custom fields (single-line text and multiple-lines text). Read about creating and managing custom fields.
To enable the new filters, select Yes to Show index page filters for each grade field. The path is CM Maps Routes Manager Pro → Settings → Custom Fields, as shown:
Now, when browsing through routes, the custom field should appear as one of the filters. The example below adds the scale "Humidity" to the search:

TIP 2: Showing Custom Fields Via Shortcode
The Custom Field Add-On allows you to show custom fields of any route anywhere on your site via a shortcode.
Example

Why Use This Feature?
The major benefit is that, whenever you edit a route and change its custom fields' values, the shortcode content will change automatically.
This prevents duplicate work.
Using Shortcode
To add a specific custom field of a route, you should use the shortcode [route-custom-field id="" key=""]
- id - the ID of the route
- key - the metakey of the custom field

Learn more: Route Custom Fields - How To - Display Custom Fields of Route Anywhere (Shortcode)
Main shortcodes
Map for a Specific Route
- Use - Displays a single map with the specified route.
- Shortcode -
[route-map id=x] - Check additional parameters.
Example
Map With Multiple Routes
- Use - Displays all routes or filter them by category, type or difficulty.
- Shortcode -
[cm-routes-map] - Check additional parameters.
Routes Index Page
- Use - Displays the route's index page.
- Shortcode -
[cm-route-index] - Check additional parameters.
Route Search
- Use - Shows a search form to find routes.
- Shortcode -
[route-search] - Check additional parameters.
Example
Translating the Plugin Interface
If your site is not in English, or if your users don't speak English, that is ok. You can translate virtually all labels from the Labels tab.

There are over 80 labels you can adjust. Some examples
Route (affects the route page and the form)
- Route name
- Description
- Author
- Edit route
- Access denied
Learn more: WordPress Travel Map Plugin (CMMRM) - Settings - Labels
Importing/Exporting
Notice
Imported routes are in "Direct" travel mode by default.
To easily move routes between sites and devices, you can perform three main operations.
To check them, head to CM Maps Routes Manager Pro → Export/Import.
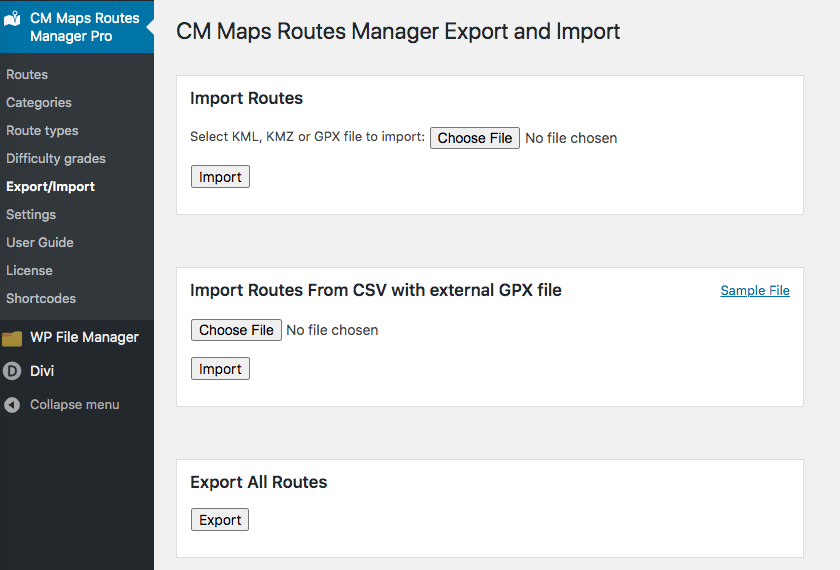
1) Import Routes From KML, KMZ or GPX Files
TIP: What is a KML/KMZ/GPX File
KML, KMZ, and GPX are the file formats used to display geographic data in an Earth browser such as Google Earth, Google Maps, and Google Maps for mobile. KML/KMZ/GPX files are tag-based.
The WordPress Travel Map plugin calculates the ground distance of imported routes by using coordinates from the files and also Google Maps information. This ensures more precision in the process.
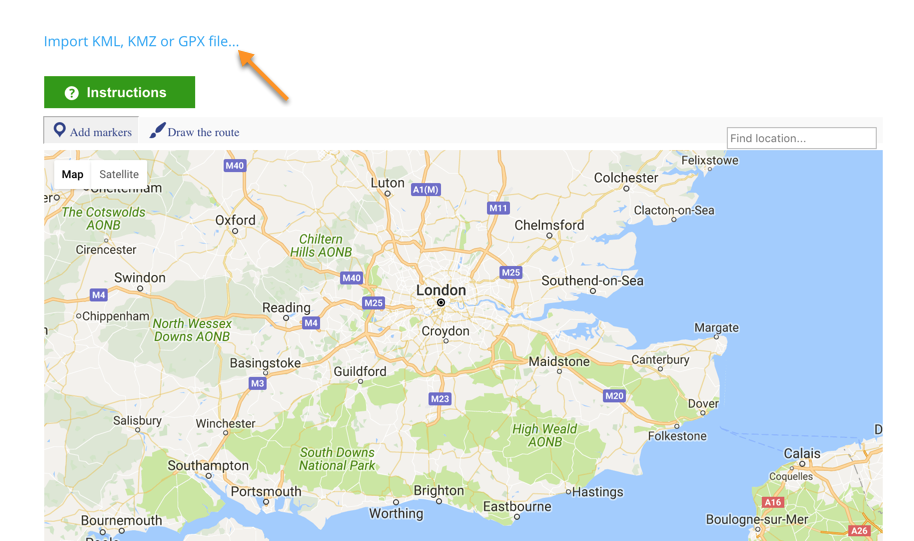
TIP: Importing During Route Creation
You can also import a file while creating a route. Scrolling down, just above the map, the option to Import KML, KMZ or GPX file be found.
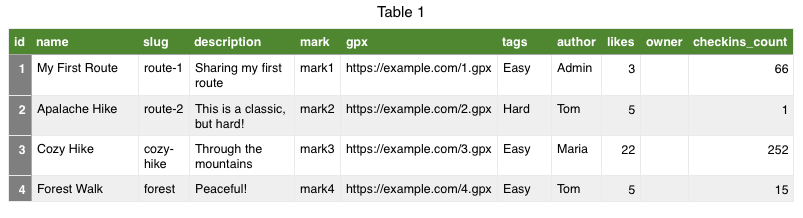
2) Upload a CSV file
Each row is a route, which can contain the link of a related GPX file. Download the Sample FIle
CSV Format
- Obligatory column - name
- Optional columns - id, slug, description, mark, gpx, tags, author, likes, owner, checkins_count
Learn more: WordPress Travel Map Plugin (CMMRM) - Importing and Finding KML/KMZ/GPX Files.
3) Export All Routes
Will generate a ZIP archive with a KML file for each route.
Learn more: WordPress Travel Map Plugin (CMMRM) - How To - Export a KML File.
Star Rating
The WordPress Travel Map plugin allows users to rate each route. You can show stars in both Index and Route pages.
Index Page
Example
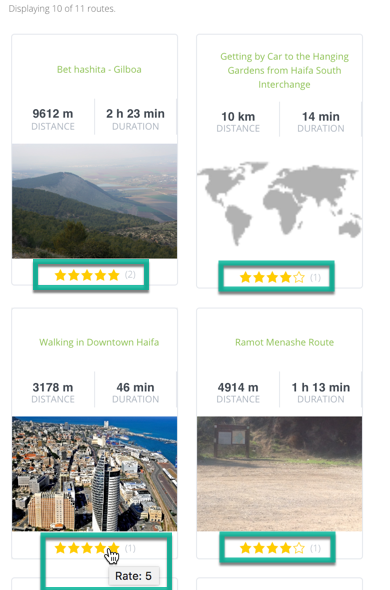
Navigate to the Index page tab. Head down to the Visible fields section and check the "Rating" box.
Route Page
Example
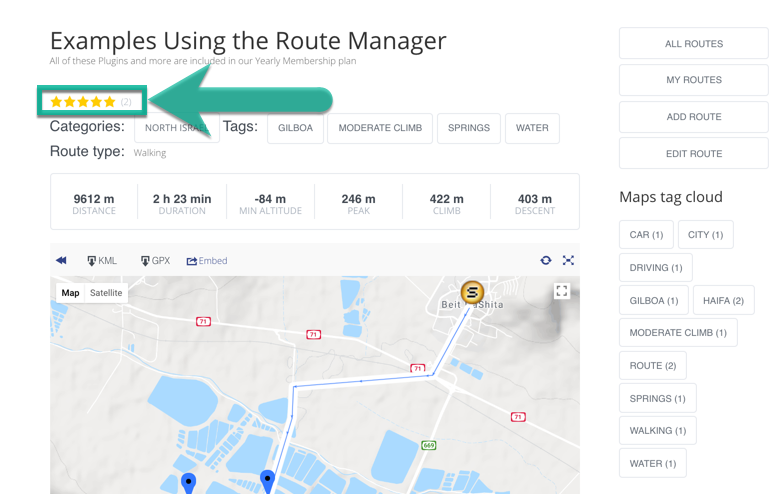
Navigate to the Route page tab. Head down to the Appearance section and choose Yes to the option Show rating on the route's page.
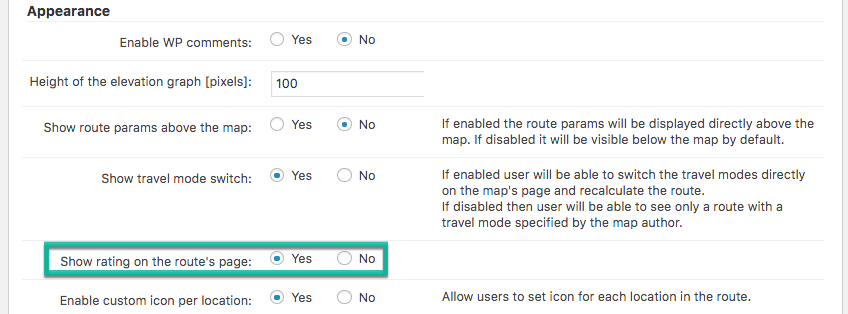
Also, in Visible Fields, check the "Rating" box.
Learn more: WordPress Travel Map Plugin (CMMRM) - How To - Enable Star Ratings.
Widgets
The plugin provides five widgets out of the box so you can show Routes content on your sidebar. Widget list:
- Related routes
- Menu
- Tag cloud
- Search
- Category description bar
Example (Search Widget)
TIP: Adding a Widget
Widgets can be accessed through Appearance → Widgets. Once a Route Manager widget is added, it will only show up on pages related to the plugin.

Learn more: WordPress Travel Map Plugin (CMMRM) - Widgets
Troubleshooting
Here are some common issues. If you experience any of them, check the article WordPress Travel Map Plugin (CMMRM) - Troubleshooting
- Map canvas is blank
- Altitude is incorrect or elevation graph is not showing up
- I cannot search for places on the edit map page
- Geolocation error shows up on the map page
- "404 Page Not Found" error
- Imported KML/GPX file seems to be incorrect
- I cannot change the travel mode
- I cannot draw a route - I can only add a marker
- Some icons are not being displayed or there's a rectangle in some text labels
- Instructions are not showing up on the edit route page
End Result
Following instructions found in the plugin and guides, you and your users should be able to add multiple routes to your site.
Use Case Front-End
Route Page
Detail: Altitude, Travel Mode, Notes
Highlighted Custom Fields
User Dashboard
 |
More information about the WordPress Travel Map Plugin Other WordPress products can be found at CreativeMinds WordPress Store |
 |
Let us know how we can Improve this Product Documentation Page To open a Support Ticket visit our support center |