Appointment Booking Calendar - Use Case - How to Create a Calendar Booking System in WordPress
Use Case - How to Create a Calendar Booking System in WordPress
Note: This guide covers features from the Pro version of Appointment Booking Calendar - This document uses version 1.4.4
Video Use-Case
Introduction
The Appointment Booking Calendar plugin for WordPress allows you manage and display multiple calendars with open spots for visitors to book.
Use Case Front-End

Use Case Assumptions
In this example use case guide, we'll cover how to create a calendar, edit it, show it on your site, and then manage bookings. We consider that you have already bought the Appointment Booking Calendar plugin, but not installed it.
It follows:
- Installing the plugin
- Setting up a calendar
- Create a calendar
- Choose availability
- Configure the booking form
- Showing calendars on your site
- Using the shortcode
- Admin view
- Improving the calendar
- General
- Colors
- Managing bookings
- Appointments dashboard
- Editing appointments
- Manual booking
- Recounting bookings
- Email notifications
- The discussion form
- Discussion page - where all discussion is held
- Labels
- Extras
Installing the Plugin
The process is the same for all CM plugins.

- Download the plugin from your customer dashboard.
- Log in to WordPress and navigate to the WordPress Admin → Plugins settings.
- Click on Add New.
- Activate it and add the license.
Setting Up Calendars
Overview
- You can have multiple calendars in your site
- Each has different availability and time slots
- Only the admin manages calendars. Users can manage calendars via the User Booking Calendar Addon
Calendars are the core of the plugin. Let's delve on how to set up one.
Step 1) Create Calendar
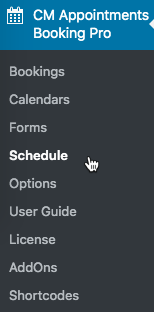
Navigate to CM Appointments Booking Pro → Calendars.
The list of previously created calendars appears on the right. On the left is the Add New Calendar form, as highlighted below.
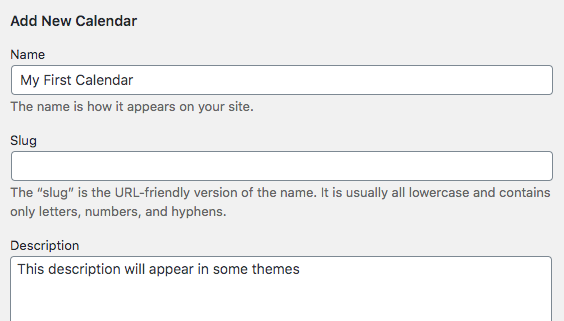
It has many fields to help you tailor the calendar to your needs.
a) Basic Fields
Fill out all of the required fields for the Calendar:
- Name: The name of the Calendar for the Front-end of the site
- Slug: The URL friendly name for the Calendar (used for shortcode)
- Description: The backend description of the calendar (use caution as some themes will display it on the front-end)
- Notification email: The email for the manager of the Booking calendar who will receive notifications of Bookings made
b) - Calendar Fields
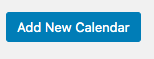
Then set the final three settings before clicking the blue Add New Calendar button:
-
Events duration: Choose how long calendar events that may be booked may be. (e.g. 15 minutes consultation, 45 minutes session, 1h doctor visit, 3 hour walking tour etc)

Choosing the booking slot duration - Booking time availability
- Minimum time before booking (in hours) - Bookings will only be available after the set amount of hours. For example, if it is set to 24, the user can only book one day after the current time. This affects the calendar.
- Maximum time before booking (in hours) - Bookings will only be available before the set amount of hours. For example, if it is set to 24, the user can only book within the next 24 hours. This affects the calendar (learn more)
- Example - the following calendar has the following settings:
- Minimum time before booking (in hours) - 2
- Maximum time before booking (in hours) - 3
- Example - the following calendar has the following settings:
- Booking Spots - How many spots each event has. You can choose to hide this information from your users in the General Settings.
- Automatic booking: Checking this box will set each booking as accepted automatically meaning Bookings manager's approval is not required for new bookings.
- Hide timezone dropdown - Check to hide the timezone selector
- Default timezone - Choose a default timezone
- Hide all events except Group Meeting events - Displays only group meetings. This setting is related to the Group Meeting add-on and will only appear if the add-on is enabled.

You can now click the Add Calendar button.
Learn more: Appointment Booking Calendar - Creating Calendars
Step 2) Choose availability
For each defined calendar you can set the available days in the week and the hours per each day in which appointments can be set.
You can also set days which are closed for booking. To set the calendar availability go to the Schedule section in the plugin admin menu.
And choose the calendar you want to set or change the availability slots.
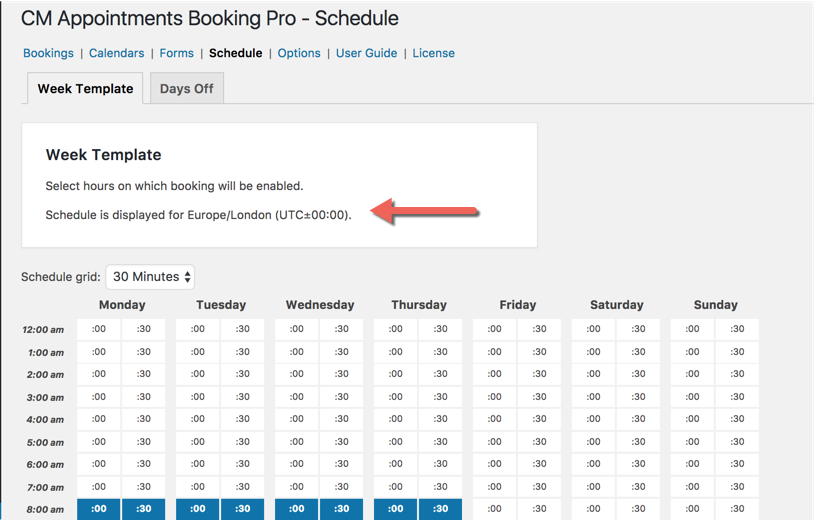
Then click on the Week Template tab. You will see the Schedule Grid.
The Schedule Grid
The grid display each time slot of the week. Available slots are marked in blue.
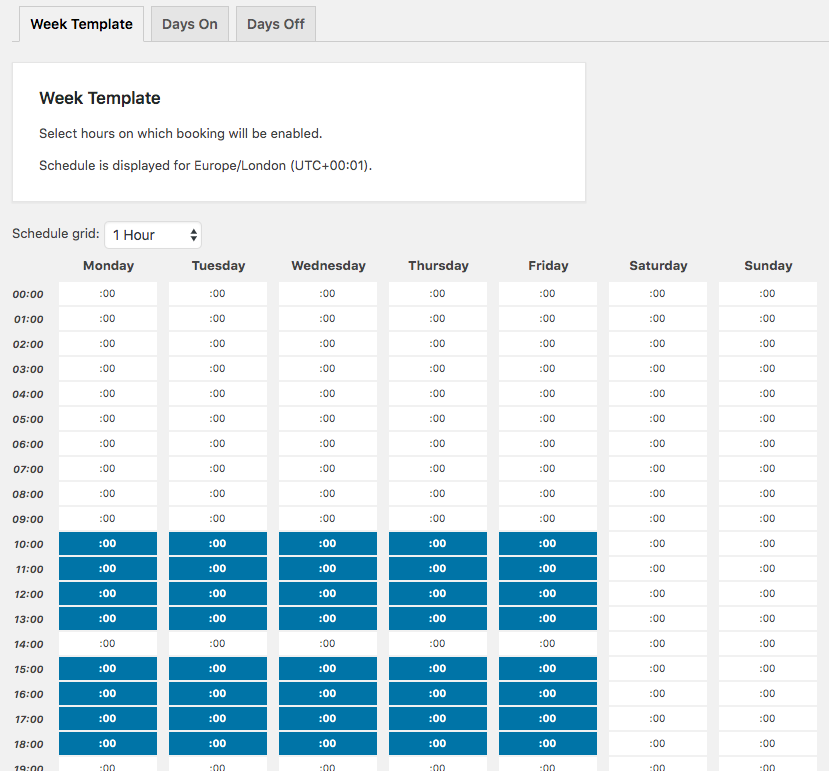
First of all, adjust the schedule grid granularity to the session length period - to make sure the granularity of the schedule matched the session length set in the calendar setting. For instance, 30 minutes or 1 hour slots.
You can then mark the days and hours in each day in which booking is available. Note that you can select a series of slots at once with the mouse.

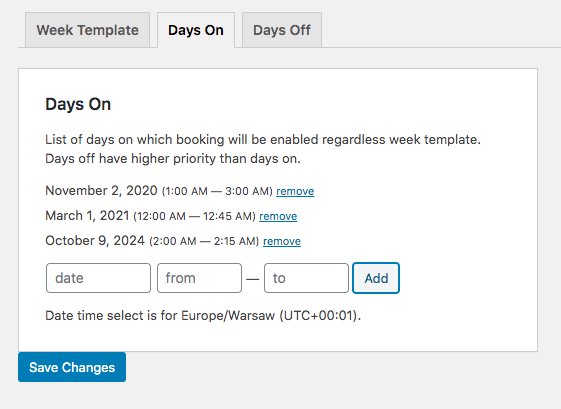
TIP: Exceptions - Days On and Off
The plugin allows you to configure exceptional days when the bookings will be available despite any other setting. This is done via the other two tabs.
Days On
Head to the "Days On" tab to add days and periods that will be have available spots despite the week template.
Days Off
Conversely, the "Days Off" tab allows you to set specific days that will be blocked despite the week template.
This is useful especially for holidays.
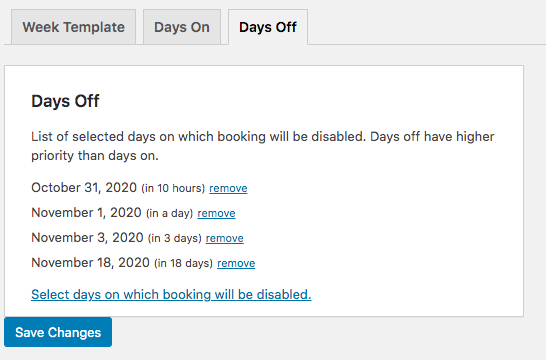
Days Off + Days On?
If you add the same period as Off and On, it will count as Off.
Showing Calendars on Your Site
You can show calendars on any page by using a shortcode.
1) Using The Calendar Shortcode
The following shortcode will result in a calendar:
[cm_event_booking_calendar calendar="your_calendar_slug"]
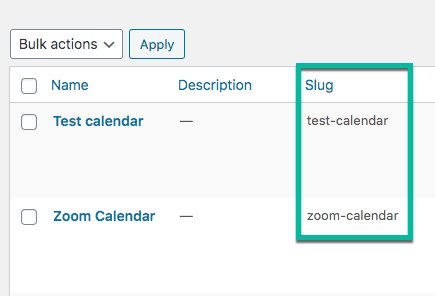
Inside the "calendar" attribute you should write down the slug of the calendar.
If you have forgotten the slug, go to CM Appointments Booking Pro → Calendars. On the right hand side the existing calendars are displayed. The third column of the table displays the slug for each calendar.
TIP: Shortcode Shortcut
Access the edit screen of a calendar to find, on the bottom, a handy shortcode ready to be copied.
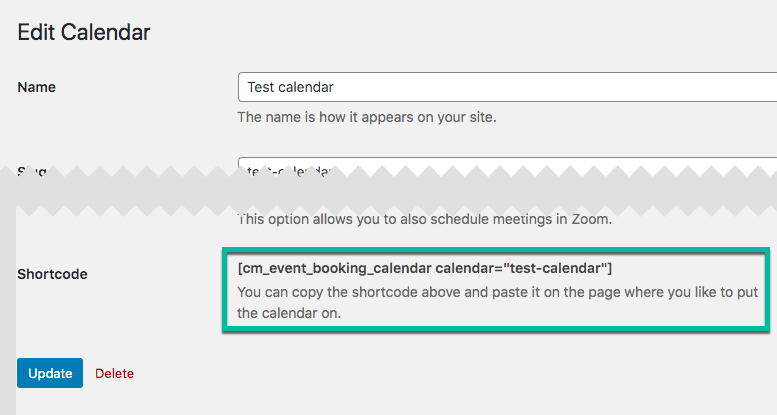
Learn how to further customize the calendar shortcode: Appointment Booking Calendar - Shortcodes.
2) Adding the Shortcode Calendar to a Page
Navigate to a previously or newly created page or post where the calendar is to be shown to site viewers.
Then Paste the shortcode into the Page or Post content.
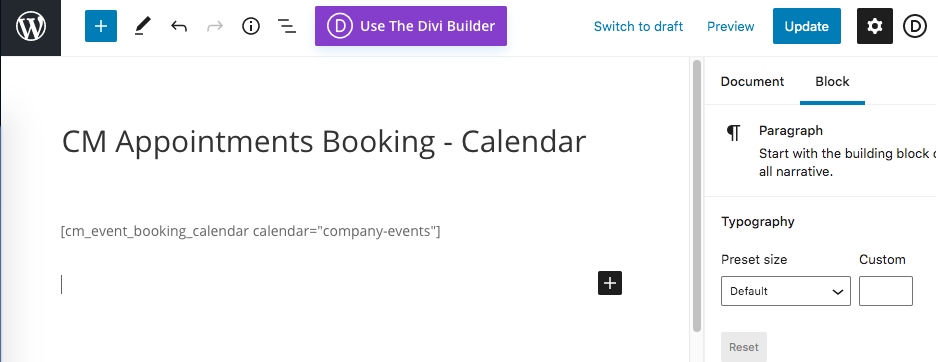
It will result in the calendar.
The Discussion Form
The plugin includes the ability to hold a discussion per each appointment request. You can start the discussion by heading to the Bookings menu.
..And then pressing the Discuss button.
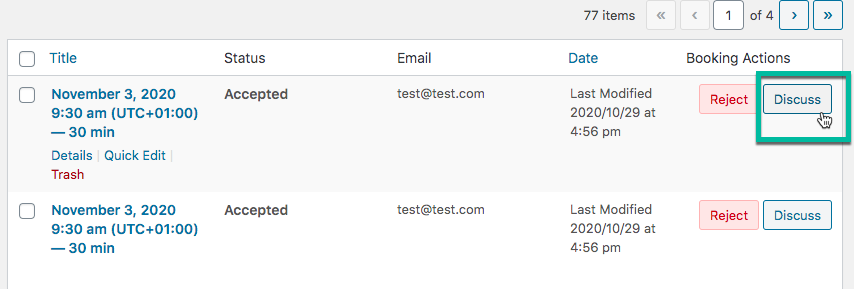
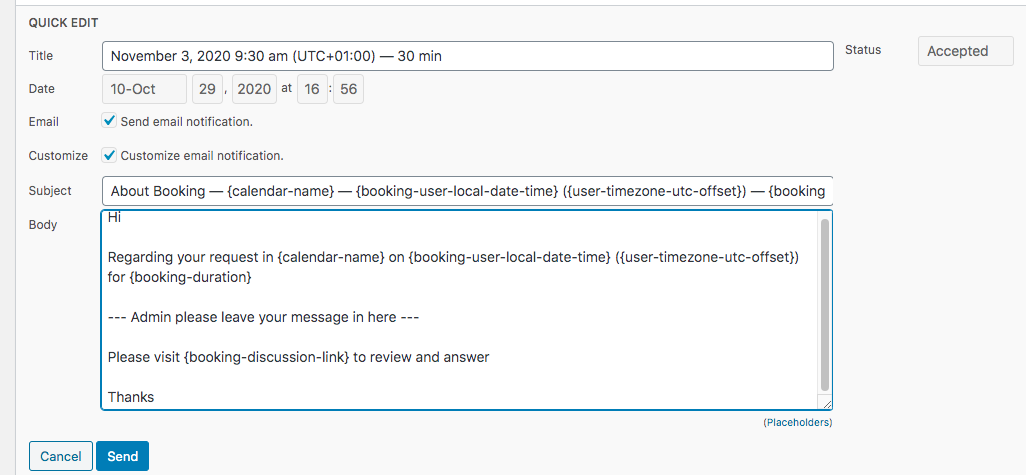
It will open up the form to send the discussion notification to the user.
Clicking Send will notify the user.
TIP: Edit Notification
You can edit the notification email from the notification tab.
Discussion Page - Where All Discussion is Held
Each booking has a separate space for discussion. It's a single page, which changes depending on the relevant booking. You can change all the information on this page including the title and also remove or add placeholders.
The user will receive a link to this page from the email notifications.
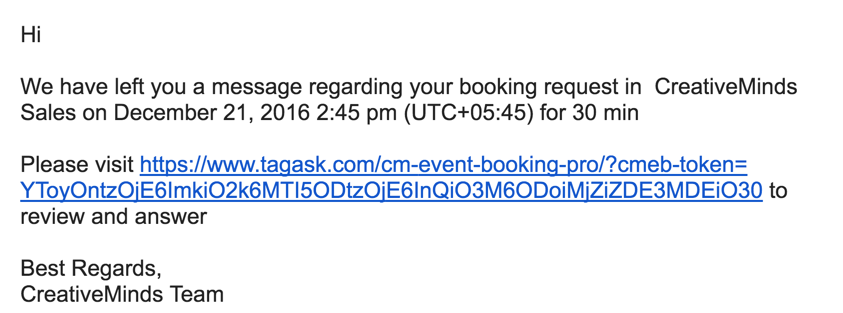
Once clicking on this link the user sees the discussion form which let him respond and view all previous discussions related to this booking request.

How This Page Works - Details
Once the plugin is installed, a new page is created by the plugin.
It includes the shortcode [cm_event_booking_discussion_form] for the discussion. You can further edit this page to add or remove content.
This page is pointed in the plugin Options under the Options tab.
Learn more: Appointment Booking Calendar - Appointments - Discussions
TIP: Cancelling Appointment
On this screen the user can also cancel the booking.
Learn more: Appointment Booking Calendar - Appointments - Canceling an Appointment as User.
Improving The Calendar
There are some ways you can improve the calendar visually. Head to the Options menu.
Note: These Settings Apply to All Calendars!
1) Calendar View - General
Inside the Plugin Options tab, you can customize the general aspect of the calendars.

- First day of the week - defined which day will show first on the front view of the calendar. This settings it for all calendars defined.
- View of the calendar - The default view of the calendar (Day, Week, Month)
- Small screen (mobile) max width - Input a number in pixels. If the device screen is smaller than this number, the view will be changed to "Day" by default. If you set to 0, the screen size will not be taken in account. This setting improves the mobile view, as the Day view is smaller, and therefore best suited to smaller screens.
- Search for an open slot - define within how many days range calendar will look for an open slot when user load the calendar. Setting a high value might cause a slowness in calendar load in case the calendar is busy.
- Send email reminder before appointment [hours] - Setting 0 disables the option.
-
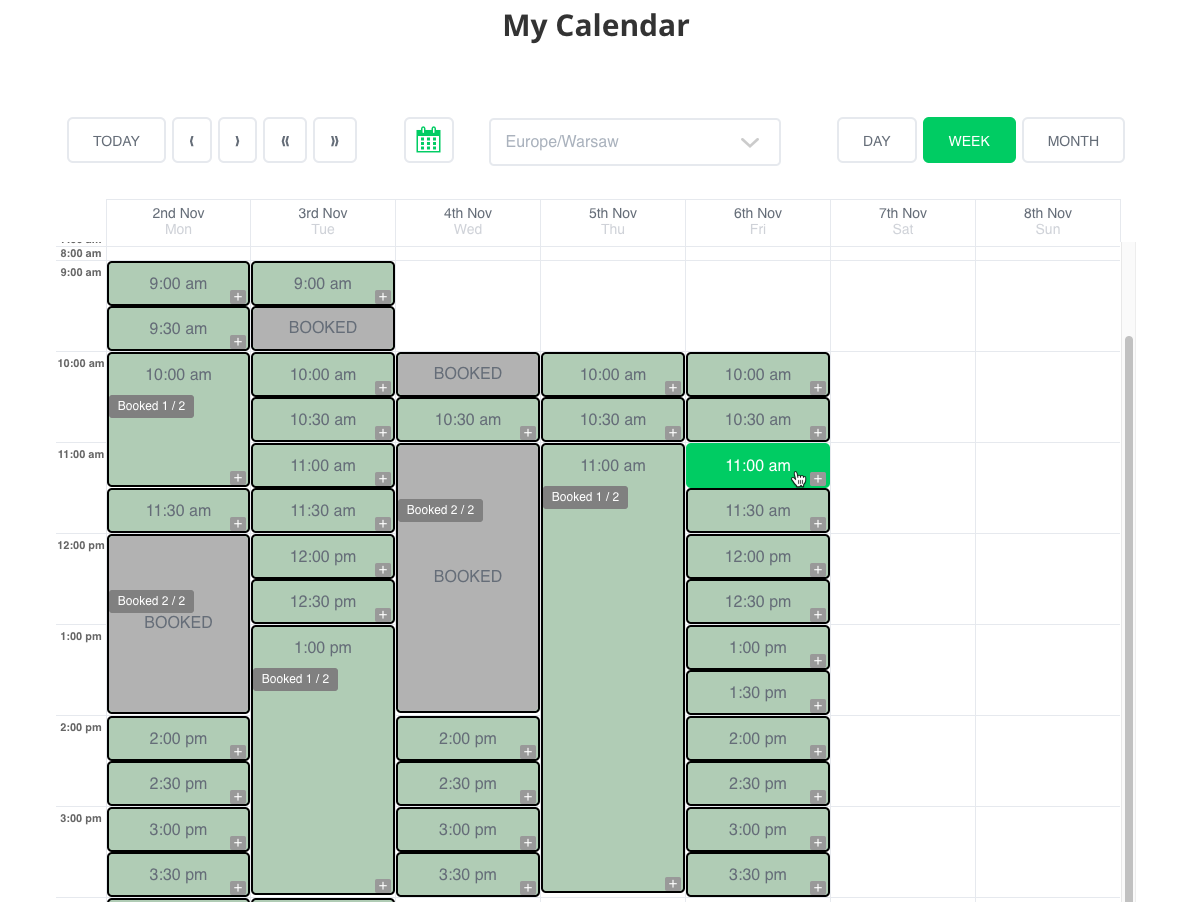
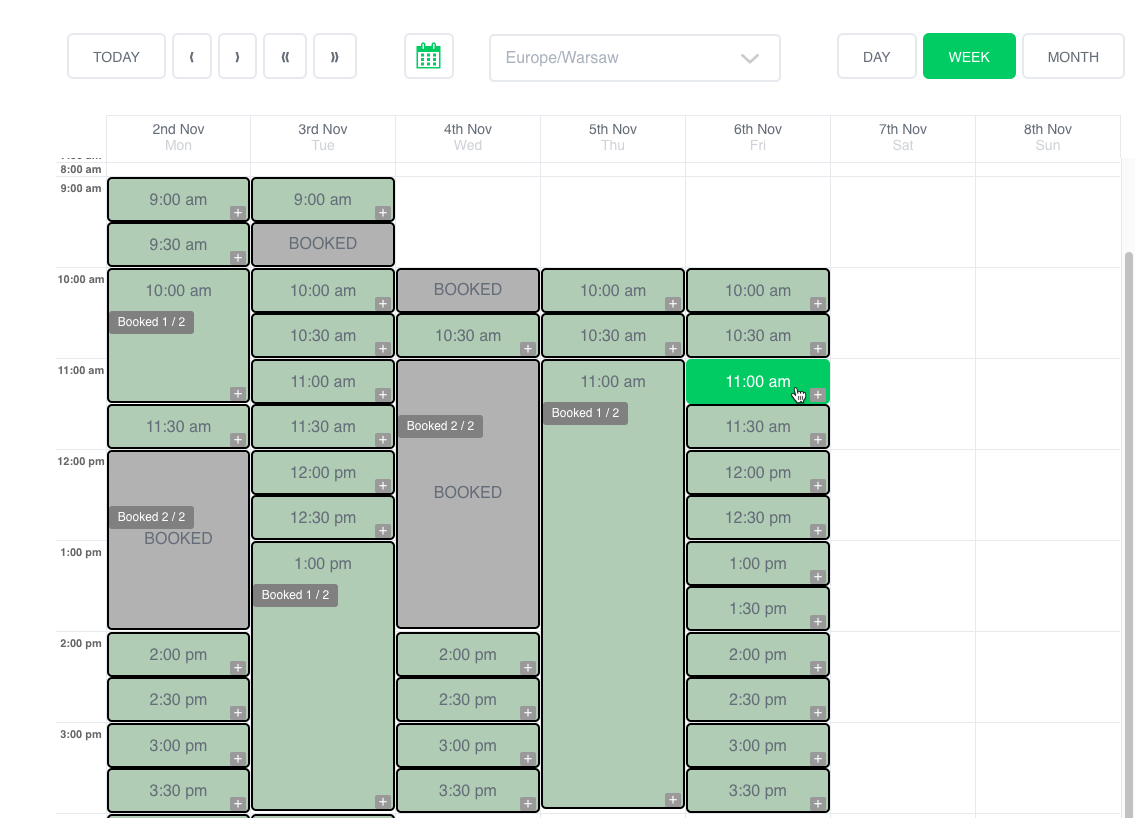
Display booked slots on calendar - Choose yes to display the number of available and total spots for each event. Example:

Displaying the amount of booked slots If the event has an opening and the user has the relevant permission, the + icon will be visible. Clicking on it directs the user to create an event from the back-end.
-
Show email in Booking title - Adds the user email to the name of the booking. You can see this in the bookings dashboard, as shown:

Adding the client email to the booking title - Discussion form page - This is a preselected page which is generated once plugin is installed and includes the shortcode for the discussion option. You can change this page while selecting another one.


TIP: Adding ReCAPTCHA
Also in this setting you can enable reCAPTCHA by adding a reCAPTCHA key. It's recommend to reduce potential automatic spam request.
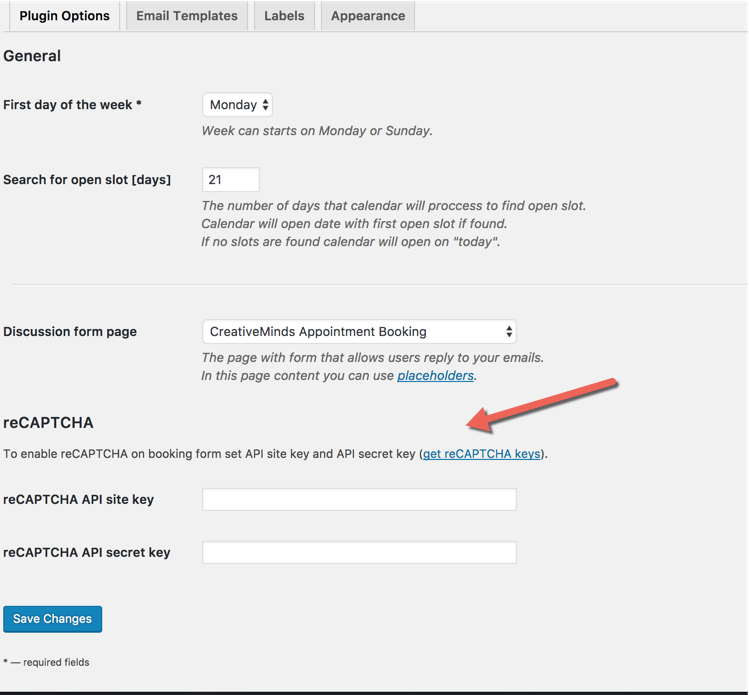
Learn how to get a reCAPTCHA key : General Support - reCAPTCHA - What is It and How to Enable - CreativeMinds Products Documentation
2) Calendar Colors
Inside the Appearance tab you can change the calendar colors of many elements.

Use the color picker to choose each color.
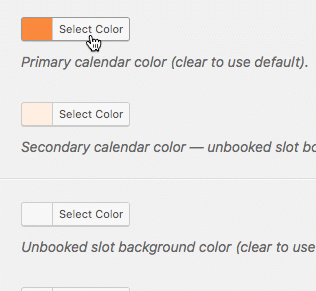
You can configure the following colors:
- Primary calendar color - When the mouse hovers over a slot

- Secondary calendar color - Border of unbooked slots
- Unbooked slot
- Expired slot
- Accepted slot
- New booking slot
- Too soon - Slot that is not enough days from current day background color
- Too distant - Slot that is too far away from current day background color
- Month remaining days - Background of remaining days in that month with slots (only applies to Month view)
Email Notifications
Email notifications are essential, so don't forget to configure them! You can enable/disable and configure automatic emails for these situations:
To the user:
- Booking Accepted
- Booking Date Change
- Discussion Update
- Discussion User Canceled the Booking
- After User Have Canceled The Booking
- Appointed Booking Reminder
To the admin:
- New Booking
- Appointed Booking Reminder
- Discussion User Reply
To customize the email settings, navigate to Admin Panel → CM Registration Pro → Settings → Email Templates tab.
You can edit each notification email's subject and body.
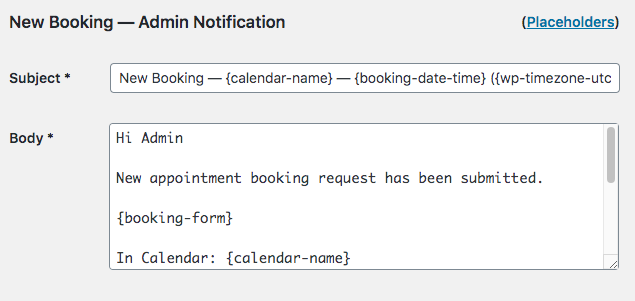
Placeholders
Placeholders are important parts of the notifications. Similar to shortcodes, they change the content depending on the booking. Samples:
{calendar-name}- Calendar name.{calendar-description}- Calendar description as defined in the calendar section.{booking-date}- e.g., December 26, 2016.{booking-time}- e.g., 5:47 am.
Managing Bookings
Reminder
When creating a calendar, you can decide if the bookings need to be approved by the admin or if they are automatically accepted.
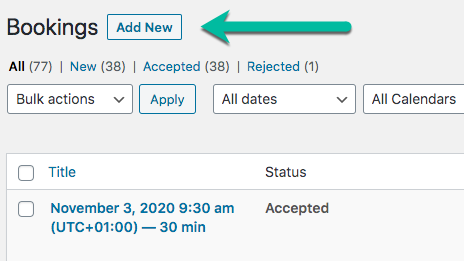
Appointments Dashboard
The booking dashboard allows you to manage each booking. You can use the filters on the top part of the dashboard to filter bookings by Month or by Calendar name.
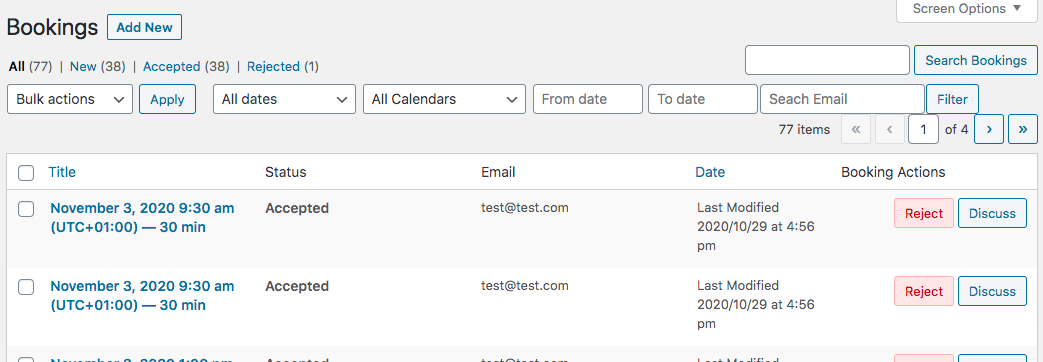
Editing Appointments
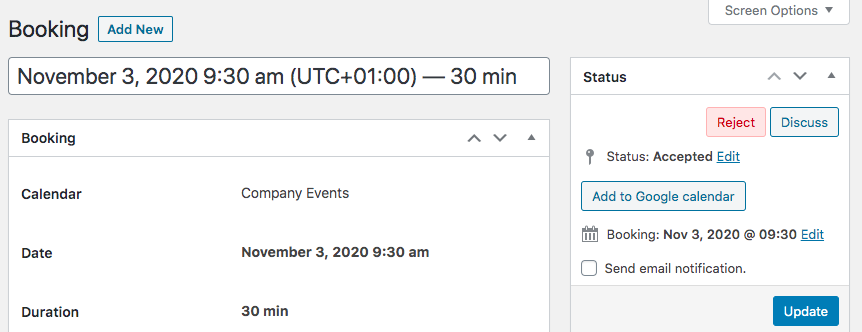
Click a specific booking...
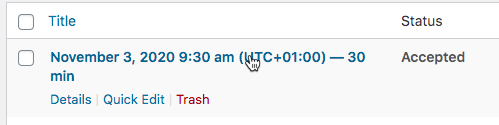
...to review and edit the details of that booking. You can edit name, booking date, status, as well as review discussion history, user information, and more.
Manual Booking
From the dashboard, click Add New to manually include a booking.
Once the details are filled, an email notification will be sent to the user email containing.
Recounting Bookings
You can manually recount bookings by heading to the Recount bookings tab and clicking the relevant button.
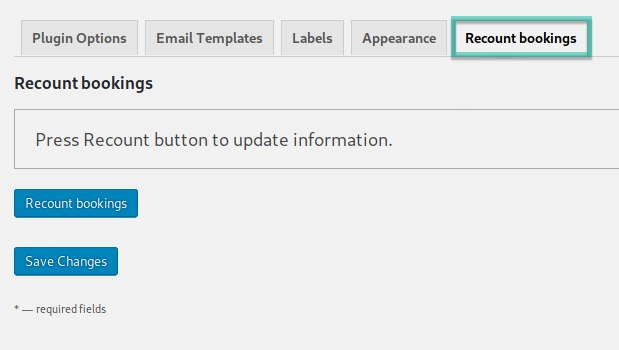
TIP: Why Recount?
This is useful if, for some reason, the counter does not change when a user rejects a booking.
Translating the Plugin's Interface
You can change the text of the front-end to anything you like. To do so, navigate to the Labels tab.

The plugin settings enable changing any label used on the frontend.
This include also messages and labels which appears on the calendar.
TIP: Translating Each Calendar
It's possible to customize labels of each calendar via shortcode. Read more: Appointment Booking Calendar - Shortcodes.
Learn more: Appointment Booking Calendar - Settings - Labels (Changing The Front-End Text)
Improving the Booking Form
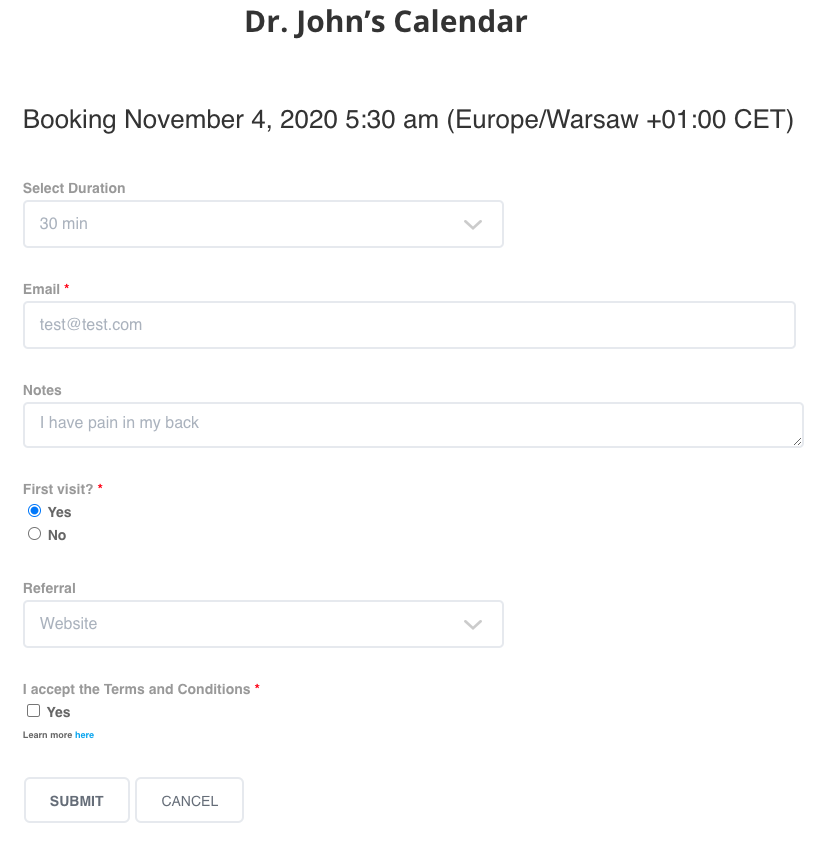
When a user tries to book a slot, they will be automatically directed to the Calendar's booking form.
By default it has the fields Select Duration, Email, and Notes. We'll cover over here how to customize the form.
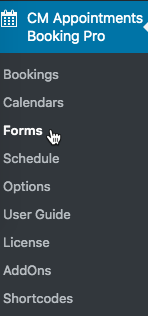
Head to CM Appointments Booking Pro → Forms.
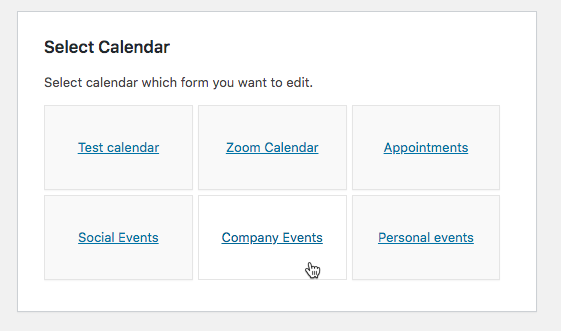
Select the calendar that you would like to make a contact form for.
The form builder will open and the form can be modified as you need. Click on the desired field on the left and a few moments later it will appear in the draft form on the right.
To rearrange form items they can be dragged and dropped into whichever order is needed.
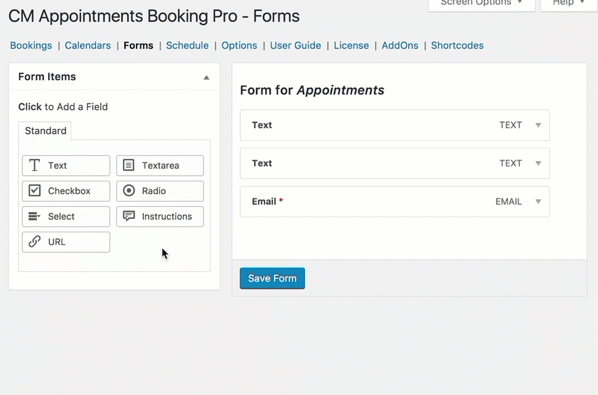
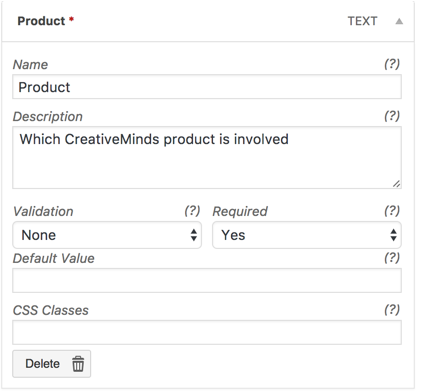
Each field can be marked as Required so that users cannot send the form without completing them. Fields can be given a placeholder Default Value. Files can also have short Description added to help customers progress through the form.
For some fields such as Email, phone number email etc it may be helpful to add validation to ensure that the required information has been added properly.
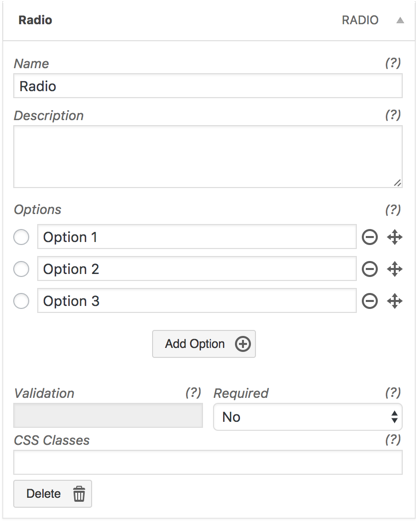
You can also use radio buttons, checkbox and select box as part of the form.
Once saved, the form will appear in the front-end view when the user tries to book an appointment.
Form information is saved in the appointment post which is accessible from the booking dashboard. It is also represented in the placeholder {booking-form} which can be added to any email notification sent.
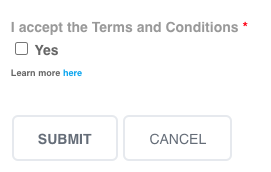
TIP: Obligatory Terms and Conditions Field
This is a good opportunity to add terms and conditions information to a required field.
Timezone Considerations
One of the most important issues when using booking calendars is to synchronize between the calendar timezone as set by the calendar owner (administrator) and the customer timezone.
The calendar timezone is taken from the WordPress site Settings → General menu.
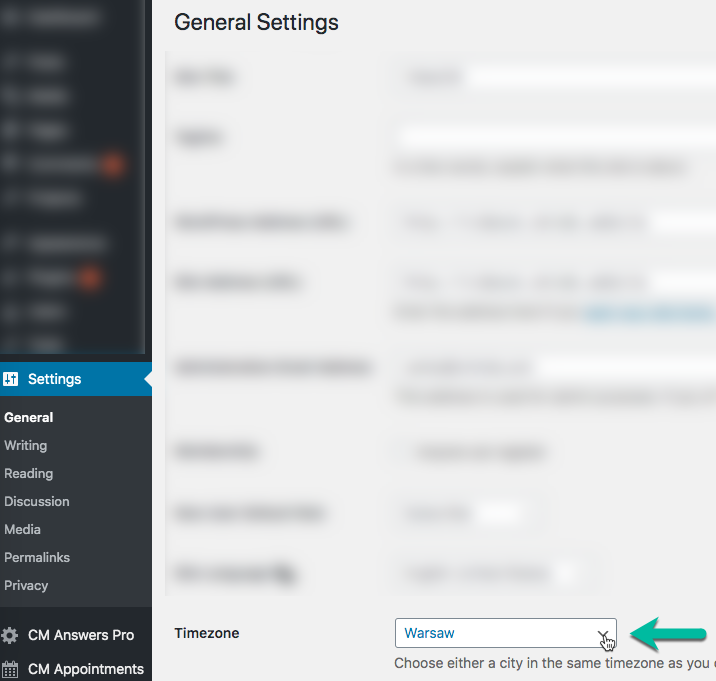
Once setting the calendar schedule for each calendar defined in the plugin the timezone used for scheduling will be displayed above the available days.
The user viewing the calendar will see the availability based on his Browser set timezone (and not the website timezone as defined above).
This is automatically adjusted per each user browser settings and can be changed by the user once clicking on the dropbox.

Zoom Integration
Overview
It's possible to schedule Zoom meetings directly from Booking Calendar.
Every new booking will generate a corresponding Zoom call.
What is Zoom
Zoom is a conferencing platform that supports audio, video and screen sharing. Learn more: Zoom
Limitations
- Only 100 meeting requests every 24 hours
- Every calendar requires a unique Zoom app
- The expiration time for the `start_url` field is two hours for all regular users.
Settings
In order to use this feature, you must following steps.
1) Connecting Booking Calendar to Zoom
This step is required once per calendar.
Zoom Resource
Zoom as a detailed guide on this: JSON Web Tokens (JWT) - Build an App - Documentation
Below we list what's important to our plugin.
-
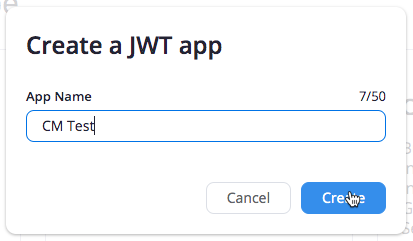
Access the Zoom JWT App Page. Choose Develop → Build App.

Creating App in Zoom - Log in with your Zoom credentials
-
If prompted over which app type to create, click Create on the app type JWT

Choosing the JWT type - Add a name (it's not important)


-
Fill the App details (these are also not important for the integration itself)

Filling the app details -
Copy the API Key and API Secret

Copying the API Key and Secret -
Create or edit a calendar. You will see the fields Zoom API Key and Zoom API secret. Paste the values there. The email should also be a perfect match.

Adding obtained API Key and Secret into relevant fields in the plugin -
You can test the connection by pressing the Test button.

Testing Zoom connection


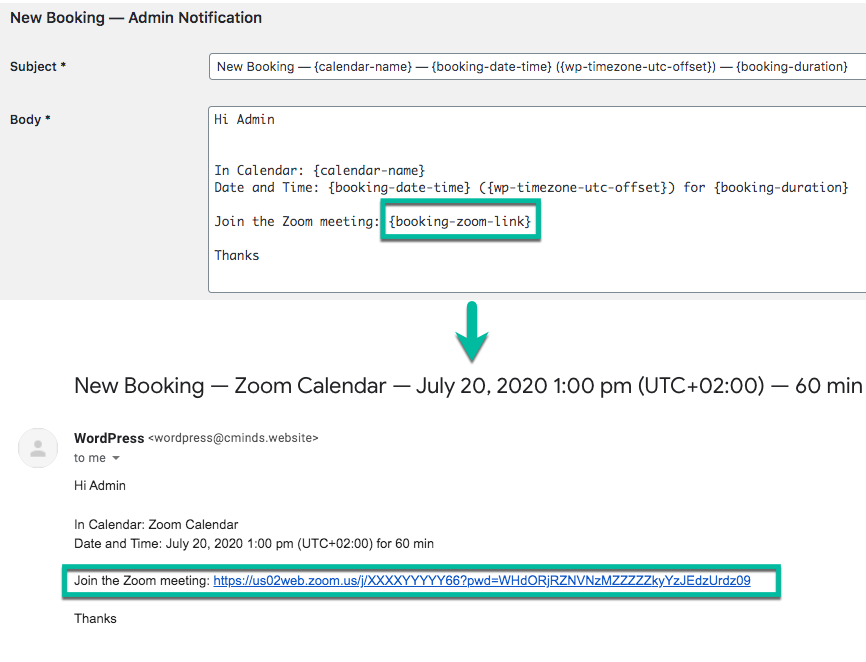
2) Adding Zoom Info to Email Notifications
Don't forget to add the Zoom link to notifications, otherwise users will not receive it.
The placeholder {booking-zoom-link} will be replaced by the Zoom link attached to that booking.
TIP: Calendars With and Without Zoom
Email templates apply to all calendars, whether they have Zoom integration or not.
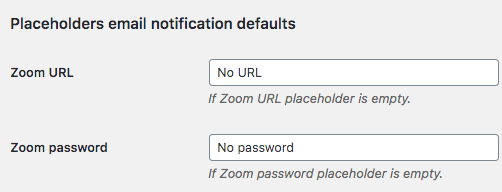
In calendars without Zoom integration, the {booking-zoom-link} placeholder will show different labels. You can configure them from the Labels settings.
Admin - Finding The Zoom Link
The admin can review the Zoom link of all bookings at any time by simply checking its Details.
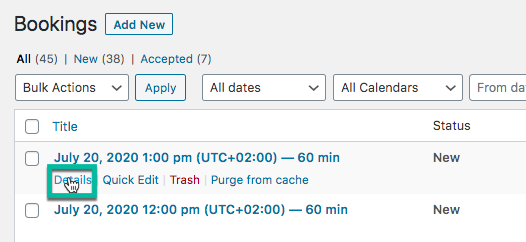
And then the Booking metabox, where the Zoom meeting link is located.

Learn more: Appointment Booking Calendar - Integration - Scheduling Zoom Meetings
End Result
Following instructions found in the Appointment Booking Calendar plugin and guides, you should be able to manage multiple calendars on your site.
Use Case Front-End
 |
More information about the Appointment Booking Calendar plugin for WordPress Other WordPress products can be found at CreativeMinds WordPress Store |
 |
Let us know how we can Improve this Product Documentation Page To open a Support Ticket visit our support center |