WordPress Course Catalog Plugin - Use Case - How to Build a University Catalog and Have the Students Registered and Pay
Use Case - How to build a university catalog and have the students registered and pay
Note: This guide covers features from
- WordPress Course Catalog plugin - This document uses version 1.2.1.
- CM Course Catalog Payments add-on - It’s built to seamlessly integrate with Easy Digital Downloads for course payments.
- Easy Digital Downloads (EDD) - To connect payment gateways such as PayPal or Stripe
- Optional:
- CM Course Catalog Dashboard add-on - For viewing all your courses, students and their registration on the easy-to-use dashboard in the Backend.
- CM Course Catalog Form Builder add-on - Creating forms for gathering the information about the students.
- Course Catalog Waiting List add-on - Creating waiting list forms for courses and letting users leave their contact information and register them once the course is available.
Video Use-Case
The WordPress Course Catalog plugin allows you to create a directory of courses, each with their own page.
By combining the Payments, Dashboard, Form Builder, Waiting List and EDD, you can charge users for registration to the courses, organize the waiting lists, gather the information about the students, and manage all your courses.
Use Case Assumptions
In this example we'll consider how the users can pay and register for your courses, how to gather and manage information about them, and how to keep the students when you don't have courses at the moment.
We consider that you have already bought the WordPress Course Catalog plugin, but not yet installed it.
Also, we assume that you already know how to build a university catalog with you courses. If not, you can learn more in Use Case - How to build a university catalog.
This documentation follows:
- Preparation
- Use Case Front-End
- Form Builder for gathering the information about the students
- Process of the registration
- Waiting list
- Dashboard
Installing the Plugin
The process is the same for all CM plugins and addons.

- Download the plugin from your customer dashboard.
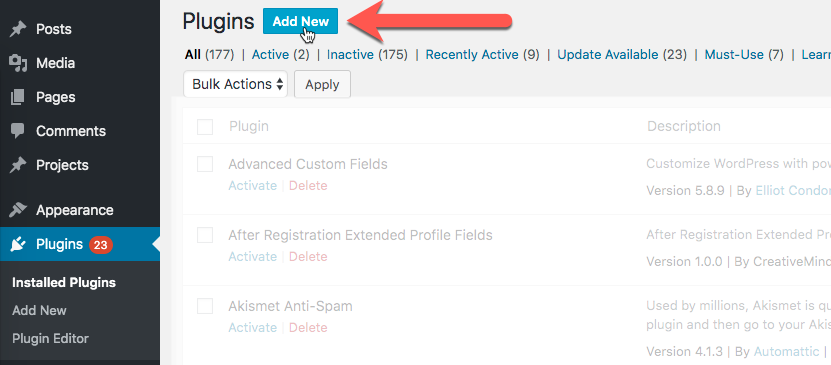
- Log in to WordPress and navigate to the WordPress Admin → Plugins settings.
- Click on Add New.
- Activate it and add the license.
Learn more: Getting Started - Plugin Overview
Installing Payment Plugin (EDD)
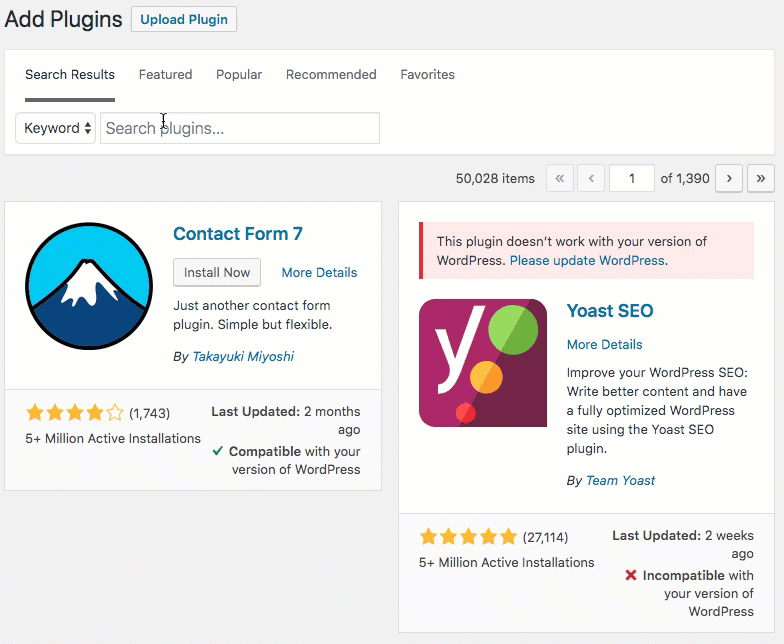
To install Easy Digital Downloads head to Admin Dashboard → Plugins → Installed Plugins and click Add New.
Search for Easy Digital Downloads and install it.
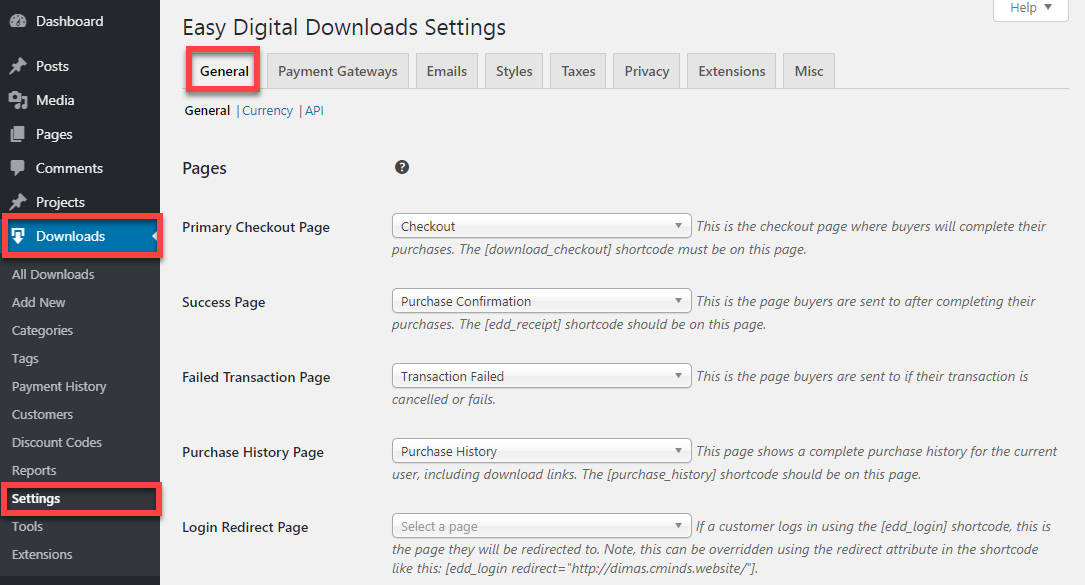
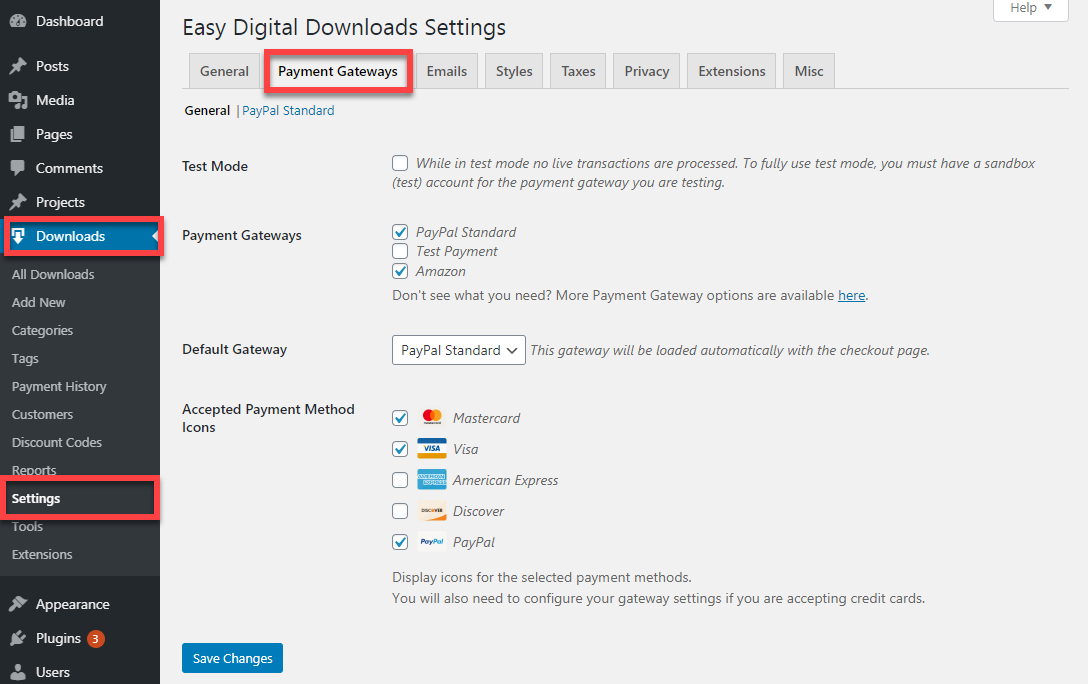
Configure Payment Plugins
Don't forget to configure the payment plugin! This way you can connect it to payment providers such as PayPal or credit card companies.
External Resource
Use Case Front-End
Process of the registration for the course

Student's profile on the dashboard
Form Builder for gathering the information about the students
When you already have the catalog with your courses, you need students to register for it, and you need to be sure you can get all the necessary info about them. For that purpose the CM Course Catalog Form Builder add-on was built. It allows you to create custom profiles for the students.
You can learn more about CM Course Catalog Form Builder.
To configure it navigate to Admin Dashboard → CM Course Catalog Pro → Settings → Student profile builder.

The editor provides the drag-and-drop area and the default fields next to the area. These fields are:
- Text Input
- Text Area
- Number
- Select
- Radio Group
- Checkbox Group
- Date Field
- Admin Textarea (note: this textarea is visible for the admin only).

The admin can make each field required or not, add tooltips per field with more detailed information, edit CSS class, default values and more.
Edit, Copy, Remove
Apply the actions to each chosen field:
- Edit - click on the Edit icon and the field will be open.
- Copy - click on the Copy icon to add the same options.
- Remove - click on the Delete icon to remove a whole field.

The users will see this form on the stage of registration for the course, when they do it for the first time. So let's see, how the process of registration goes.
Process of the student registration
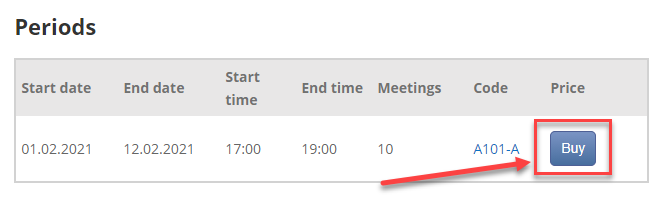
When the user chooses the course, he clicks the Buy button, and the course goes to the cart.
TIP: change the name of the button
You can change the label of the button while editing the course in the field Buy button label.

Then the user clicks Checkout button and goes to the Checkout page.
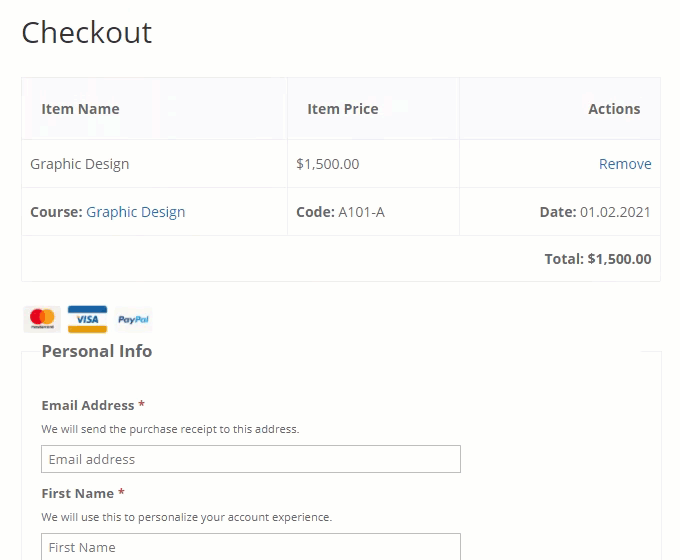
Here the user can see the information about the purchased product and payment methods.
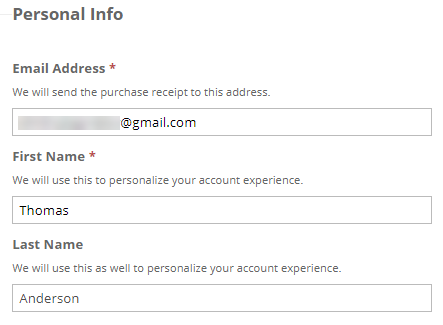
Lower there's a Personal Info form that the student needs to fill with required data about themselves such as Email Address, First Name and Last Name.
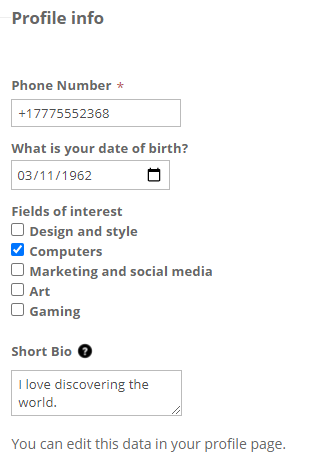
And at the end they need to fill the Profile info form that you create using the CM Catalog Course Form Builder add-on.
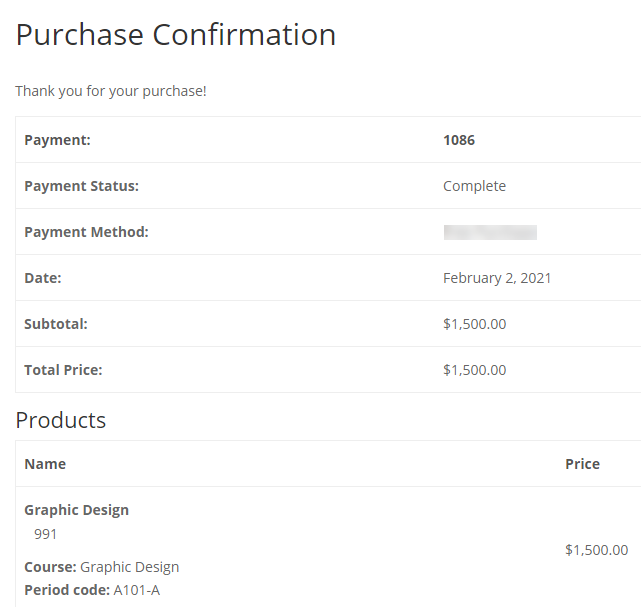
After all the user clicks the Purchase button, finishes the buying and gets the confirmation.
The user gets a few emails with information:
- Purchase Receipt
- Information about the course the user registered for
- Link for account verification
- Username and Password
When the user has already registered and verified their account, and goes on to buy another course they will only receive the first two emails.
Waiting List
Sometimes there are no available places left for a course or the user is not available for the course dates. In this case, you can use the CM Course Catalog Waiting List add-on to keep users and let them join the courses later.
You can learn more about CM Course Catalog Waiting List.
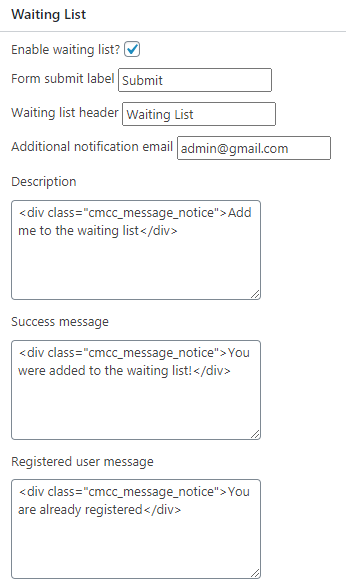
While creating the course you can enable the option Waiting List, and a special form will appear on the course page. Here you can edit:
- Form submit label
- Waiting list header
- Additional notification email
- Description
- Success message
- Registered user message
This is how the form looks in the Front-End.
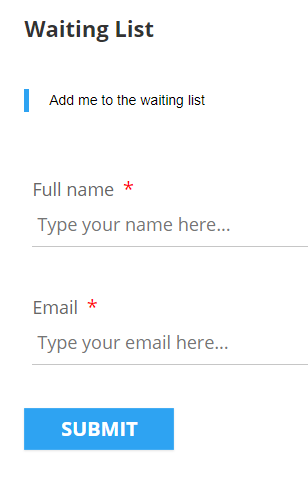
After submitting, the user gets an email letting them know they have been added to the waiting list.
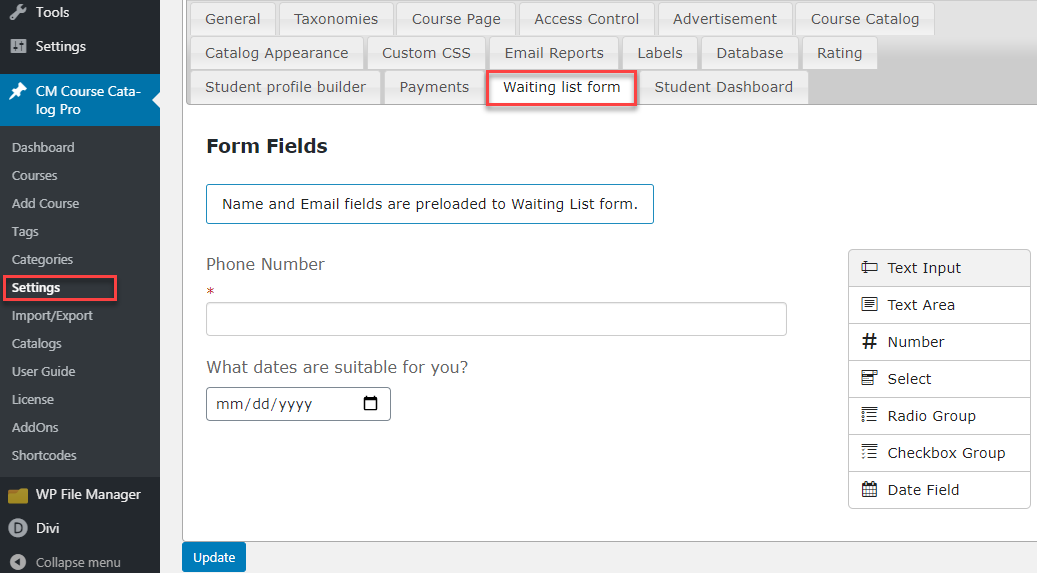
TIP: Custom fields
You can edit this form by adding custom fields to get more information from users.
Navigate to Admin Dashboard → CM Course Catalog Pro → Settings → Waiting List. Here you can see the same form builder as in the CM Course Catalog Form builder add-on, and it works the same. Name and Email fields are preloaded to Waiting List form.
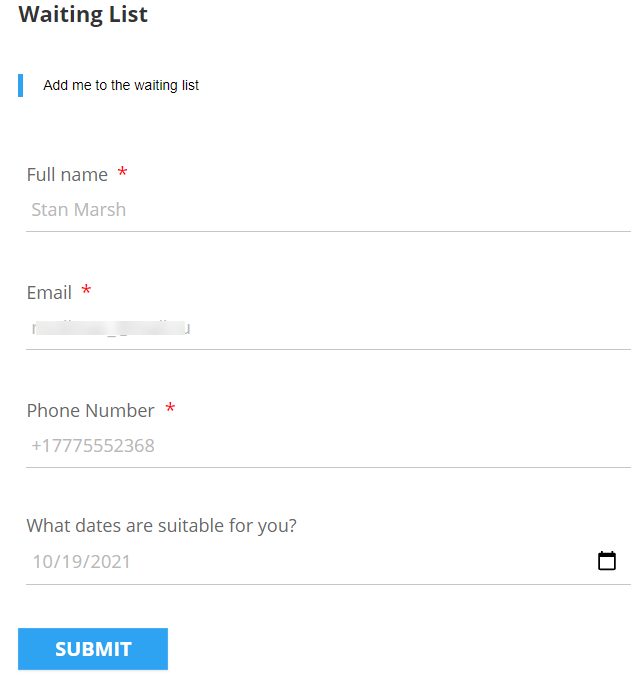
Front-End:
Dashboard
You can view all your courses, students, and their registrations on the easy-to-use dashboard in the Backend, using the CM Catalog Course Dashboard add-on.
You can learn more about possibilities of CM Course Catalog Dashboard.
Navigate to Admin Dashboard → CM Course Catalog Pro → Dashboard.

Courses
On the first tab, Courses, you can view the full list of your courses. By expanding any of them you can see the list of registered students for that specific course.
On all tabs of the dashboard you can sort the information by any column.
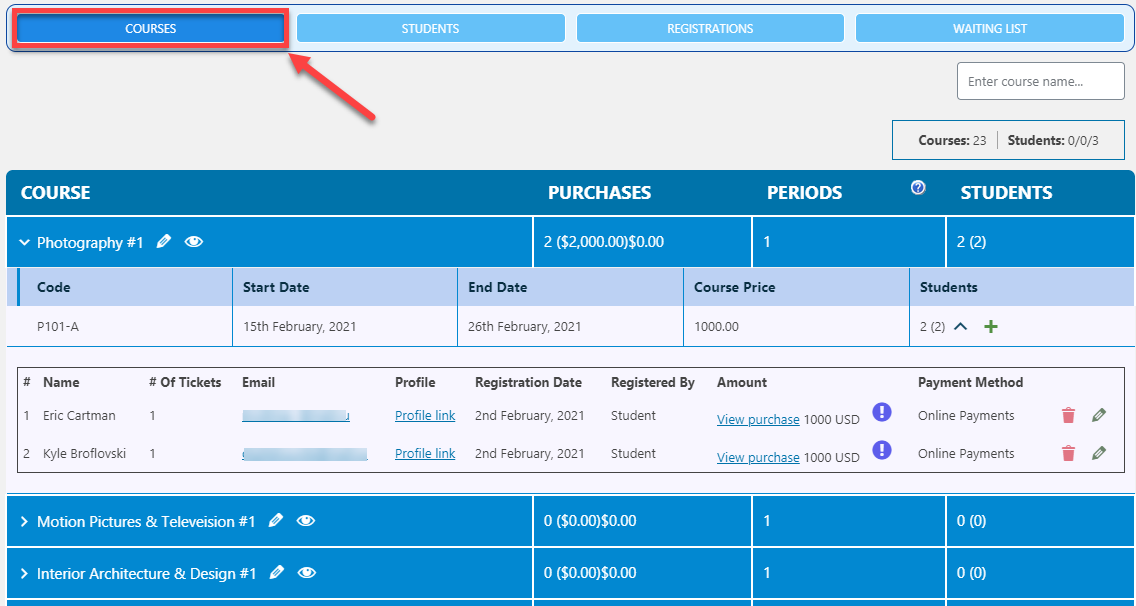
Here you can add the student to the course from the list of registered users.
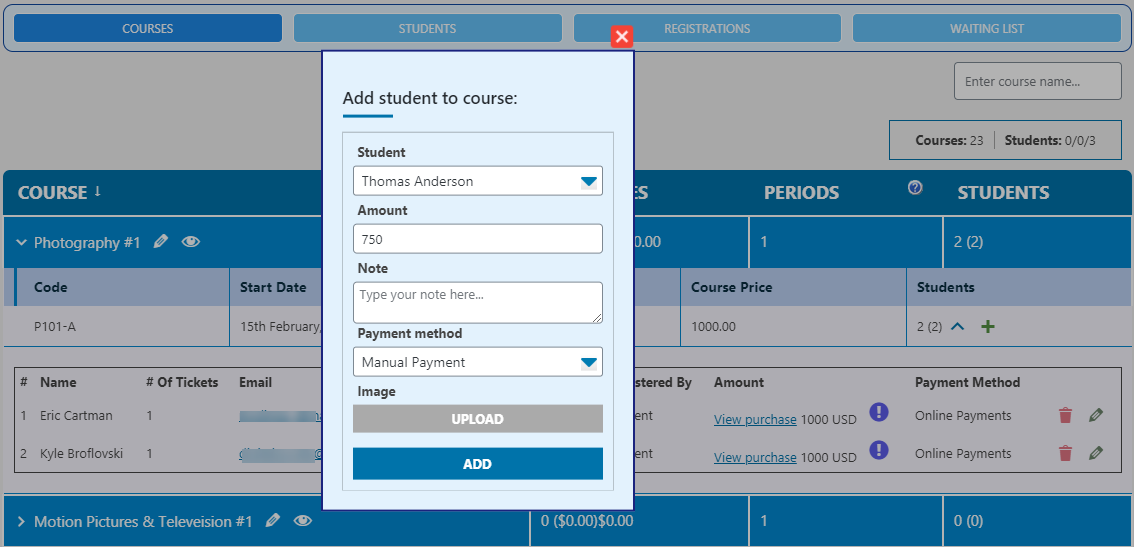
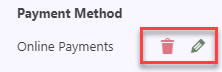
You can also change the period of the course for the student or delete them from it.
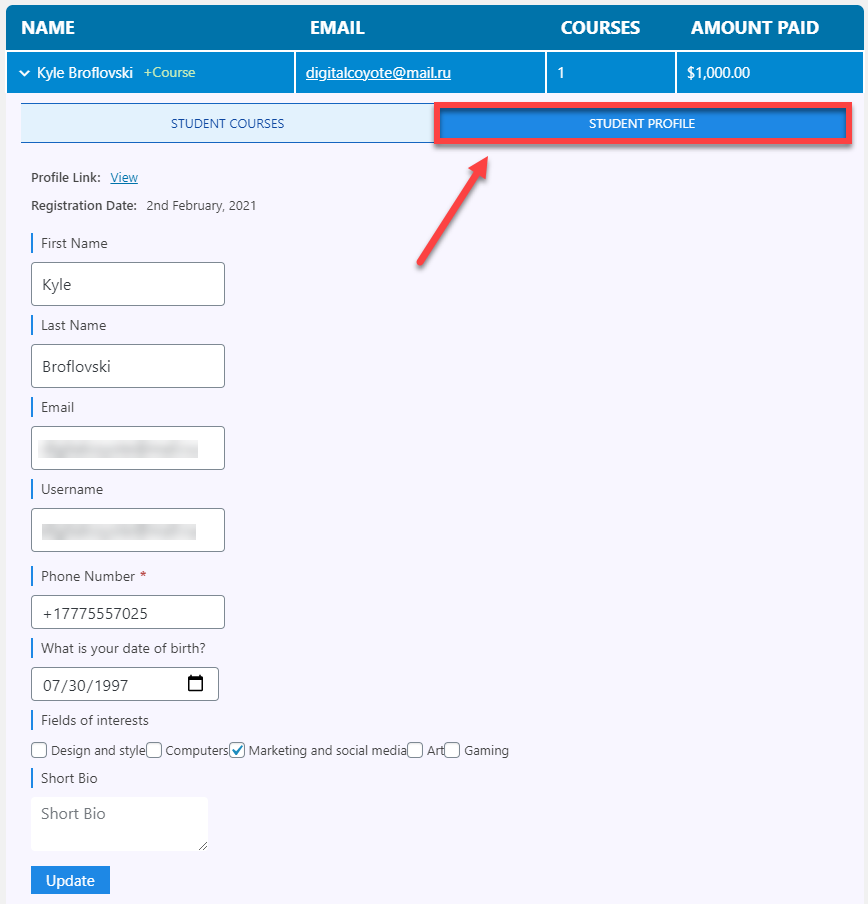
Students
Next tab - Students. Here you can see how many courses the student registered for and how much money they paid for them. There are two tabs with more detailed information.
- Student Courses - On the first page there are a list of student's courses, periods, and payment information.

- Student Profile - Page with the student's personal information requested in the form built with with the CM Course Catalog Form Builder add-on. You can edit the student's information if needed.
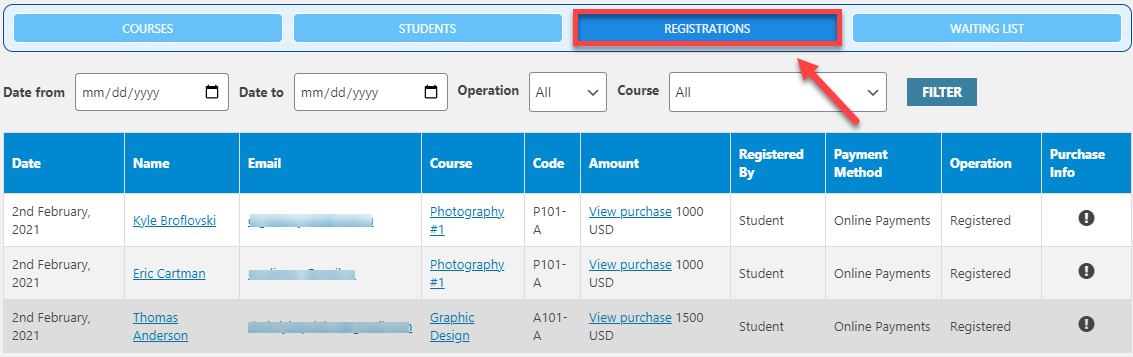
Registrations
On the Registrations tab you can see the whole list of registrations. You can filter this list by registration dates, operations (registered or deleted students) and courses. Unlike the first two tabs you can see all registrations and payments, even if the courses are expired or deleted. The same goes for the students - info about their registration and payments remain here, even if they unregistered or don't have any courses at the moment.
Waiting List
On the Waiting List tab you can see all left requests including the info from custom fields that you can configure in settings.
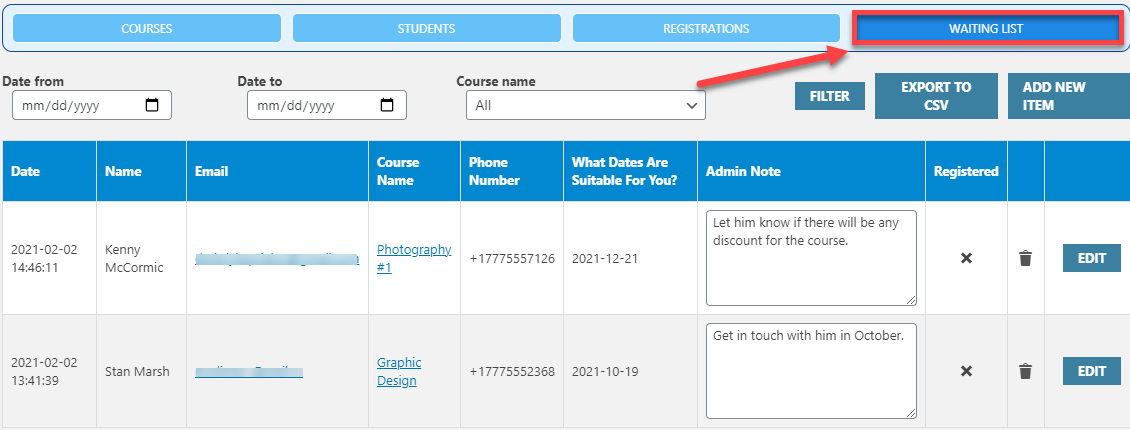
You can add an admin note for every request, filter the list by dates or courses, export the list to CSV.
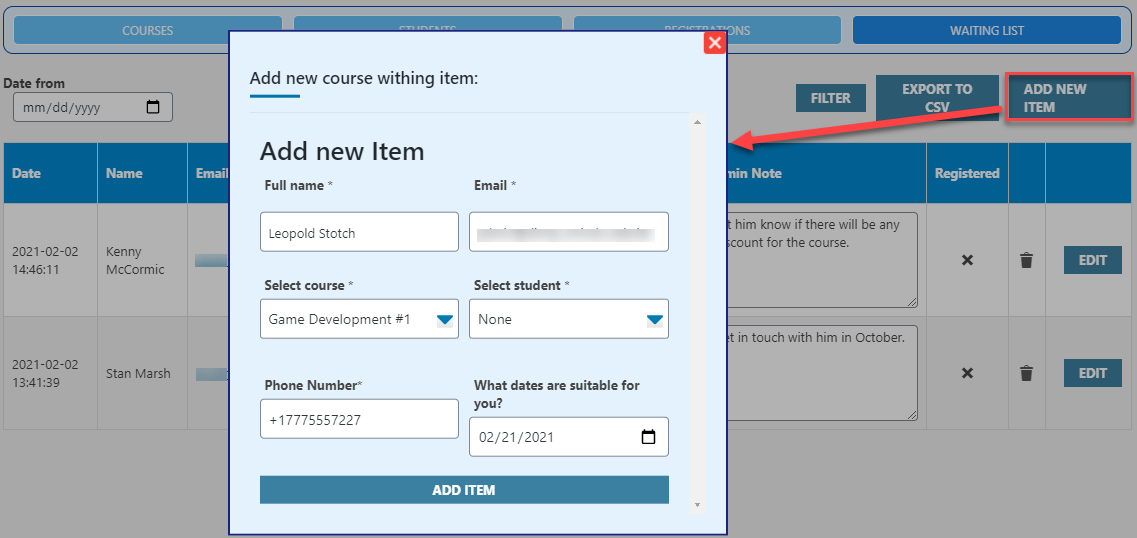
There is also a possibility to add a new record to the list - for example, if you get the request by the phone.
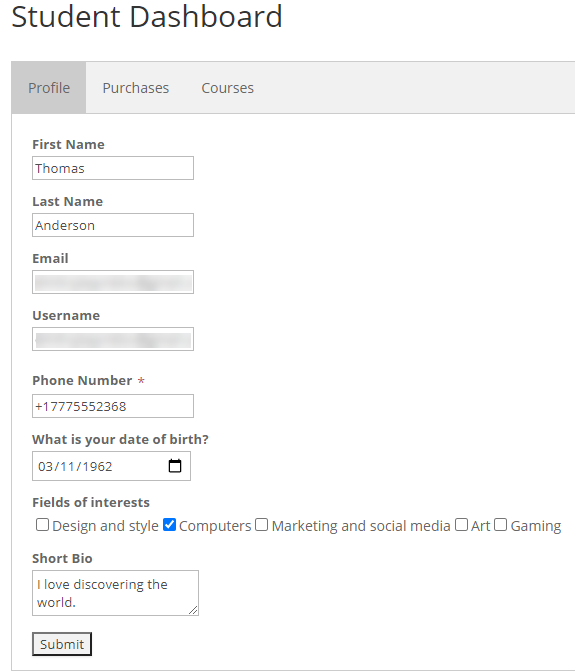
Student Dashboard
Students can view their courses and unregister from courses on the Student Dashboard.
To let them do this you need to navigate to Admin Dashboard → CM Course Catalog Pro → Settings → Student Dashboard. Scroll to the Student dashboard section.
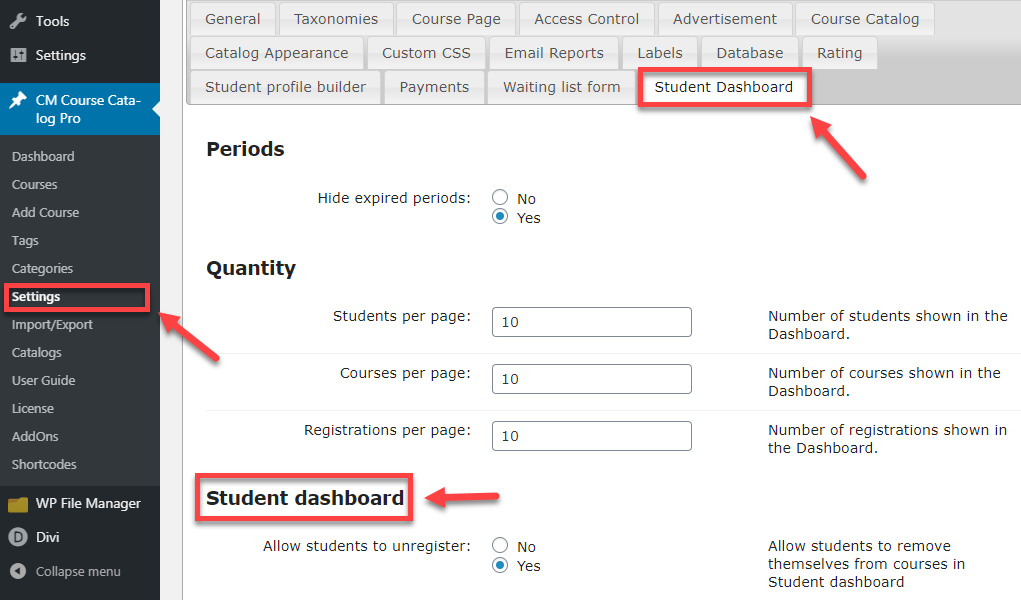
In these settings you can enable the Allow students to unregister option, and manage what tabs the students can see.
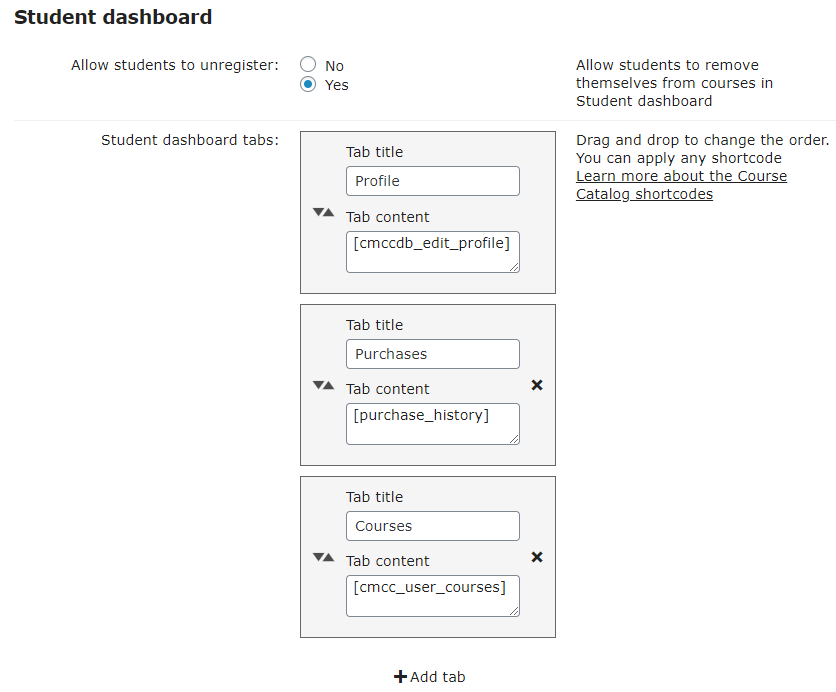
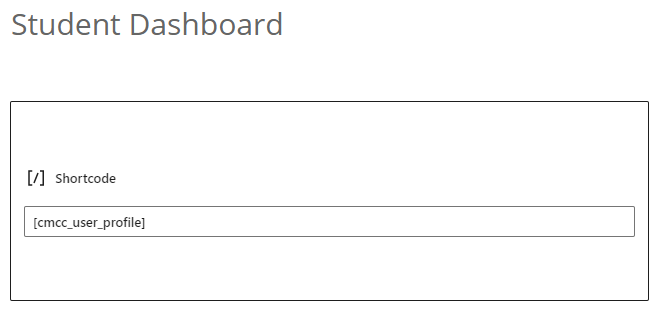
You need to use the shortcode [cmcc_user_profile] to display this on your site.
TIP: What Are Shortcodes?
Shortcodes add dynamic content to your site via a small piece of code. Learn more: Shortcodes - How To Use
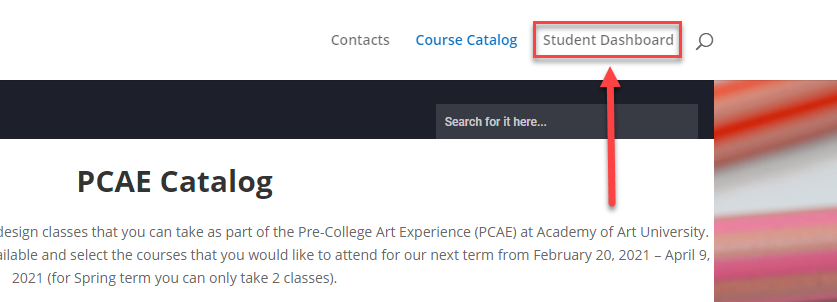
You can create a page, add a shortcode, and place that page to the menu to make it easy to navigate for the students.
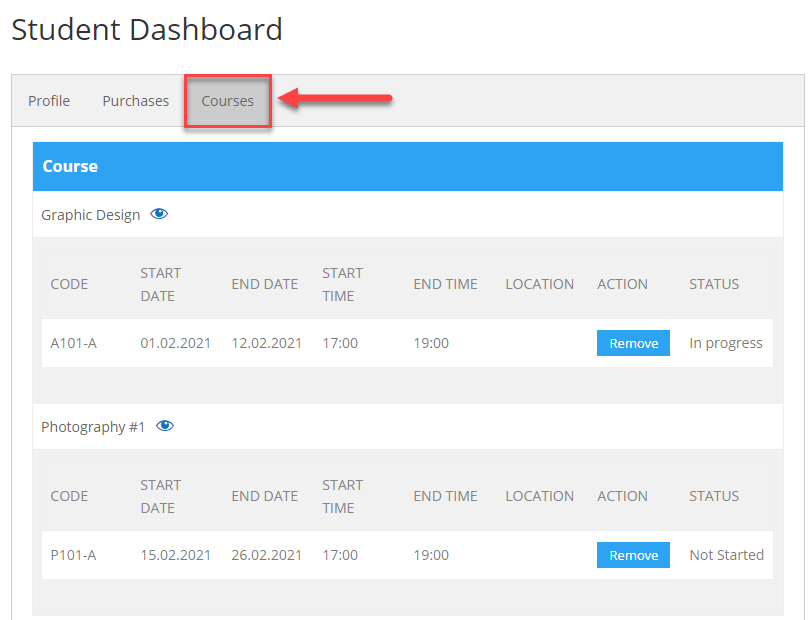
Student Dashboard on the Front-End
Note: The student must be logged-in to browse this page.
- Profile - On the first tab the student can see the personal information they gave when registering. They can edit it here.

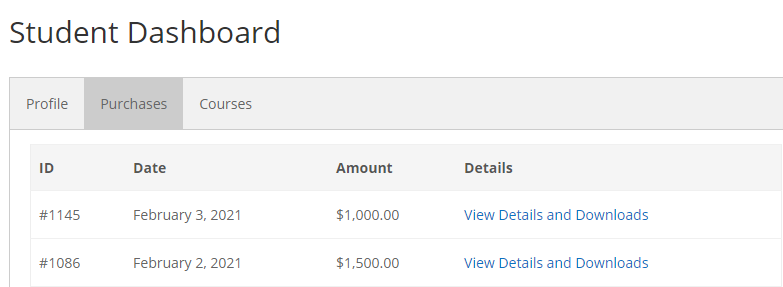
- Purchases - On the second tab there is information about all purchases with the possibility to view detailed information about payment.
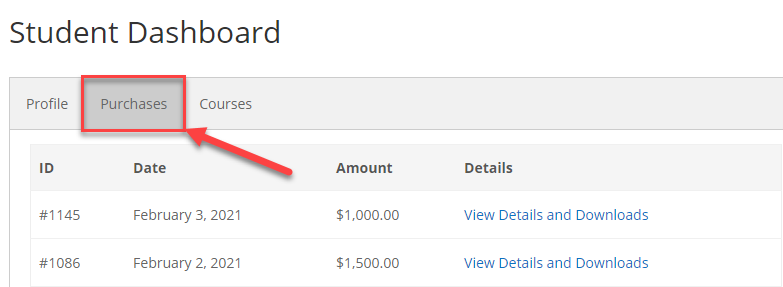
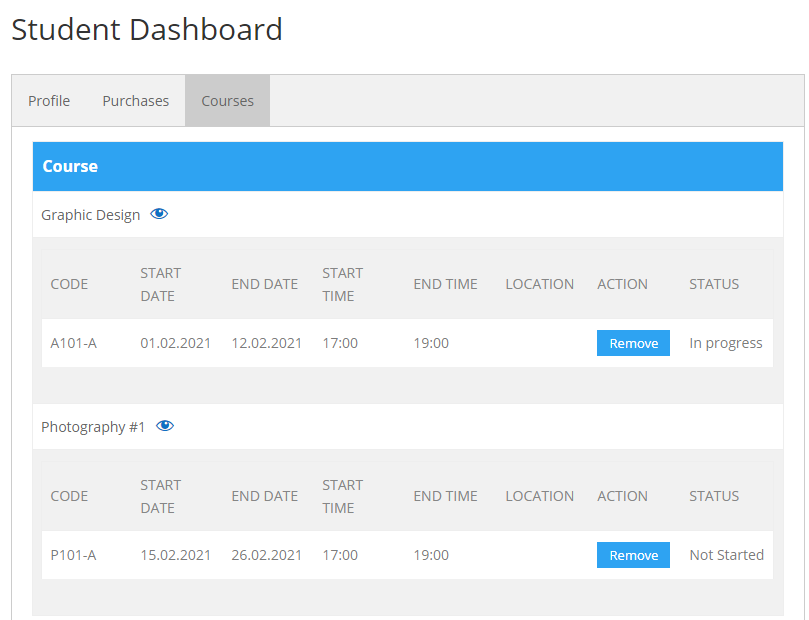
- Courses - This is where a students courses are listed. Here you can view detailed information about the students progress on the course, including start date, end date, and status. The student can go to the course page using the eye-icon or unregister from the course with the Remove button.
This is how you can organize and manage the process of registration for your students.
 |
More information about the WordPress Course Catalog Plugin Other WordPress products can be found at CreativeMinds WordPress Store |
 |
Let us know how we can Improve this Product Documentation Page To open a Support Ticket visit our support center |