WordPress Glossary Plugin (CMTG) - Getting Started - Use Case - Creating Glossary in Multiple Non-English Languages
Use Case - Creating Glossary in Multiple Non-English Languages
Note: This guide covers features from the Ecommerce version of the WordPress Glossary plugin - This document uses version 3.9.8.
Some features are also present in Pro+ and are marked as such.
Introduction
The WordPress Glossary plugin supports any UTF-8 characters, allowing you to build an alphabetic index for non-English terms. This article will focus on the language aspect.
Video Tutorial (Uses version 3.9.8)
Use Case Front-End
Multilingual Glossary
Different Glossaries for Each Language (version 3.9.10)
Multilingual Term (version 3.9.10)
Is My Language Supported?
The WordPress Glossary plugin uses UTF-8, which supports over 1 million characters. That ensures virtually all languages work with the plugin. Examples:
- Japanese, Chinese, Hebrew, Albanian, Korean, Arabic, Slavic languages, Hindi, Nepali, Tamil, Thai, and Uyghur
- Symbols - Mathematical symbols, music notation, and more
Learn more:
Use Case Assumptions
In this example use case guide, we'll cover how to create a small glossary in a language other than English.
We consider that you have already bought the plugin, but not installed it.
It follows:
- Installing the plugin
- Adding the first term
- Single language x Multiple languages
- Single Language
- Multiple Languages (eCommerce only)
- Translating the interface
- Special cases
- Troubleshooting
Installing the Plugin
The process is the same for all CM plugins.

- Download the plugin from your customer dashboard.
- Log in to WordPress and navigate to the WordPress Admin → Plugins settings.
- Click on Add New.
- Activate it and add the license.
Learn more: Getting Started - Installation And First Steps
TIP: Refresh the Permalinks Structure
This will help to prevent common 404 errors. Take these simple steps:
- Log in to your WordPress website as the admin.
- Visit Admin Dashboard → Settings → Permalinks.
- Click on Save Changes.
Adding First Term
Let's review how to add a term. Head to CM Tooltip Glossary → Add new.
The term title is the word or phrase which, when found on the post/page, would display the tooltip with the definition, and link to the Term Page or any other custom links according to the settings that you define.
Term descriptions is the actual content.
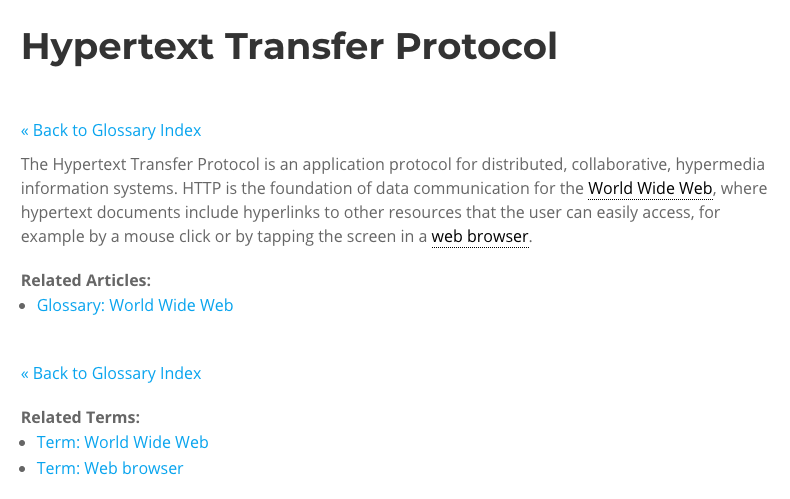
Adding a Term Example
Here we show the term Hypertext Transfer Protocol.
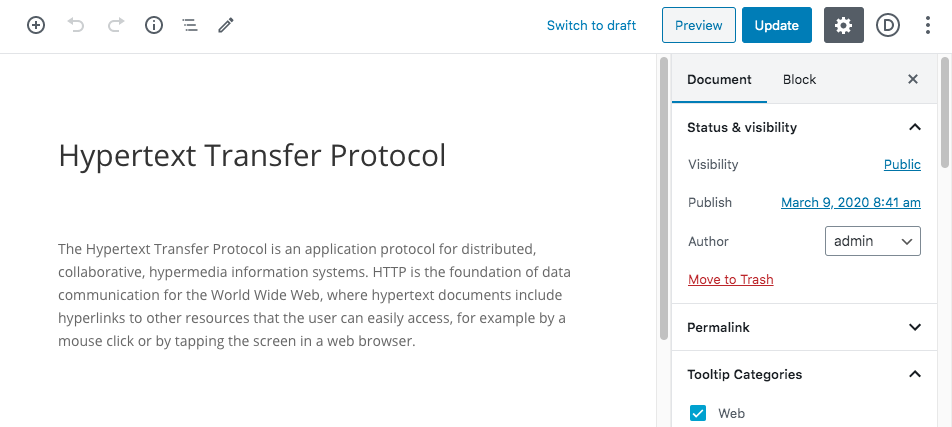
Aside from the content, this term has a category (Web), related articles and an abbreviation (HTTP).
Learn more:
- Getting Started - Use Case - Creating a Glossary Website With Tooltips From Scratch
- Getting Started - Adding a Term
Single Language x Multiple Languages at Once
There are two major ways of using glossaries with language in mind. This guide covers both.
Independently, you can also enable Google Translate integration. Learn more: WordPress Glossary Plugin (CMTG) - Integrations - Google Translate
Method 1) Single Language
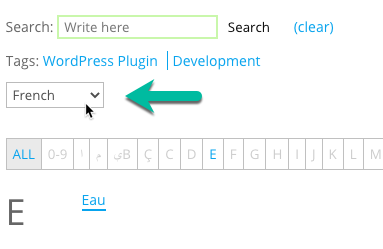
The Alphabetic navigation is a box that filters terms based on their first letter.

The tooltip Glossary Index Page can support any UTF-8 characters, allowing you to build an alphabetic index for non-English terms.
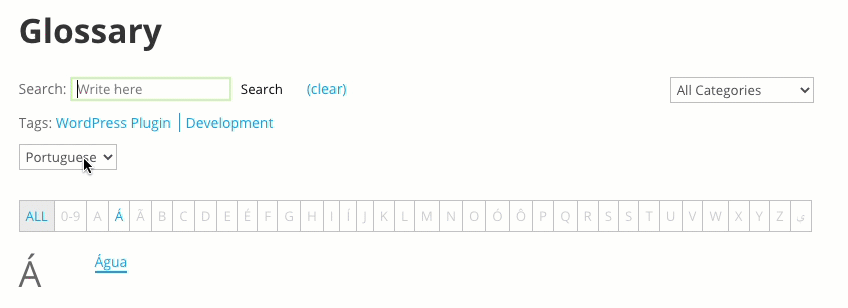
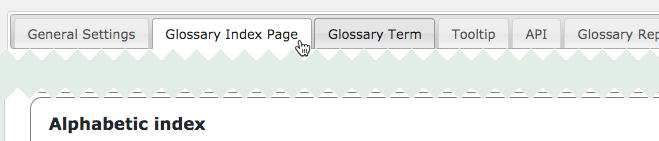
You will find the settings in Admin Dashboard → CM Tooltip Glossary → Settings → Glossary Index Page tab → Alphabetic Index section.
Included Letters
Head to the Letters in alphabetic index to add different characters to your alphabet. This is useful for languages that contain characters not present in the English alphabet, such as "ż", "ß", "ø" and so on.
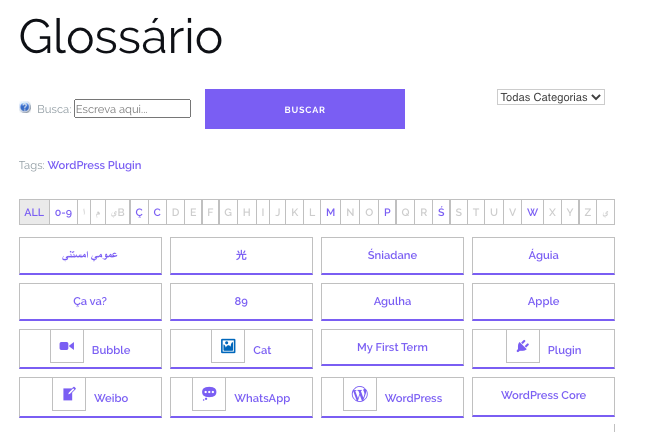
Example

On the Glossary Index Page this will look as follows:

One other important setting in this section:
- Consider non-latin letters separate from their latin base? - Enabling it bundles all non-latin letters in their base. Example: When this setting is unchecked:
- Terms starting with "A" and "Á" will be bundled in "A".
- Terms starting with "Ć" or "Č" will be bundled in "C"
TIP: Character Order
The index will respect the order in which you place the letters in the "Letters in alphabetic index" setting. This is useful for languages that contain characters not present in the English alphabet, such as "ż", "ß", "ø" and so on.
Check all settings: Index - The Alphabetic Index.
Method 2) Multiple Languages At Once
Version 3.9.10 introduced many language settings to the eCommerce version of the WordPress Glossary plugin.
Set up
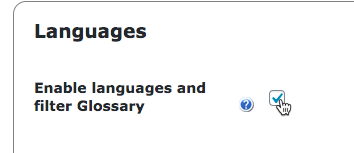
Step 1 - Turn the Language Mode On
Head to Admin Dashboard → CM Tooltip Glossary → Settings → Ecommerce Settings tab → Languages section.

Enable the option "Enable languages and filter Glossary". We'll cover the other settings in a moment.
Important Change
While this setting is on, the glossary will only show terms of one language!
Step 2 - Create languages
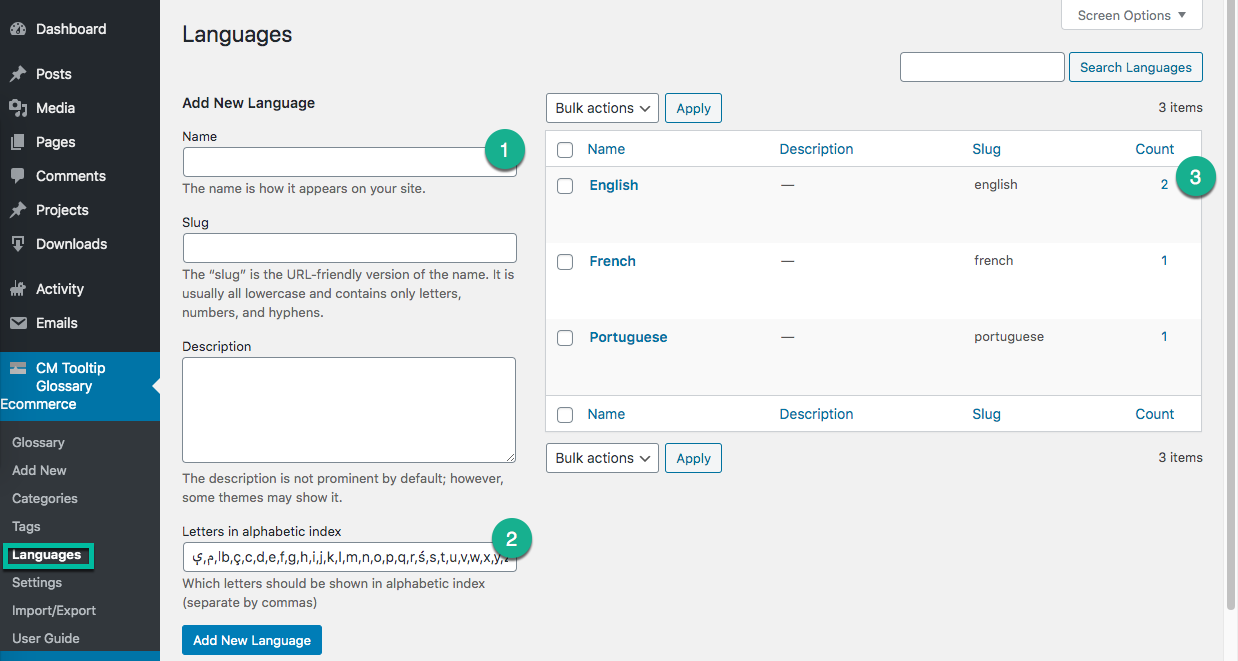
Head to Admin Dashboard → CM Tooltip Glossary → Languages.
In this screen you can add and manage languages. Notes:
- Add the name of the language. E.g. Hindi, French etc.
- Choose which letters the alphabet contain. This means different languages can have different alphabets
- The "Count" column provides a shortcut of all the terms currently assigned to that language
Step 3 - Create unique versions of terms for each language
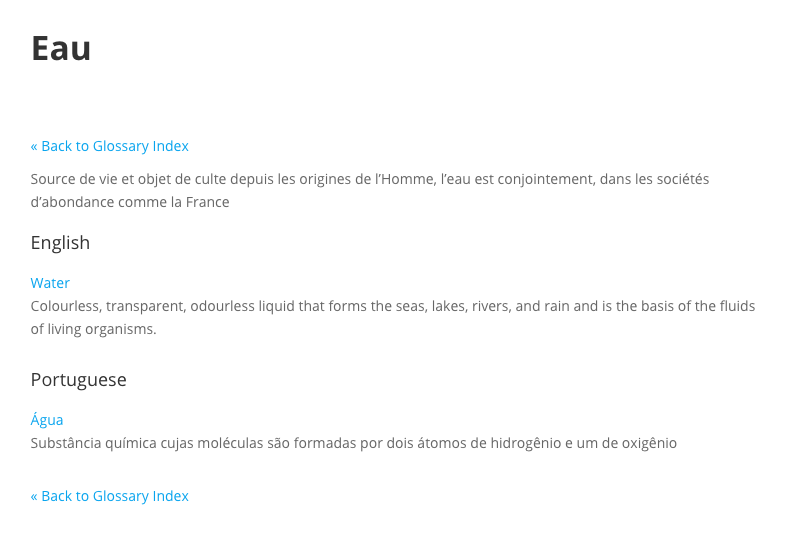
Each language must have the same version of the term. For example, Water, Eau and Água refer to translations of the same word, so they should be three separate terms.
If you only have one (for instance, Water), create the other ones.
Step 4 - Assign languages to your terms
While creating or editing terms, take notice of the metabox "CM Tooltip - Term Language". It is very important.
There, assign the language of the term you are editing. Then, you select, for each language, the corresponding term.
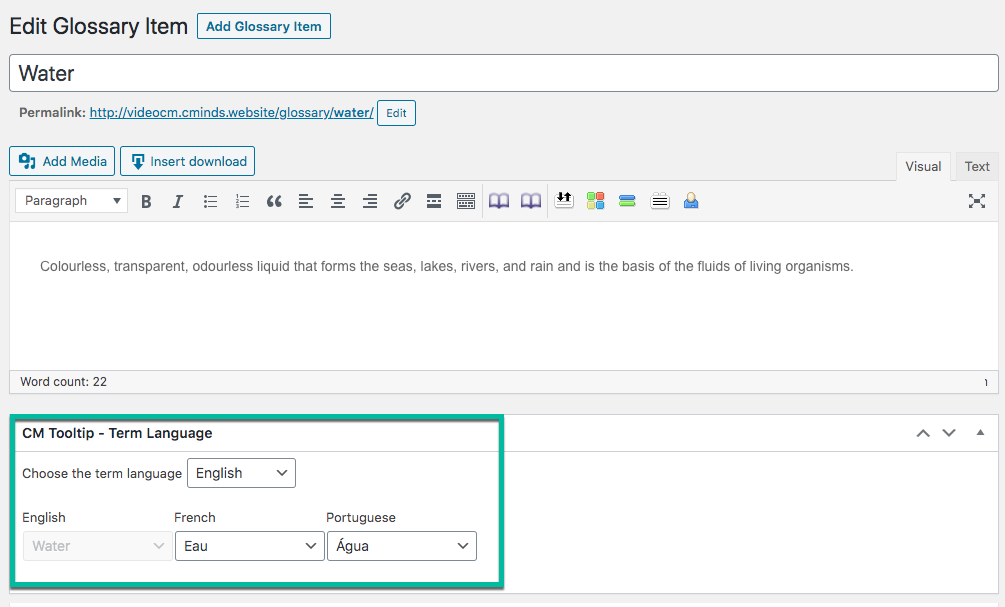
Repeat this step for all relevant terms.
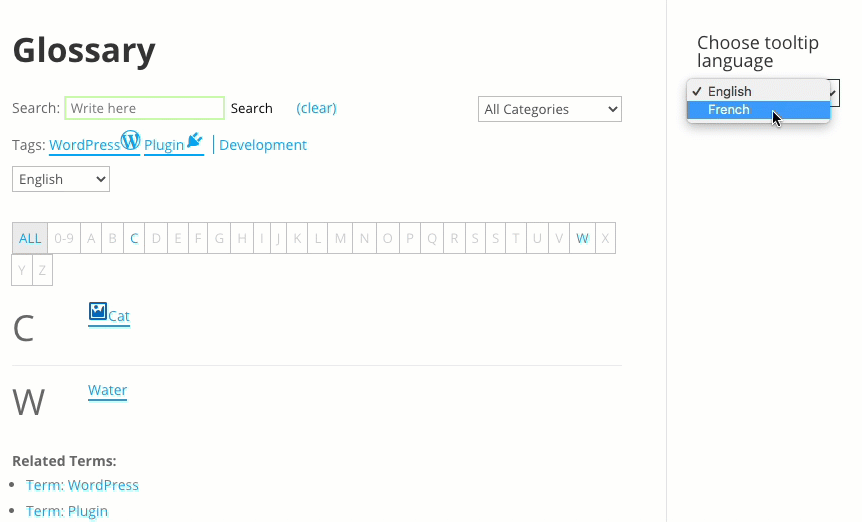
Glossary Language Settings
Now we have multiple glossaries with connected terms. The following settings allow you to decide how the glossary will be affected.
- Default Glossary language - Which language the glossary will be in at first.
- Show language dropdown selector on Glossary Index - Show or hide.
- Language switch widget applies to - The plugin comes with a widget that changes the language of the tooltips. You can choose if, when a user selects a new language, that affects only the current page or the whole site.
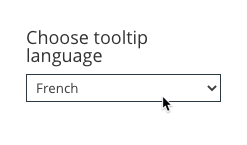
- Language in the tooltips - You can force the tooltip to be in a set language. Choosing "---" will make the tooltip respect the language to the term. Choosing a specific language, on the other hand, will force the tooltip to show the definition of that language.
- Choose languages to show on Index Page - Which languages will be selectable from the dropdown.
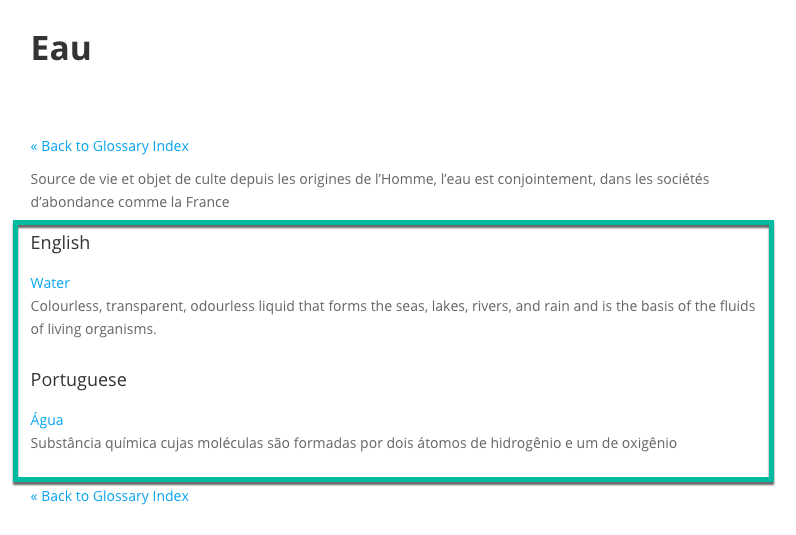
- Show other languages of the term in the term page - If enabled, shows the definition in all available languages.
Tip: Great Feature for Dictionaries and eLearning
The widget and the "Language switch widget applies to" setting can be really useful for dictionaries or eLearning sites.
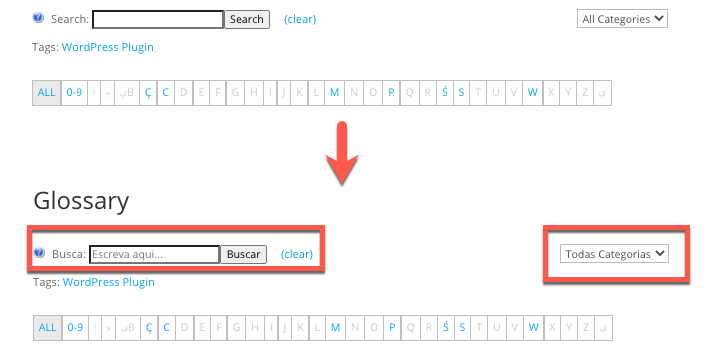
Translating Interface
If your site is not in English, that's ok. The WordPress Glossary plugin fully supports all UTF-8 languages. Translate it by adapting labels, and making a few tweaks.
The Pro+ and eCommerce are even compatible with WPML (WordPress MultiLanguage).

Examples
Some examples of labels available for translation:
- Back to Top
- « Back to Glossary Index
- Read More
- Glossary Item
Example - Translation to Portuguese
Learn more: Settings - Labels
Special Case 1: Right-to-Left (RTL) Languages
WordPress Glossary plugin supports Right-to-Left (RTL) languages, such as Hebrew.
Example

There are two ways to enable RTL in Tooltip Glossaries.
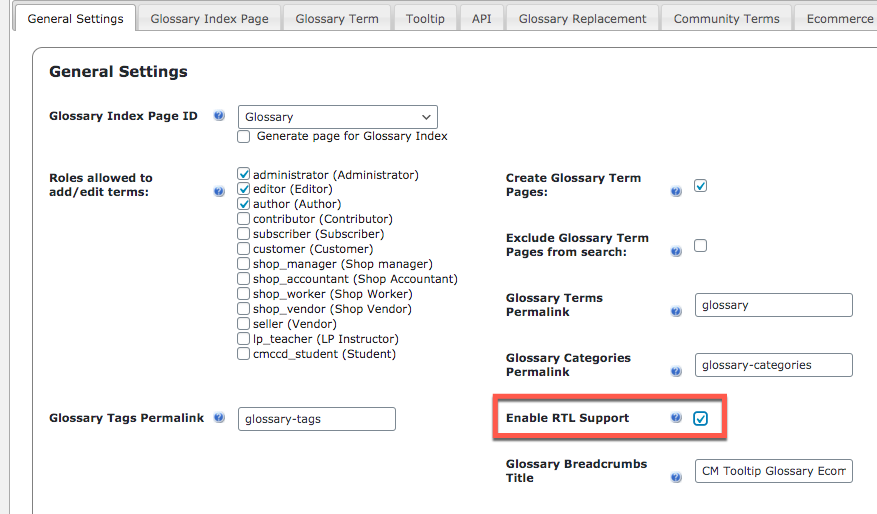
1) Automatic (Pro+ and Ecommerce)
In the Pro+ and Ecommerce editions, you can enable RTL (Right to Left text) support simply by checking Enable RTL Support in the path CM Tooltip Glossary → Settings → General Settings, as shown below:
2) Manually (other editions)
It's also possible to enable this function manually in other editions, but there are limitations. Two steps are needed.
a) For the Alphabetical List on Glossary Index Page:
Add this custom CSS to your theme or in the Additional CSS option in the customizer.
.ln-letters a { float: right !important; }
b) For Items on Glossary Index Page, Tooltip Content and Glossary page:
They will be displayed correctly when you set your whole site to RTL.
Learn more: WordPress Glossary Plugin (CMTG) - Extras - RTL Support - CreativeMinds Products Documentation
Special Case 2: Asian Language Support (Partial Word Search)
The Pro+ and eCommerce editions of the WordPress Glossary plugin make it possible to support partial word search.
TIP: Japanese is an Example
This is needed when dealing with Asian languages such as Japanese, which does not have a space between words, or in cases where you are looking into highlighting part of the word.
To set this feature you need to visit Admin Dashboard → CM Tooltip Glossary → Settings → General Settings and then scroll down to the Term Highlighting section.
Uncheck the option: “Highlight only space separated terms”.
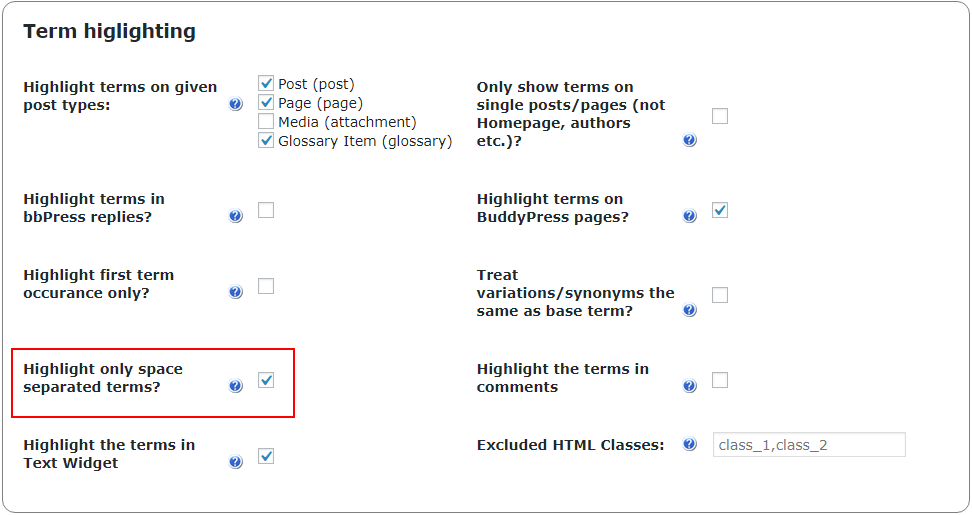
By default this options is enabled – which means only the space separated words would be searched.
Learn more: Terms - Partial Word Search (Asian Language Support)
Troubleshooting
Issue 1) Non-English Characters Not Appearing Correctly
The WordPress Glossary plugin works in UTF. This means that your MySQL DB table should also be defined as UTF8.
Steps
- Make sure that you have the correct database table and column charset/collation in your database. When a table is created in the database, it relies on environmental settings, so if you have a charset/collation set for your database that doesn’t allow special characters by default (utf8 characters), then the results will be wrong.
- Set the charset to utf8, and the collation to utf8_general_ci.
-
Try the following SQL Queries (replace your_wp_db_name with the database name you have set in your WordPress installation):
ALTER DATABASE your_wp_db_name DEFAULT CHARACTER SET utf8 DEFAULT COLLATE utf8_general_ci;ALTER TABLE your_wp_db_name.wp_glossary_synonyms DEFAULT CHARACTER SET utf8 COLLATE utf8_general_ci;ALTER TABLE your_wp_db_name.wp_glossary_synonyms MODIFY synonym VARCHAR(145) CHARACTER SET utf8 COLLATE utf8_general_ci;
Learn More
Check the official WordPress resource: Read more about changing the database charset on WordPress.org.
Issue 2) Some Terms are not Parsed
Make sure that the Terms are defined to not be case-sensitive. Go to Admin Dashboard → CM Tooltip Glossary → Settings → Tooltip and uncheck this box:

Learn more: Troubleshooting - Characters in non-English languages that do not appear correctly
End Result Example

 |
More information about the WordPress Glossary Plugin Other WordPress products can be found at CreativeMinds WordPress Store |
 |
Let us know how we can Improve this Product Documentation Page To open a Support Ticket visit our support center |