WordPress Invitation Code - Use Case - How to Restrict Two Separate Pages With Different Codes
Use Case – How to restrict two separate pages on your site with a different invitation code for each of them.
Note: This guide requires:
- WordPress Invitation Code plugin - This document uses version 1.3.7
Video Use-Case
Introduction
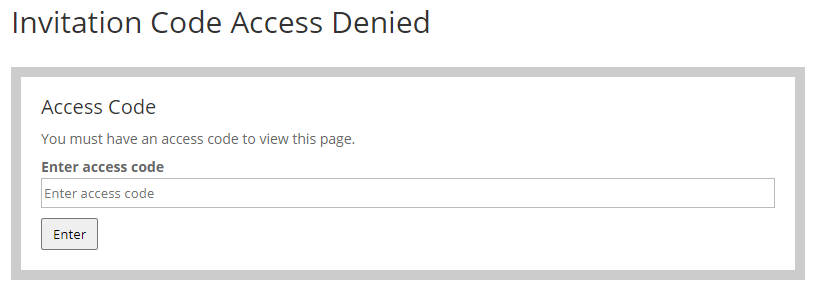
This WordPress Invitation Code plugin allows you to create and sell a series of personalized temporary access codes. Each code grants limited access to a selected page only. When creating codes, you assign them to a URL or a file. It will automatically be locked and, when accessing it, visitors will be prompted to input the code.
Use Case Front-End
Use Case Assumptions
In this example we will consider how to restrict two separate pages on your site, with different invitation codes for each of them. The code should have an expiration period within days from creation, and also limited amount of views (limit how many times the user with a code can view the page). We consider that you have already bought the plugin, but not installed it.
Note: the following instruction works the same for restricting URL, Posts/Pages, Content inside Page/Post, File Upload and File Link. In our example we will consider restricting the post.
It follows:
Installing the Plugin
The process is the same for all CM plugins and add-ons.

- Download the plugin from your customer dashboard.
- Log in to WordPress and navigate to the WordPress Admin → Plugins settings.
- Click on Add New.
- Activate it and add the license.
Learn more: Getting Started - Plugin Overview
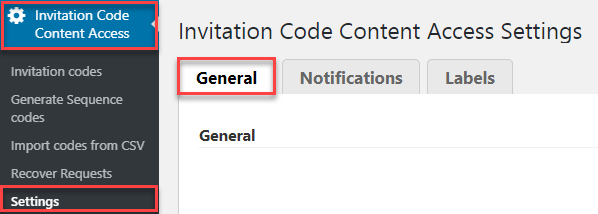
Initial Setup
Before starting, WordPress Invitation Code plugin has to be properly set up.
If you still haven't configured:
- General settings for codes.
- Notifications - email notifications for admins and users.
- Labels - configure/translate messages that the user will see in front-end.
Also, we consider that you've already have existing posts that you need to restrict with the codes.
Creating an invitation code
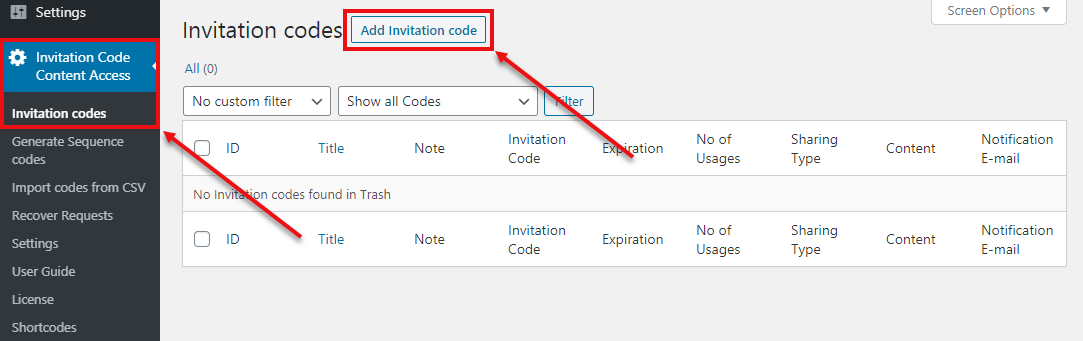
Let's start creating an invitation code for the first post.
First, navigate to Admin Dashboard → Invitation Code Content Access → Invitation codes, then click the button Add Invitation code.
Next, you need to fill the fields with the data.
- The Title - name of the invitation code.
- Code is generated automatically. If you need to generate another one - use the button Generate new.
-
Note - this is a field for a note that only admin can see.

Generating the invitation code and adding extra info

TIP: Use the Hint/question
Write a hint or question where the correct answer is the code. Users will be granted access after they input the correct answer. Every post can have more than one invitation code that is randomly chosen from all codes for a specific post.
To be able to use this feature, first you need to navigate Invitation Code Content Access → Settings → General.
Find the option Require specific invitation code and enable it.

Then you can use Hint/question feature. Example of using:

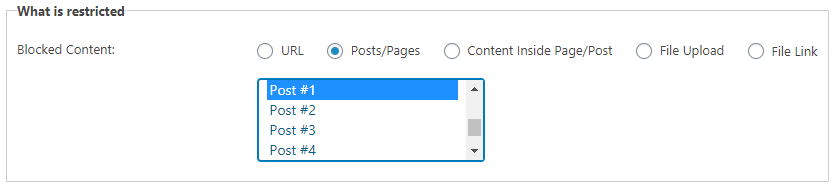
Then you need to choose the post or page that will be restricted by the code. Choose Posts/Pages in the list of Blocked Content and then find and choose needed post.
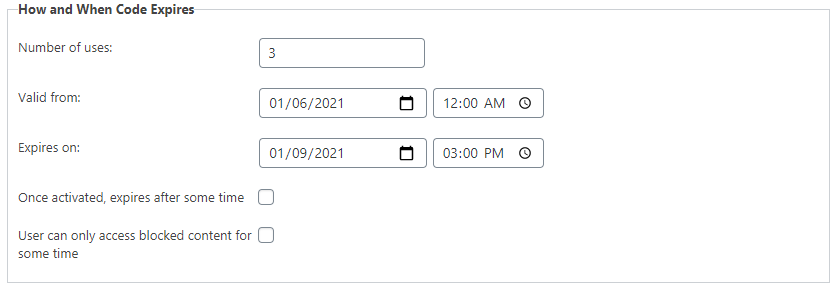
Next step - to set the method and date of expiration of the invitation code.
- Number of uses - Set a usage limit (empty or 0 means unlimited).
- Valid from - Leave empty to activate the code right away (respects the website time zone).
- Expires on - Leave empty to never expire (respects the website time zone).
- Once activated, expires after some time - Expires the account a certain amount of time after the first time the user logs in. The timer runs while the user is offline. Enter the amount of hours. 1 equals one hour, 0.5 equals half an hour (30 minutes) and so on. Default value is 1.
- User can only access blocked content for some time - Expires the account after the user spends a certain amount of time on your site. The timer only runs while the user is online and accessing the content. Enter the amount of hours. 1 equals one hour, 0.5 equals half an hour (30 minutes) and so on. Default value is 1.
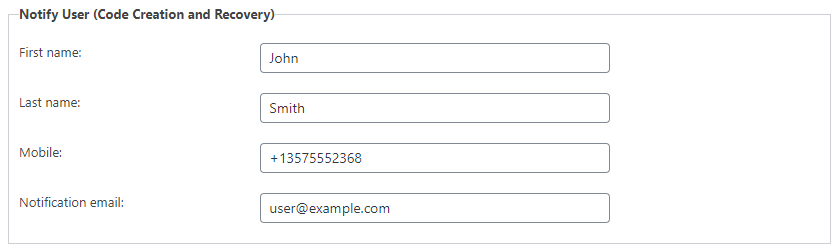
Notify User - send the notification for the user. Used for recovering the code.
You can customize the email template that the user gets via the settings. Learn more: How To - Customize Email Template.
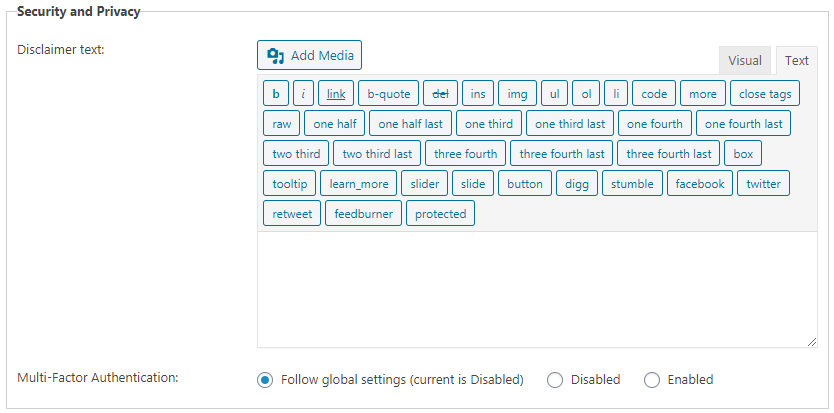
Security and privacy - Apply unique Terms of Service text. If you leave the field empty, the default ToS will be applied (learn more: Settings - General (Configuring Access, Privacy).
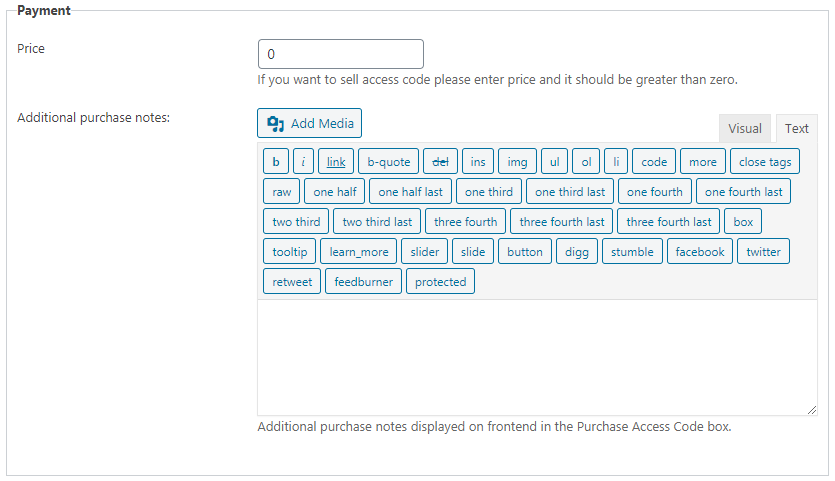
If you want to sell the invitation code to access the content, you need to set the price for the invitation code in Payment section. Learn more about How to sell an invitation code for accessing a specific content on your site.
Use code as template - Enable it to use this code as a template for generating subsequent codes with external tools.

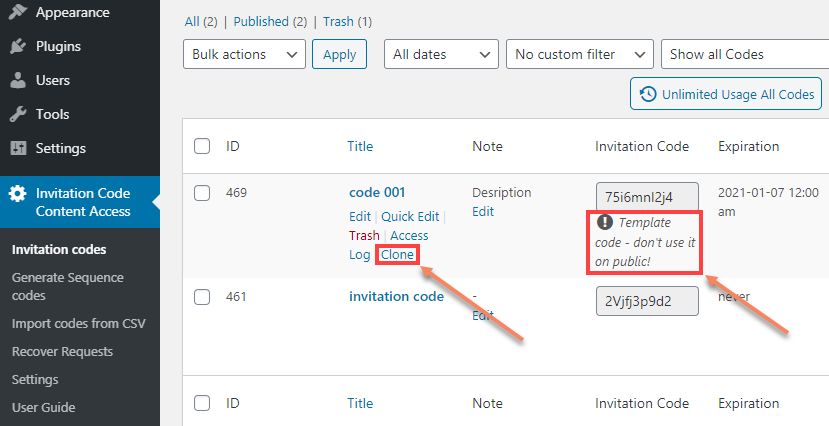
TIP: Using the code template
To create the invitation code using a template, you need to navigate to your list with codes in Invitation codes. Find the needed template-code (it is marked with a special note), hover over it and click on the Clone button. Most fields will be already filled with the information, and you can work with it the same as while creating or editing regular invitation codes.
The template code can also be used for generating and selling codes directly from the WooCommerce shop. Learn more: Sell the Access Codes Directly From the WooCommerce Shop
End Result
After all of that press the button Publish. Now you can go the restricted post and see the result.
Using the same instruction you can restrict another post or page on your site with another code.
Use Case Front-End
 |
More information about the WordPress Invitation Code Plugin Other WordPress products can be found at CreativeMinds WordPress Store |
 |
Let us know how we can Improve this Product Documentation Page To open a Support Ticket visit our support center |