WordPress Invitation Code - Settings - General (Configuring Access, Privacy)
General Settings
To find the WordPress Invitation Code plugin settings, navigate to Admin Dashboard → Invitation Code Content Access → Settings → General tab.

General
These are the options:
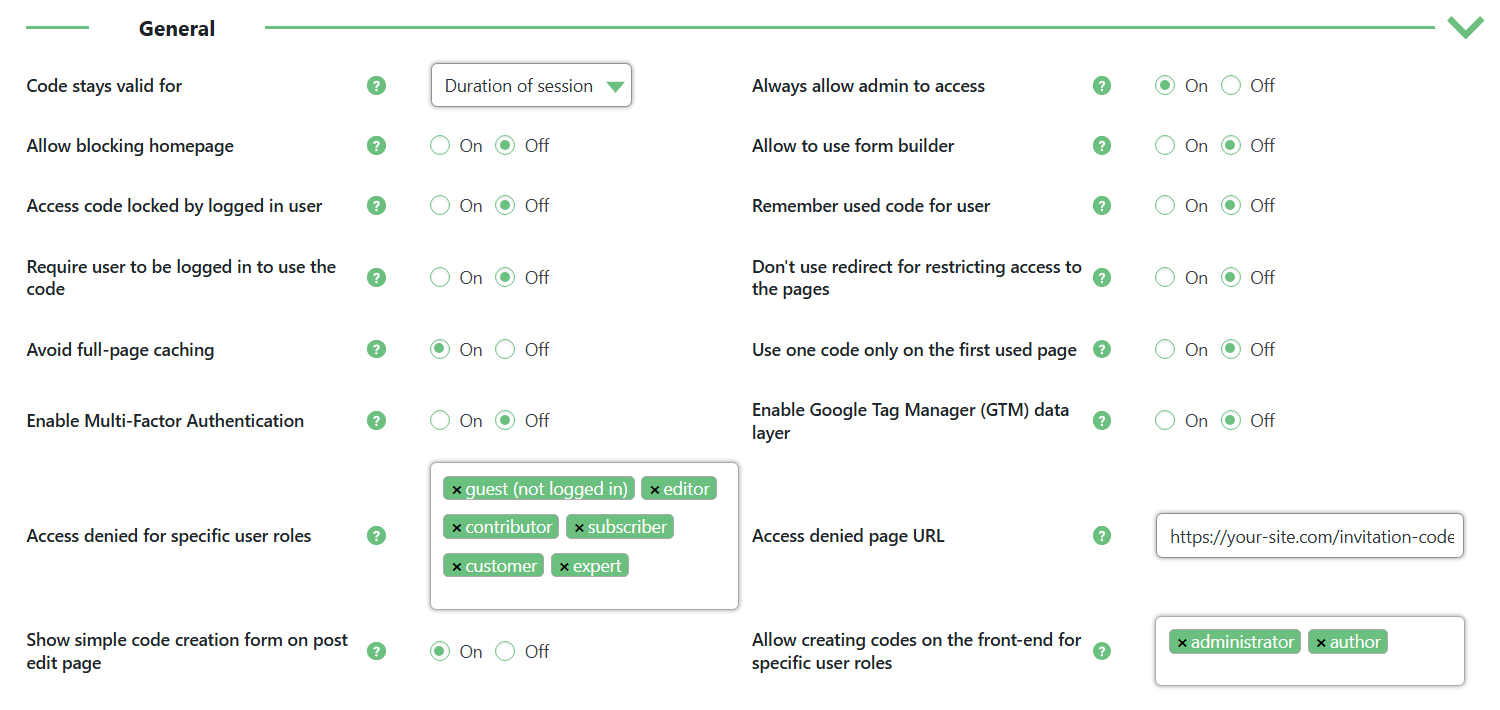
- Code stays valid for - Choose between:
- Duration of session - The code will be used once every session, until the session cookies are cleared. Have a note that session cookies can behave differently on different devices and browsers/applications. So the session cookies are not everywhere cleared when the browser is closed.
- Single view - The user will have to input the code every time the page refreshes.
- Always allow admin to access - Content will never be locked for users with the admin role.
- Allow blocking homepage - This option allows you to block homepage of your site. This feature is available since version 1.3.8. Learn more about restricting URLs and homepage.
-
Allow to use form builder - Enable this option to use form builder for expanding invitation code access form. Note: this option was introduced in version 1.4.0.
Profile Fields
When the option Allow to use form buider is enabled a new item appears in the menu:

Profile Fields menu item You can learn more about Profile Fields in this guide: WordPress Invitation Code - Profile Fields
- Access code locked by logged in user - Enable this option to tie codes to the logged-in user. This way, after a logged-in user uses the code, that code cannot be used by any other user.
- Remember used code for user - When enabled the code will be remembered, meaning users only need to enter the code once.
- Require user to be logged in to use the code - In order to use the code, the user must be logged-in.
-
Don't use redirect for restrict access to the pages - If enabled, plugin will use the_content filter to restrict access to the page. In means, when the user visits restricted page he won't be redirected to the page with a form for entering the invitation code. Instead of it, the form for entering the code will appear on the restricted page. You can use it if you have problems with the "Redirect" mode. The URL for redirecting is set in the Access denied page URL option. Note: this option was introduced in version 1.4.0.
Avoid full-page caching - If enabled, the plugin will add GET parameter to URLs of restricted by codes pages to avoid full-page caching. The GET parameter contains a ranodom string, this way the URL is always unique, so it can help to avoid possible problems with cache and full-page cache plugins. We recommend to enable this option in case, if you use any plugin for caching. Note: this option was introduced in version 1.4.4.
How It Looks Like On the Front-End:
Before entering the invitation code:

'Avoid full-page caching' in action After accessing the restricted page:

'Avoid full-page caching' in action Enable Multi-Factor Authentication - When enabled, the access code box will require SMS authentication. The user will receive an SMS with a code and the code will only work after the user inputs the SMS code. (Requires the CM Secure Login installed with SMS as Two-Factor authentication method).
Enable Google Tag Manager (GTM) data layer - Can be used to track customer usage of the codes by using the dataLayer.push method. Requires your site to have Google Tag Manager activated.
Technical information:
- Access denied for specific user roles - Only logged-in users with selected roles and guests will be required to enter the code. Setting Always allow admin to access takes precedence for roles with manage_options capability during access control.
- Access denied page URL - The user will be redirected to this page if they try to access locked content with an expired code. Learn how to set this page up: WordPress Invitation Code - How To - Display Content Access Form (Shortcode)
- Show simple code creation form on post edit page - Enable this option to display a metabox with a simple form for creating codes on page/post editing pages. Note: this option was introduced in version 1.7.2. Learn more about in this use case guide: WordPress Invitation Code - Use Case - How to Let Users Use Direct Access Links Instead of Invitation Codes
- Allow creating codes on the front-end for specific user roles - Choose which user roles are allowed to create invitation codes on the front-end (either using a front-end form or a widget). Note: this option was introduced in version 1.7.5. Learn more about it in this use case guide: WordPress Invitation Code - Use Case - How To Let Specific User Roles Create Invitation Codes From On Front-end


Code Specifications
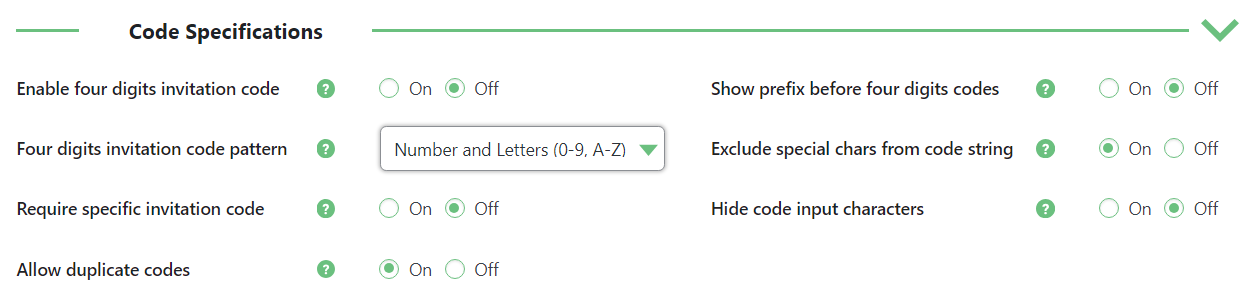
- Enable four digits invitation code - Codes will have four digits only.
- Show prefix before four digits codes - If enabled there will be an additional prefix field for the four digits codes generated with prefix.
- Four digits invitation code pattern - Only works if "Enable four digits invitation code" is enabled. You can choose which characters will be included:
- Numbers and Letters (0-9 and A-Z)
- Numbers only (0-9)
- Letters only (A-Z)
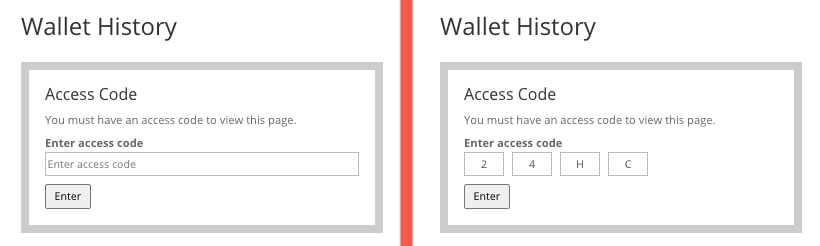
Four Digits code mode
If Four Digits Code mode is enabled, this will happen:
- Longer codes WILL NOT work
- New codes will be generated with four characters only
- The code box will ask for only four digits
Learn more: WordPress Invitation Code - Four Digit Codes
-
Exclude special chars from code string - Enable this option if you want to exclude the following special characters from automatically generated codes: 1, L, l, 0, O. Note: this option was introduced in version 1.4.4.
When you create a single code, these characters won't be added in the code, if it's generated automatically. But you can add them manually, if needed. If you create a sequence of codes, the option Exclude special chars from code string will work only in case if you enable the option Randomize codes? while confuguring the sequence.

Randomizing codes while creating them in bulk - Require specific invitation code - If enabled users will be shown a defined hint/question (randomly chosen from all codes for a specific post) along with the access code. Only a correct answer to the specific question will give the user access to the post.
- Hide code input characters - If enabled, access code characters typed by the user will be hidden. If disabled, typed characters will be visible all the times. Users can click the eye icon to toggle options. Note: This feature works only with standard invitation codes (single input).
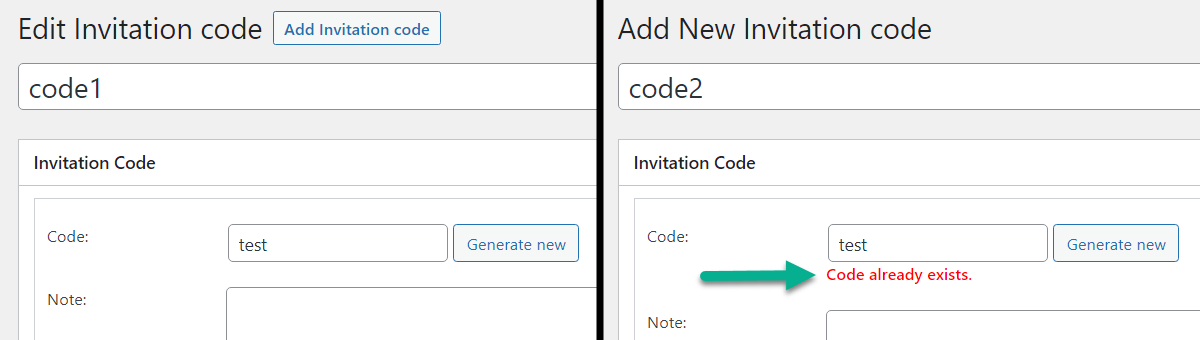
- Allow duplicate codes - If enabled, then you will be able to create repeated codes. Note: this option was introduced in version 1.6.4.

If the option is disabled and you're trying to create a code with the same value, you will see a message that the code already exists and you won't be able to create/update the code.
Access via Link & QR

- Allow apply code via URL - Enable this option to use URLs with invitation codes as parameters which allow users accessing restricted pages by direct link, without entering codes to the access boxes. The list of relevant links can be displayed in the metabox on each post/page if the option Show simple code creation form on post edit page is enabled. Note: this option was introduced in version 1.7.2. Learn more about in this use case guide: WordPress Invitation Code - Use Case - How to Let Users Use Direct Access Links Instead of Invitation Codes
- Activation Code GET Parameter - Specify the name of the GET parameter to be used in URLs for passing activation codes. Do not use special characters or spaces. Example of the URL that includes the invitation code for accessing content: https://your-site.com/example-post/?code=12345. Note: this option was introduced in version 1.7.11.
- Enable QR code generation for invitation code URLs - If enabled, QR codes will be automatically generated for invitation codes. It allows users to access restricted content by simply scanning the QR code. Note: this option was introduced in version 1.7.11. Learn more about it in this use case guide: WordPress Invitation Code - Use Case - How to Let Users Access Locked Content Using QR Codes Based On Invitation Codes
- Generate QR Codes for all invitation codes - Clicking this button will generate QR codes for all invitation codes that don't have them. Note: this option was introduced in version 1.7.11.
Payment

- Enable Payment - For this feature you need to install WooCommerce plugin.
- Auto create/update WooCommerce products for invitation codes with price - If enabled, after saving the invitation code with defined price value, a WooCommerce product will be automatically created/updated to handle the purchase process. Otherwise, a manually created product can be associated with a particular code. For this feature you also need to install the WooCommerce plugin. Note: this feature was introduced in version 1.3.7.
This feature affects the Payment section in Add New Invitation code. Learn more about Add New Invitation code and How to charge Users for Access Code.
- Allow to sell invitation codes via products ordered directly from the shop catalog - If enabled, the customers will be able to order the invitation codes via associated products chosen directly from the WooCommerce shop catalog. Otherwise, the invitation codes can be only ordered throught a dedicated paybox form. For this feature you also need to install WooCommerce plugin. Note: this feature was introduced in version 1.3.10.
Terms and Privacy
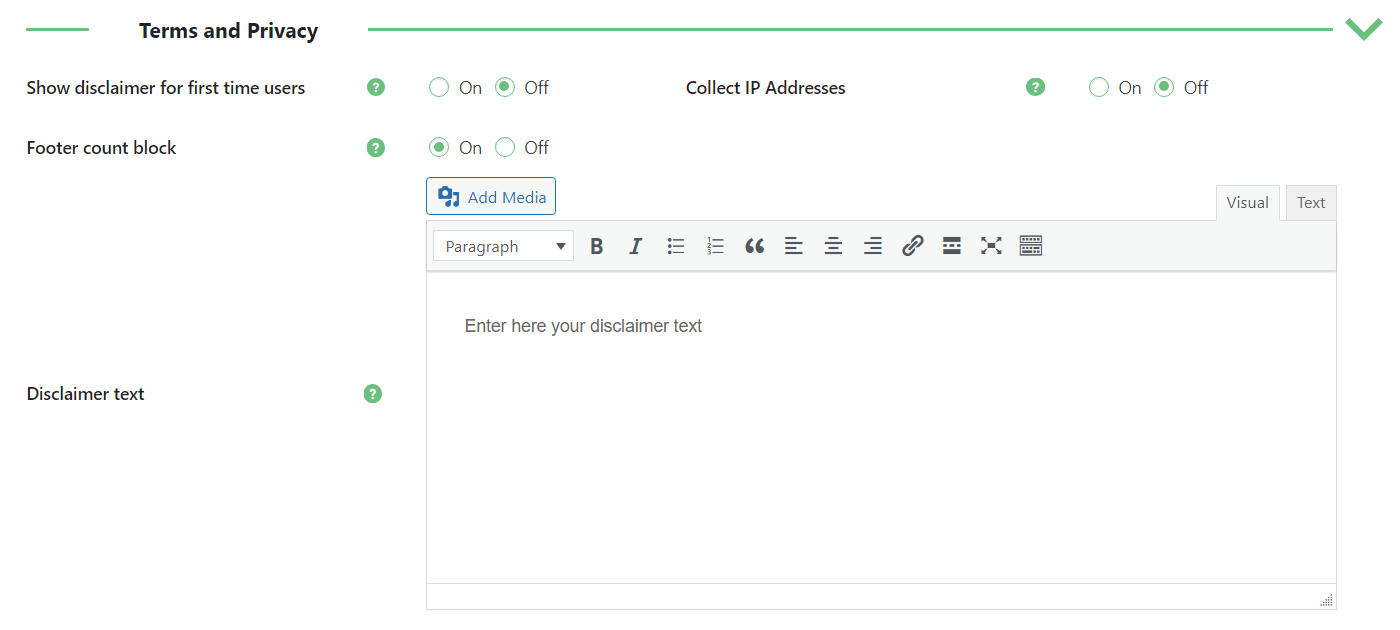
- Show disclaimer for first time users - If enabled, users will be prompted to accept your terms before applying a code for the first time.
- Collect IP Address - Choose if the plugin will register the IP Address of users when they apply codes. The IPs will be visible in the access log of each code. Depending on the geographical region of your user, disclosing this practice in terms of service can be obligatory.
-
Footer count block - Enable this option to display the footer with the counter.
Note
The option was introduced in the version 1.3.12.
This footer can be displayed only when you create the code, and choose the way how the code will expire - Once activated, expires after some time.

'Once activated, expires after some time' option How it looks like on the Front-end:

Footer count - Disclaimer text - Add the Terms of Service text users will have to accept in order to utilize the service. You can add rich text and multimedia. When creating codes, you can apply unique ToS messages.


Appearance
-
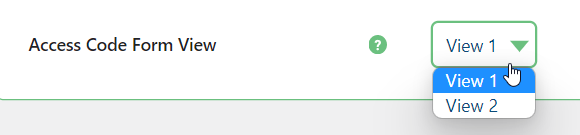
Access Code Form View - Select the form view for entering the access code. Note: this feature was introduced in version 1.6.0.
View 1

Access Code Form View 1 View 2

Access Code Form View 2


Widgets
Since the version 1.7.5. of WordPress Invitation Code, the plugin allows selected user roles to create invitation codes using a front-end widget. The admin can enable this widget for specific posts/pages using a metabox.
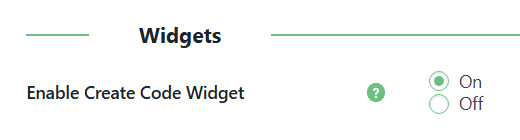
- Enable Create Code Widget - Enable a metabox in posts/pages that allows to display a front-end widget for creating invitation codes.
Learn more about it in this use case guide: WordPress Invitation Code - Use Case - How To Let Specific User Roles Create Invitation Codes From On Front-end.
Google reCaptcha v2
Since the version 1.6.2 of WordPress Invitation Code, the plugin allows to enable reCaptcha in the form for entering invitation codes. It is done to increase the security against bots.
To enable reCaptcha, you need to configure the following options:

- Enable Google Recaptcha - Turn on this option to secure the form for entering invitation codes with Google reCaptcha. The plugin is compatible with reCaptcha v2 only.
- API site key - Enter API site key.
- API secret key - Enter API secret key.
To obtain API keys, visit Google Recaptcha platform. Learn more about how to get API keys in this user guide: General Support - reCAPTCHA - What is It and How to Enable
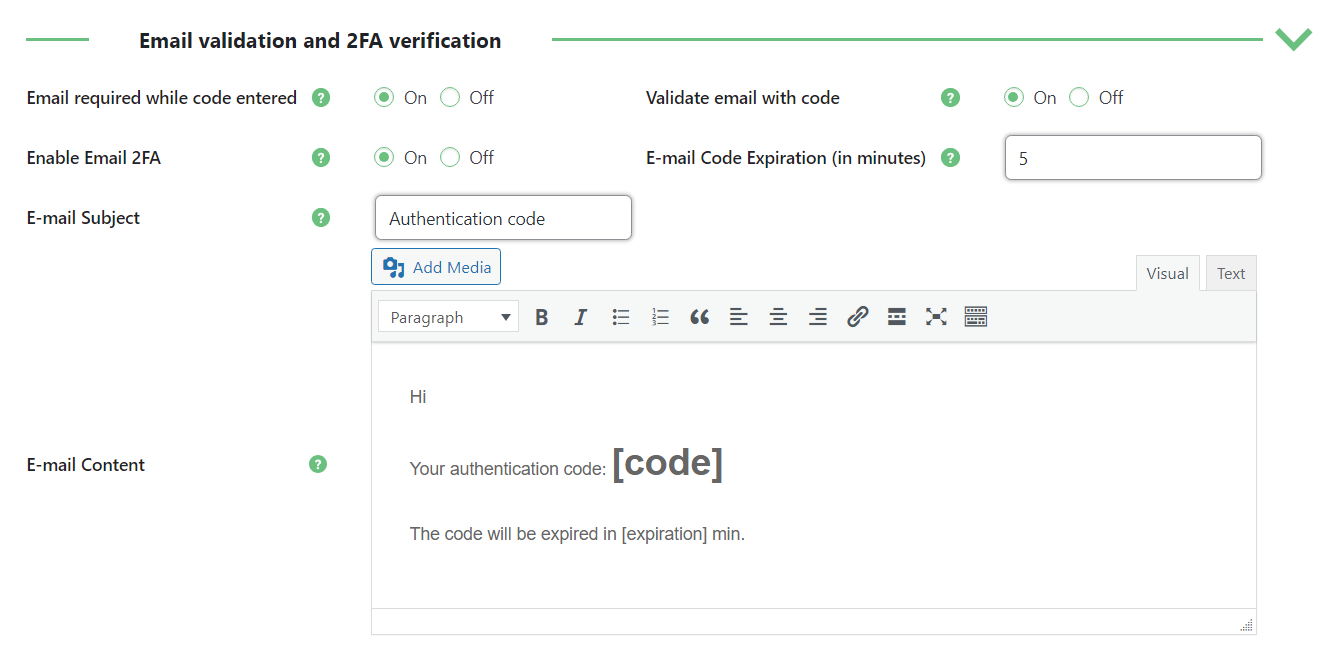
Email validation and 2FA verification
Since the version 1.7.2 of WordPress Invitation Code, the plugin allows to use two factor verification when entering the invitation code.
-
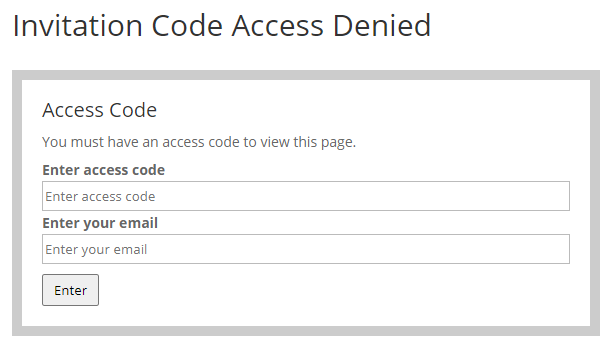
Email required while code entered - Enable it to make users enter their emails while entering the access code. Note: This feature was introduced in version 1.3.8.
Example
This is how it looks like in Front-End:
Requiring to enter an email with the invitation code And in Back-End while viewing and editing the code you can see the list of emails, who used that code:

The list of provided emails
- Validate email with code - If enabled, when entering the code the user must use the email which is assigned to the invitation code, otherwise he can't access the content. Requires the option Email required while code entered to be enabled.
- Enable Email 2FA - If enabled, when entering the invitation code, the user must enter his email. There will be sent a temporary one-time code which the user should also enter to the access box. Works only when options Validate email with code and Email required while code entered are enabled.
- E-mail Code Expiration (in minutes) - Define the expiration time of the one-time email code.
- E-mail Subject - The subject of the email that notifies users about one-time codes.
- E-mail Content - The content of the email that notifies users about one-time codes. You can use the following placeholders:
[code]- code that the user has to enter to approve the access. The email template MUST contain this shortcode.[expiration]- shows in how many minutes the code expires.


TIP
Learn more about the 2FA feature in this use case guide:
When you finished configuring settings, don't forget to click the button Save Changes at the bottom of the page.

 |
More information about the WordPress Invitation Code Plugin Other WordPress products can be found at CreativeMinds WordPress Store |
 |
Let us know how we can Improve this Product Documentation Page To open a Support Ticket visit our support center |