WordPress Registration Form Plugin (CMREG) - Settings - General Settings
General Settings
Table of Contents
- Accessing the Settings
- General
- API Keys (reCAPTCHA)
- Edit Profile Form
- Log out
- Appearance
- Toast Message
- Admin Bar
Accessing the Settings
To configure general settings in WordPress Registration Form Plugin, navigate to Admin Dashboard → CM Registration Pro → Settings → General.
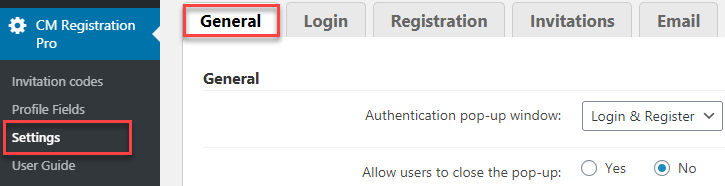
General
Configure the registration/login pop-up.
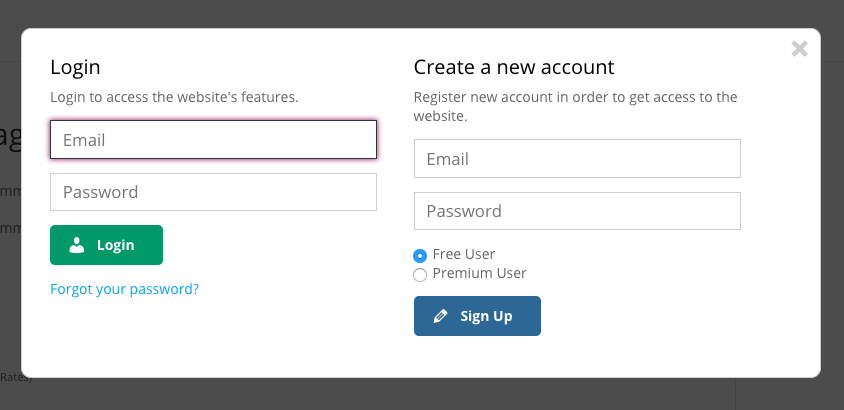
- Authentication pop-up window - Decide what will be shown:
- Login and Registration - Will display both forms
- Only login - Will display only the login form
- Only registration - Will display only the registration form
- Allow users to close the pop-up - If enabled, the user will able to close the pop-up.
-
Hide password field characters - If enabled, the password field characters typed on the frontend will remain hidden until the user clicks the eye icon. Otherwise, typed characters will be visible all the time.

Hiding password characters -
Which roles can delete themselves - Choose which user roles are allowed to delete their account on their own. The administrator role is not in the list, as this role has the permission to delete user account by default. Note: this option was introduced in version 3.3.8.

Selecting user roles which can delete their profiles


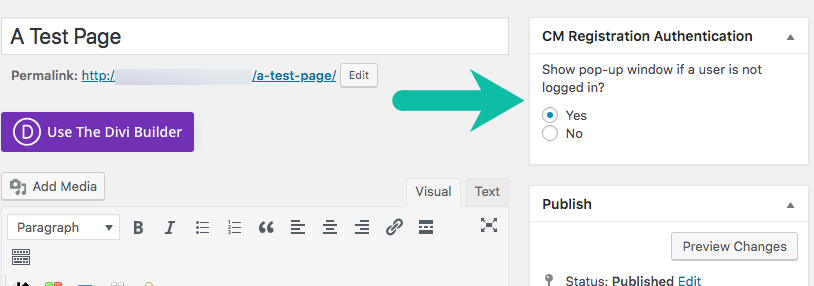
TIP: Activating the Pop-up
You can enable/disable the pop-up on each page or post. Simply check or uncheck the option under the CM Registration Authentication metabox.
API Keys
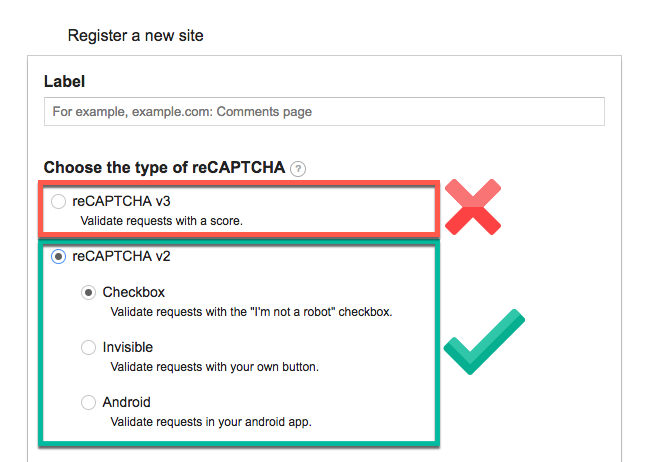
Important! Use reCAPTCHA v2 Keys only
Using reCAPTCHA v3 keys may lock you out of your website.
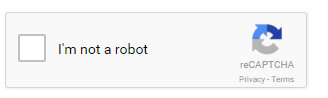
In the API Keys section enter Google reCAPTCHA keys to enable reCAPTCHA for the login area. reCAPTCHA helps prevent bots from crashing a website. They look something like this...
In General Settings click on the "Register new reCAPTCHA key" button to be directed to the Google page for generating new API keys.
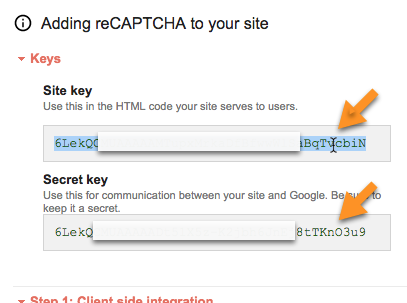
Existing keys will appear in the grey box in the top portion of the screen. To generate new reCAPTCHA keys for the site use the form below this.
- Label - A name for the reCAPTCHA key used to identify it.
- Choose the type of reCAPTCHA - Choose one of the options inside reCAPTCHA v2.
- Domains - Enter the Web address that the reCAPTCHA key is going to be used on.
- Accept the reCAPTCHA Terms of Service - Check this box.
- Click the "Register" button.

The Site key and Secret key will then be generated and can be copied and pasted into corresponding fields on the WordPress Dashboard.
Remember to click Save at the bottom of the page.
Note for Wordfence Users: "Verification Required" Error
If you face the error message "verification required" during login attempts, it's likely due to a conflict with WordFence's settings.
The solution is simple: turn off the v3 reCAPTCHA option in Wordfence's Login Security page.
More information: Wordfence documentation
Edit Profile Form
Note: Learn more about Editing User Profile
This section allows you to:
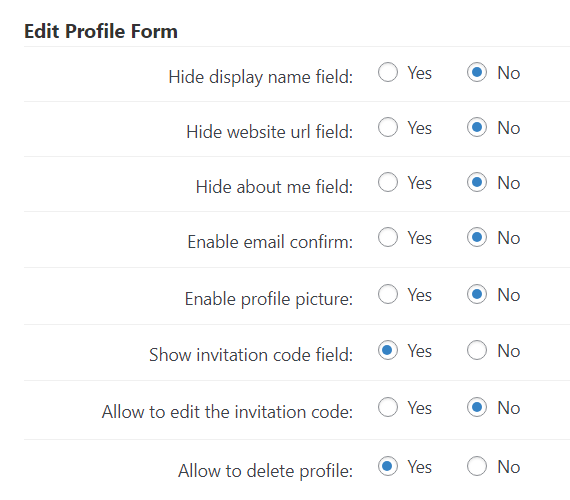
- Hide display name field - By default, the hide option is set to "no" (meaning the "My display name" field will be displayed).
- Hide website url field - By default, the hide option is set to "no" (meaning the "Website URL" field will be displayed).
- Hide about me field - By default, the hide option is set to "no" (meaning the "About me" field will be displayed).
- Enable email confirm - If enabled, the user will be able to change his email only after confirmation of the new email address. Note: this feature was introduced in version 3.1.8.
-
Enable profile picture - If enabled, the user will be able to change profile picture from edit profile page. Note: this feature was introduced in version 3.2.7.
Editing the profile picture on the front-end:

Ability to add or change a profile picture Admin can see the result while editing user profile on the back-end:

Ability to add or change a profile picture on the back-end
- Show invitation code field - If enabled, the user will be able to see a field with the invitation code that he used while the registration. Note: this option was moved here from another section since the version 3.5.8.
- Allow to edit the invitation code - If enabled, the user will be able to change the invitation code to another one. It might change his user role depending on the invitation code settings. Learn more: How To - Edit the Profile Fields (Back-End and Front-End). Note: this option was introduced in version 3.5.8.
- Allow to delete profile - If enabled, user will be able to delete their accounts. Have a note that the button for deleting profile will be displaying only to users which have user role defined in the option Which roles can delete themselves. Learn more: WordPress Registration Form Plugin (CMREG) - How To - Let Users Delete Their Profiles. Note: this option was introduced in version 3.7.4.


Logout
- Redirect after logout to URL address - Choose what page opens up for users after they logout.
- Logout after inactivity time - If a site user doesn't do anything on the site for a defined amount of time they're automatically logged out.
- Reload browser after logout - If the user has been logged out the plugin will automatically refresh the browser. This can be good for security reasons if a user has stepped away from a computer and forgotten to log out leaving private information on the screen.

Appearance
- Custom CSS - Custom CSS styles can be applied to pages containing the WordPress Registration Form Plugin.
- Note, this feature was moved to a new tab in version 2.7.3. Learn more: WordPress Registration Form Plugin (CMREG) - Extra - Custom CSS Styling
-
Example of a custom CSS:

Login form
-
- Overlay background opacity - Sets the percentage transparency / opacity of the background of the registration box.
- Preload login form overlay - Toggles whether to preload the login form or wait for the page to load first.
-
Display form fields label - Choose to display or hide the form fields label, as the ones highlighted below:

Displaying fields labels
Toast Message
- Toast Message Time [Seconds] - Toast messages are nonintrusive alerts that pop up over the content. The default value is 10 seconds.

Admin Bar
- Hide Admin Bar - Choose to display or hide the admin bar overall front-end. (Feature added in version 2.6.5)
You can also make an exception to certain user roles. Check the user roles that should be able to view the admin bar.
 |
More information about the WordPress Registration Form Plugin Other WordPress products can be found at CreativeMinds WordPress Store |
 |
Let us know how we can Improve this Product Documentation Page To open a Support Ticket visit our support center |