WordPress Quiz Plugin - Use Case - Creating Your First Quiz From Scratch
Use Case – Creating your first quiz from scratch
Note: This guide covers features from:
- WordPress Quiz Plugin - This document uses version 1.2.0.
Video Use-Case
Introduction
The WordPress Quiz Plugin allows you to add quiz knowledge tests with multimedia content and multiple answers anywhere on your posts and pages. You can also monitor the results of your audience.
Use Case Front-End
Use Case Assumptions
In this example use case guide we will consider how to create your first quiz and display it on the page of your WordPress site.
We consider that you have already bought the plugin, but not installed it yet.
It follows:
- Installing the plugin
- Plugin settings
- Creating quiz
- Creating questions and assigning them to quizzes
- Including quiz to post/page
- Progress report
- End result
Installing the Plugin
The process is the same for all CM plugins and add-ons.

- Download the plugin from your customer dashboard.
- Log in to WordPress and navigate to the WordPress Admin → Plugins settings.
- Click on Add New.
- Activate it and add the license.
Learn more: Getting Started - Plugin Overview
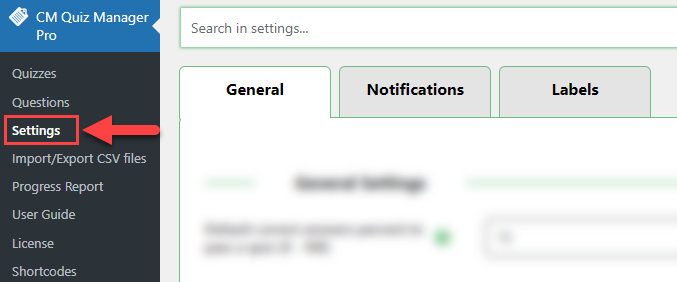
Plugin Settings
Before we create our first quiz, let's start with configuring plugin settings. To do this, navigate to Admin Dashboard → CM Quiz Manager Pro → Settings. There you can find 3 tabs with options.
General
First tab is General. The options are:
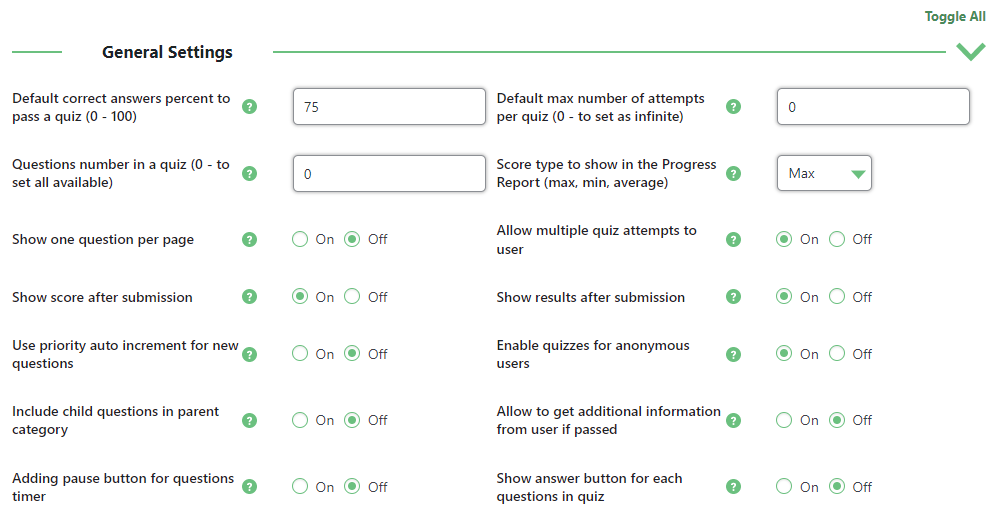
- Default correct answers percent to pass a quiz (0 - 100) - Indicates what percentage of correct answers should be given to pass the quiz. This setting can be changed per quiz.
- Default max number of attempts per quiz (0 - to set as infinite) - Indicates the number of attempts user can have to pass the quiz. This setting can be changed per quiz.
- Questions number in a quiz (0 - to set all available) - Indicates the number of questions inside a quiz. Questions will be randomly selected from available in a quiz. This setting can be changed per quiz.
- Score type to show in the Progress Report (max, min, average) - Indicates the type of score shown in the Progress Report.
-
Show one question per page - Forces users to answer questions in order.
Navigation
The user can navigate between questions using the buttons "Next Question" and "Previous Question". When the option Show one question per page is enabled, a new button appears in the quiz - "Mark Question". The user can mark questions and skip them, and easily get back to the marked questions choosing them in the dropdown list "Marked questions" above.

Mark question feature - Allow multiple quiz attempt to user - Enable to let users attempt the same quiz multiple times. Disable it if you want to limit the amount of attempts to one time.
- Show score after submission - Shows the score to the user after the quiz is completed.
- Show results after submission - Shows the correct answers to the user after the quiz is completed.
- Use priority autoincrement for new questions - You can enable this setting if you want to autoincrement new question priority when creating a question for a quiz.
- Enable quizzes for anonymous users - You can enable this setting if you want to show your quizzes even for anonymous users. This requires the cookies to be enabled on the user side.
- Include child questions in parent category - Allows grouping questions. When enabled, will add to the quiz all the questions from its children quizzes.
- Allow to get additional information from user if passed - Requires the user to input information after passing the quiz. Requires to be installed and activated the plugin After Registration Extended Profile Fields. Learn more about it here: WordPress Quiz Plugin + After Registration Extended Profile Fields - Use Case - How to Ask a User to Add Additional Information After He Passed a Quiz
-
Adding pause button for questions timer - If enabled, the user will be able to stop the timer using the "pause timer" button. The timer will be displayed only for quizzes that have a timer. This option can be useful if you want your users to have some practice before the real test.
Example

Pause timer feature -
Show answer button for each questions in quiz - If enabled, the button "Show answer" will appear in the quizzes, so users could check the correct answers. When the user clicks this button, he is not able to choose or change the answer for this question anymore. This option can also be useful for your users to have some practice before the real test.
Example

Show answer feature


Notifications
Second tab is Notifications. It has two types of notification for Admin and for User.
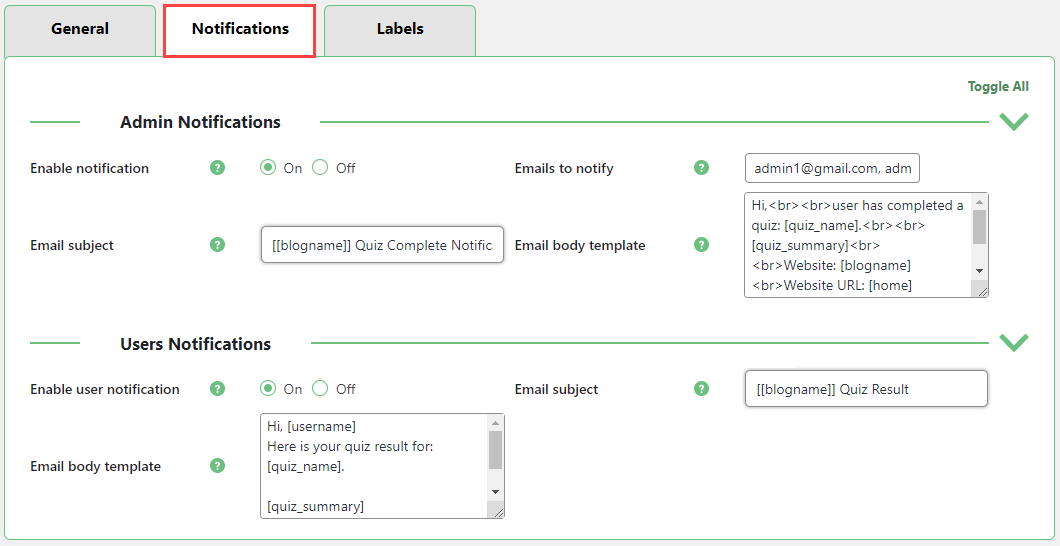
Both notifications have 3 identical options:
- Enable notification - Sends the notification to Admin / User once the quiz has been completed by user.
- Email subject - Edit the subject of the email notification. Accepts the placeholder
[blogname]- website's name. - Email body template - Edit the text of the email notification. Accepts the following placeholders:
[blogname]- website's name[home]- website's home url[quiz_name]- name of the quiz[quiz_summary]- summary of the quiz[username][userlogin][useremail]
The admin notification has one more option:
- Emails to notify - Set here emails which will receive the email notification. You can add multiple emails by separating them with a comma. Example: "admin1@example.com, admin2@example.com".
User notification is not sent automatically - the user should decide on his own if it's needed to him. If the option Enable user notification is turned on, an option for sending email notification will appear for the user under the quiz result:
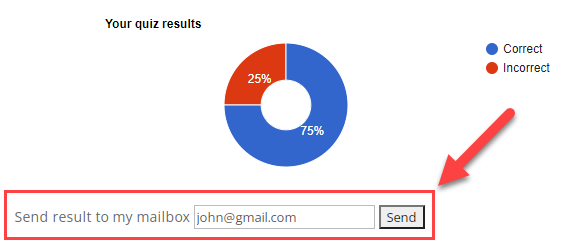
In the field Send result to my mailbox will automatically contain user's email (for logged-in users). The user can leave this email or change it and click the button Send to get the results on the email.
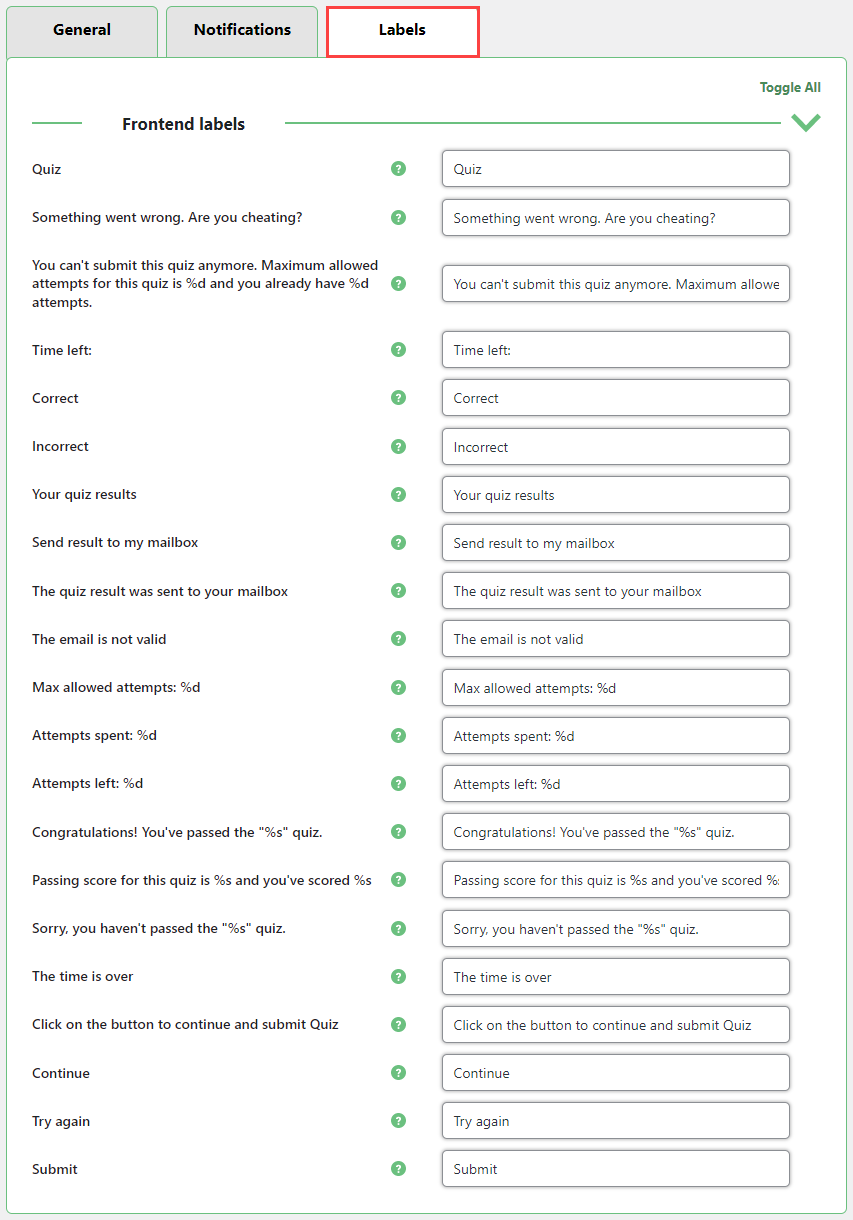
Labels
Last tab is Labels. Here you can change most of the text that the plugin displays on your website. The labels are:
Notes on Labels with Two Placeholders
The following labels have two placeholders: (bolded below)
- "You can't submit this quiz anymore. Maximum allowed attempts for this quiz is %d and you already have %d attempts."
- "Passing score for this quiz is %s and you've scored %s"
It's possible to invert the order of the placeholders by slightly changing them.
Example
For instance, considering that a user has scored 50% on a test.
- "You've scored %s out of %s" will result in "You've scored 100% out of 50%."
- "You've scored %2$s out of %1$s" will result in "You've scored 50% out of 100%."
Similarly, changing the %d placeholders to %2$d and %1$d will also invert the order in which they will be displayed.
When you finish changing plugin settings, click the button Save Changes at the bottom of the page.

Creating Quiz
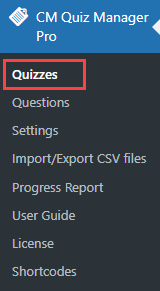
Now it's time to create our first quiz. To do this, navigate to Admin Dashboard → CM Quiz Manager Pro → Quizzes.
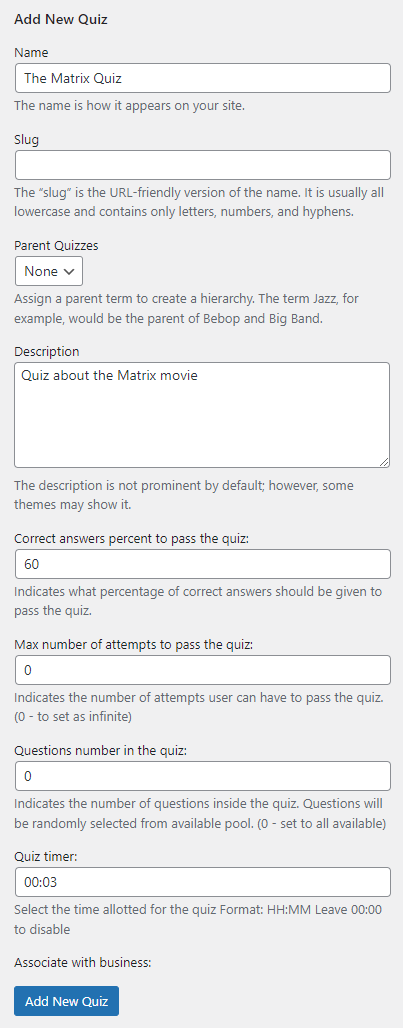
On the left half of the screen you can see the form for creating a Quiz. The fields that you need to fill are:
- Name - This field is used to identify the quiz both in the Back-End and in the Front-End.
- Slug - If this field is left blank, the plugin will generate a readable slug automatically. Can be used inside shortcodes to display quizzes.
- Parent Quizzes - You can make this quiz a "child" of another quiz. Useful for organization, as you can display all the questions related to a quiz.
- Description - This field may display on the Front-End, depending on your theme.
- Correct answers percent to pass the quiz - The numbers represent the percentage of questions that must be correct to be considered a success. For instance, if the quiz has 10 questions and this value is 60, that means the viewer has to score at least 6 to pass (because 60% percent of 10 is 6). This field overrides the default value in plugin settings.
- Max number of attempts to pass the quiz - After the user tries to solve the quiz this many times, he will not be able to see the quiz anymore. Leaving "0" means users can try the quiz infinite times.
- Questions number in the quiz - Choose how many questions the quiz will display. If the quiz holds more questions than this value, they will be showed randomly. Leaving a "0" means all questions assigned to this quiz will be available.
-
Quiz timer - Select the time allotted for completing the quiz. Time format: HH:MM. To disable the timer, set 00:00.
How It Looks Like On the Front-End
The user is able to see how much time is left on the Front-end:

Example of the timer on the front-end When the timer stops, the user is not able to scroll or click anything in the quiz. A pop-up window appears with a message and a button Continue that user have to click to finish the quiz and see the result.

Example of the message after the time has expired


When all needed fields are filled, click the button Add New Quiz below the form. For our use case we filled it in the following way:
All created quizzes are displayed in the table on the right half of the screen:
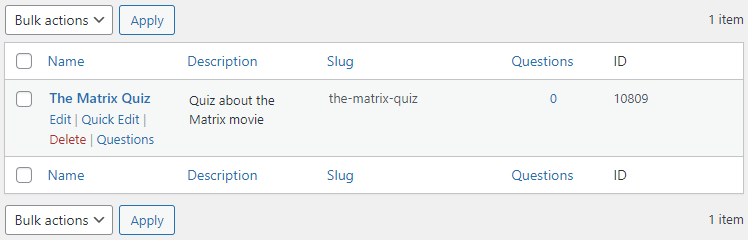
Here you can Edit or Delete the quiz using relevant buttons. And in the column Questions we can see the amount of questions that are assigned to that quiz. Currently it shows "0", as we haven't created any questions yet.
So let's create some.
Creating Questions and Assigning Them to Quizzes
To create questions, navigate to Admin Dashboard → CM Quiz Manager Pro → Questions.
Click the button Add Question at the top.

You will reach the Create/Edit Question page. It works just the same as when editing a post. Here are the areas that you need to fill:
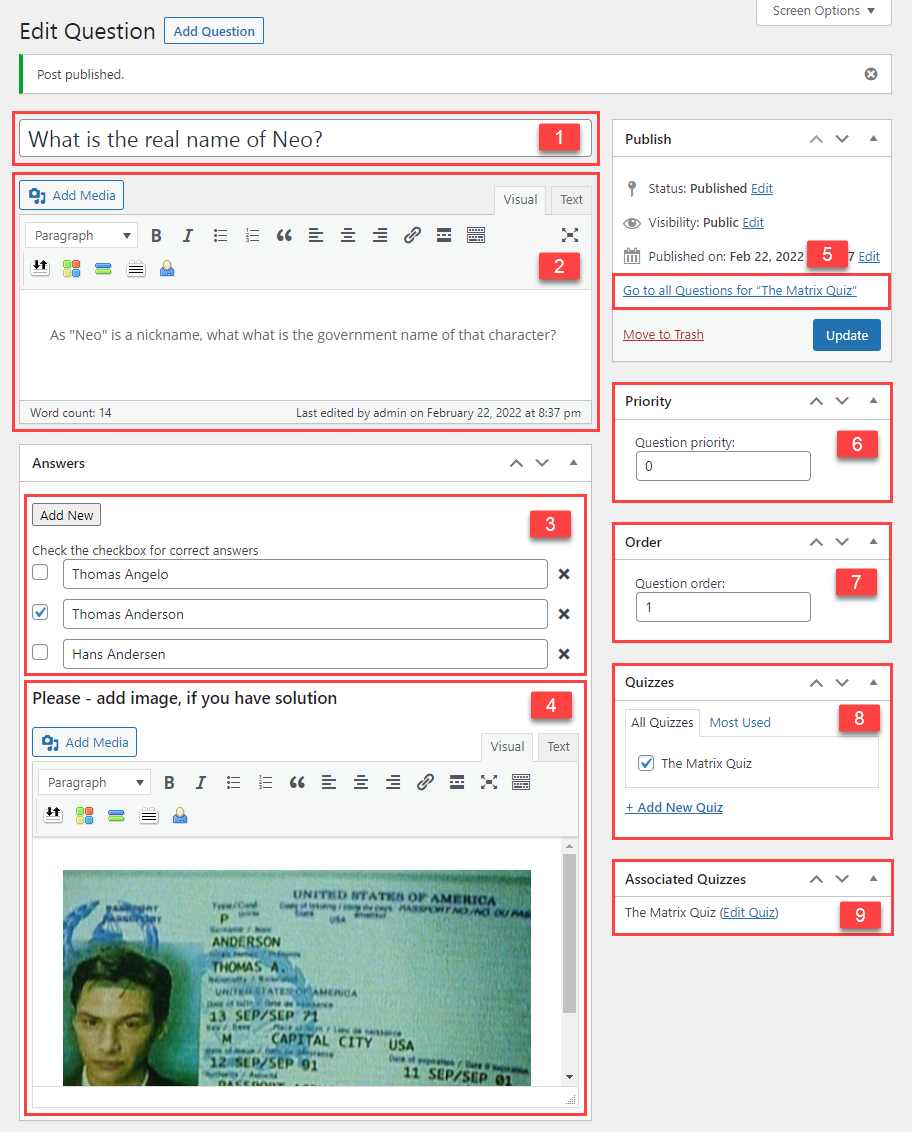
- The title represents the question.
- The description will be displayed following the question. It can contain rich formatting, such as images and links.
- Manage answers in the Answers panel. Every question needs at least one answer. Trying to Publish or Update a question that has no answer set will result in an error message. It's possible to choose many correct answers - all of them will have to be selected in order to answer the question correctly.
- You can add an Answer Explanation that can contain text and image. It will be displayed in the results table to give the user more information about the correct answer. The field also accepts HTML.
- Shortcut to the list of questions of the main quiz.
- Define the question's priority. The way how the questions will be ordered in the quiz on the front-end depends on this value.
- Define the question's order in the quiz.
- Assign this question to quizzes. It is possible to assign one question to different quizzes.
- Shortcut to edit the assigned quizzes.
Then click the button Publish to create a question (or Update, if you edit it).
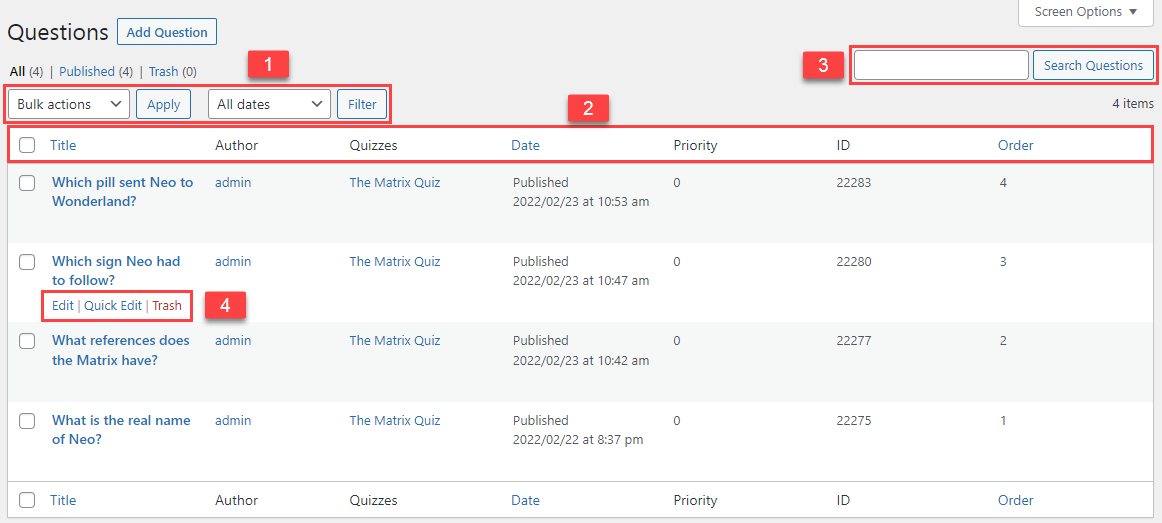
The same way we can create any number of questions. When questions are created, you can see them in the table on the Questions page. Here you can manage all you questions using following features:
- Commit bulk actions to questions (edit or delete) and filter questions by dates.
- Use information panel for ordering questions by different parameters.
- Search questions.
- Edit or delete single questions by hovering on them.
Change Questions Order
Learn more about how to change questions order in the quiz in this guide: How To Change Questions Order in the Quiz
Including Quiz to Post/Page
Now when the quiz with questions is created, we need to place it on some page. To display a quiz on a page, we use the shortcode [cm_quiz id="xxx"]
The id parameter accepts either the quiz slug or its id. That means that you should substitute the "xxx" in the shortcode with one of these two values. You can find that information in the table with created quizzes:
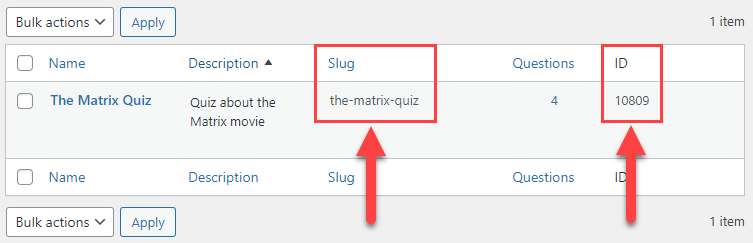
So our shortcode will look like this:
[cm_quiz id="the-matrix-quiz"] or [cm_quiz id="10809"]
TIP
The plugin has a few more shortcodes that provide additional features. Learn more about them in this guide: WordPress Quiz Plugin - Shortcodes
Let's create a page and place the shortcode there. Don't forget to click the button Publish after that.
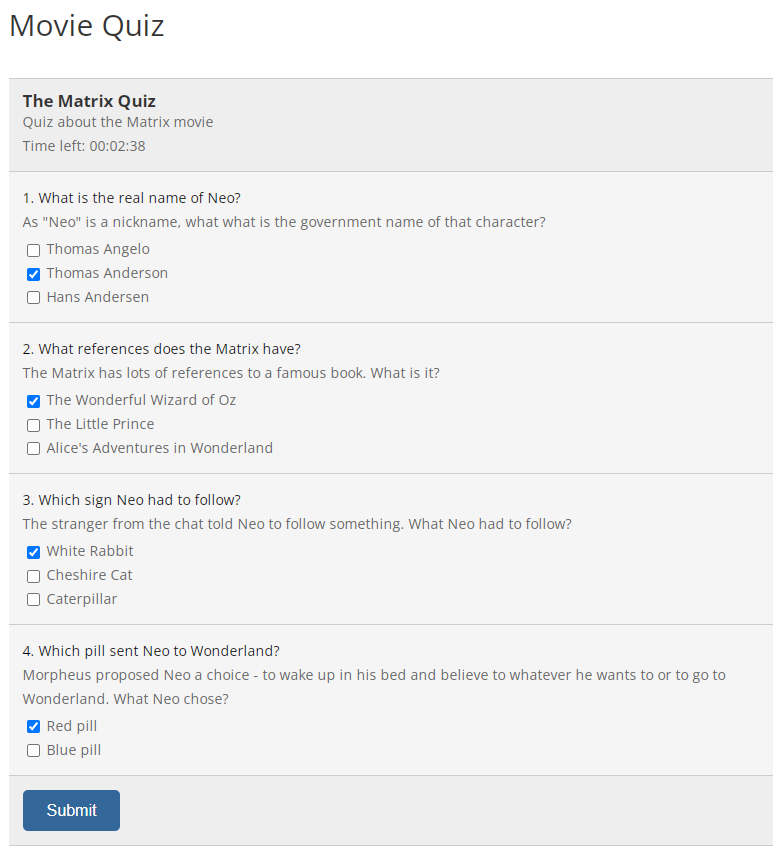
Front-end Example
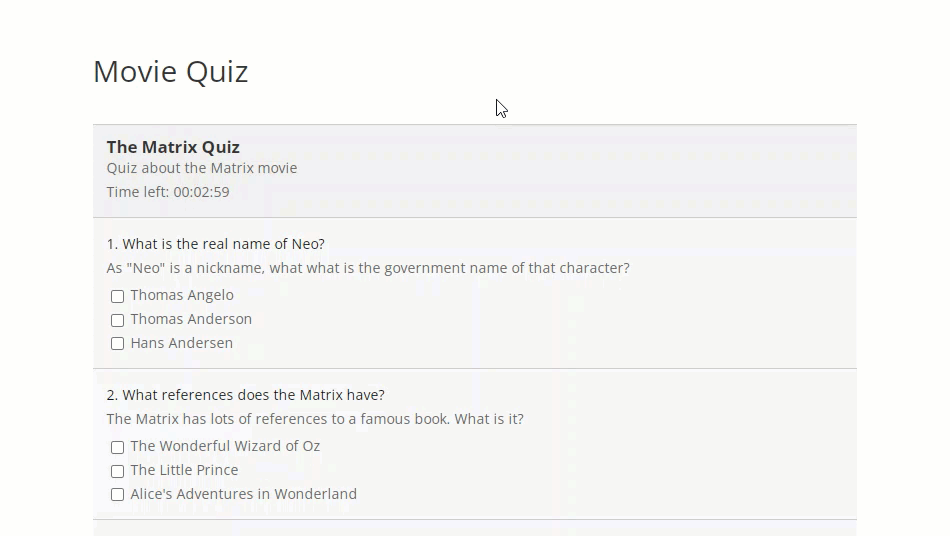
This is how it works on the front-end.
On the first step, the user needs to answer the questions and click the button Submit.
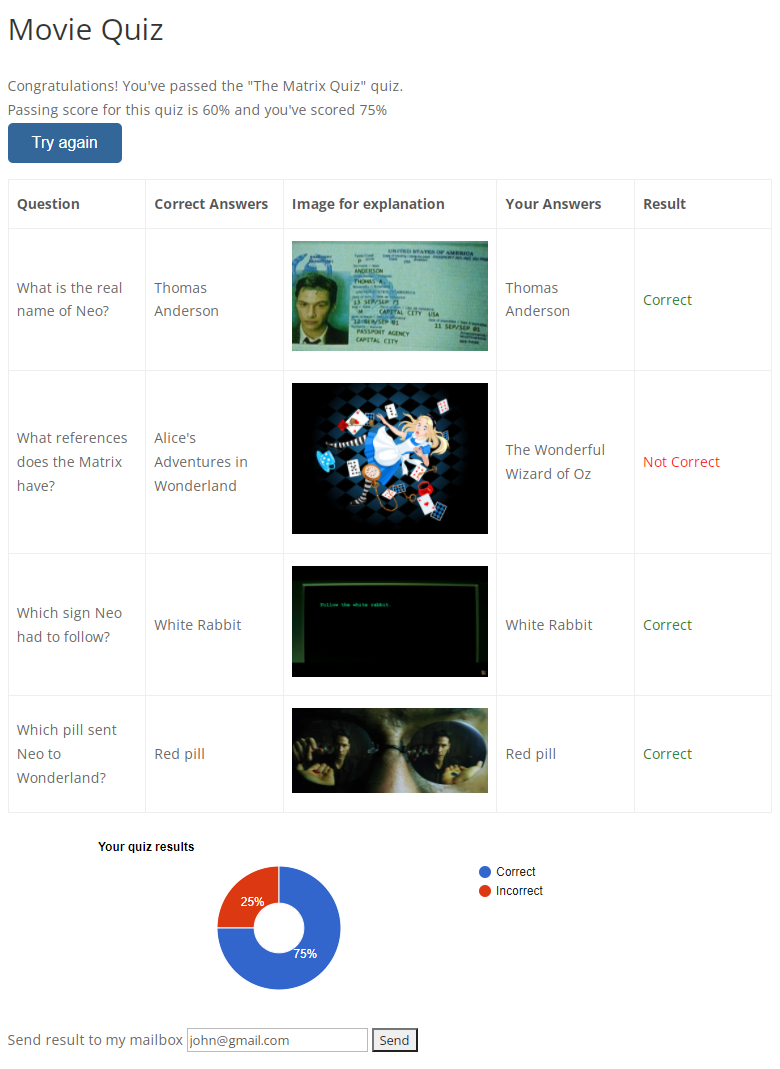
On the second step, the user can see the results, if he passed the quiz or not. There he can see a table with questions and compare his answers with the correct ones. And below it is displayed a graph of correct and incorrect answers. And at the very bottom, he the user can click the button to receive these results on his email (optionally, he can send it to another email).
Progress Report
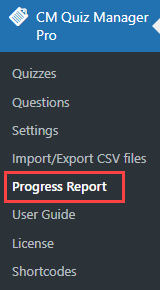
The plugin allows monitoring quiz results of your audience. To do this, navigate to Admin Dashboard → CM Quiz Manager Pro → Progress Report.
From the top bar you can:

- Group by - Group result by User or Quiz.
- Filter quiz - Choose the specific quiz that you want to see the report for.
- Filter user - Choose the specific user that you want to see the report for.
- Result - Choose the type of results that you want to see the report for - All, Passed or Failed.
To apply chosen filters, click the button Show report.
When you group results by Quiz, you can see general information about the results for certain quiz.
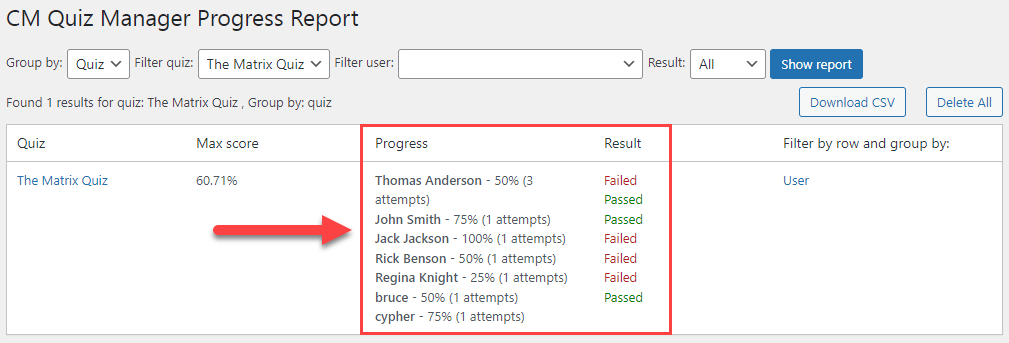
If you want to see detailed information about progress of each user, you need to group results by User.
To see detailed information, you need to click the button See Summary for needed user.
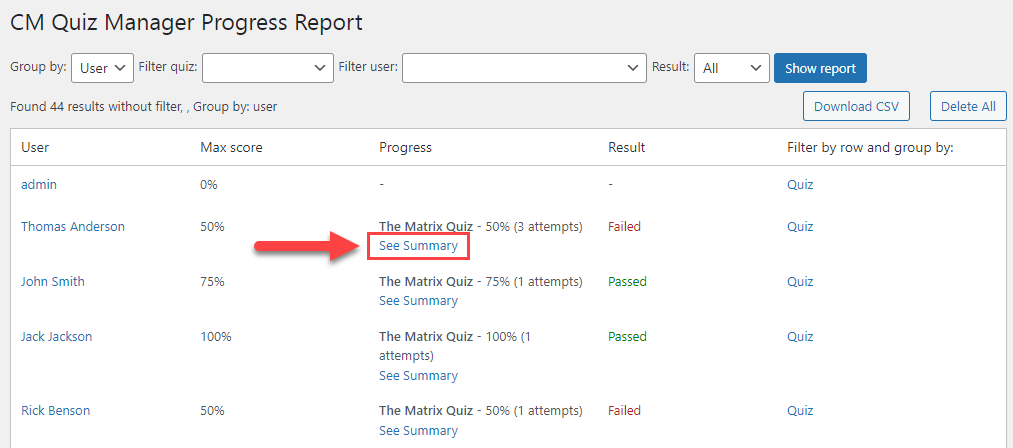
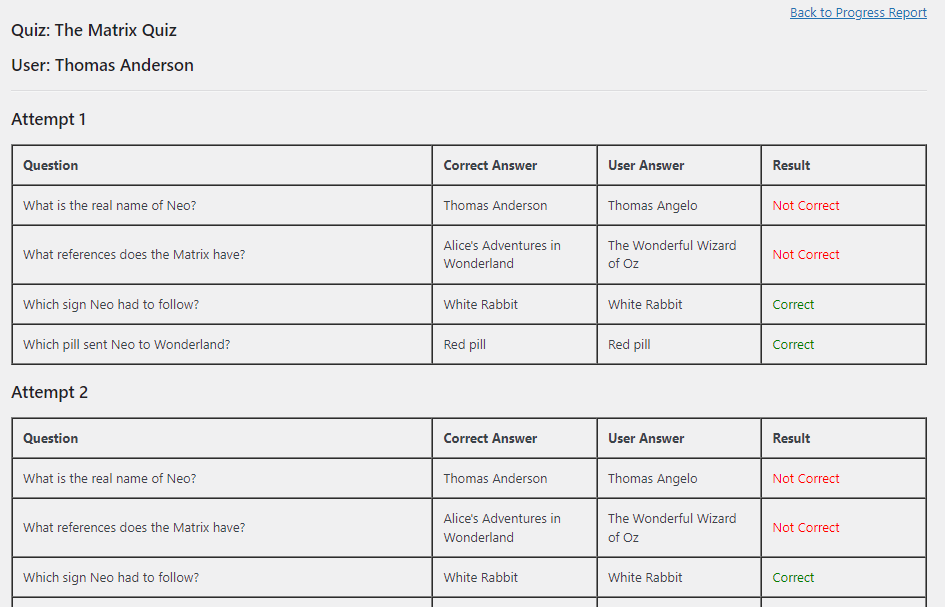
And there will be a table with all user attempts:
Export and Delete Progress Report
At the top right of the table, you can find two buttons:

- Download CSV - Click it to export progress report to a CSV-file.
- Delete All - Click it to erase the progress report.
End Result
Following instructions found in the plugin and guides you should be able to create your first quiz and display it on the page of your WordPress site.
Use Case Front-End
 |
More information about the WordPress Quiz Plugin Other WordPress products can be found at CreativeMinds WordPress Store |
 |
Let us know how we can Improve this Product Documentation Page To open a Support Ticket visit our support center |