WordPress Interactive Map Plugin (CMML) - Installation
Installation
Prefer a Complete Step-by-Step?
Check our use case guides:
- WordPress Interactive Map Plugin (CMML) + Custom Fields - Use Case - Building a Location and Store Locator Tool
- WordPress Interactive Map Plugin (CMML) - Use Case - How to Track User Location Trails and Routes On the Map
- WordPress Interactive Map Plugin (CMML) - Use Case - How to Work With Map Location API
- WordPress Interactive Map Plugin (CMML) - Use Case - How to Add Temporary Locations, Polygons and Time Based Location Layers On the Map
- WordPress Interactive Map Plugin (CMML) + PeepSo - Use Case - Letting Users Manage Their Locations in PeepSo Profile
- Before installing the WordPress Interactive Map plugin make sure you deactivated and deleted old versions of this plugin or the free one.
- To install this plugin, you must first download it.
- Download the Free Version from WordPress.org
- Download the Pro Version from the Client Dashboard
- Next, you can install it on your WordPress site. Navigate to the Plugin tab in your WordPress dashboard and click Add New.

- Select the plugin you downloaded by clicking on Upload and finding the file.

- Install the plugin.
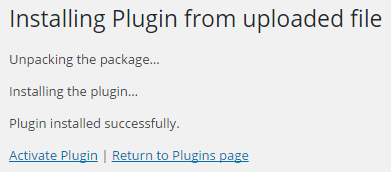
- Once the plugin is installed, it will appear under the Plugin tab on your WordPress dashboard. Here it is available for you to activate and use.
-
If you are using the Pro Version, you will need to activate the license. Under the plugin in your dashboard, there is a section called Licence. Click on this to take you the Licence page where you can enter the license key given to you by CreativeMinds.
If you don't know how to find your license key, there are instructions for finding it under Licensing Instructions. Once you have entered the key, click save and activate. If you see a green label, the license was successfully activated.
 |
More information about the WordPress Interactive Map Plugin Other WordPress products can be found at CreativeMinds WordPress Store |
 |
Let us know how we can Improve this Product Documentation Page To open a Support Ticket visit our support center |