WordPress Course Catalog Plugin - Use Case - How to Sell Tickets to Courses and Manage Them
Use Case - How to sell tickets to courses and manage them
Note: This guide covers features from:
- WordPress Course Catalog plugin - This document uses version 1.4.0 of the Enterprise Edition.
- CM Course Catalog Payments add-on - This document uses version 1.1.0 of the Enterprise Edition.
- CM Course Catalog Dashboard add-on - This document uses version 1.1.0 of the Enterprise Edition.
- Easy Digital Downloads (EDD) - This document uses version 2.11.7.
Introduction
The WordPress Course Catalog plugin allows you to create a directory of courses, each with their own page.
Using the add-on Payments in combination with the payment plugin Easy Digital Downloads allows you to charge users for registration to courses. It is possible to sell multiple tickets to the same customer for the same course.
The add-on Dashboard lets you manage all your courses and registered students.
Use Case Front-End
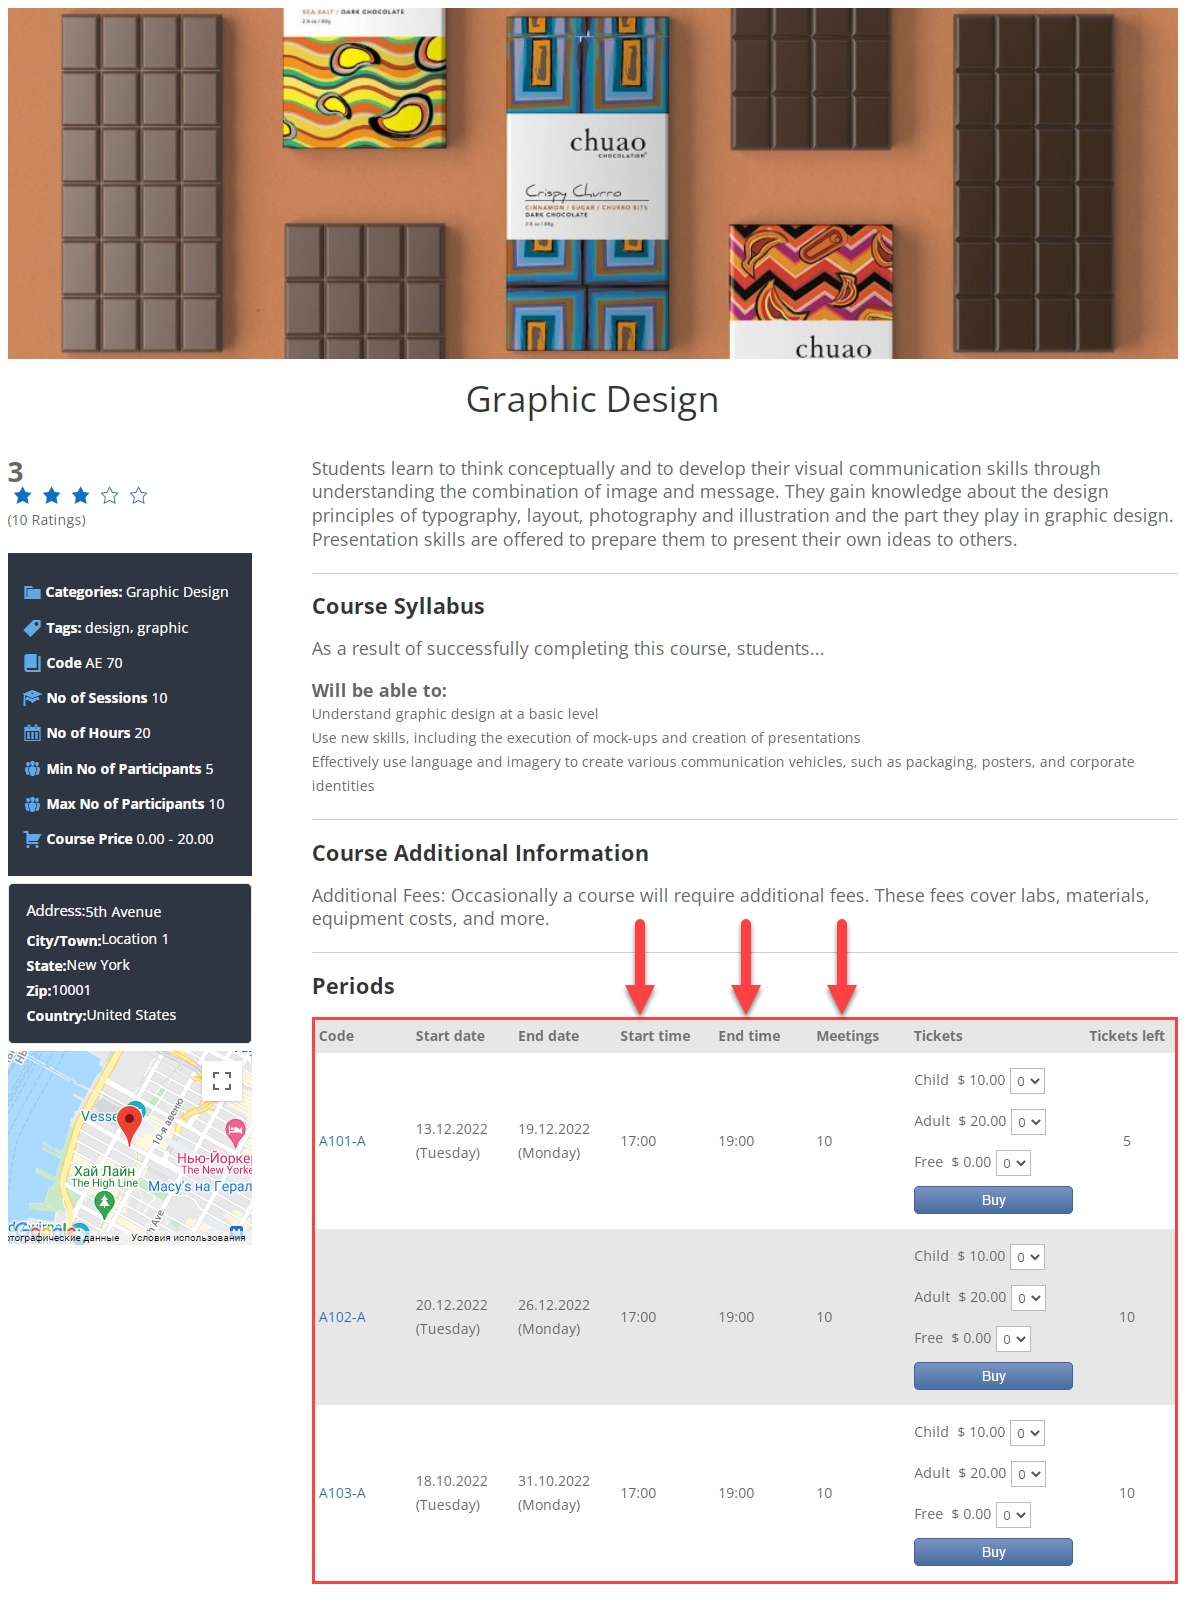
Course page with different periods and multiple types of tickets for each period:
Choosing the tickets:
Checkout page:
Purchase confirmation:
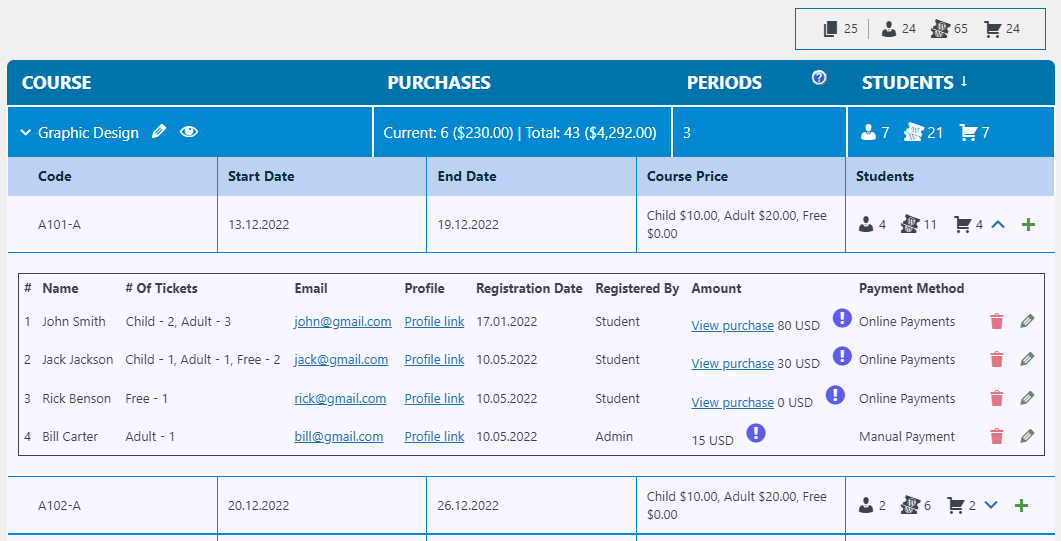
Admin dashboard with courses and registered students:
Use Case Assumptions
In this example use case guide we will consider how to sell tickets to your courses, how the registration process goes and how to manage registered students in the dashboard.
We assume that you have already bought the plugin and add-ons, but not installed them yet. This use case guide uses the Enterprise Edition of the WordPress Course Catalog plugin and its add-ons.
It follows:
- Installing the plugin
- Installing payment plugin (EDD)
- Quick recap
- How pricing works
- Payments settings
- Creating and managing tickets in courses
- EDD products
- Checkout process - user side
- Managing registered students in the dashboard
- Translating the plugin's interface
- End result
Installing the Plugin
The process is the same for all CM plugins and add-ons.

- Download the plugin from your customer dashboard.
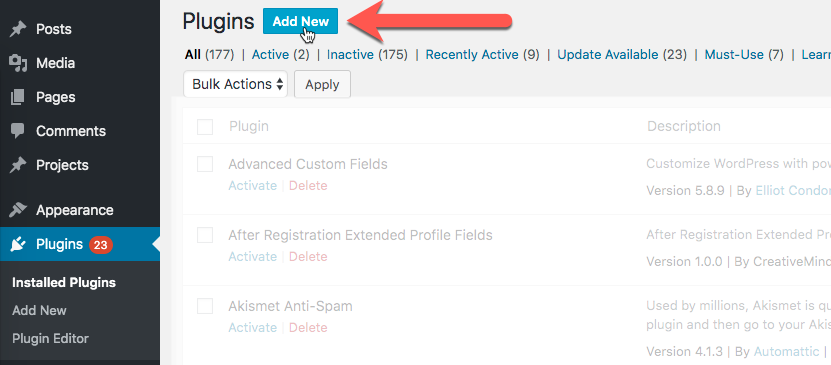
- Log in to WordPress and navigate to the WordPress Admin → Plugins settings.
- Click on Add New.
- Activate it and add the license.
Learn more: Getting Started - Plugin Overview
Installing Payment Plugin (EDD)
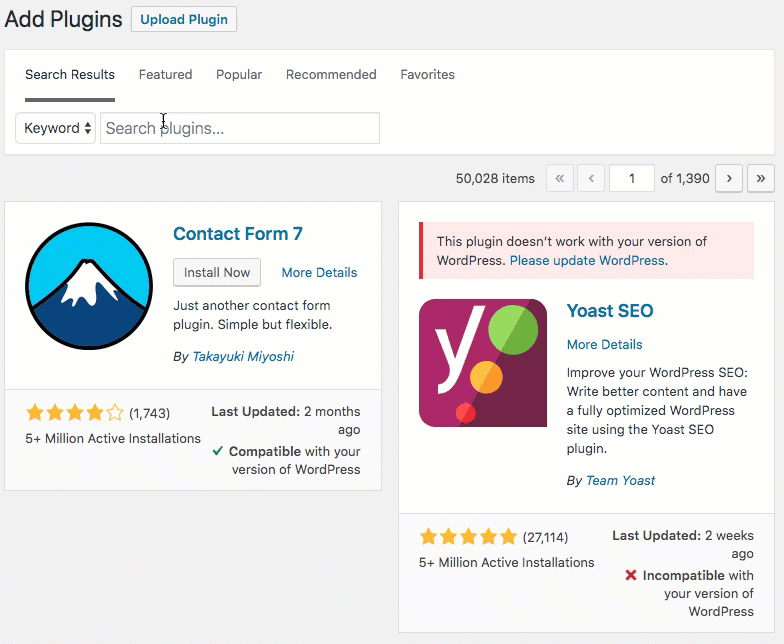
To install Easy Digital Downloads head to Admin Dashboard → Plugins → Installed Plugins and click Add New.
Search for Easy Digital Downloads and install it.
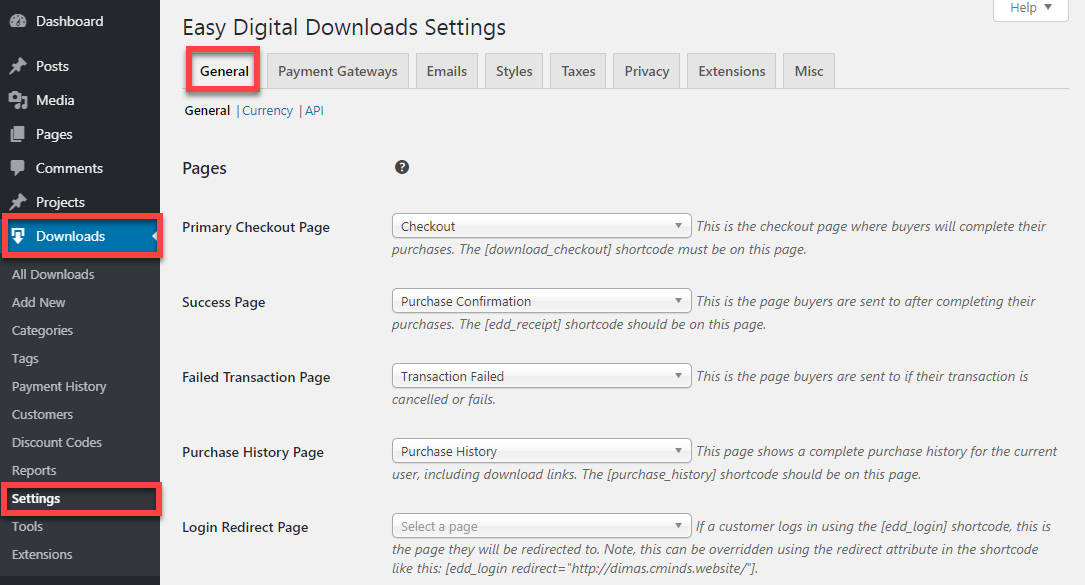
Configure Payment Plugins
Don't forget to configure the payment plugin! This way you can connect it to payment providers such as PayPal or credit card companies.
External Resource
Quick Recap
If you still have questions about how to create and organize courses on your website, then check this use case guide first:
In this use case guide we will focus only on the process of selling tickets to courses.
How Pricing Works
Once you install and activate the base WordPress Course Catalog plugin, the Course Catalog Payments add-on and the payment plugin Easy Digital Downloads, the payment functionality will be applied automatically.
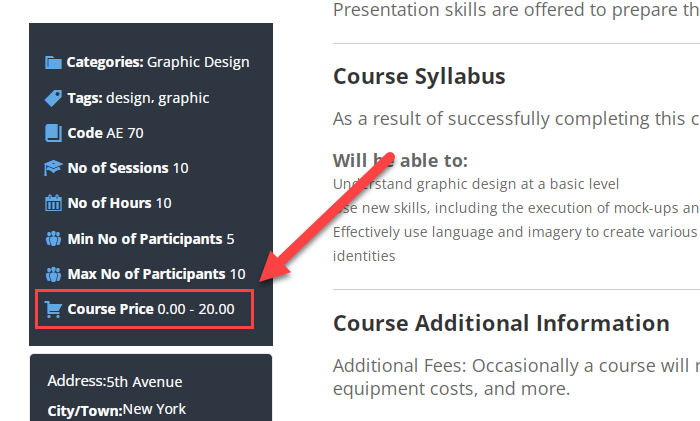
When courses are paid, users have to buy them before being registered. The price range (cheaper and most expensive period) will be shown in the course info box.
The Buy button is available for each period. Each period can have a group of prices and it is possible to set the limit for the tickets amount.
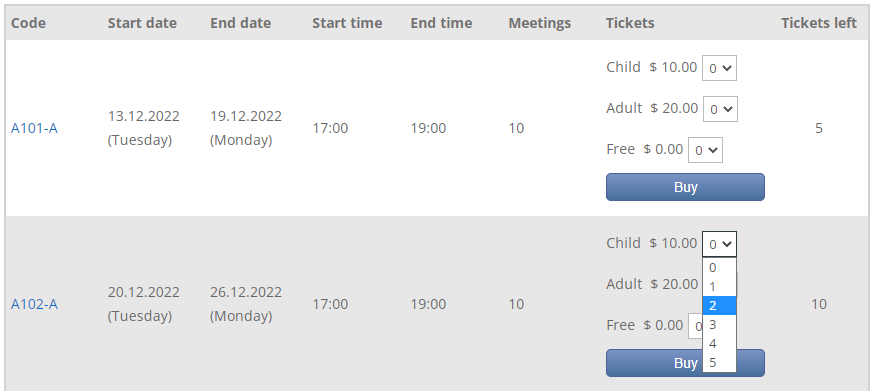
When the user chooses the amount of needed tickets of the definite price type and clicks Buy, it will direct him to the checkout page.
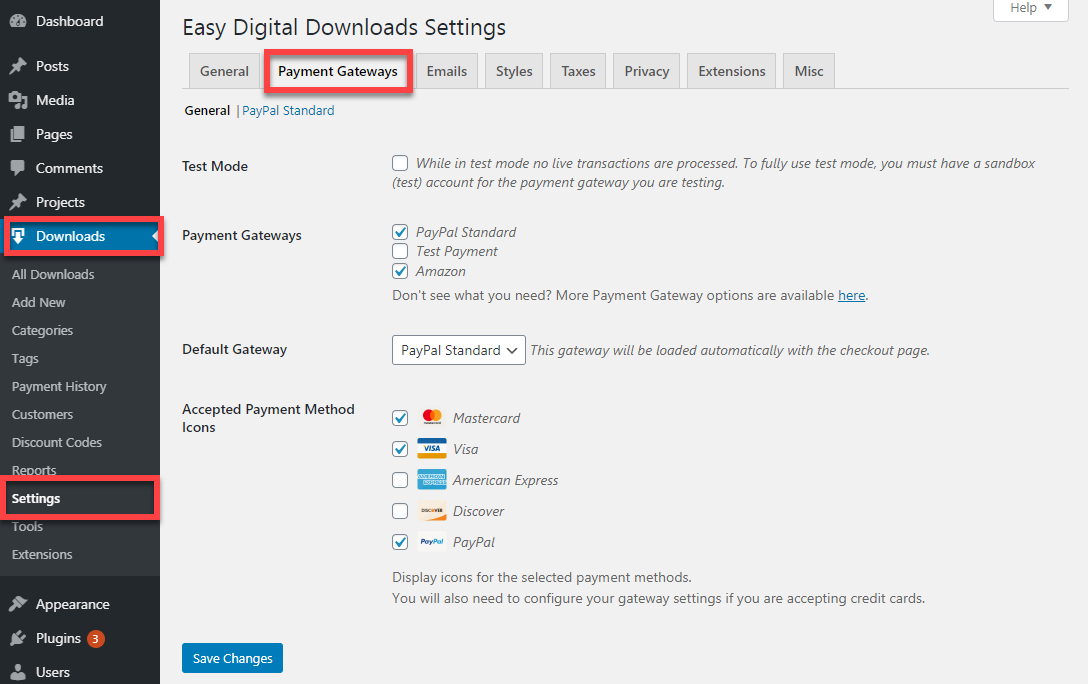
Payments Settings
First, let's configure the payment settings. Navigate to Admin Dashboard → CM Course Catalog Pro → Settings.
Head to the Payments tab.

There you can find a few sections with options.
Course period purchase
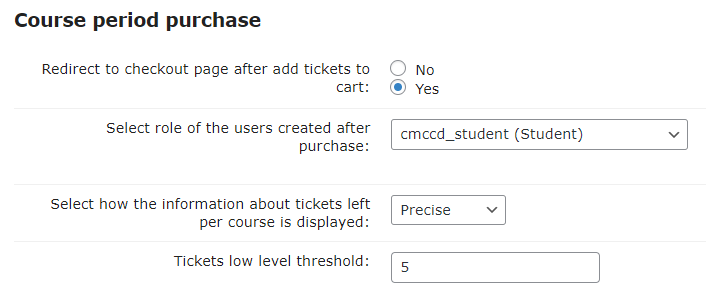
- Redirect to checkout page after add tickets to cart - If enabled, the user will be redirected to the checkout page at once after adding course tickets to the cart.
- Select role of the users created after purchase - You can select which role users registered by purchasing courses will get. By default it uses general WordPress settings. For convenience, the plugin adds a new user role "Student".
- Select how the information about tickets left per course is displayed - You can select how the information about tickets left per course is displayed. Choose between:
- Don't show - Never display the amount of left tickets.
- Precise - Always display the precise amount of left tickets. Let's choose this option for our use case.
- Low only - When the amount of left tickets is equal or less than defined value, there will be a message on the front-end which says that there are low amount of tickets left. The amount of tickets can be set in the option Tickets low level threshold.
- Tickets low level threshold - Select the threshold below which the message about the low level of tickets available will be displayed. Leave empty to disable.
Student courses

- Courses quantity limit for students - Set the number of courses a student can be registered for. If you set, for example, a value "10", then one student can buy and register for 10 courses only.
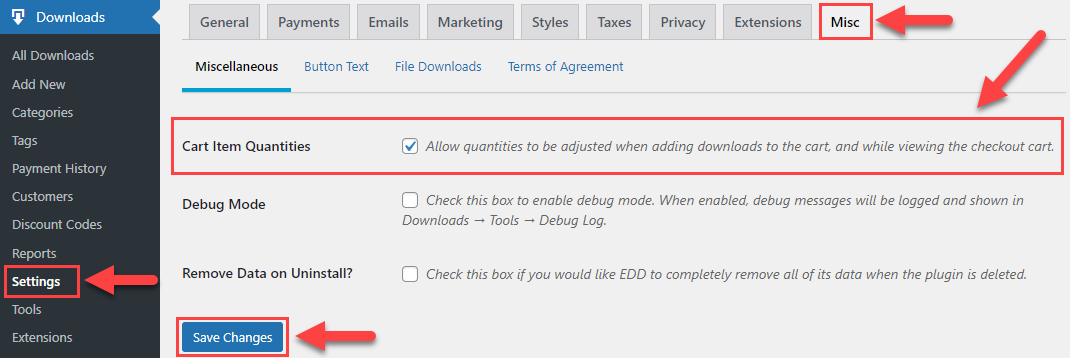
Course tickets quantity

- Courses ticket quantity - To allow users adding multiple amount of tickets to the cart, you need to enable the relevant option in EDD settings - Cart Item Quantities. This setting shows if the EDD option is enabled or not and contains a straight link to the needed option in EDD settings.
TIP: EDD Settings
This option can also be found manually by navigating to Admin Dashboard → Downloads → Settings → Misc tab. Enable the option Cart Item Quantities, then click Save Changes.
- Max tickets per transaction - Define the maximum amount of tickets that can be bought for one period in one go.
Permissions
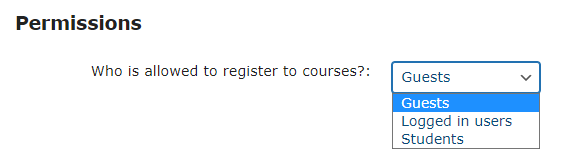
- Who is allowed to register to courses - Allows the admin to limit access to particular user groups. These groups are:
- Guests
- Logged in users
- Students
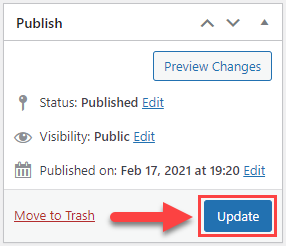
After changing the settings, click the button Update below the settings.

Creating and Managing Tickets In Courses
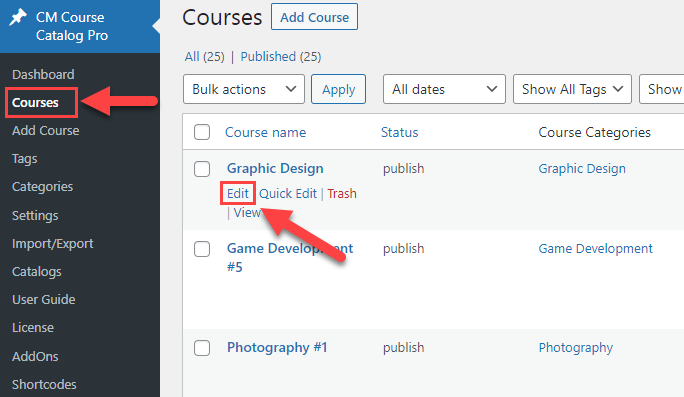
Now it's time to set the tickets and prices for a course. To do this, navigate to Admin Dashboard → CM Course Catalog Pro → Courses, hover on the needed course and click Edit.
Reminder
Learn more about the whole process of creating a course: WordPress Course Catalog Plugin - Use Case - How to Build a University Catalog
To edit prices, scroll down to the section Course Periods.
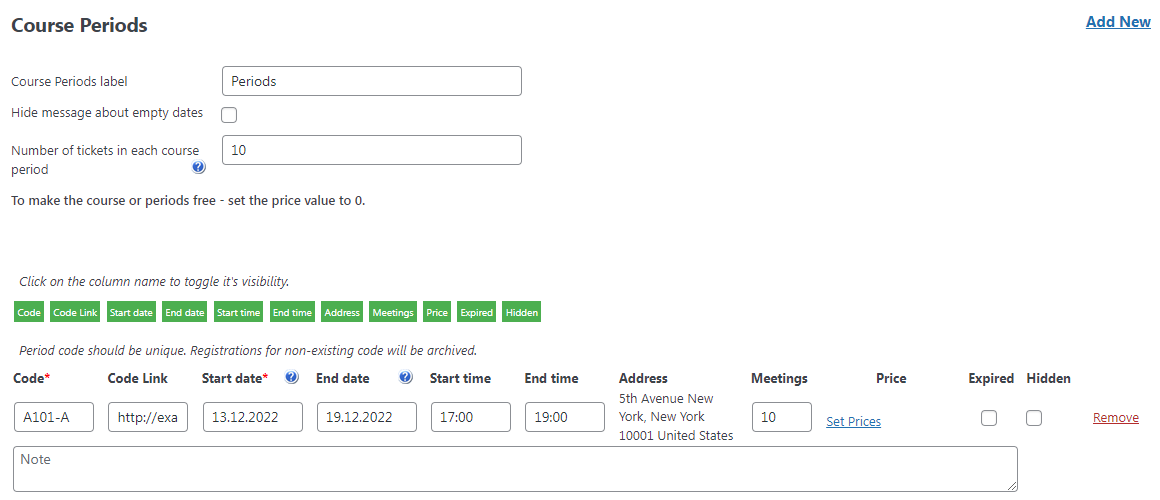
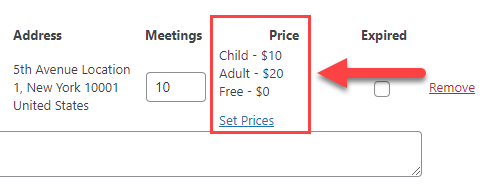
The prices are set in the column Price. Click the button Set Prices.

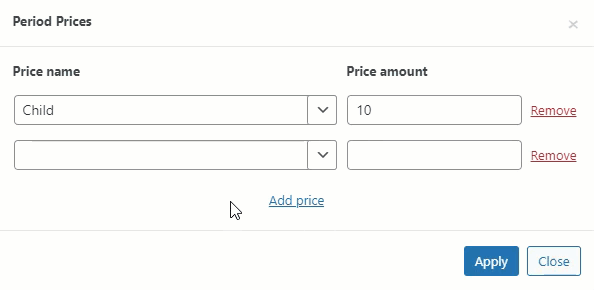
There you can add a few prices. To create a price, click the button Add price. There you need to fill two fields: Price name and Price amount.
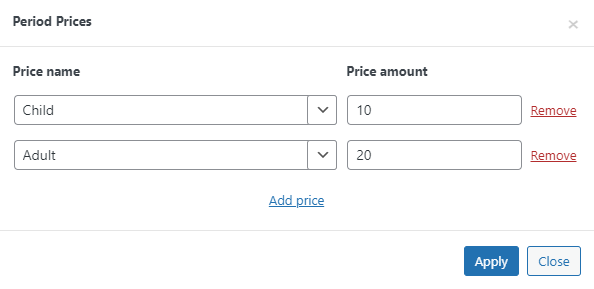
Any price can be deleted by clicking the button Remove.
TIP 1: Price Name
If you have lots of similar names of prices, it is not necessary to write them from scratch every time. You can just choose already created name in the dropdown list.
TIP 2: Free Course
If you want to make some course free, then just set the price to "0".
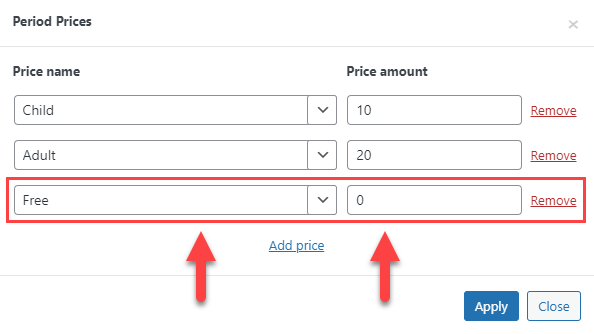
When you've added the prices, click the button Apply. You can see there the price list for each period.
In the same way you can configure the prices for each period. So, let's create a couple of more periods and prices for them.
Amount of Tickets
You can also define the amount of tickets that can be sold for the period. It can be done in the field Number of tickets in each course period.
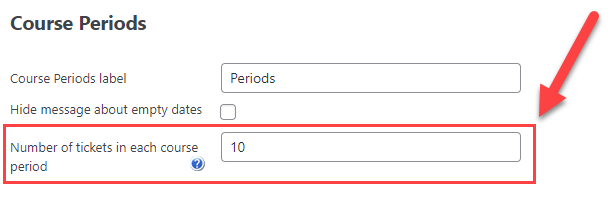
To make the amount of tickets in periods of the course unlimited, set the value to "0".
After configuring the prices and amount of available tickets, don't forget to save the changes by clicking the button Update.
EDD Products
Every course is associated with an EDD product. Setting variable pricing to an EDD product allows you to offer unique prices for different periods of a course.
The product with the group of prices is created automatically for each course after you set and saved the prices:
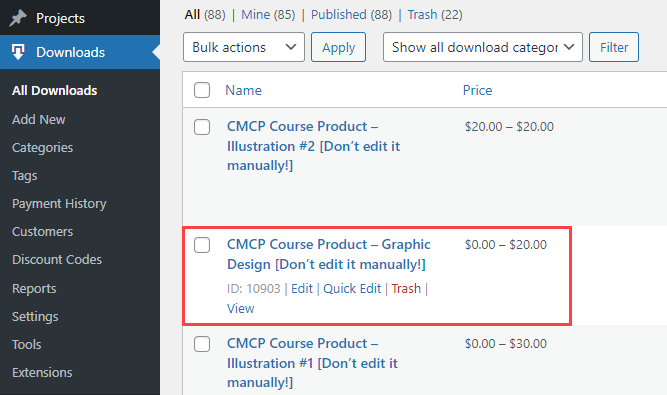
Important
The prices must be edited only on the course editing page.
Checkout Process - User Side
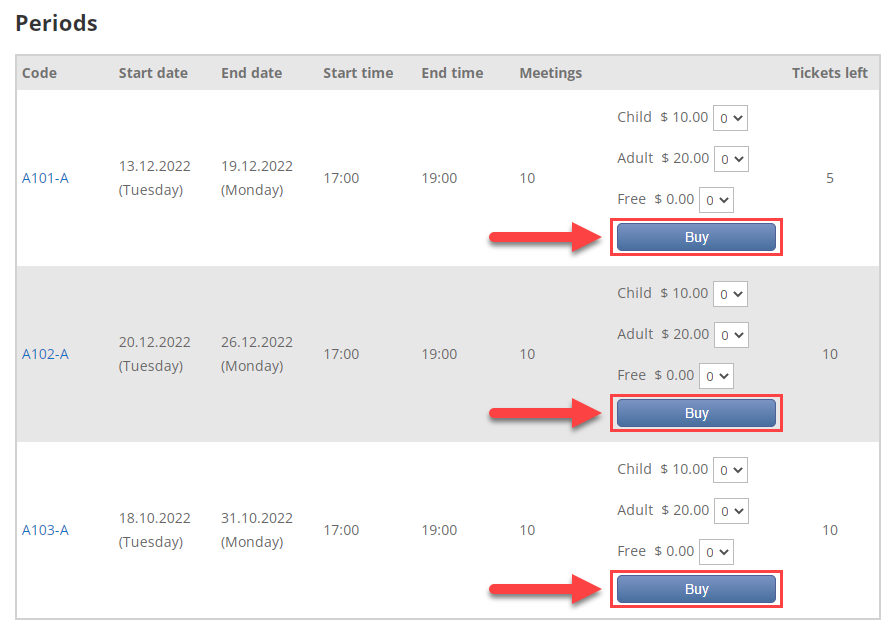
Allowed users can buy courses in the section Periods.
Users can choose between different types of prices and choose the amount of tickets. The amount of available tickets is displayed in the column Tickets left. When the choice is made, the user clicks the button Buy.
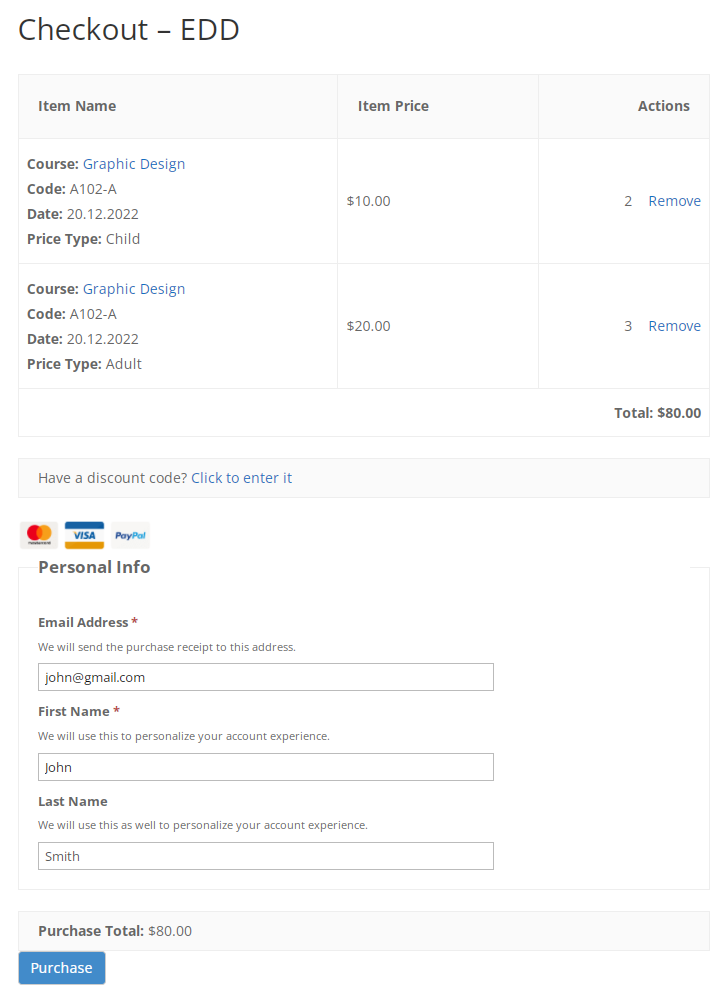
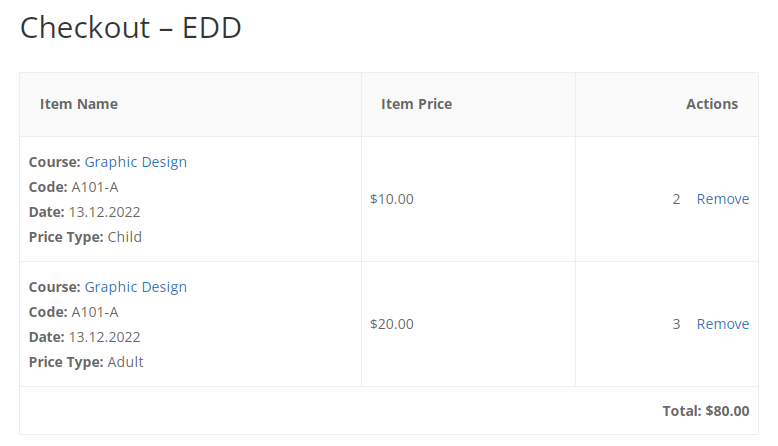
After this the user will be redirected to the checkout page that is based on the Easy Digital Downloads Cart system.
Checkout
The checkout page shows the basic and necessary information for clients: the course information (name, code, dates, chosen price type), the course price, the amount of booked tickets.
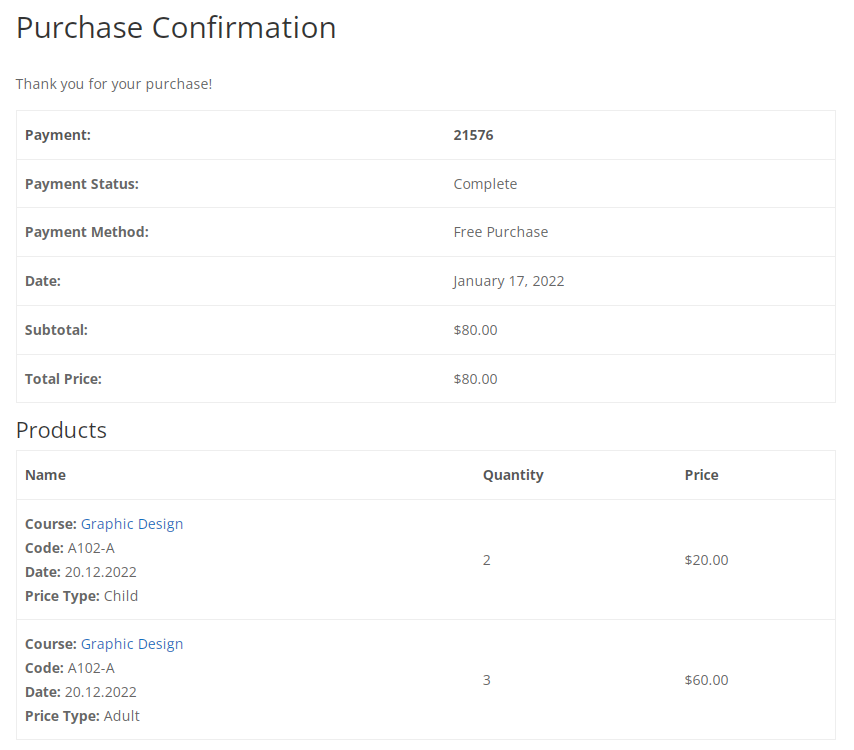
Purchase Confirmation
After the user enters all the information, and clicks the Purchase button, the purchase information will be available for the student.
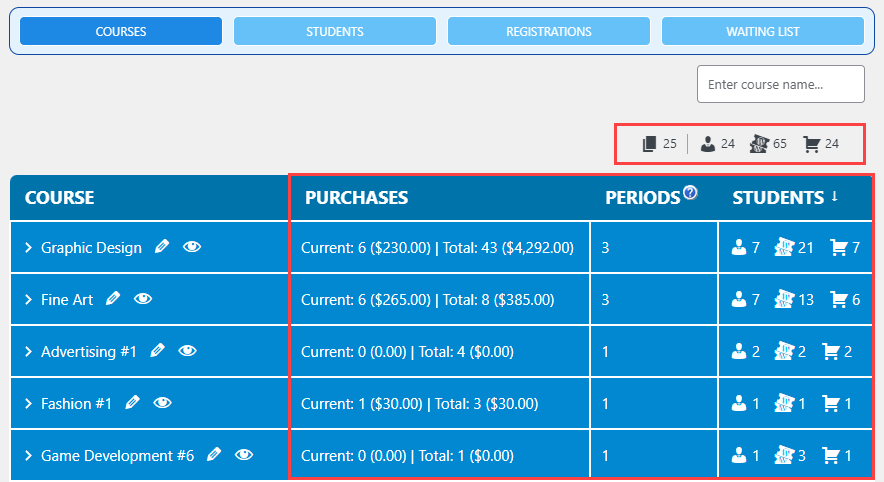
Managing Registered Students In the Dashboard
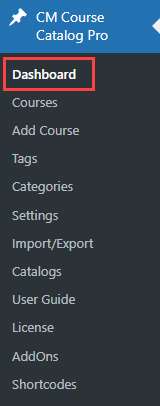
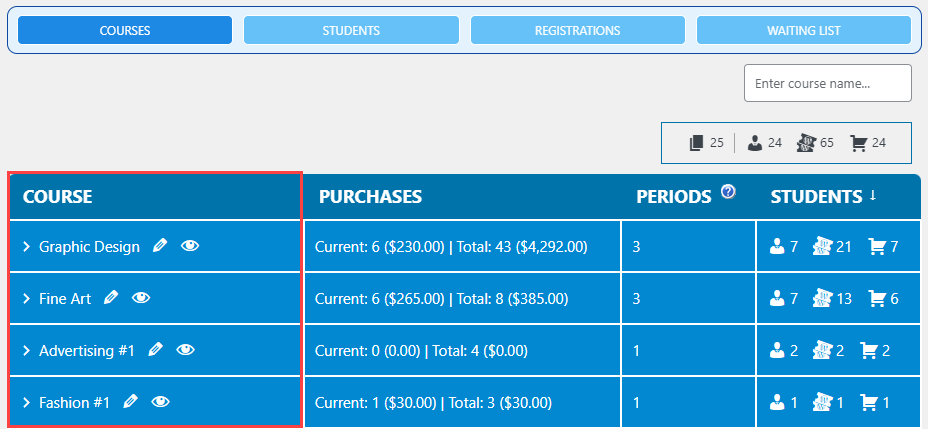
The list with all the existing courses is available by this path: Admin Dashboard → CM Course Catalog Pro → Dashboard.
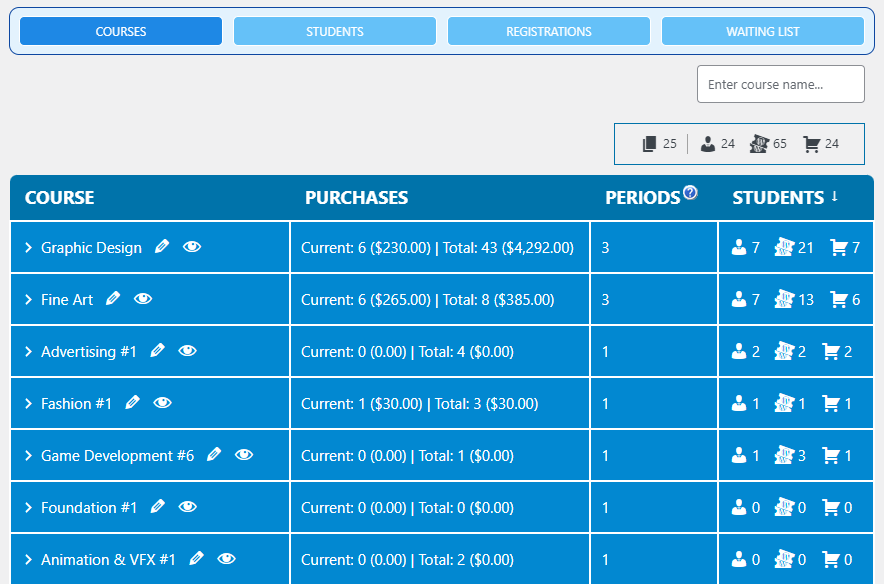
Head to the tab COURSES. The admin can view the courses on the grid, edit or open them in a separate page on the front-end.
Filters
The add-on allows applying the search filter by entering the course title into the field Enter course name. Just start typing and the relevant results will be displayed.
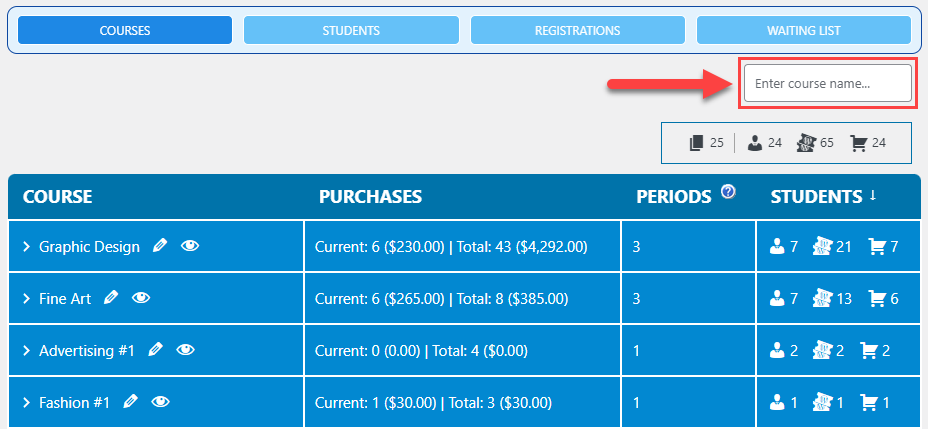
Numbers of Courses/Participants
You can find the total number of courses, participants, sold tickets and purchases above the grid. There is also the statistics for each course: the sum of currently sold tickets, total sum of purchases, amount of periods per course, the number of participants, sold tickets and purchases.
Edit/View Courses
The Course Dashboard provides you the grid where you can open the course for editing or view it on the front-end.
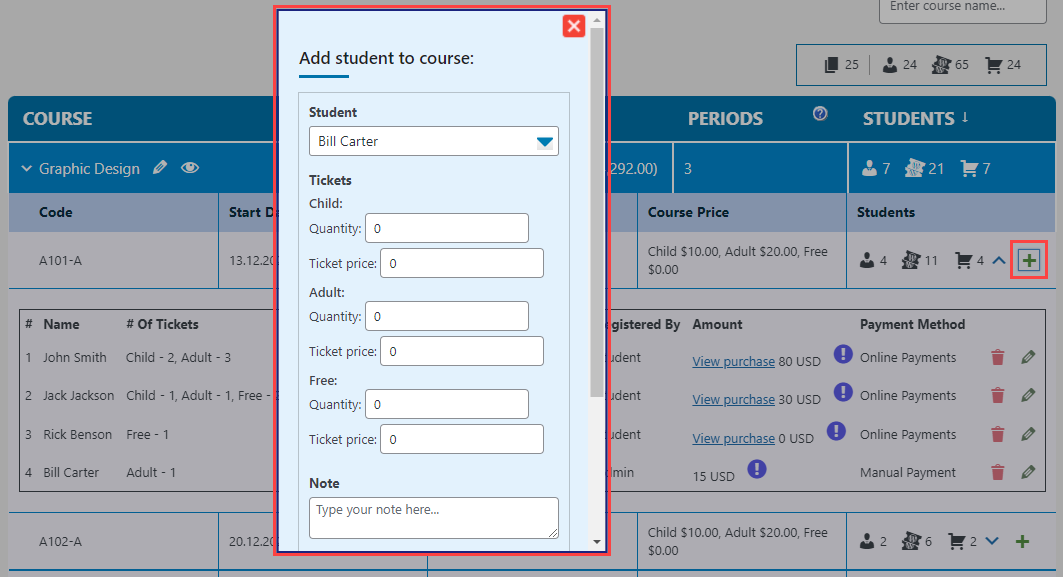
Add students to courses
To open the course for editing on the Dashboard, please click on the course and the additional fields will appear. Here you can view all the students contact information, their payments and way of registration and amount of purchases tickets separated by types.
You can also add existing users on your website to the course. Click on the "+"-icon and the popup will appear. After filling in the fields, click ADD and the participant will be registered to the course.
TIP
Learn more about possibilities of the Dashboard in our documentation: Course Catalog - Dashboard (LMS)
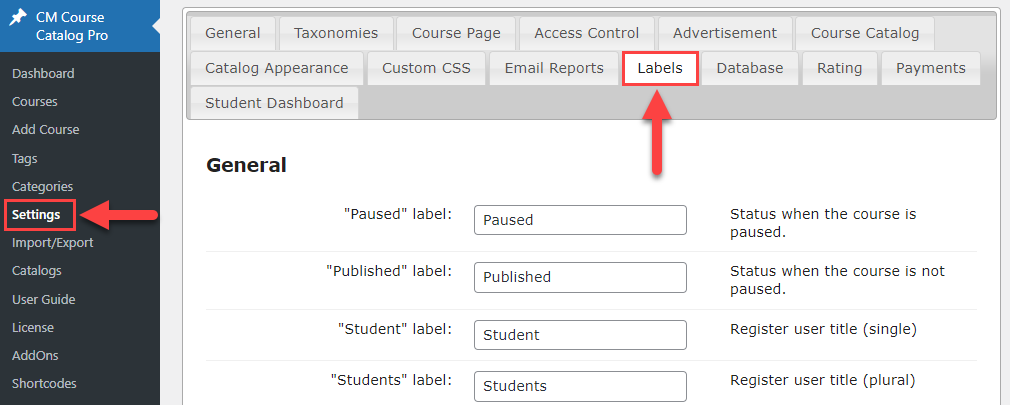
Translating the Plugin's Interface
The WordPress Course Catalog plugin and add-ons have lots of labels which can be customized. To find them, navigate to Admin Dashboard → CM Course Catalog Pro → Settings → Labels tab.
You can learn more about labels for the base plugin and add-ons in the following guides:
- WordPress Course Catalog Plugin - Settings - Labels (Translating the Plugin)
- Course Catalog Payments - Settings - Labels (Translating the Addon)
- Course Catalog Dashboard - Settings - Labels (Translating the Addon)
End Result
Following instructions found in the plugin and guides, you should be able to sell tickets to your courses and manage registered students in the dashboard.
Use Case Front-End
Course page with different periods and multiple types of tickets for each period:
Choosing the tickets:
Checkout page:
Purchase confirmation:
Admin dashboard with courses and registered students:
 |
More information about the WordPress Course Catalog Plugin Other WordPress products can be found at CreativeMinds WordPress Store |
 |
Let us know how we can Improve this Product Documentation Page To open a Support Ticket visit our support center |