WordPress Registration Form Plugin (CMREG) - Shortcodes - Displaying Login Button, Registration Form, Changing Password, and More
Using Shortcodes
How Shortcodes Work
Shortcodes are simple codes contained within square brackets such as [example-shortcode] .
Some have parameters, which can be written before closing the bracket, as in [example-shortcode parameter="value"]
To learn about them, go to the WordPress dashboard and navigate to CM Registration Pro → Shortcodes. This page shows every shortcode supported by WordPress Registration Form Plugin, with explanations and examples.
Table of Contents
- Login
- Registration
- Password and Utilities
- Invitation Codes
- Delete Account
- User Dashboard
1) Login Shortcodes
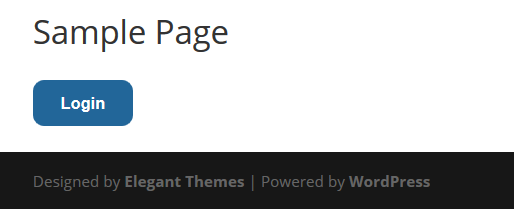
Login Button
[cmreg-login]
Add this shortcode to display a login button on pages or posts.
Optionally, you can:
-
Customize the button's text - add it inside the shortcode, as shown:
[cmreg-login]Enter the custom text here[/cmreg-login] -
Add a redirect page - use the "redirect-to" parameter (feature added in version 2.7.5). The following example will direct the users to www.yoursite.com/dashboard:
[cmreg-login redirect-to="/dashboard"] -
Show a simple button after user logs in - instead of the logout button. Use the "after-login" parameter with the value 1, as shown:
[cmreg-login after-login=1] - Customize the after login button - use the "after-text" parameter and specify the label. Can only be used with after-login=1:
[cmreg-login after-login=1 after-text="Insert Text Here"]
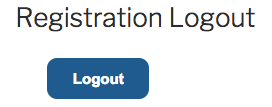
Logout Button
[cmreg-logout-btn]
Add this shortcode to display a logout button on pages or posts.
Optionally, you can
-
Customize the button's text - add it inside the shortcode, as shown:
[cmreg-logout-btn]Text[/cmreg-logout-btn]
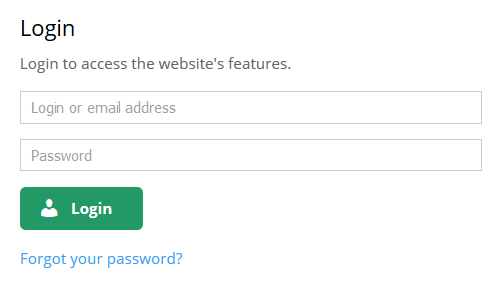
Login Form
[cmreg-login-form]
Displays login form.
Optionally, you can:
-
Add a link to the registration page - By using the "registration_url" attribute. For example, this shortcode will display a link to the registration page. In this case, www.yoursite.com/registration:
[cmreg-login-form registration-url="/registration"] -
Define the text for the registration page link - By using the "registration_link" attribute, as shown:
[cmreg-login-form registration-link="Click here to register"] -
Show different info to logged in users - Pass text or HTML that will be displayed for the logged-in users instead of the login form by putting it between the shortcode tags:
[cmreg-login-form]You are already logged-in[/cmreg-login-form] -
Show social login buttons - Use the parameter "social_login" with 1 to show or 0 to hide. Examples:
[cmreg-login-form social_login=1] [cmreg-login-form social_login=0] -
Redirect users after login - Use the parameter "redirect-to" to send logged in users to a certain page. (Feature added in version 2.7.5)
This example will send them to www.yoursite.com/welcome:
[cmreg-login-form redirect-to="/welcome"]
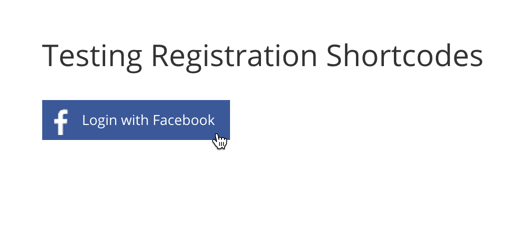
Social Login
[cmreg-social-login]
Displays the button that site visitors can use to login using Facebook.
2) Registration Shortcodes
Registration Form
[cmreg-registration-form]
Displays registration form.
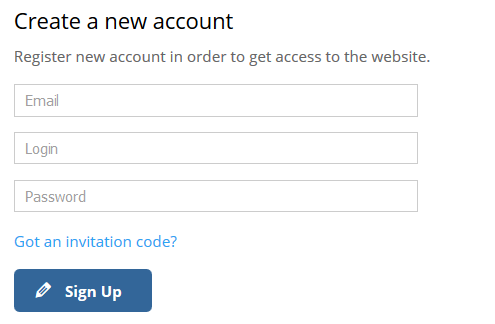
Optionally, you can:
-
Add a link to the login page - By using the "login_url" attribute. For example, this shortcode will display a link to the login page. In this case, www.yoursite.com/login:
[cmreg-registration-form login-url="/login"] -
Define the text to the login page link - By using the "login_link" attribute, as shown:
[cmreg-registration-form login-link="Click here to login"] -
Choose a role that the new users will receive - By using the "role" attribute. For example, this shortcode will register users as editors:
[cmreg-registration-form role="Editor"] -
Show social login buttons - Use the parameter "social_login" with 1 to show or 0 to hide. Examples:
[cmreg-registration-form social_login=1] or [cmreg-registration-form social_login=0] -
Redirect users after register - Use the parameter "redirect-to" to send logged in users to a certain page. (Feature added in version 2.7.5)
This example will send them to www.yoursite.com/welcome:
[cmreg-registration-form redirect-to="/welcome"] -
Define the text if user already logged in - This text will show if user already logged in. In this case text will show instead of form. Examples:
[cmreg-registration-form]You are logged in already.[/cmreg-registration-form]
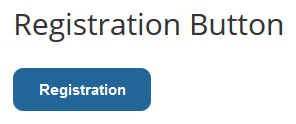
Registration Button
[cmreg-registration-button]
Displays the registration button and the registration form is being opened in the overlay after clicking the button.
-
Customize the button's text - add it inside the shortcode, as shown:
[cmreg-registration-btn]Click here[/cmreg-registration-btn]
Login and registration buttons
Attributes
Note on using URL attributes
Use a # before the first parameter, ? before the second and & before the subsequent ones. This ensures the URL will be proper.
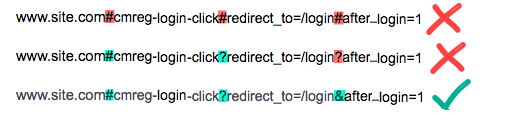
Learn more: Query string - Wikipedia
You can add the login action on any link using the following URLs (href attributes).
#cmreg-login-click- will produce both login and registration form in the overlay.#cmreg-only-login-click- will produce only the login form in the overlay.#cmreg-only-registration-click- will produce only the registration form in the overlay.#cmreg_popup_open=1- will automatically trigger the pop-up box. Requires that the destination link has the[cmreg-login]shortcode.?redirect_to=/dashboard- add a URL to redirect to this address.&after_login=1- shows a simple button after the user logs in, instead of the logout button.&after_text=AnyText- Customize the text of the after login button.
Examples
-
Link to login
<a href="#cmreg-login-click">Add label here</a>
-
Link to login and redirect to the dashboard page
<a href="#cmreg-login-click?redirect_to=/dashboard">Add label here</a>
-
Link to login, and after login change the link label and redirect to the dashboard page
<a href="#cmreg-login-click?redirect_to=/dashboard&after_login=1&after_text=AnyText">Add label here</a>
How to Customize Links
The following example shows how to add the separate Login button and the Registration button to your Wordpress menu (Admin Dashboard → Appearance → Menus):
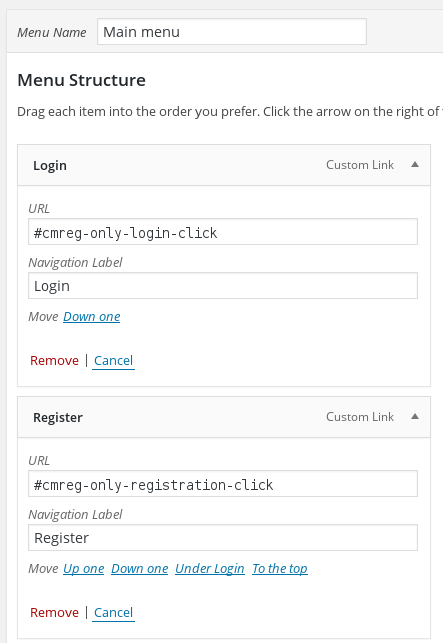
You can add also the button which will show the login and registration forms at once:
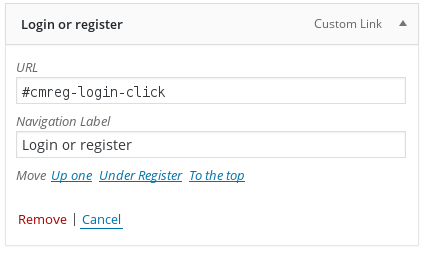
This will produce the new menu links on the front-end:

Notice: the login buttons will be replaced by the Logout buttons when the user is logged-in.
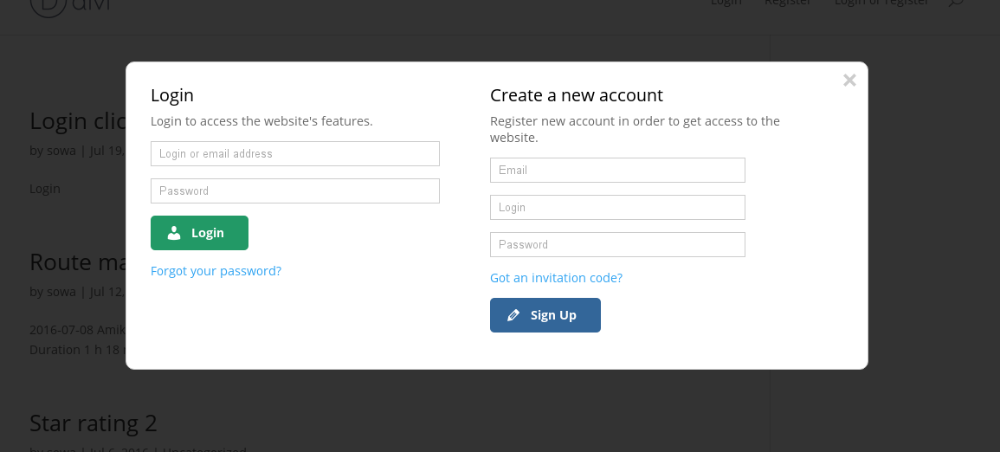
Clicking on each link will show the login or/and registration forms up floating over the website content:
3) Password and Utilities Shortcodes
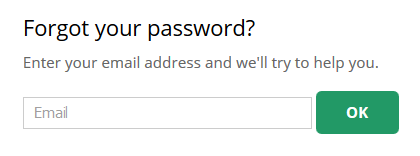
Lost Password
[cmreg-lost-password]
Displays lost password form.
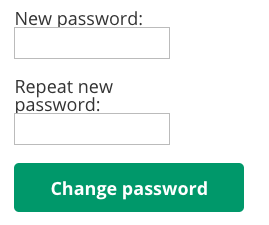
Change Password
[cmreg-change-password]
Displays fields to reset the password.
Parameters
- showheader - whether to show or not the header with the text "Change Password" (0 for no, 1 for yes). The default is 0.
Optionally, you can:
-
Show the header with the "Change Password" text - By using the "showheader" attribute with 1 to show and 0 to hide. Examples:
[cmreg-change-password showheader=1] [cmreg-change-password showheader=0]
Reset Password (For The Lost Password Page)
[cmreg-reset-password]
Displays one field to reset the password.

Edit Profile Form
[cmreg-edit-profile]
Displays the form that registered users can use to update their profile information.

Learn more: Shortcodes - Editing User Profile
Show Last Login Date of Specific User
[cmreg_login_date id="user_id"]
Displays the last login date of a specific user.
This shortcode requires the option "Log user last login date" to be enabled. You can find it under CM Registration Pro → Settings → Login. Learn more: Settings - Login Settings
4) Invitation Codes Shortcodes
Let User Create Invitation Code
[cmreg-create-invitation-code]
Displays the form that a user can utilize to invite his friends or just create the invitation codes.
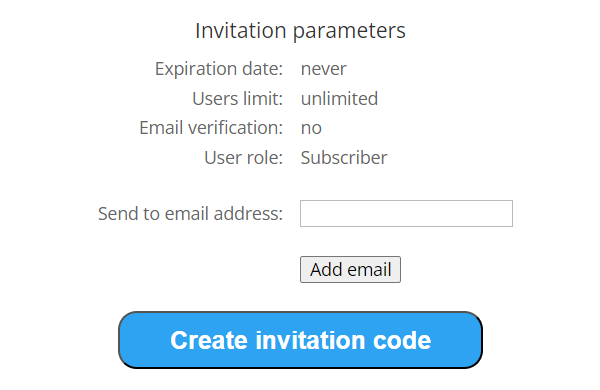
Parameters:
- expiration - set the invitation code's expiration date in format YYYY-MM-DD HH:MM:SS or give the time period as 30 days. You can use the following English words: minutes, hours, days, weeks, months or years.
- userslimit - number of users that can use the invitation code.
- verifyemail - one of: global, 1, 0. Whether to require a user registered with this code to verify his email address.
- emailinput - 0 or 1 - whether to show the email address input field to send the invitation code to or not. Note: since the version 3.4.6 it is possible to add multiple emails in the form for creating invitation codes.
- role - set a Wordpress role that a user registered with this invitation code will be assigned to. If empty then use the role from the plugin settings.
- showparams - 0 or 1. Show the parameters that the invitation code will have.
- showlink - 0 or 1. Shows a link that can be followed to claim the code.
Example
[cmreg-create-invitation-code expiration="2 weeks" role="Editor" userslimit="3" emailinput="1" showparams="1" showlink="1" verifyemail="1"]

Send Referral Invitation Codes and Links
Since the version 3.4.6, logged-in users can invite people to register with the referral code/link. It can be done via a form created by the following shortcode:
[cmreg-send-invitation-code]
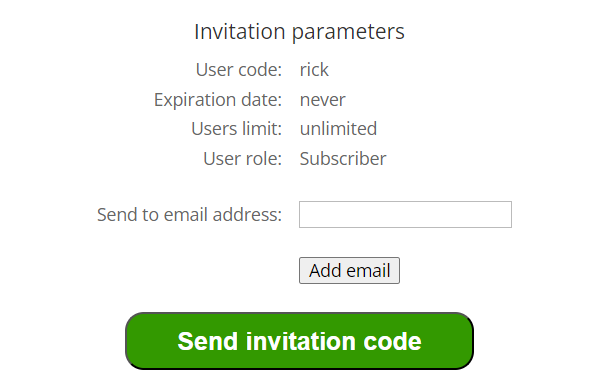
The referal invitation code/link is based on the username of the sender. The user can specify multiple emails for sending the invitations.
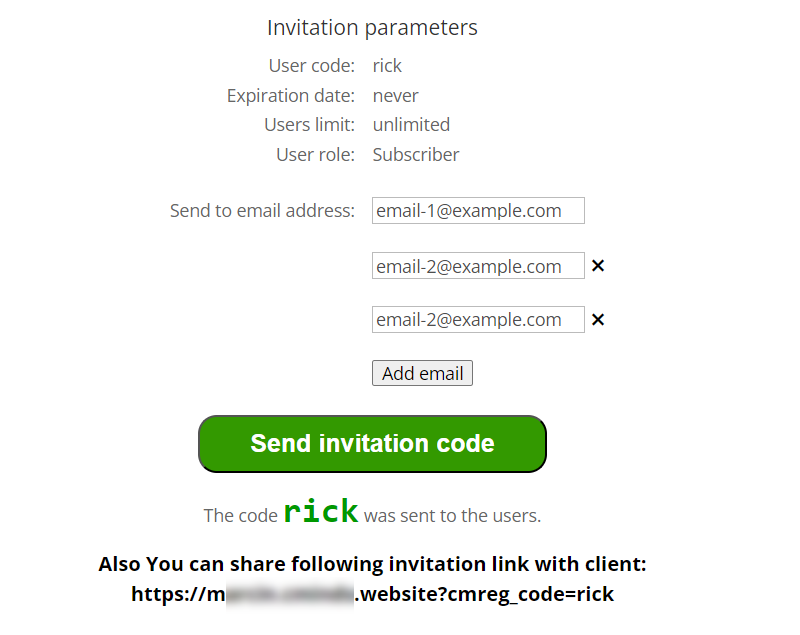
Learn more about this feature in this guide: WordPress Registration Form Plugin (CMREG) - Invitation Codes - Creating and Sending Referral Codes and Links
Show Invitation Codes Created by User
[cmreg-list-users-invitations]
Displays the table with all invitation codes created by the current user.
Parameters:
- used - Filter which should be displayed.
- all - all invitations (default)
- yes - invitations that were accepted
- no - invitations that were not used
Example:
[cmreg-list-users-invitations used="yes]
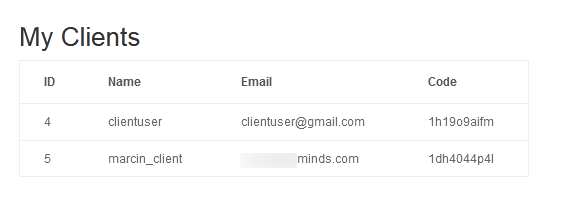
Show People Invited By User
[cmreg-my-users-from-codes]
Displays the table with all people invited by the current user and that accepted the invite. Includes their ID, name, email and invitation code.
Show Text to Invited User
[cmreg-Invited-by-info]
Shows the username of the person that has invited the current user. If the user is not logged-in or was not invited by any one, he/she will not see any content.
Parameters:
- show-label - Show additional text other than the username (0 for no, 1 for yes). The default is 1.
- label-text - Customize the text. The default is "Invited by: ".
Examples
[cmreg-Invited-by-info][cmreg-Invited-by-info show-label="0"]- Will only display the username.[cmreg-Invited-by-info show-label="1" label-text="You were invited by the user: "]- Will display "You were invited by the user: username"
Set Additional User Roles
Note: this shortcode was introduced in version 3.8.0.
[cmreg-additional-code]
Show the form that allows a user to enter an invitation code and set an additional user role for his account. The form is visible for logged-in users only.
Examples
[cmreg-additional-code]- Will show the form for logged-in users.[cmreg-additional-code] You must be logged-in to access the form [/cmreg-additional-code]- Will show the form for logged-in users and a restriction message for guest users.
Learn more about using this shortcode in this user guide:
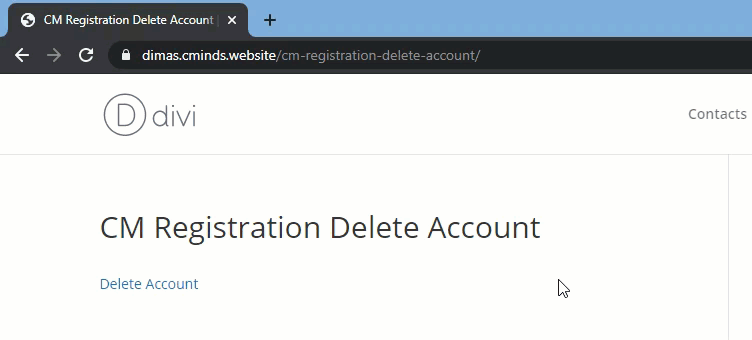
5) Delete Account
Show Delete Account Button
[cmreg-delete-account]
You can display the button for removing the account and set the text that will appear on the button. Note: this shortcode was introduced in version 3.1.8.
Example
[cmreg-delete-account]Delete Account[/cmreg-delete-account]
User Dashboard
Note: this shortcode was introduced in version 3.7.1.
The plugin allows to create and display a user dashboard. To display a user dashboard, you need to place the following shortcode on the needed page:
[cmreg-dashboard]
The shortcode has a parameter view which allows to display a user dashboard in either Tabs or Accordion views.
Examples:
[cmreg-dashboard view="tabs"]
[cmreg-dashboard view="accordion"]
Learn more about the user dashboard in this guide:
 |
More information about the WordPress Registration Form Plugin Other WordPress products can be found at CreativeMinds WordPress Store |
 |
Let us know how we can Improve this Product Documentation Page To open a Support Ticket visit our support center |