WordPress Glossary Plugin (CMTG) - Tooltips - Image Inside Tooltip
Adding Images to Tooltips
This feature is only available in the Pro, Pro+ and Ecommerce editions of the WordPress Glossary plugin.
You can control the size of the image, and the end result looks like this:

In order to display this, you must adjust the general settings and also be sure that each term is set properly.
Method 1 - Image in Content
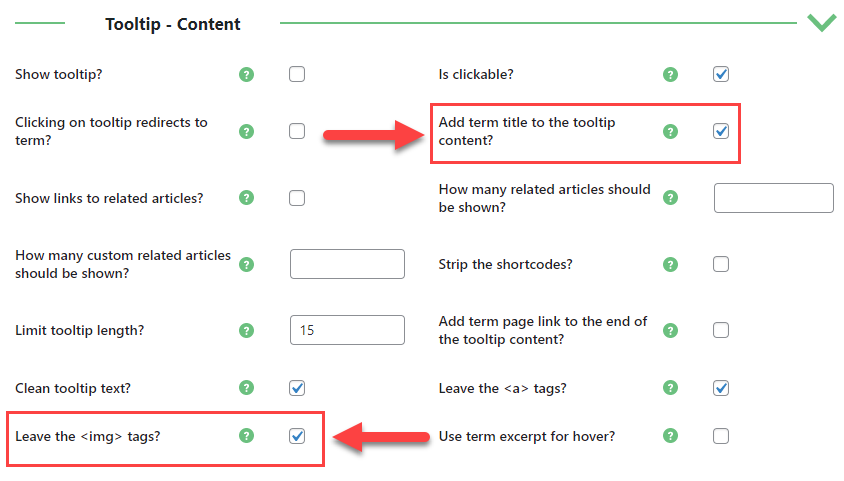
Step 1) General Settings
First, head to Admin Dashboard → CM Tooltip Glossary → Settings → Tooltip tab.

Here, two settings are important:
- Add term title to the tooltip content - Disable this if you would like to remove the title from the tooltip
- Leave the <img> tags? - Enable this to include, in the tooltip, all images added to the term
You might also want to make the background more subtle. You can change it for all tooltips from the settings (learn more WordPress Glossary Plugin (CMTG) - Tooltips - Change the Tooltip Style).
Step 2) Adding Image to Tooltip and Set Up
When creating or editing the term, add the relevant image to the content area. You don't need to add any text.
Image Size
Note that the image dimensions will impact the tooltip size.
Method 2 - Featured Image
An alternative method is to add assign the image as the feature image of the term, instead of adding it to the content.
Step 1) General Settings
First, head to Admin Dashboard → CM Tooltip Glossary → Settings → Tooltip tab.
Two settings are relevant:
- Show featured image in tooltip - Choose the default alignment of the image inside the tooltip. You can change this for each term
- Image width - Choose the default width of the image. You can change this for each term

Step 2) Adding Image to Tooltip and Set Up
When creating or editing the term, set the relevant image as the featured image. You can leave the content field empty.
Image Size
In this case, the image dimensions will not impact the tooltip size. Instead, the width setting seen on step 1 will.
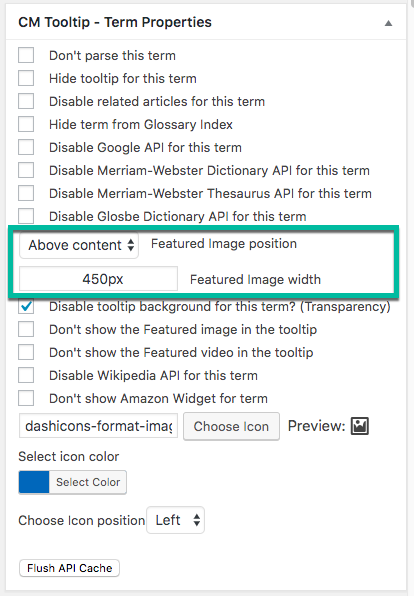
Individual Size
In the Ecommerce edition, you can configure the size of each term image from the term's CM Tooltip - Term Properties metabox.
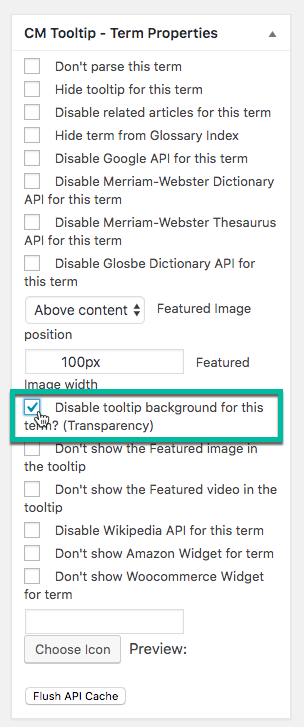
Extra - Disabling the Background for This Term
In the Ecommerce edition, when editing a term, you can disable its background entirely by enabling the relevant option within the CM Tooltip - Term Properties metabox (located on the right sidebar).
 |
More information about the WordPress Glossary Plugin Other WordPress products can be found at CreativeMinds WordPress Store |
 |
Let us know how we can Improve this Product Documentation Page To open a Support Ticket visit our support center |