Search and Replace Plugin (CMSR) - Use Case - Optimizing the Rebranding Process for Your Website
Use Case - Optimizing the Rebranding Process for Your Website
Note: This guide covers features from:
- Search and Replace plugin - This document uses version 1.6.3.
Introduction
The Search and Replace plugin allows you to easily replace text in all types of posts and pages, including theme and plugins generated content.
It works via rules: you tell it "x" should become "y". Then, every time a visitor visits a page with "x", he/she will see "y".
Use Case Front-End
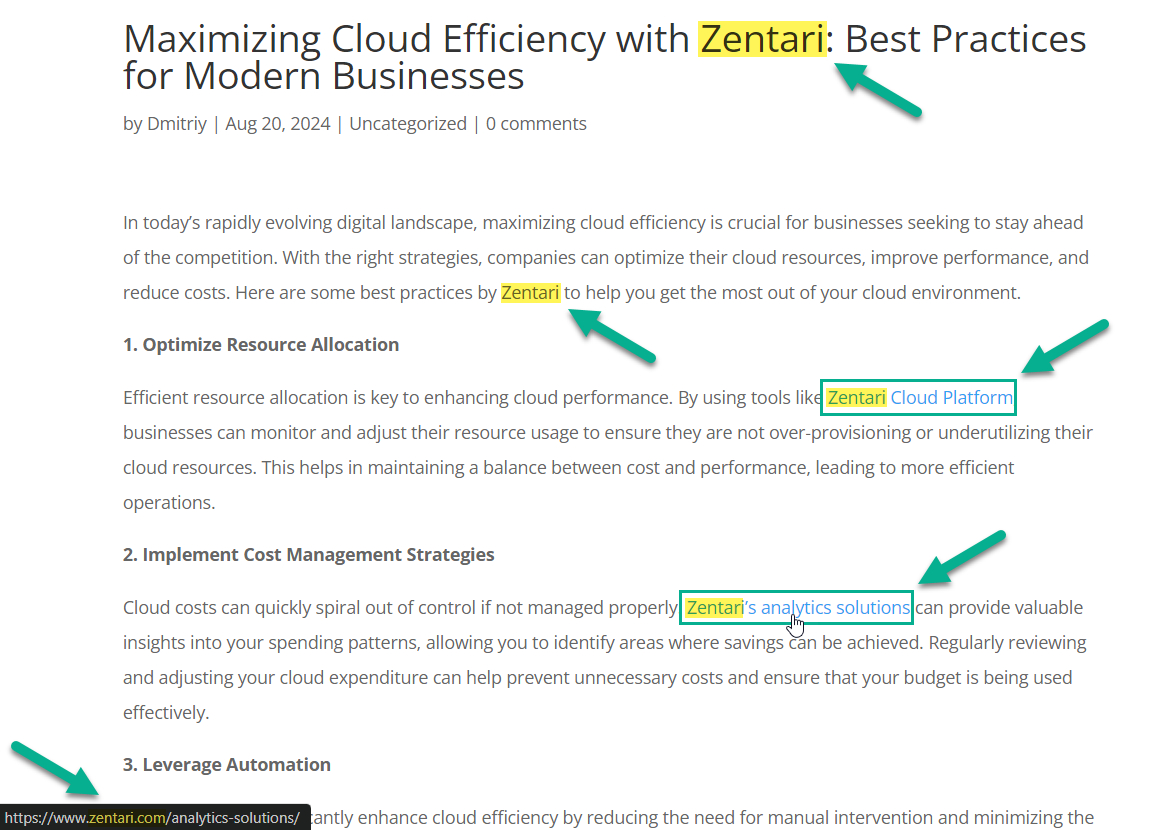
Example of the blog article before replacing the company name and internal links:
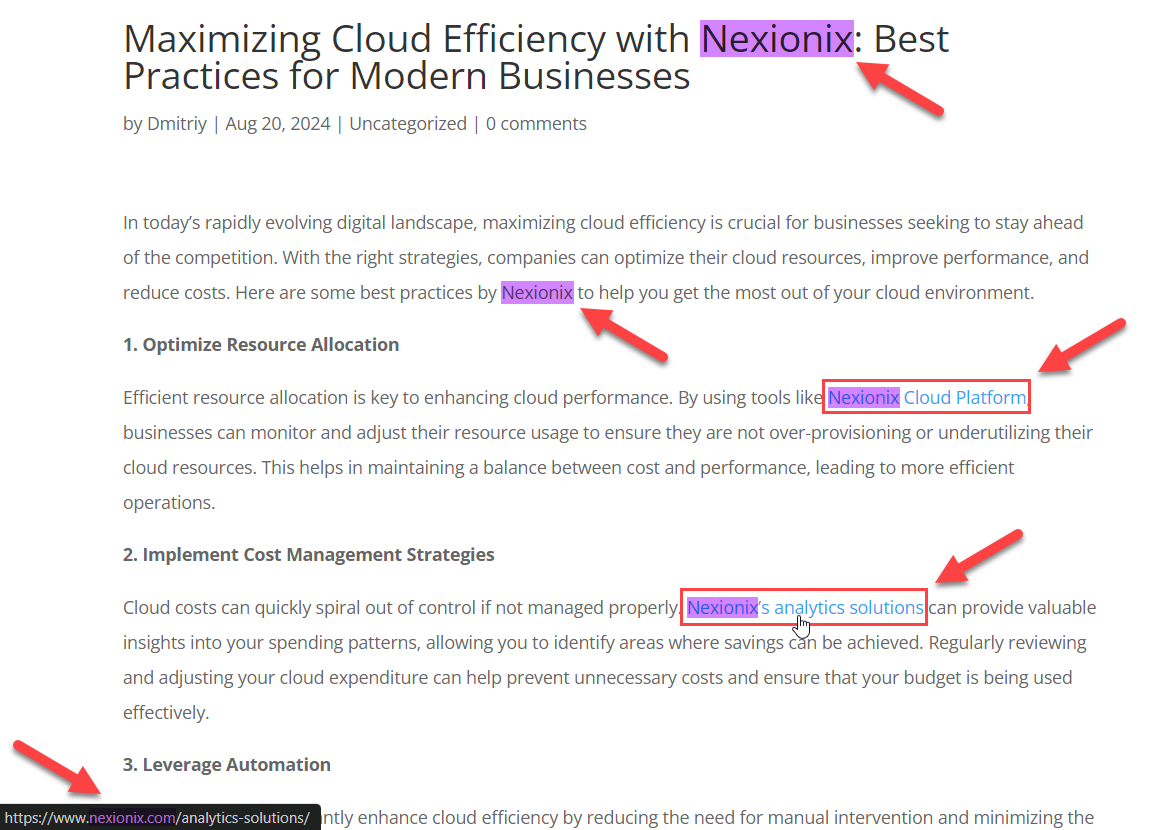
Example of the blog article after replacing the company name and internal links:
Use Case Assumptions
In this example use case guide, we'll cover how to make the rebranding process of your site using the Search and Replace plugin easier by replacing old brand name and links by the new ones.
We consider that you have already bought the plugin, but not installed it.
It follows:
- Installing the plugin
- Quick recap
- Rebranding process
- Creating replacement rules
- Changes log
- Permanent changes in database
- Log of permanent DB changes
- SEO Yoast integration
- End result
Installing the Plugin
The process is the same for all CM plugins.

- Download the plugin from your customer dashboard.
- Log in to WordPress and navigate to the WordPress Admin → Plugins settings.
- Click on Add New.
- Activate it and add the license.
Learn more: Getting Started - Plugin Overview
Quick Recap
In this use case guide we will focus only on those settings that can be useful for the rebranding process. If you want to take a look on more generic case with considering more settings, then check another use case guide:
Rebranding Process
Initial data for our use case: we have a site Zentari with the domain zentari.com which is going to be rebranded to Nexionix with the domain nexionix.com. This site offers some products and services, and besides that it has some blog with articles that tell about its products - so it has lots of internal links which we need to replace. So, what we need to do:
- Search the site name "Zentari" and replace it by "Nexionix" across the site.
- Search the internal links that contain "zentari.com" and replace them by "nexionix.com".
- Avoid searching and replacing on some pages like "About Us" that tells about the company history and the blog article with the announcement of rebranding.
Example of the blog page before rebranding:
So let's create a few replacement rules.
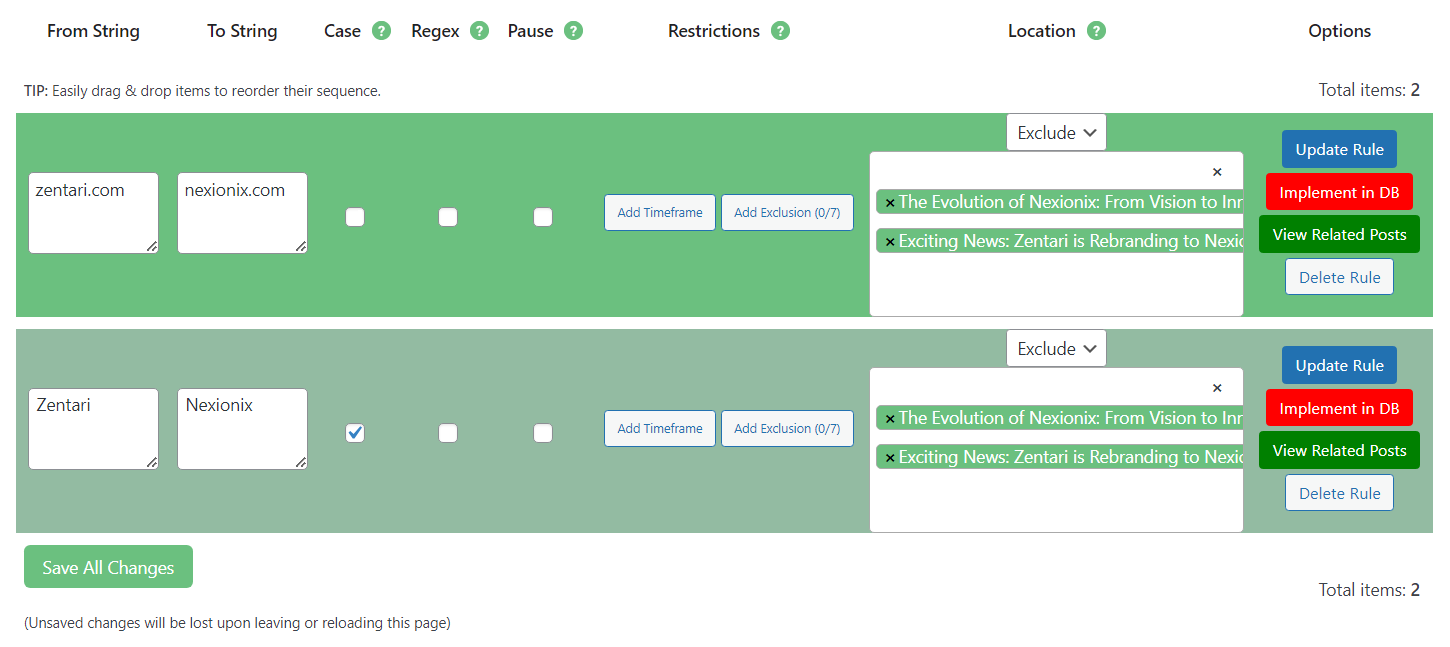
Creating Replacement Rules
By default, the plugin does not make permanent changes to your content. Once you create replacement rules, they will be applied to visitors only while they access the page.
To create a rule, navigate to Admin Dashboard → Search & Replace → Settings.
Under the Replacement Rules tab you can find a dashboard for creating rules.
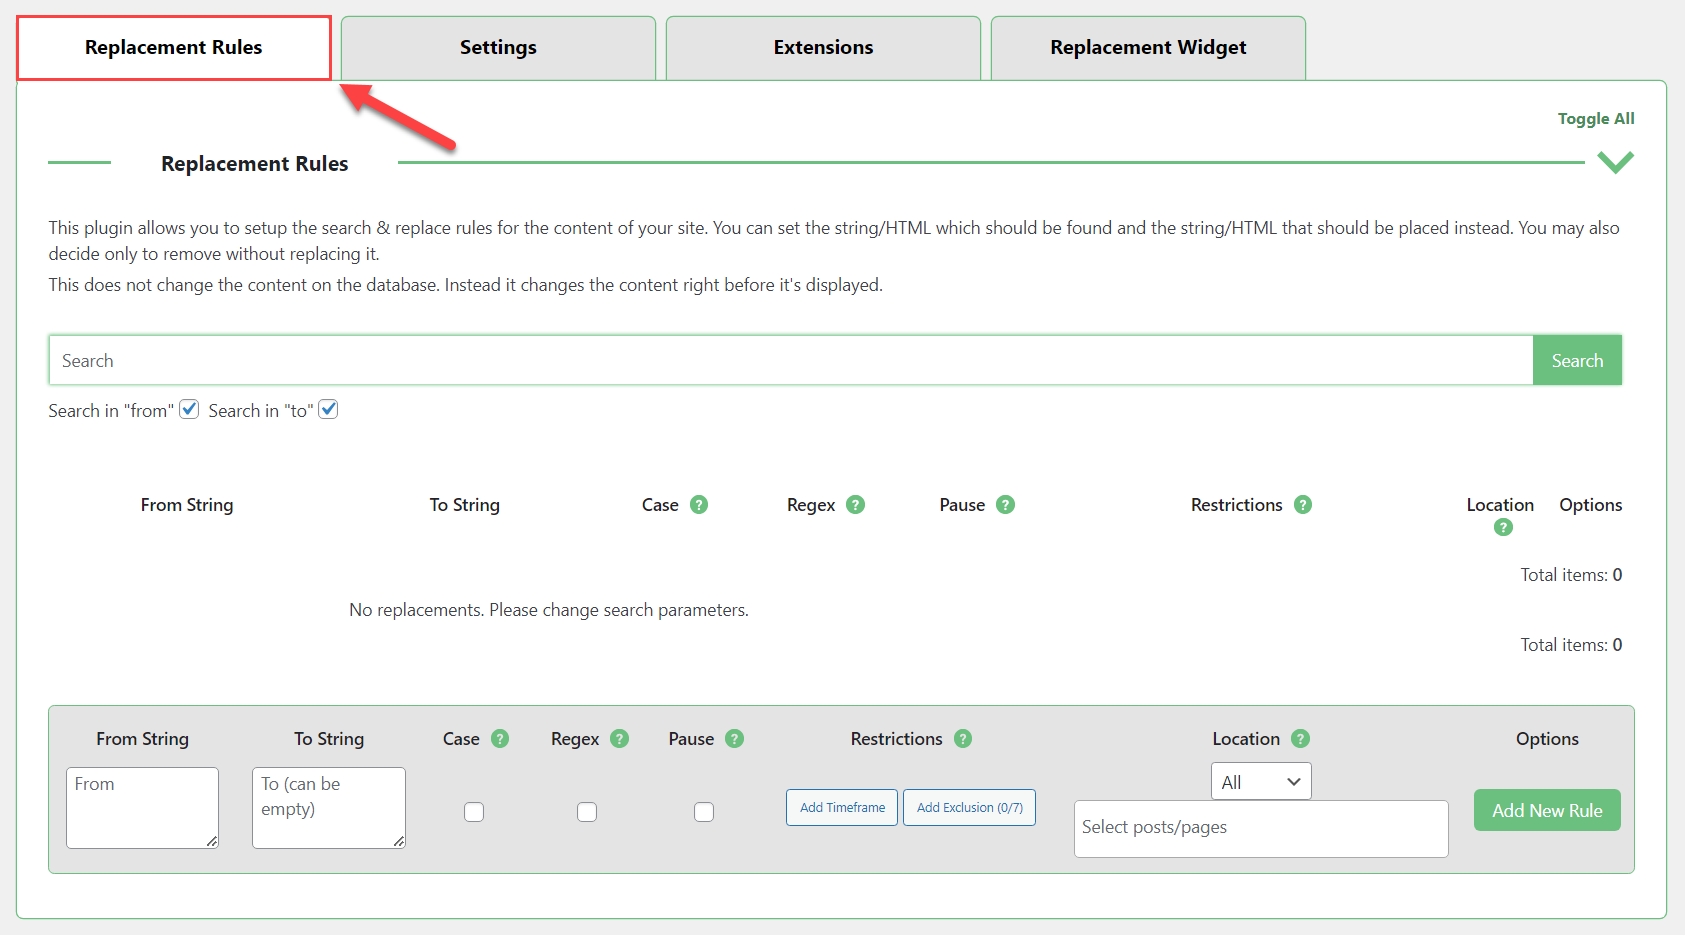
To create a rule, we need to use the form at the bottom of the page. Here you need to:

- From String - Add the word/phrase that you want to replace.
- To String - Add the word/phrase that should replace the content from the From String field.
- Case - Define if the searched word/phrase should be case-sensitive.
- Location - Define where the search and replace process should be applied. You can choose either to apply it everywhere, or you can include or exclude only specific pages.
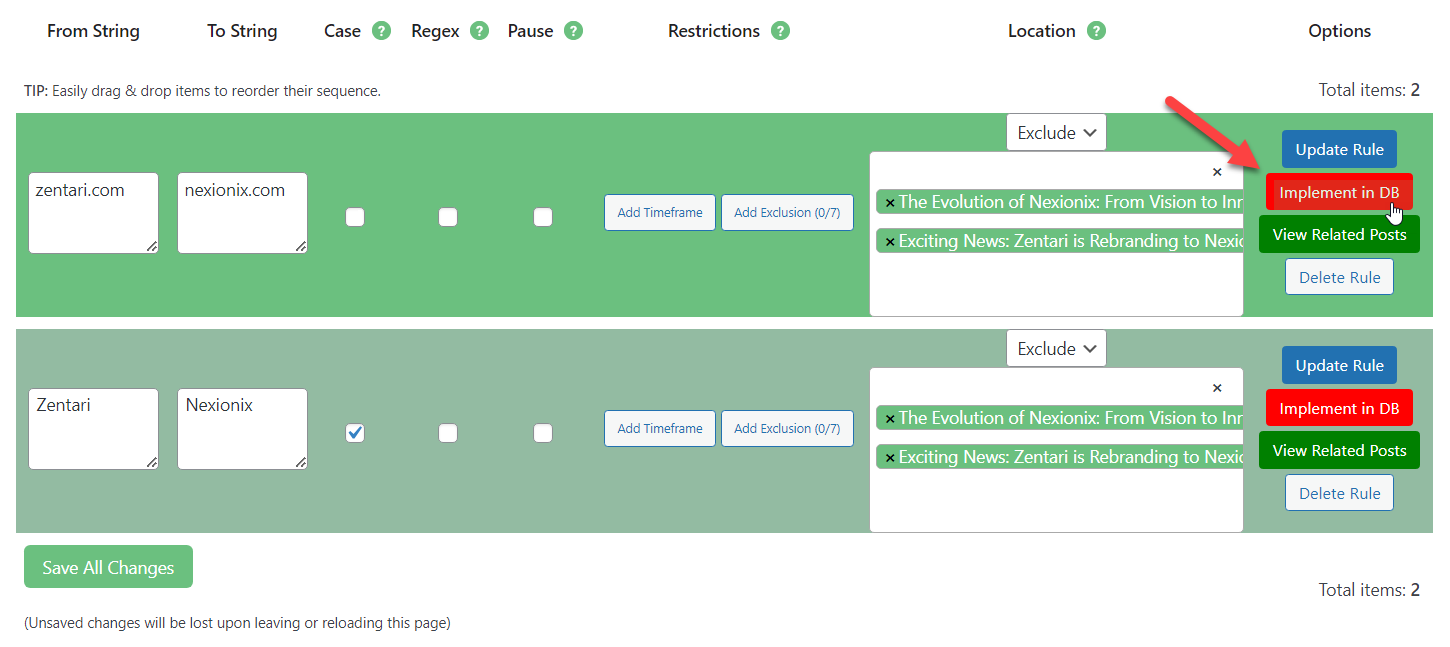
Created rules will appear above the form. We created 2 rules:
- The rule that replace "zentari.com" to "nexionix.com".
- The rule that replace "Zentari" to "Nexionix". This rule is case sensitive in order to not replace the word "zentari" in "zentari.com" to "Nexionix" that starts with the capital city.
Both rules exclude 2 pages - one page is the page that tells about the company, and the second one is the blog article that announces the rebranding process. It is done because both pages mention the original and rebranded company names.
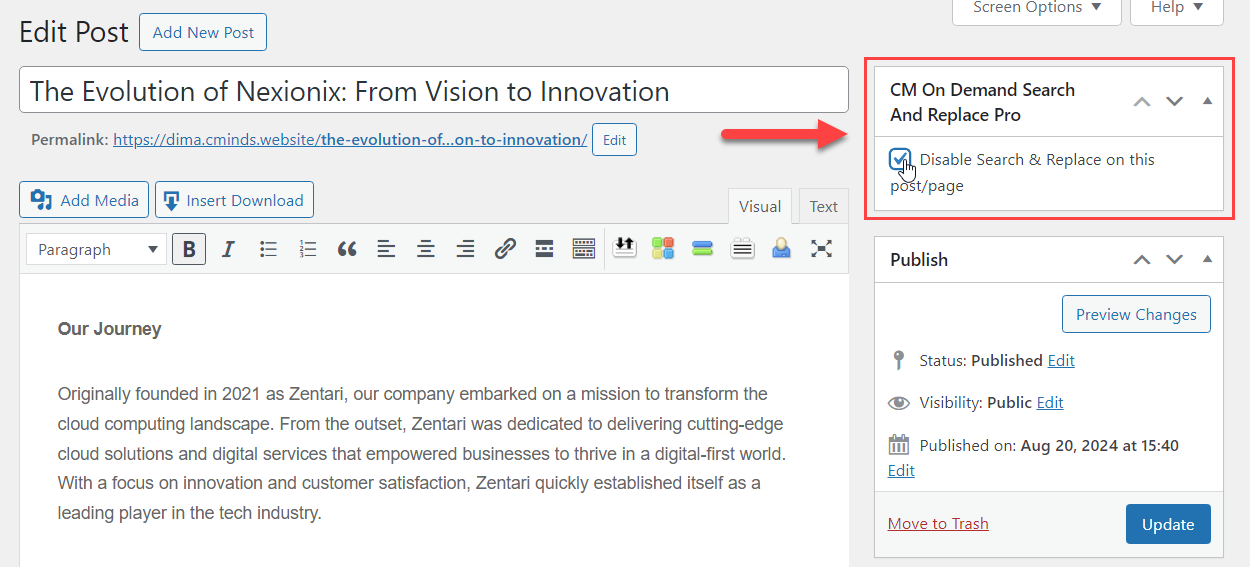
TIP
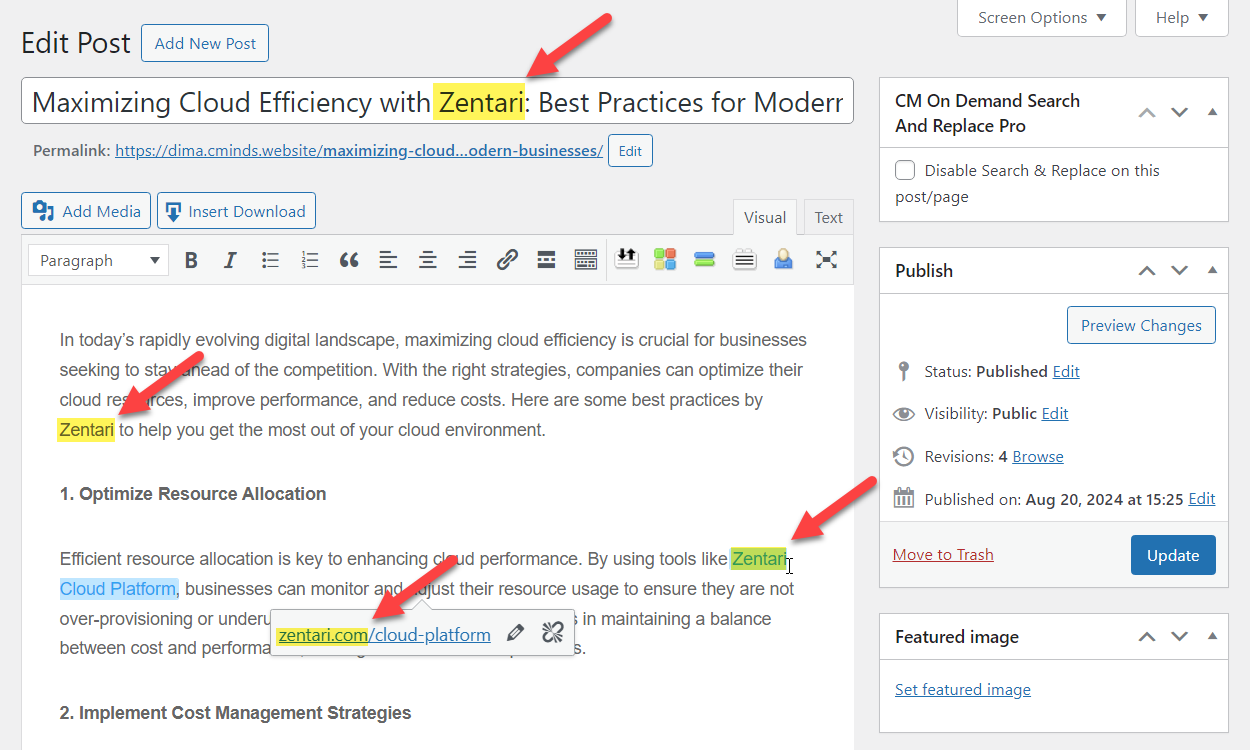
Alternatively to the excluding pages in the rule, you can also disable the search and replace functionality for a specific post or page when editing it. Just find the metabox CM On Demand Search and Replace Pro and select the option Disable Search & Replace on this post/page, then click Update to save the changes.
Let's check the result on the front-end.
Here's the blog article before replacing the company name and internal links:
And here's the result after replacing:
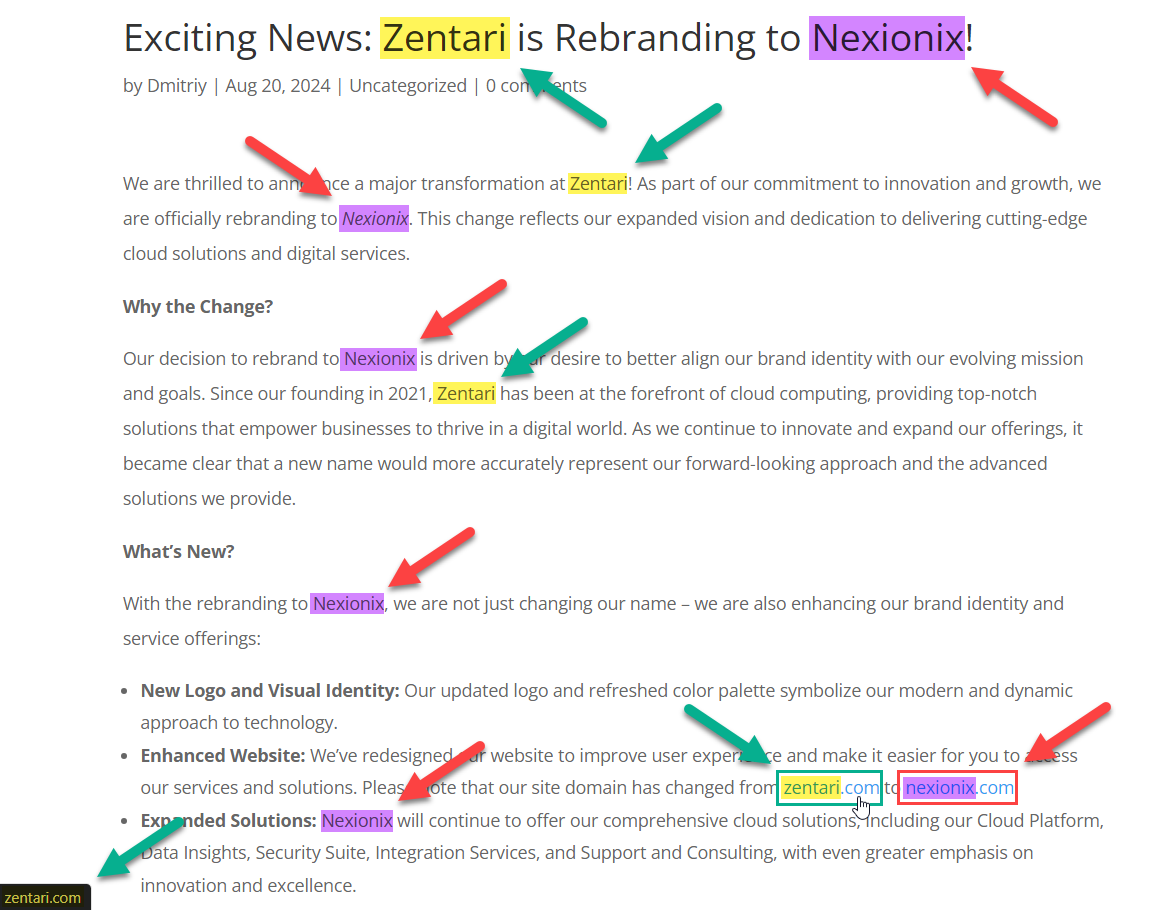
And here's one of the pages that we excluded from the search and replace process - the announcement blog article about rebranding the company. Here "Zentari" and "zentari.com" are kept and not replaced, and "Nexionix" and "nexionix.com" were originally written in the article.
Changes Log
For each post and page where changes were applied, you can track the relevant changes on the back-end. But first, you need to enable this feature in the plugin settings. Navigate to Admin Dashboard → Search & Replace → Settings → Settings tab.

Scroll down and find the section Log. There are 2 settings:

- Enable Preview & Log - Choose On to turn on the log functionality.
- Cleanup log - Click this button if you want to delete existing logs.
Don't forget to save the changes after editing the settings.
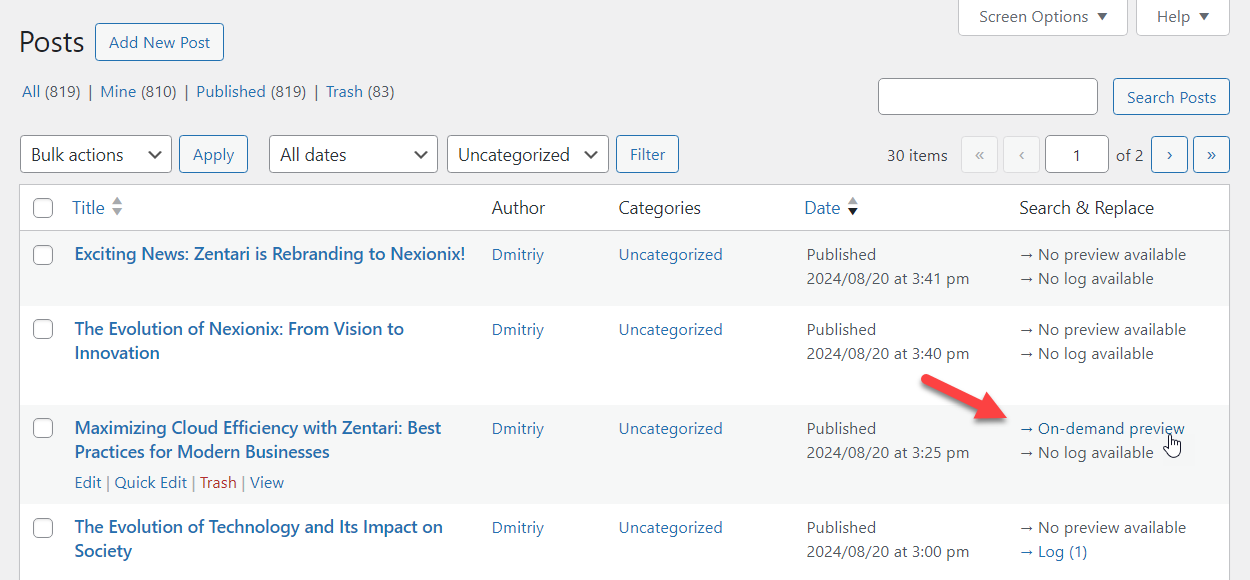
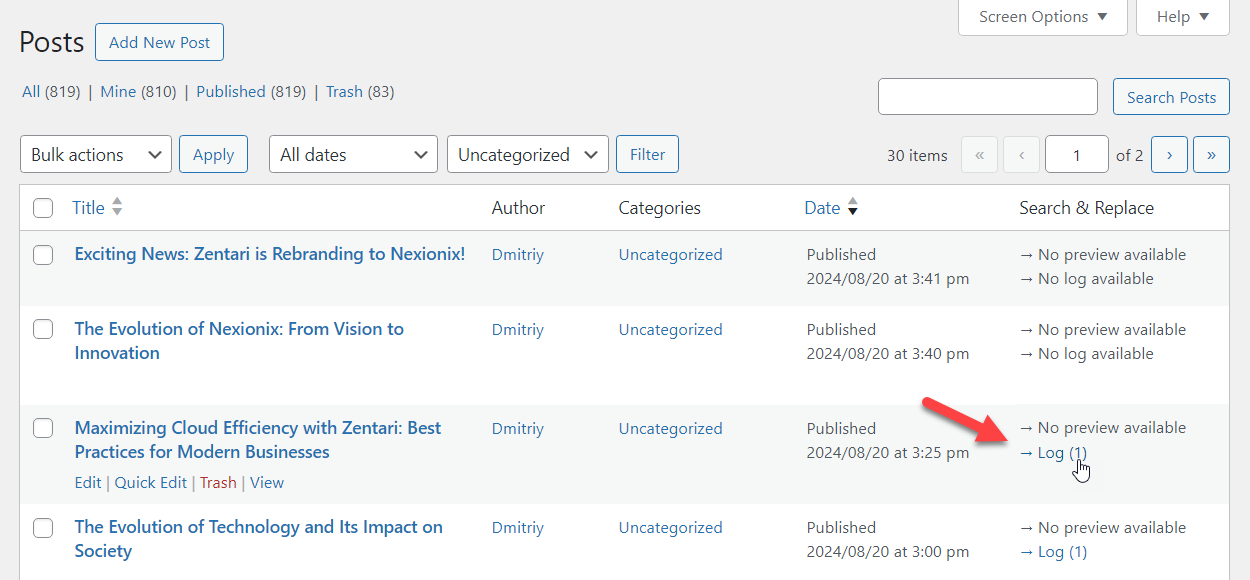
Now we need to go to the list of posts or pages that we want to check. In our case, we need to check a post. Navigate to Admin Dashboard → Posts → All Posts.

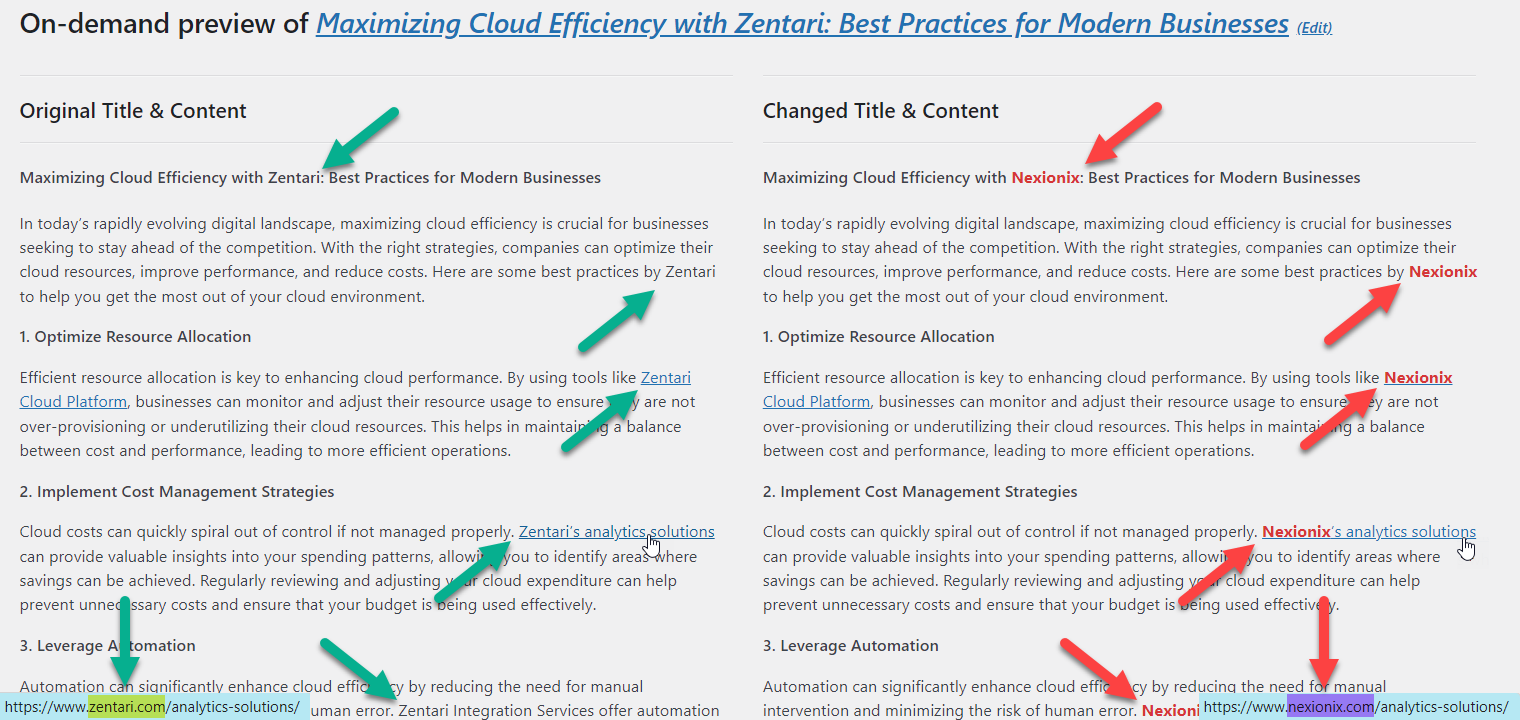
There's a column Search & Replace. For each post where the changes are applied, you can see the button On-demand preview. Hover on it and click.
On the open page you can see 2 columns: Original Title & Content on the left side and Changed Title & Content on the right side. All changes are highlighted with red color in the right column.
Permanent Changes In Database
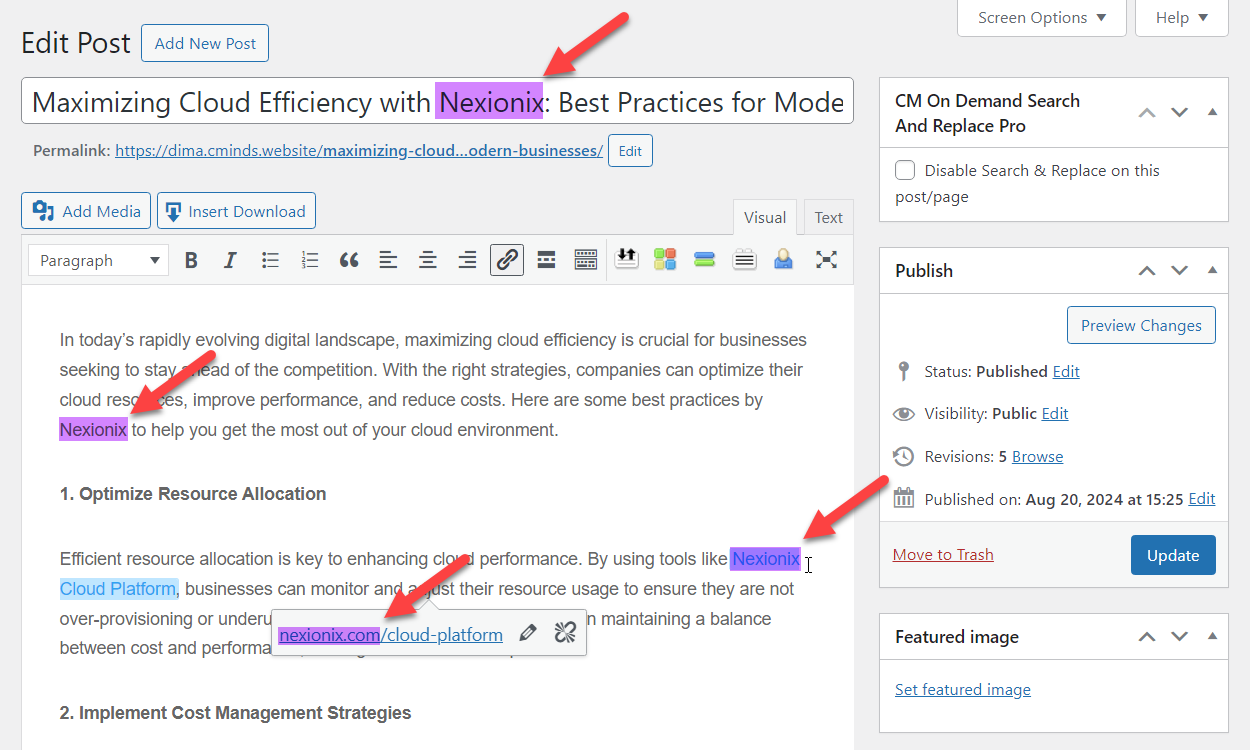
As it's been said above, all changes applied by the rules are made on the fly - so users can see them on the front-end, but on the back-end the content is kept original. So if we check on the back-end the page where the front-end changes are applied, we can still see the original content - brand name "Zentari" and "zentari.com" in links.
There are a two ways to make the permanent changes to the database.
First way is to click the button Implement in DB for the needed rule. The changes will be applied to all related pages.
Another way is to apply changes of all relevant rules to a specific page.
To do this, we need to enable the replacement widget for that. There are 2 replacement widgets - first allows to enable or disable the changes that are made on the fly, and the second widget allows to apply permanent changes to the database and this is widget can be displayed only to the admin.
Navigate to Admin Dashboard → Search & Replace → Settings → Replacement Widget tab.

There you can find the following settings:
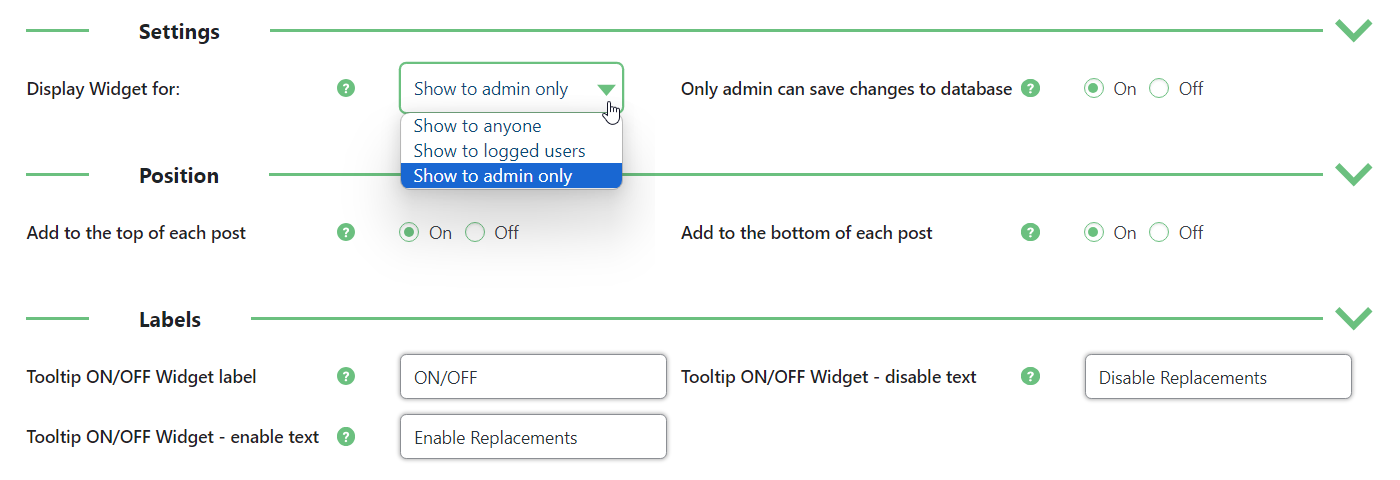
Settings
- Display Widget for - This option allows to define which users will be able to see the replacement widget. In our case we need only the admin to see it, so we choose Show to admin only.
- Only admin can save changes to database - This option appears only when the option Show to admin only is chosen. It allows the admin to implement permanent changes to the database.
Position
There are 2 options in this section which allow to define where to display the widget:
- Add to the top of each post
- Add to the bottom of each post
Labels
There are 3 labels in this section which you can change for the widget that allows to enable or disable the changes that are made on the fly:
- Tooltip ON/OFF Widget Label
- Tooltip ON/OFF Widget - disable text
- Tooltip ON/OFF Widget - enable text
When the settings are configured, save the changes.
Now let's check the result on the front-end as an admin. You will see the button Make changes permanent in DB.
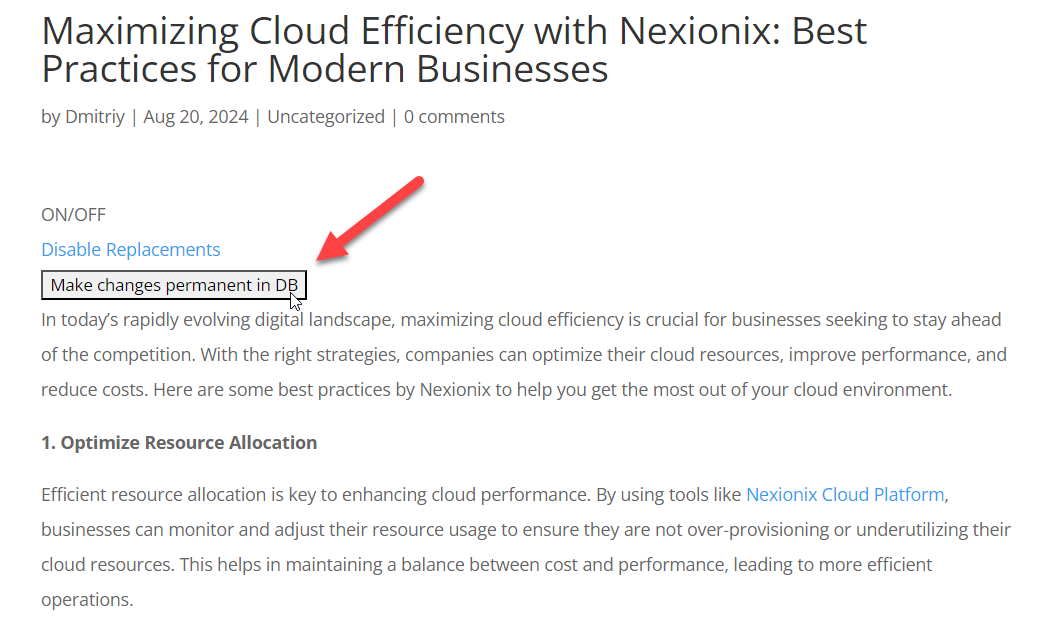
After clicking on it, we can see the replacement was applied on the back-end as well.
Log of Permanent DB Changes
For posts and pages where the permanent changes were applied, you can also check the log. As we have already enabled the log functionality, let's got the list of our posts and check the log.
Now for the same post we don't have a preview log, as all replacement rules were applied. Instead of it, there's a button Log to check the permanent changes. The button Log has (1) next to it - it shows how many times DB changes were applied to this post.
Clicking on the Log will show the page where you can see 6 columns, where you can see order number of the change, old and new post title, old and new post content, and date and time when the changes were applied.
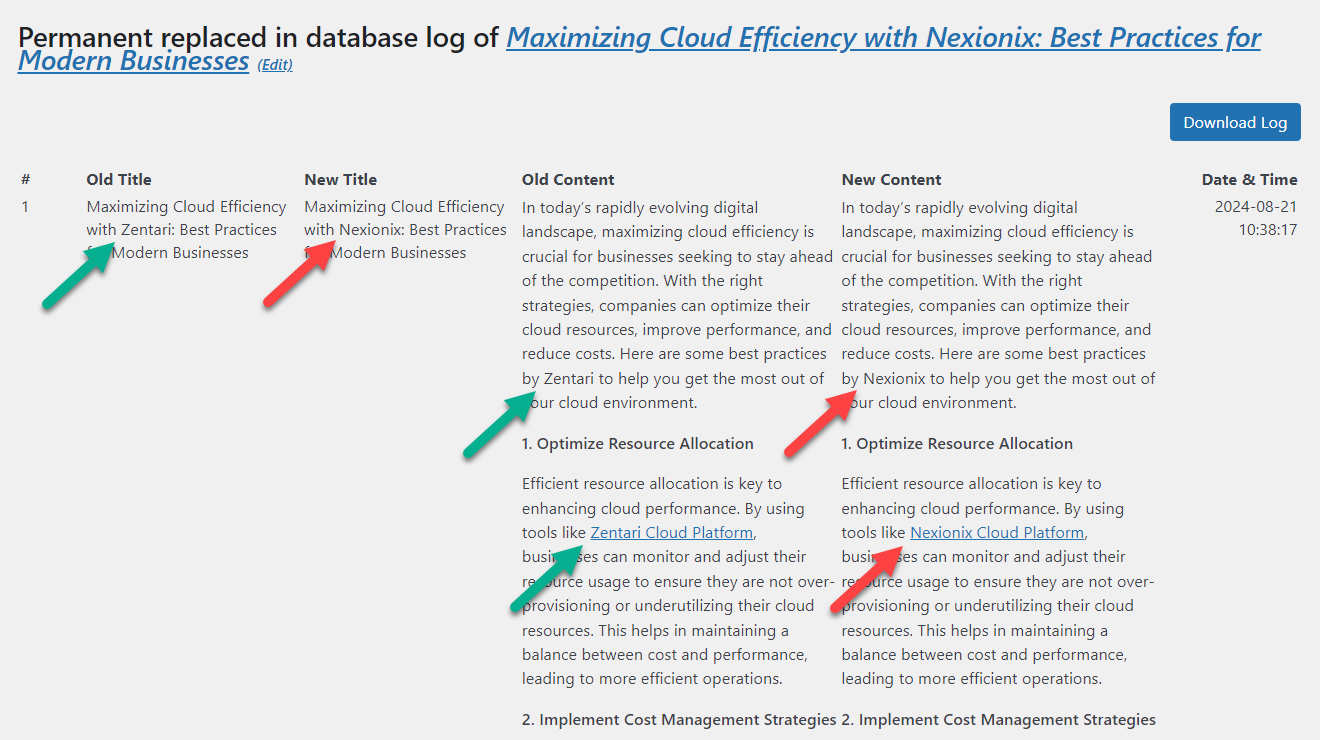
Each search and replace change in the database will be shown in this log. Additionally, you can download a CSV file with the log by clicking on the button Download Log.
SEO Yoast Integration
The plugin supports the integration with the plugin Yoast SEO, so it is possible to also apply the changes on the fly to SEO title and meta description.
So, first you need to install and activate the plugin Yoast SEO.
When it's done, on the post editing page you can see the metabox Yoast SEO, where you can fill the fields SEO title and Meta description for improving your site representation and ranking in search engines.
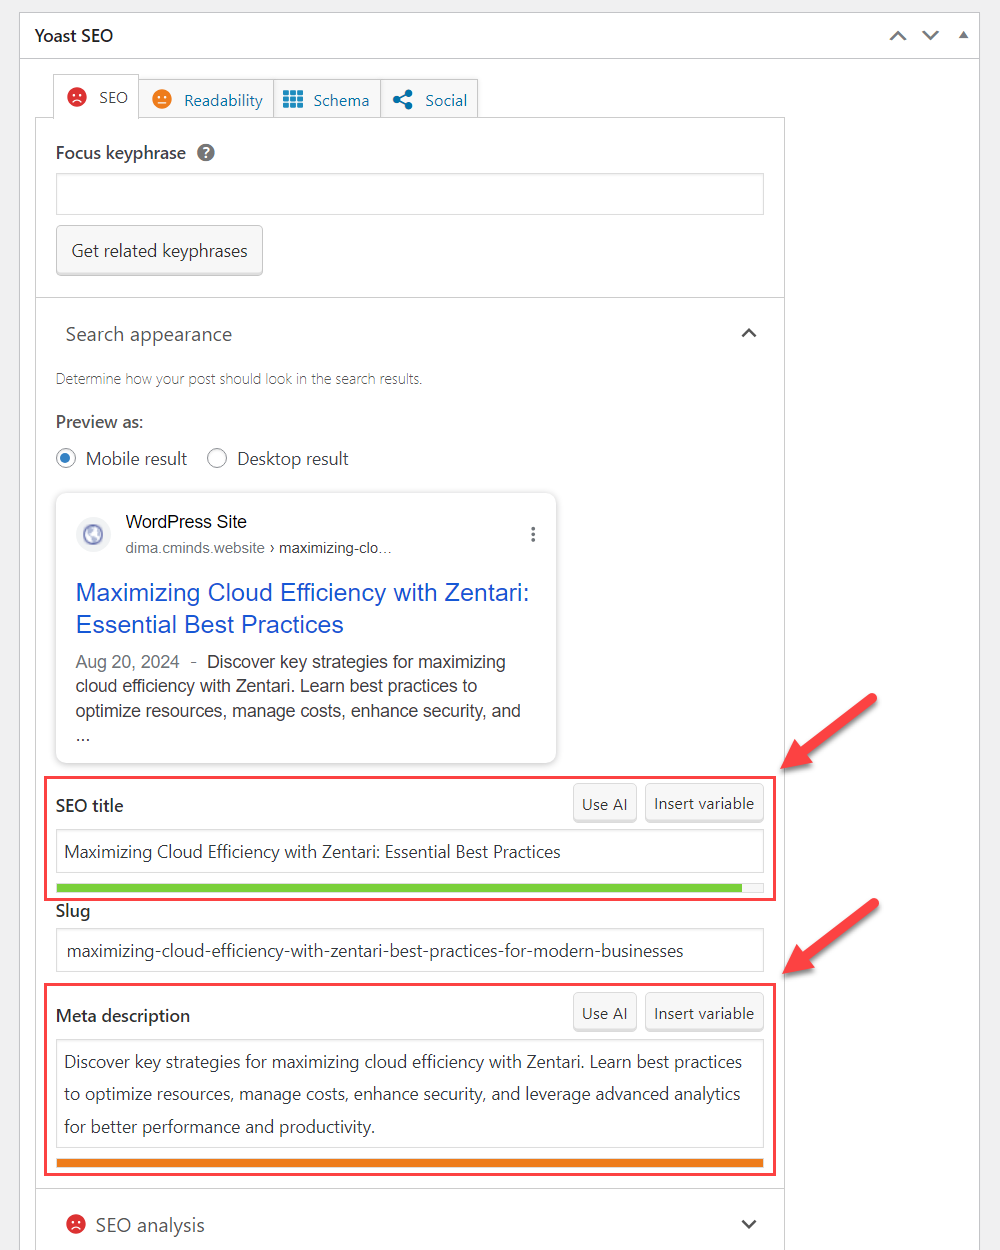
To enable the Yoast SEO support in the Search and Replace plugin, navigate to Admin Dashboard → Search & Replace → Settings → Extensions tab.

Here we have 2 separate options for the Yoast SEO support - Yoast SEO Title and Yoast SEO Description. Let's enabled both of them.

Don't forget to save the changes after editing the settings.
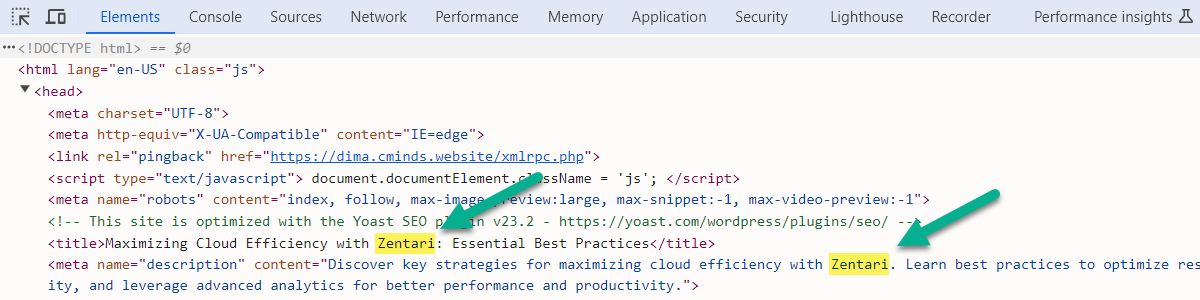
Let's check the result on the front-end in the browser console.
Here are the SEO title and meta description of the post before the changes:
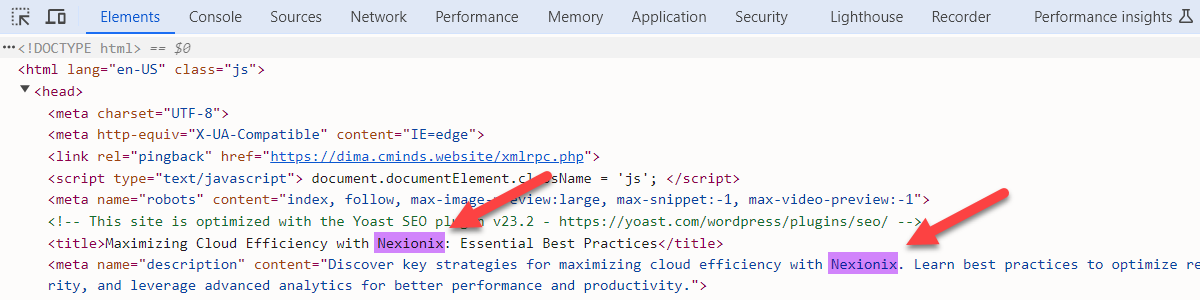
And here are the SEO title and meta description of the post after the changes:
Have a note that implementing permanent changes to the database is not supported for the Yoast SEO integration - the changes are made only on the fly in this case.
End Result
Following instructions found in the plugin and guides, you should be able to make the rebranding process of your site using the Search and Replace plugin easier by replacing old brand name and links by the new ones.
Use Case Front-End
Example of the blog article before replacing the company name and internal links:
Example of the blog article after replacing the company name and internal links:
 |
More information about the Search and Replace Plugin for WordPress Other WordPress products can be found at CreativeMinds WordPress Store |
 |
Let us know how we can Improve this Product Documentation Page To open a Support Ticket visit our support center |