WordPress Disclaimer Plugin (CMWMD) - Use Case - How to Add Age Verification to Your Site
Use Case - How to Add Age Verification to Your Site
Note: This guide requires:
- WordPress Disclaimer Plugin – This document uses version 1.5.0
Introduction
The WordPress Disclaimer Plugin lets you create custom welcome messages, ask users to accept site legal terms or confirm the age in order to get access to the content.
Use Case Front-End
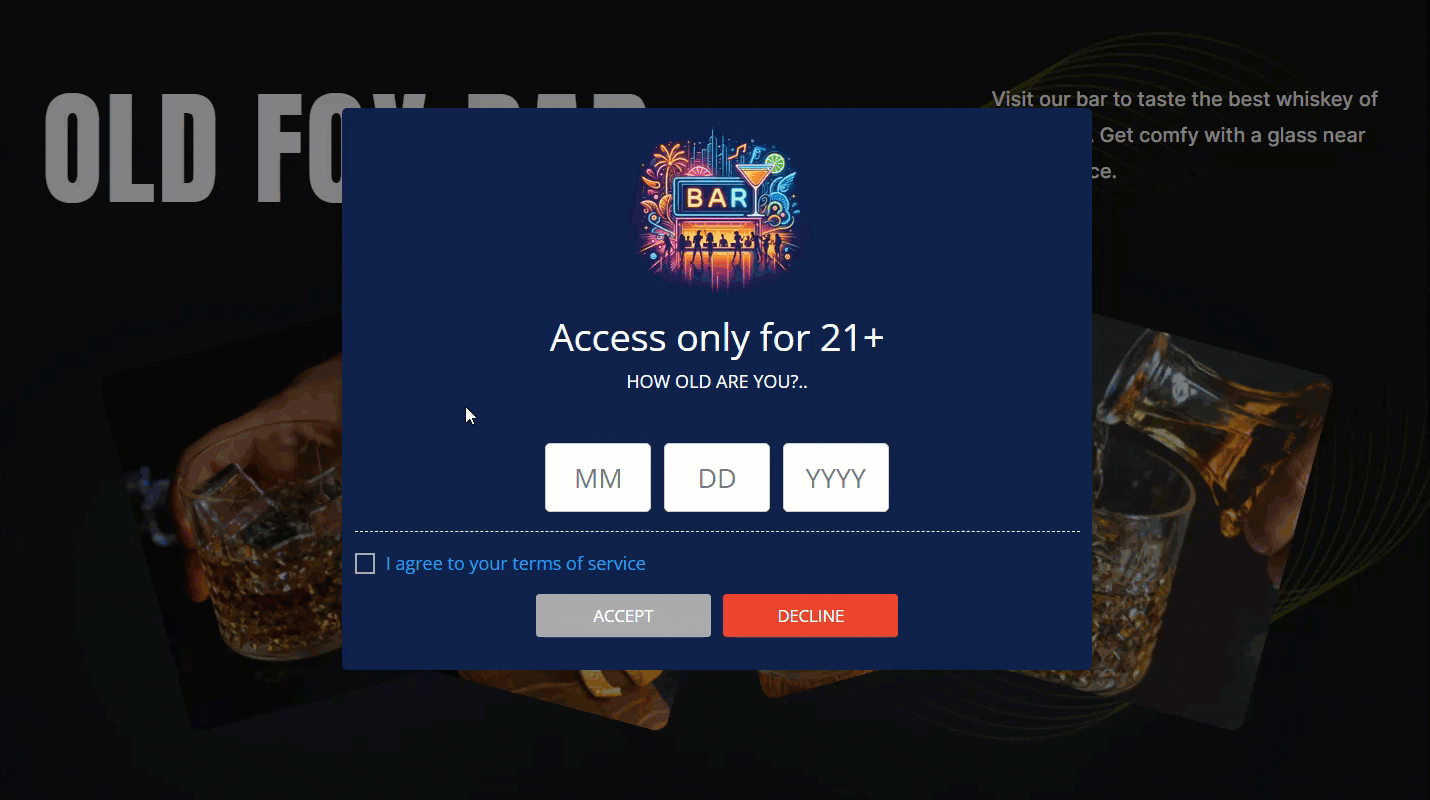
Full date verification example:

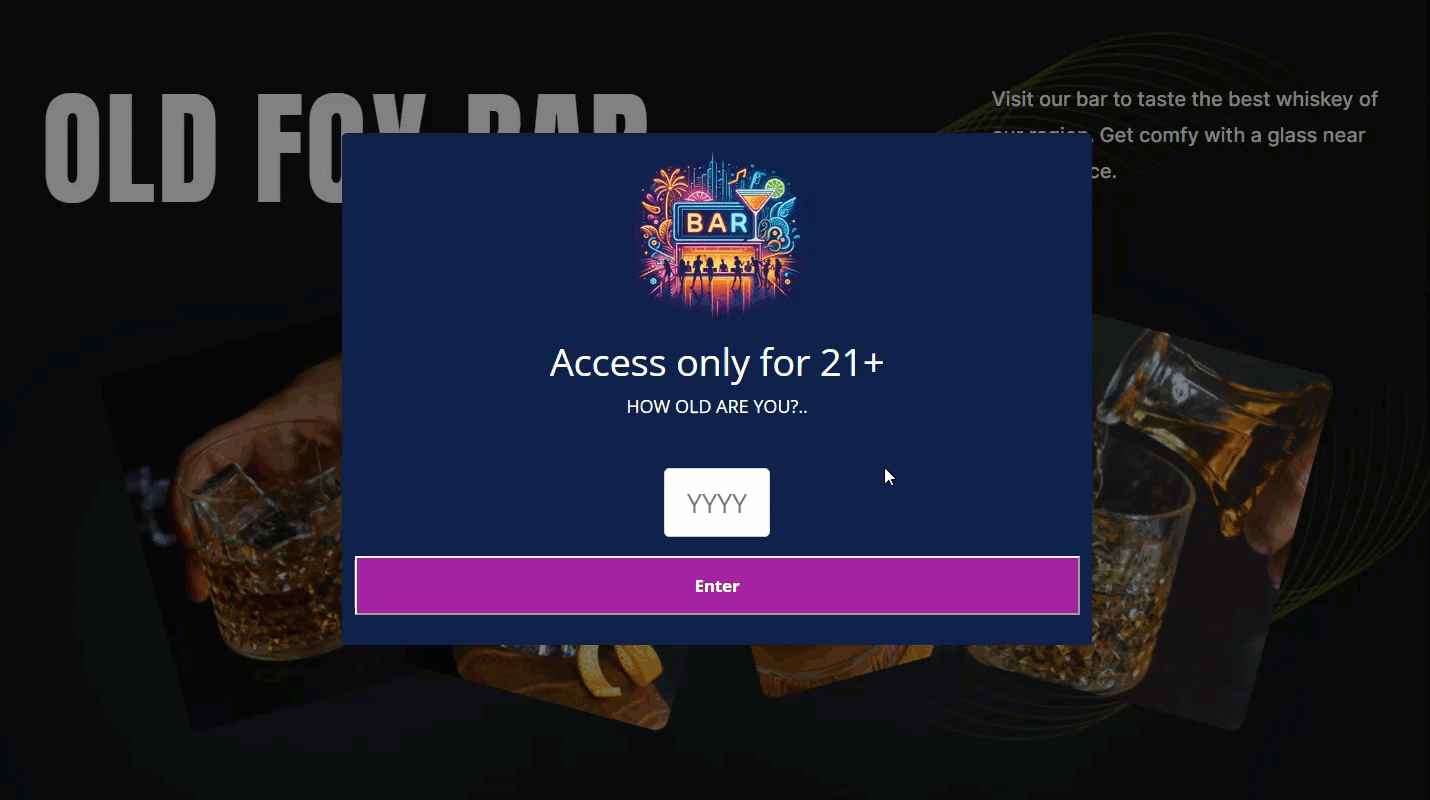
Only year verification example:
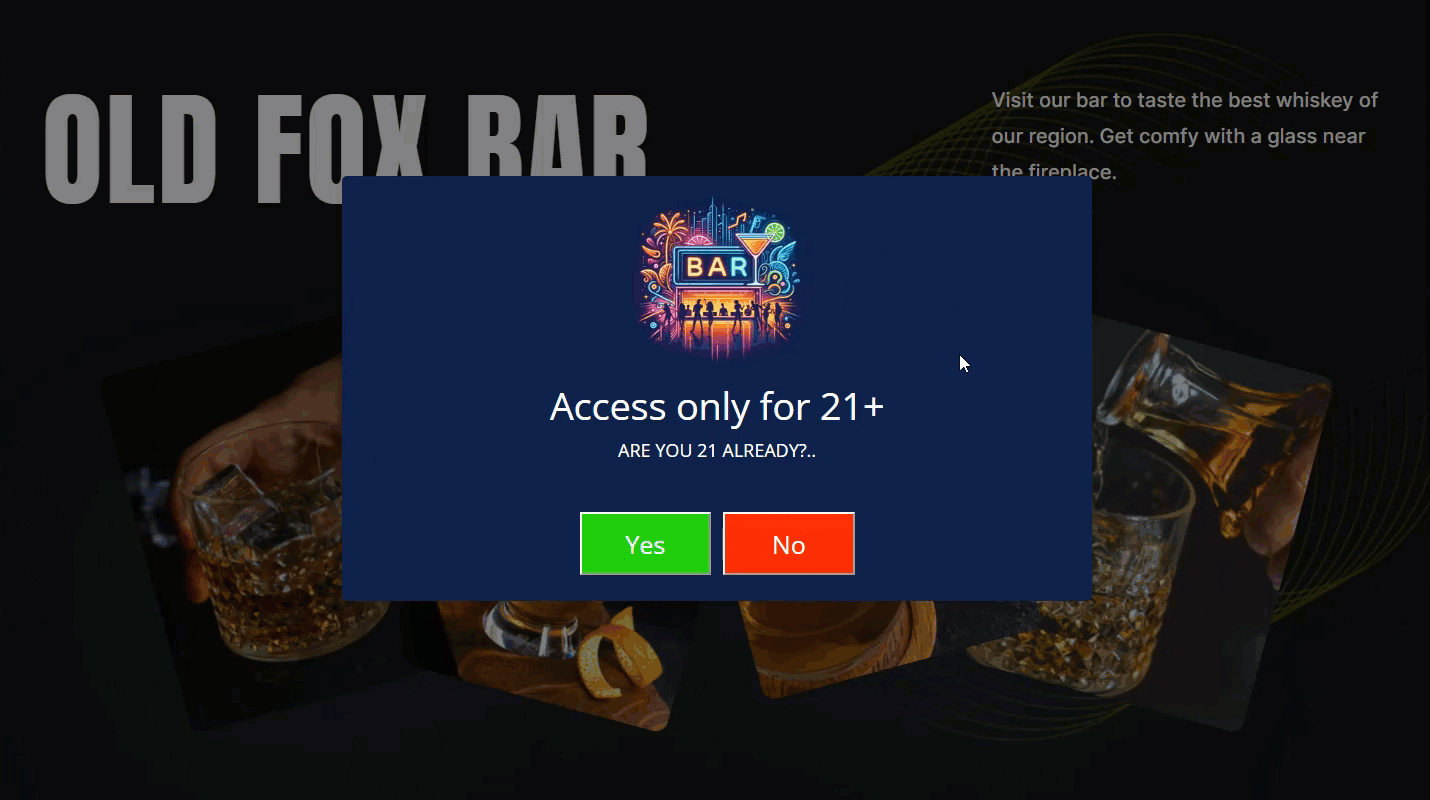
Simple Yes/No verification:
Use Case Assumptions
In this example use case guide we will consider how to add age verification to your site and allow users to access content only after approving the age.
It follows:
Installing the Plugin
The process is the same for all CM plugins and add-ons.

- Download the plugin from your customer dashboard.
- Log in to WordPress and navigate to the WordPress Admin → Plugins settings.
- Click on Add New.
- Activate it and add the license.
Learn more: Getting Started - Plugin Overview
Quick Recap
In this use case guide we will focus on setting up the age verification feature. If you want to start from the basic of how to work with the plugin, please, check the following use case guide:
It covers the following topics:
- Setting up the plugin
- Creating first disclaimer
- Disclaimer Options
- Accept Button
- Decline Button
- Display Options
- Advanced Visual
- Activity
Creating Age Verification Campaign
To create a popup message with age verification, navigate to Admin Dashboard → CM Welcome Message & Disclaimer for WordPress → Add New Message.

There will be a form which you need to fill. At the top, write a title of the campaign, it is for the internal usage only, it will not be displayed on the front-end.
Next, under the Message Content section, you need to configure the basic content that will be displayed in the popup message. Here you can add text, media and HTML content.
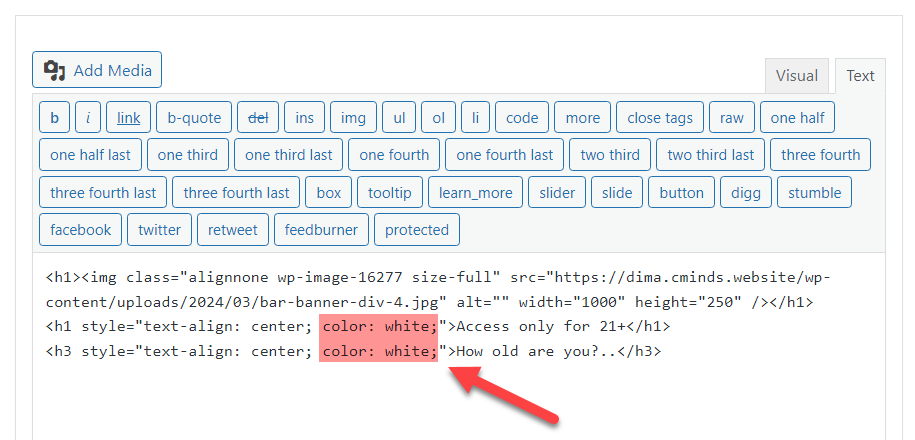
For our use case we added an image which will be shown at the top of the message (we will change the background of the rest part of the popup later), and added 2 lines of the text which asks about the age:
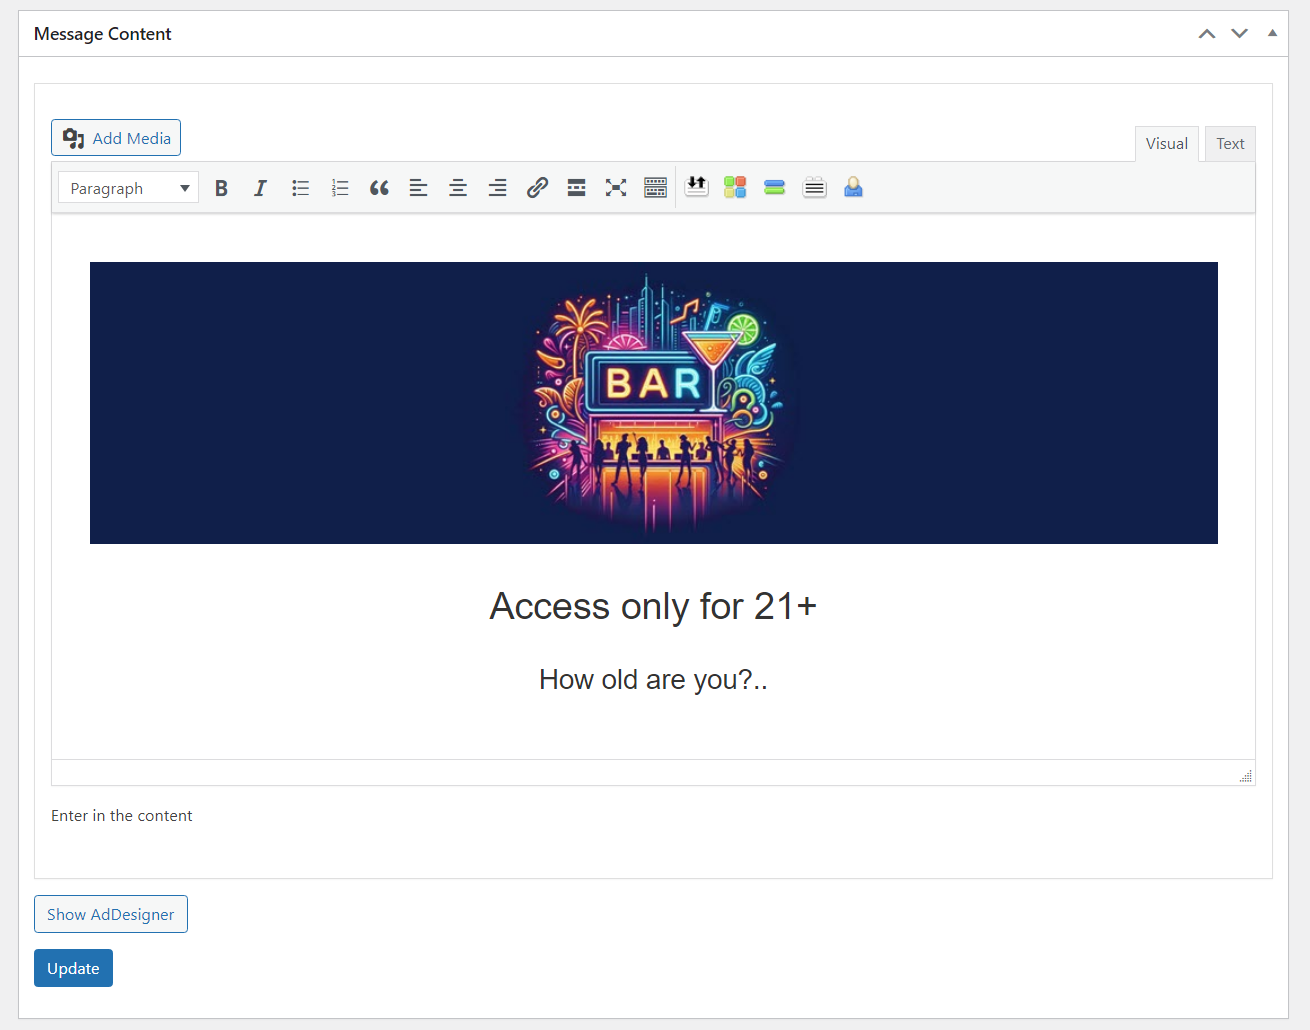
As the popup background color will be quite dark, we switched to Text editor and changed the text color to white using HTML:
Now we can configure the rest popup settings, which are located below.
There are a few sections with the settings, and before configuring the age verification feature, we will start from the some more generic popup settings.
Display Options
The Display Options tab allows you to define the basic appearance settings of the popup.
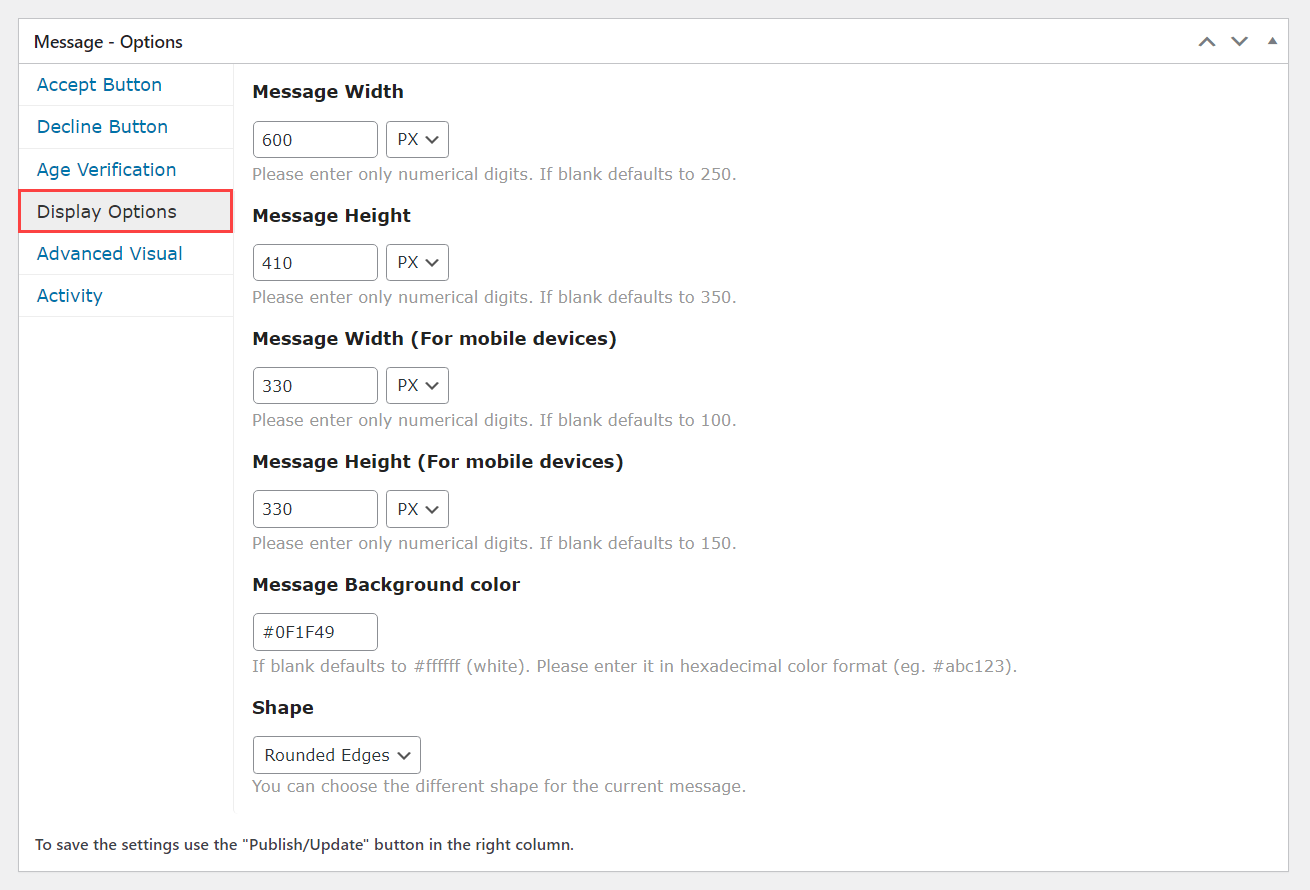
Here we defined the specific sizes of the popup message for the desktop and mobile devices using the following options:
- Message Width
- Message Height
- Message Width (For mobile devices)
- Message Height (For mobile devices)
We also defined the specific Message Background color using the relevant option. We specified the same color that we have in the image which we placed at the top of the popup message.
And, the last option Shape - there is a choice how the popup corners should be: either rounded or sharp. We chose the option Rounded Edges.
Advanced Visual Settings
Next tab we will consider is Advanced Visual. It has a few important settings which are marked with green on the screenshot below.
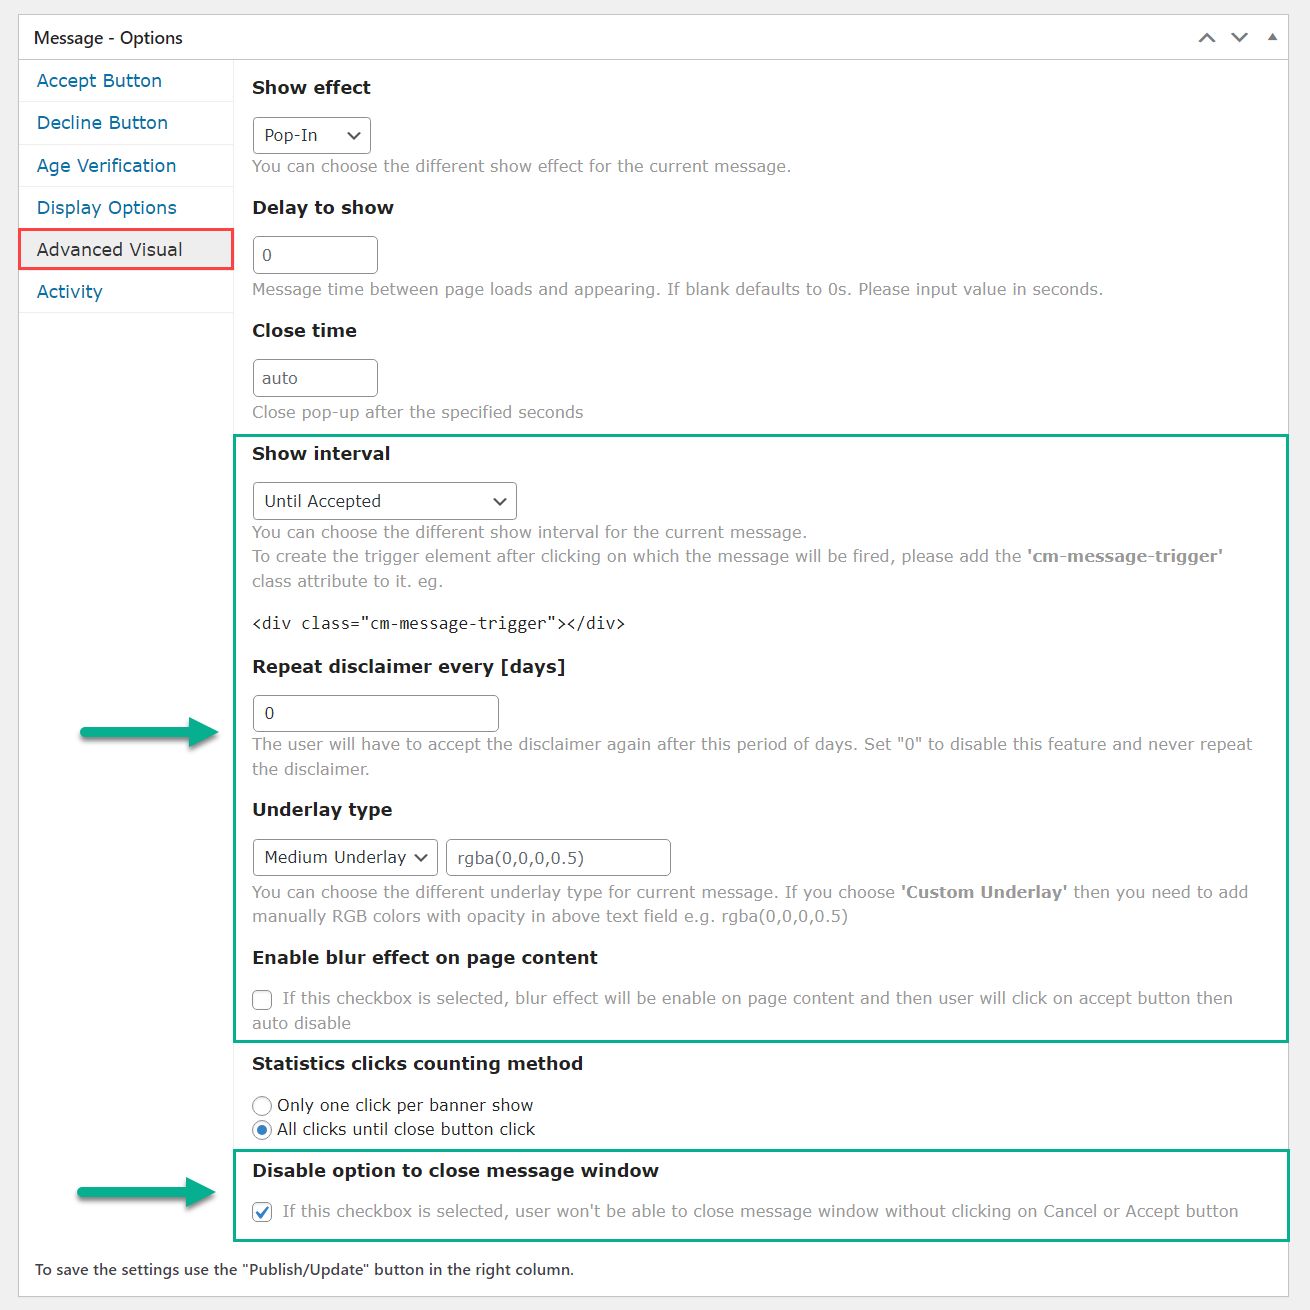
- Show interval - This settings allows to define how often to show the popup message. It has a few options, but as we need site visitors to confirm the age only once and there's no need to show the message again after that, we choose the option Until Accepted. It means that when the user confirmed his legal age, he will not see the popup message with age verification again.
- Repeat disclaimer every [days] - This option appears, when the option Until Accepted is chosen.
- Underlay type - Here you can define the underlay type behind the popup. You can disable underlay, make it totally black, or choose a few grades of how dark it should be. Also, you can specify the custom underlay.
- Enable blur effect on page content - Additionally to the previous option, you can blur the content behind the popup message, if you want to make it less visible until the legal age is confirmed.
- Disable option to close message window - Check this option to hide the closing button for the popup. It is important, because otherwise, users will be able to just close the popup, instead of confirming the age.
Activity Settings
Next tab that we need is Activity. Here you can define where to show the popup message. The options which are important for our use case are marked with green on the screenshot below.
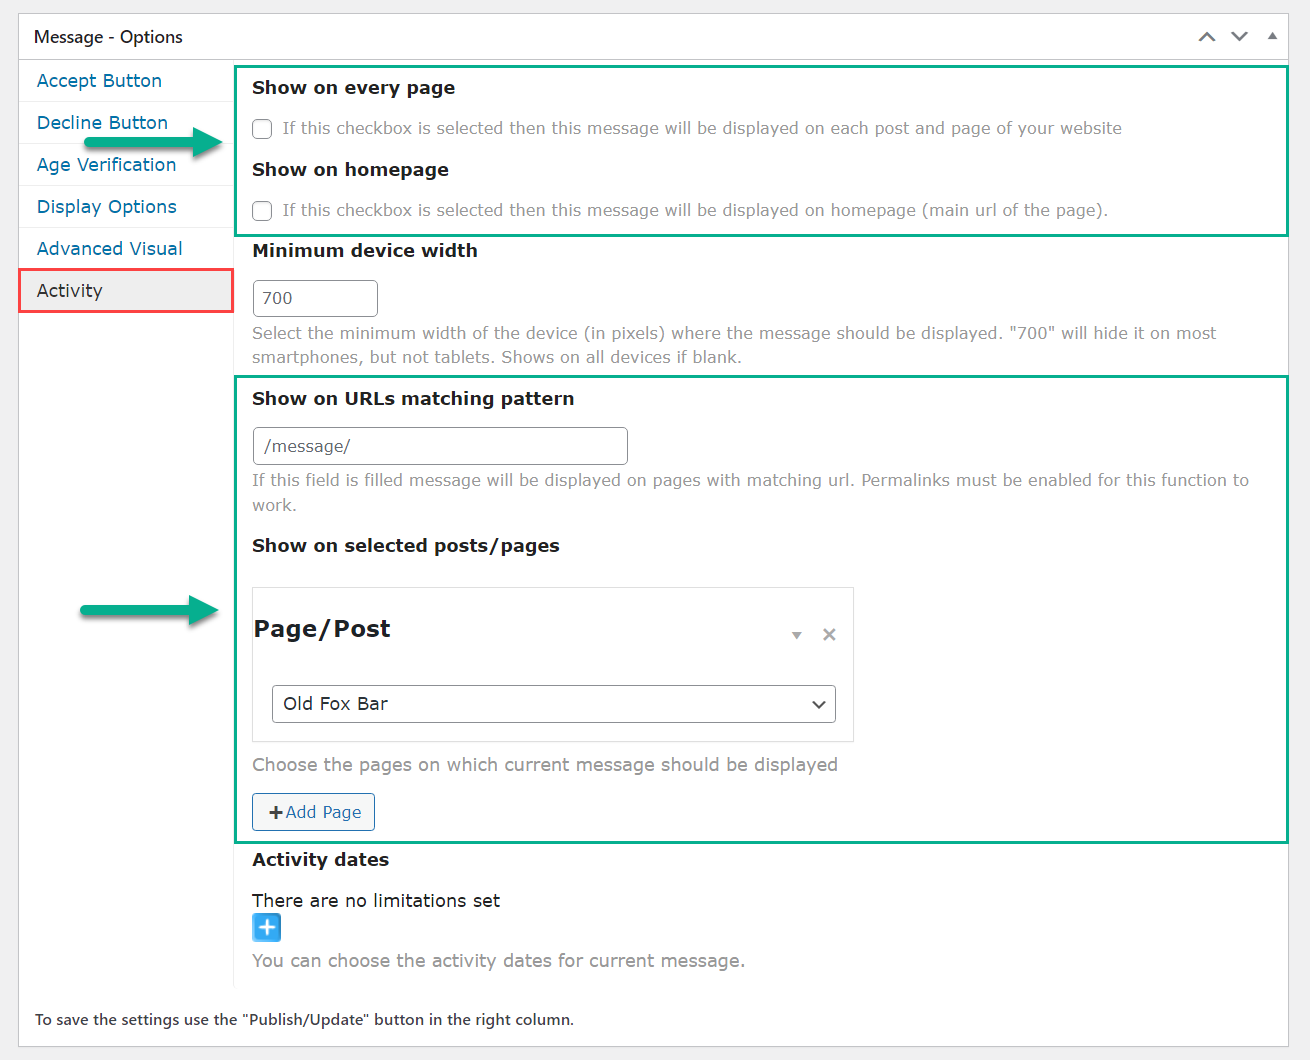
- Show on every page - Enable this option if you want the popup message with age verification to be displayed on all pages of your site. It will be displayed, until the user confirms his legal age, as we configured before.
- Show on homepage - Alternatively, you can enable this option if you want to display the popup message on the homepage. Have a note that the previous option for displaying popup on every page, also includes the homepage.
- Show on URLs matching pattern - This option allows you to define the specific single page where you want to show the popup message. You need to add URL link of the needed page.
- Show on selected posts/pages - This option allows you define multiple specific pages, where you want to display the popup message. Just choose the page or post from the dropdown list, and click +Add Page button if you want to choose more pages. For our use case, we used this option and chose the specific page.
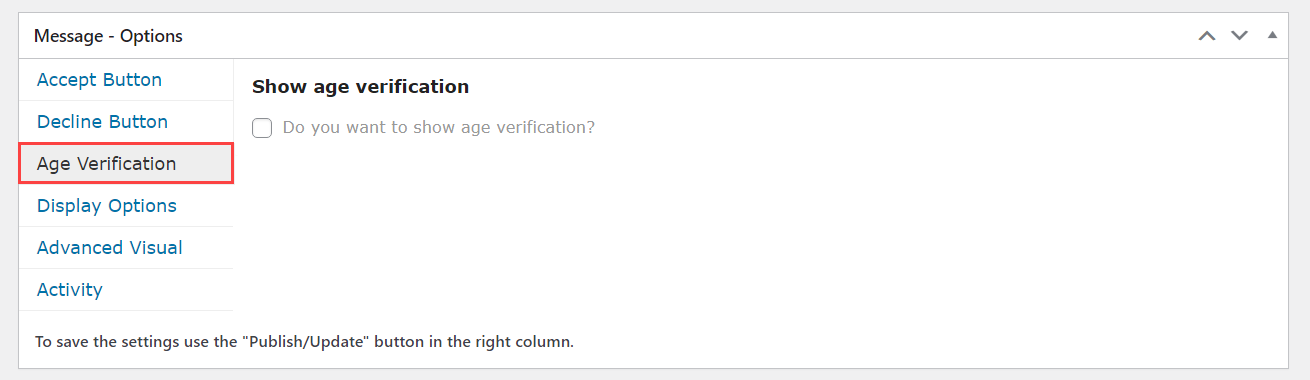
Age Verification Settings
Now it's time to configure the Age Verification feature under the respective tab. Enabling the option Show age verification will enable the feature there will appear some more settings below.
There are a few types of the age verification, but we will start from the generic age verification settings which are marked with green on the screenshot below.

- Minimum age - Define the minimum age required to access the content.
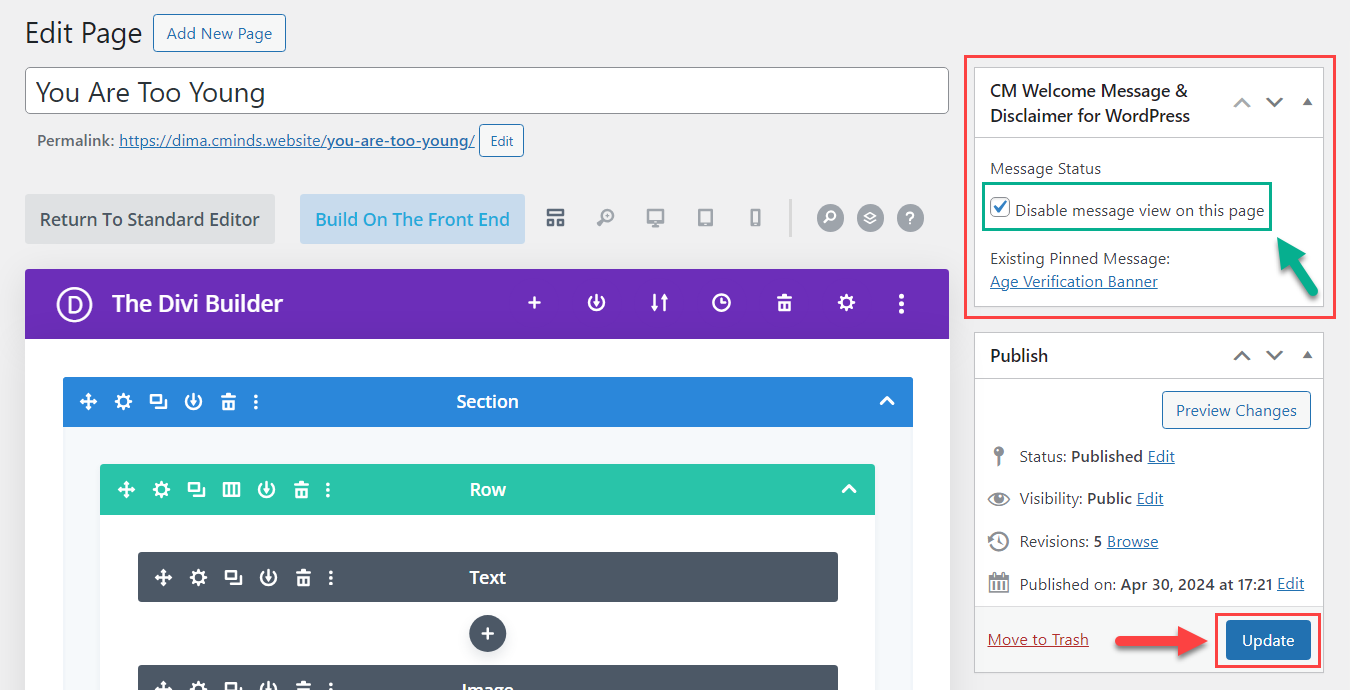
- Redirection path - Enter a URL, where the user will be automatically redirected in case if he did not pass the age verification. If this field is empty, the user will stay on the same page with the popup open. Here we added a URL link to the page that we have made in advance, which says the access is restricted.
TIP
In case if you choose to show the age verification popup on every page, and you want to redirect users to the predefined page when they don't suit the age control terms, you might need to hide this popup for this predefined page. To do that, start editing that page and find the metabox CM Welcome Message & Disclaimer for WordPress. Check the option Disable message view on this page, then save the changes by clicking Update.
- Age time redirection - Define the amount of seconds the redirection will happen if the user did not pass the age verification. This timer works only for verification types Full date verification and Only year verification chosen in the option below. For the Simple Yes/No verification, the redirection will start after choosing the option No. For our use case we changed this value to 3 seconds.
- Age verification label - Enter the text that will be displayed above the age verification functionality in the popup message. For example, it can be text like "You must be older than 18 years". If the field is empty, it will not be displayed on the front-end - instead, you can define formatted text in the Message Content area. We kept this field empty, as we already added formatted text to our popup banner.
- Access Denied label - Enter here a message that will appear in case if the user did not pass the age verification. By default it shows "You must be older to access the content.". This message will appear at the top of the popup banner.
Finally, under the setting Choose verification type you can choose between 3 following options:
- Full date verification
- Only year verification
- Simple Yes/No verification
Let's consider them more detailed below.
Full Date Verification
The Full date verification type provides the most precise way of age verification by displaying 3 fields to enter the day, month and year. It means that if the required age is 21, and the user enters 30.04.2003, and today is 29.04.2024, then this user can not access the content as he hasn't turned 21 yet.
Note: you can choose between US and EUR date formats in the plugin settings.
When this verification type is chosen, a couple of more options are available below:

- Enter Button Label - Change the label for the button Enter. This button is displayed below the fields for entering the date.
- Date required fields label - Change the label for the message that appears when the user didn't fill some of the date fields.
Now let's check how this age verification type looks on the front-end. Don't forget to save the changes by clicking the button Publish or Update (in case if you're editing the existing popup campaign).
Front-End Example
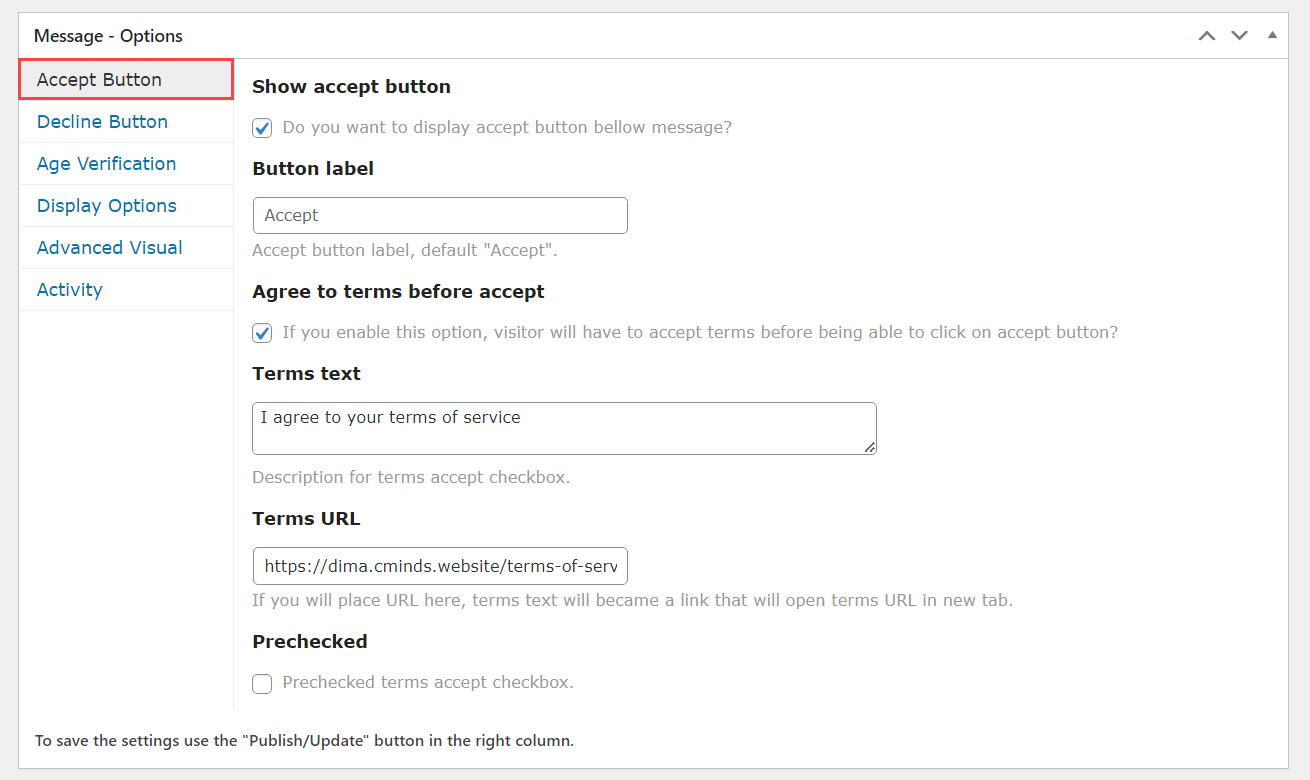
Using With Accept/Decline Feature
The plugin allows to create popup message which contain a link to your terms of service and shows buttons Accept and Decline. When this functionality is enabled, the age verification works similarly, but the Enter button is not displayed. In this case, the age verification can be confirmed when the user checks the agree-to-terms box and clicks Accept.
Front-End Example:
The Accept Button settings can be configured under the relevant tab:
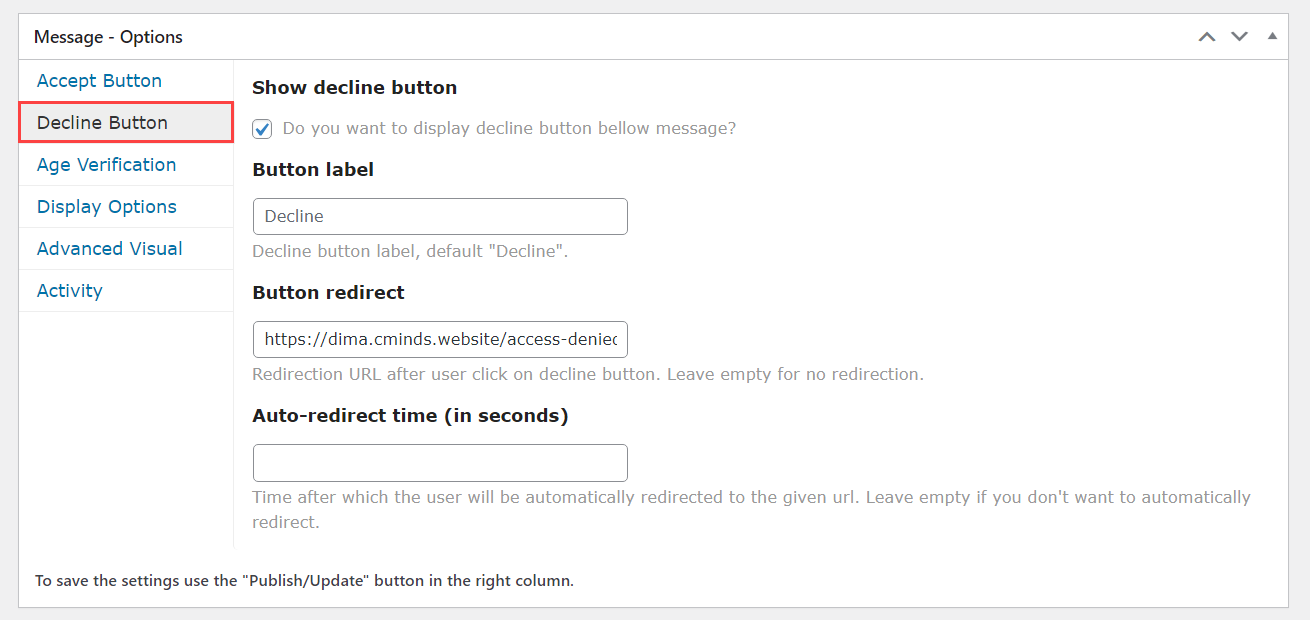
And there's a tab for configuring the Decline Button:
Learn more about it in the following use case guide:
Only Year Verification
The Only year verification type displays 1 fields where the user should enter the year he was born. It means that if the user enters 2003, and now it's 2024, the plugin will count the age verification as passed, as it doesn't count the precise day and month of birth.
When this verification type is chosen, a couple of more options are available below - they are identical to the ones which are displayed when the option Full date verification is chosen.
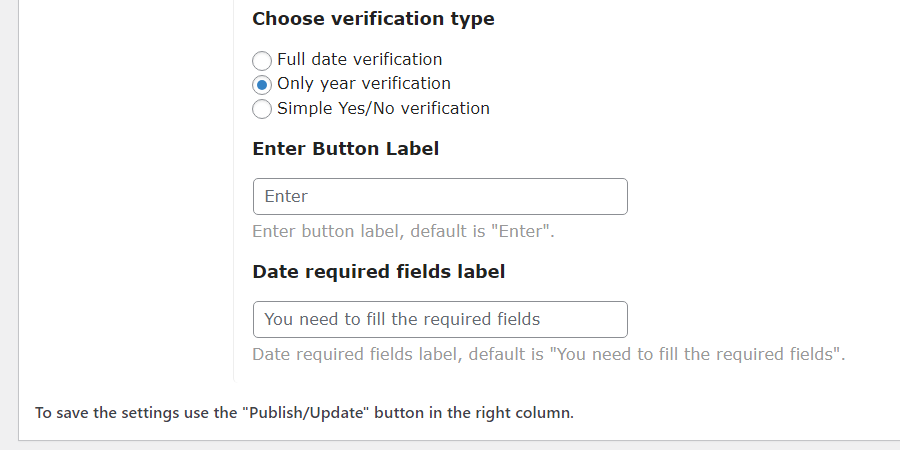
- Enter Button Label - Change the label for the button Enter. This button is displayed below the field for entering the birth year.
- Date required fields label - Change the label for the message that appears when the user didn't fill the birth year field.
Now let's check how this age verification type looks on the front-end. Don't forget to save the changes.
Front-End Example
Using With Accept/Decline Feature
When the Accept/Decline functionality is enabled, the Only year verification works similarly to the previous case - the Enter button is not displayed. In this case, the age verification can be confirmed when the user checks the agree-to-terms box and clicks Accept.
Front-End Example:
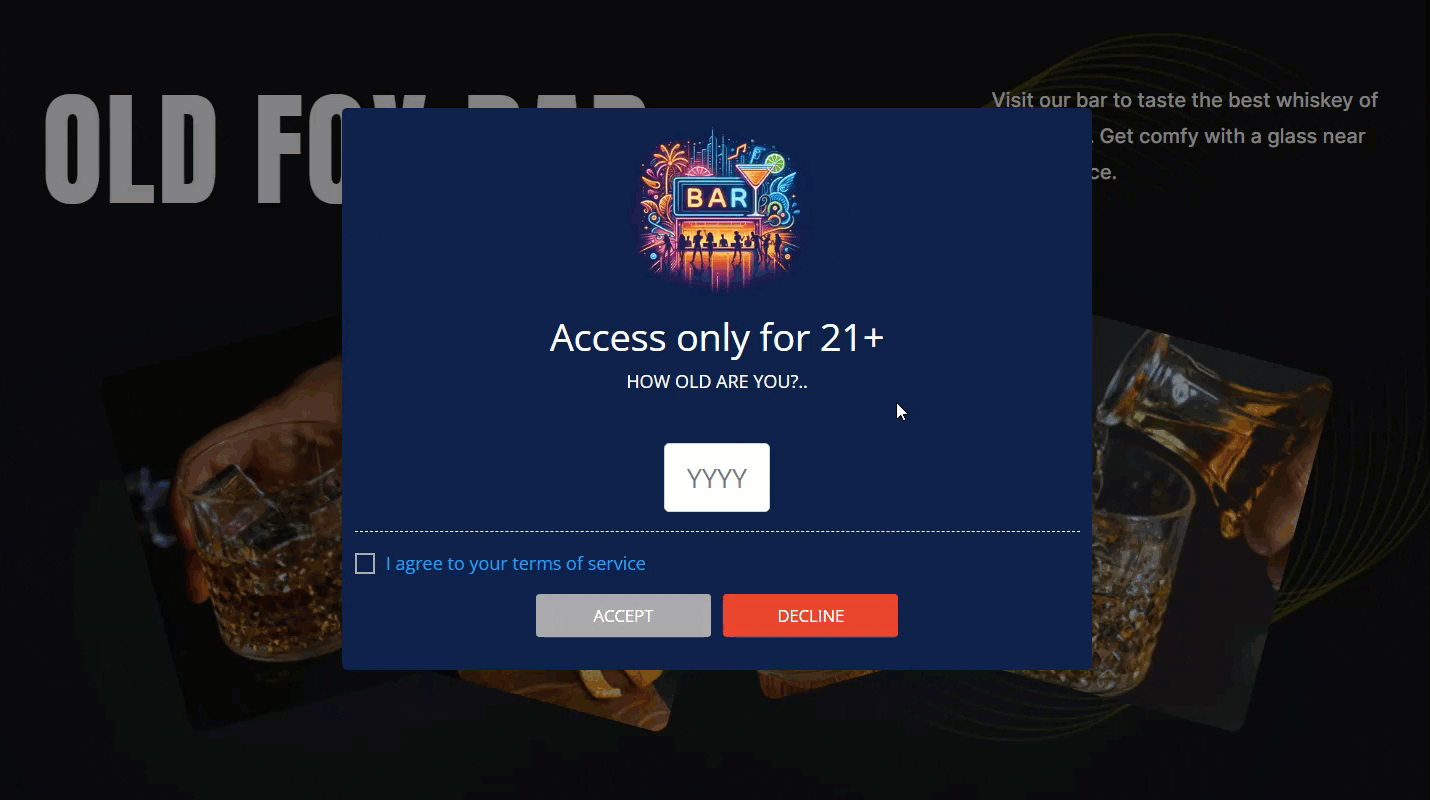
Simple Yes/No Verification
The Simple Yes/No verification type displays 2 buttons Yes and No. So the user just needs to click one of these buttons.
By default, the Yes button is green, and the No button is red. You can customize these buttons in the general plugin settings.
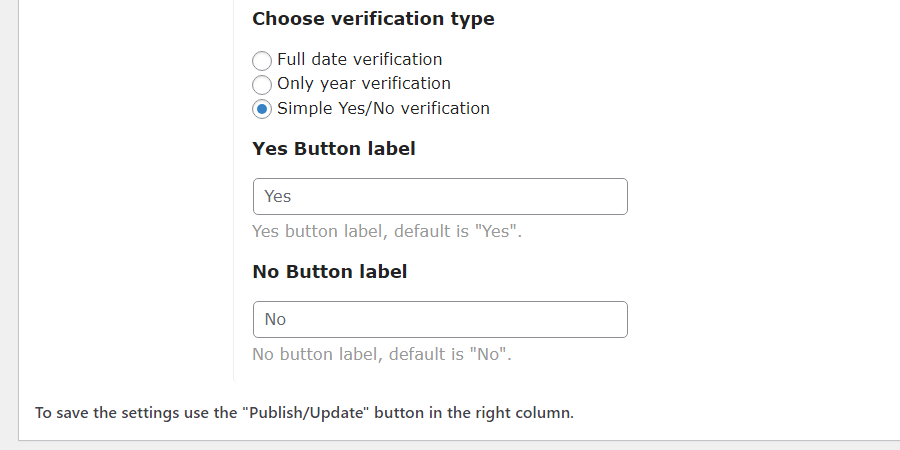
When this verification type is chosen, a couple of more options are available below - these are two labels for Yes and No buttons:
- Yes Button label
- No Button label
Now let's check how this age verification type looks on the front-end. Don't forget to save the changes.
Front-End Example
Using With Accept/Decline Feature
When the Accept/Decline functionality is enabled, the Simple Yes/No verification type works a bit differently. Both buttons are grey in this case, and popup is not closed when clicking on them. The user clicks on either Yes or No, and this button changes its color. Then the user needs check the agree-to-terms box and click Accept in order to access the content.
Front-End Example:

General Settings
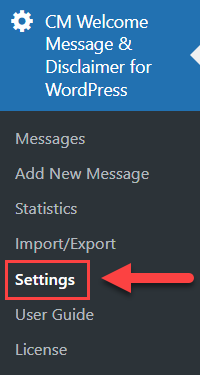
There are also some general settings which you can edit. Navigate to Admin Dashboard → CM Welcome Message & Disclaimer for WordPress → Settings.
There are two tabs.
General
Under the General tab, there's one option which is important for our use case:
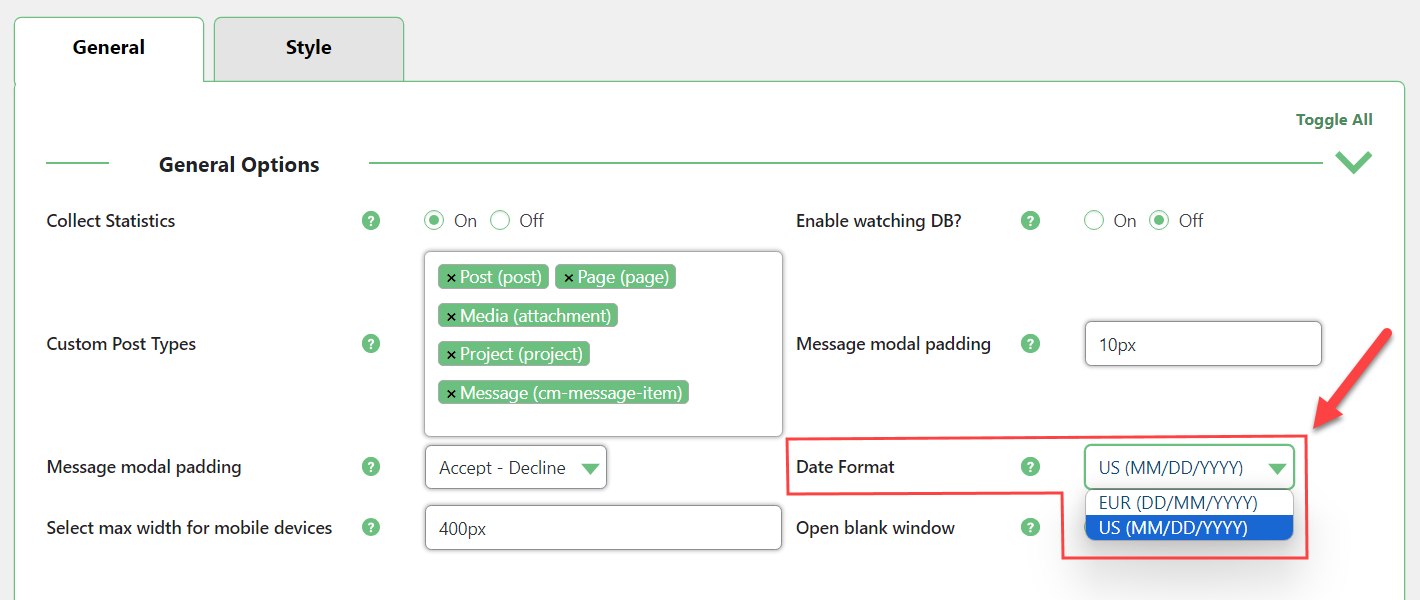
- Date Format - This option allows you to choose the date format for the Full date verification type. You can choose between:
- EUR (DD/MM/YYYY) - European date format.
- US (MM/DD/YYYY) - The USA date format.
Style
Under the Style tab you can configure the appearance of buttons and messages.
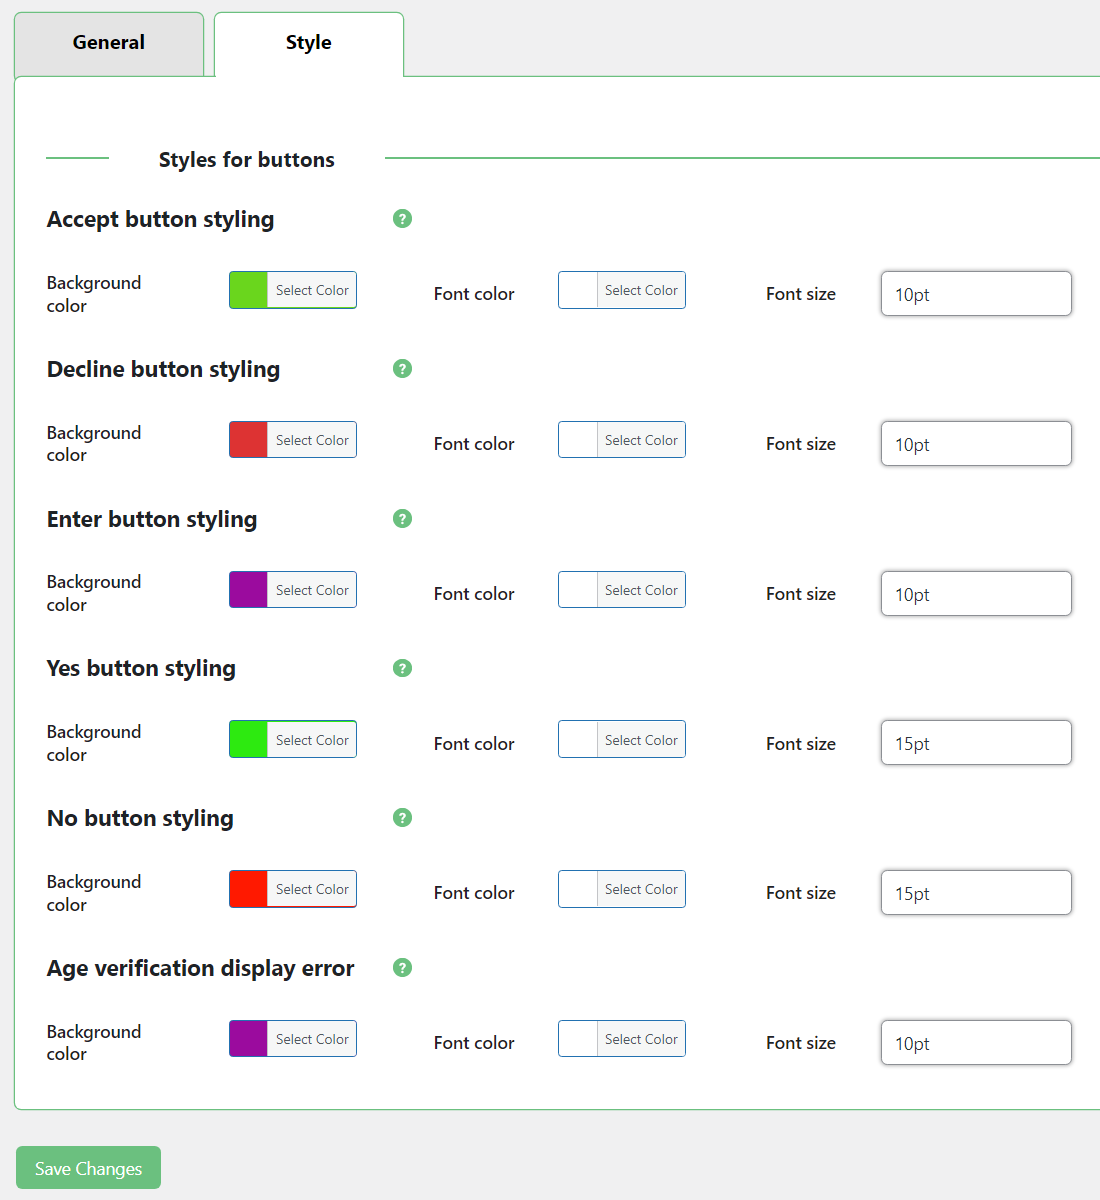
For each button and message you can configure the background color, font color and font size. You can edit the following items:
- Accept button styling
- Decline button styling
- Enter button styling
- Yes button styling
- No button styling
- Age verification display error
When configured the settings, click the button Save Changes at the bottom.
End Result
Following instructions found in the plugin and guides, you should be able to add age verification to your site and allow users to access content only after approving the age.
Use Case Front-End
Full date verification example:
Only year verification example:
Simple Yes/No verification:
 |
More information about the WordPress Disclaimer Plugin Other WordPress products can be found at CreativeMinds WordPress Store |
 |
Let us know how we can Improve this Product Documentation Page To open a Support Ticket visit our support center |