WordPress Disclaimer Plugin (CMWMD) - Use Case - How to Allow Access to Pages on Your Site After Accepting the Disclaimer
Use Case – How to allow access to pages on your site after accepting the disclaimer
Video Use-Case
Note: This guide requires:
- WordPress Disclaimer Plugin – This document uses version 1.4.4
Introduction
The WordPress Disclaimer Plugin lets you create custom welcome messages or ask users to verify site legal terms.
Use Case Front-End

Use Case Assumptions
In this example use case guide we will consider how to restrict pages on your site and allow users access them only after accepting the disclaimer.
It follows:
- Installing the plugin
- Setting up
- Creating first disclaimer
- Message - Options
- End Result
- Extra - Changing the background
Installing the Plugin
The process is the same for all CM plugins and add-ons.

- Download the plugin from your customer dashboard.
- Log in to WordPress and navigate to the WordPress Admin → Plugins settings.
- Click on Add New.
- Activate it and add the license.
Learn more: Getting Started - Plugin Overview
Setting up
Before creating our first disclaimer we can configure the default settings of the plugin according to our needs. Navigate to Admin Dashboard → CM Welcome Message & Disclaimer for WordPress → Settings. There you will find the General tab with all basic settings.
Now we are interested in the following options:
- Custom Post Types - Choose the types of posts where the welcome message or disclaimer may be displayed.
- Message modal padding - You can set padding (in px) for all your message boxes.
The other settings are about the appearance of the Accept and Decline buttons: the order how they appear, their background color, font color and font size.
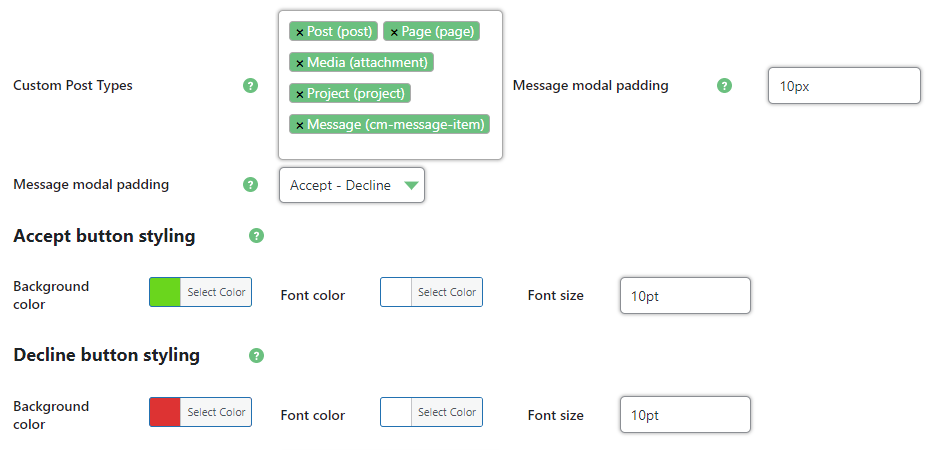
Click the button Save Changes after configuring the plugin.
You can find some more different settings. Learn more about it: WordPress Disclaimer Plugin (CMWMD) - General Settings
Creating First Disclaimer
Now we can create the first disclaimer. To do this, navigate to Admin Dashboard → CM Welcome Message & Disclaimer for WordPress → Add New Message.
First we need to type the Title in the respective field:

Then you can see the form Message Content. This is the main box you need to fill. Here you can add any content as well as any media, video, hyperlinks, etc. All of the HTML valid for the post/page is also valid for the Message. For editing the message you can use Visual Editor or Text Editor (if you need to build in a video, for example).
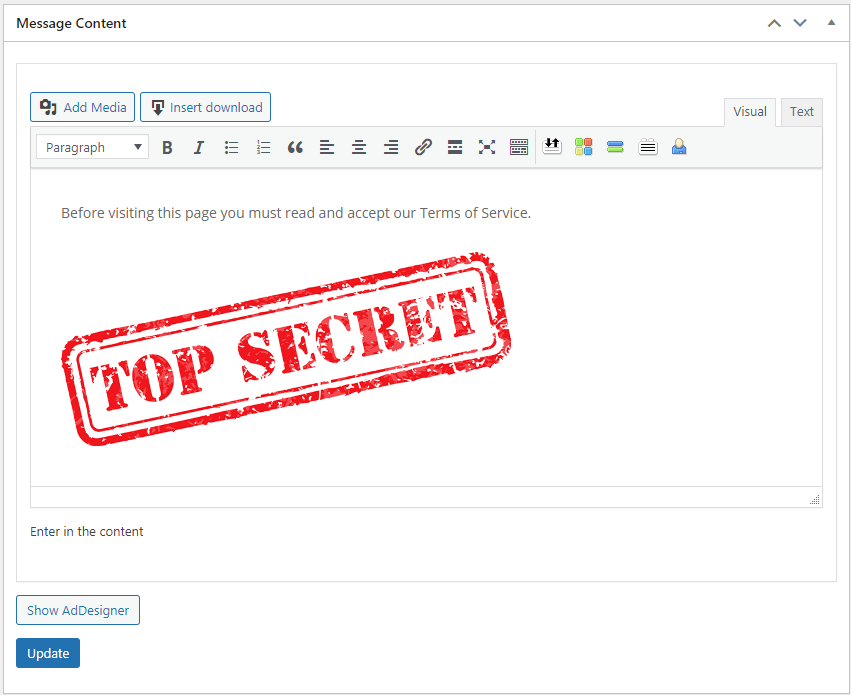
Click Update to save the changes.
Tip: Customize your post with AdDesigner
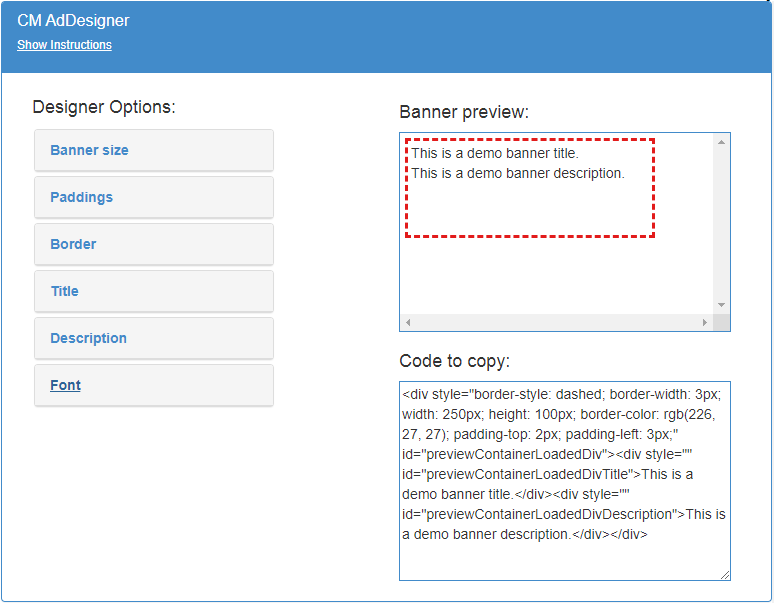
With the WordPress Disclaimer Plugin, you can customize your post content using AdDesigner - to launch it click the Show AdDesigner button below the Post Content field. Using the controls you can change the way how the banner should look like and see all changes in the box labeled Banner preview.
Learn more about how to work with AdDesigner: WordPress Disclaimer Plugin (CMWMD) - AdDesigner
Message - Options
Next step is to configure the appearance and behavior of the Disclaimer message. There are 5 sections with additional options. Let's consider them step-by-step.
Accept Button
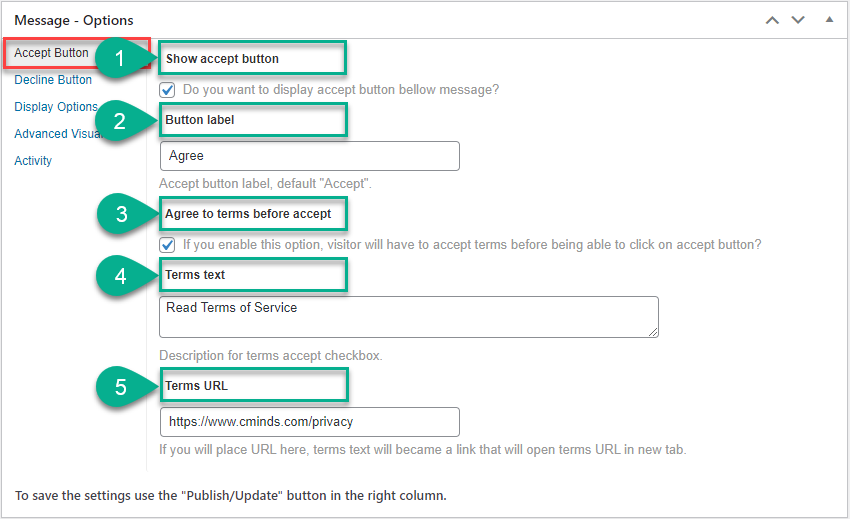
First tab is Accept Button. Here you can find the following options:
- Show accept button - Enable it to display the Accept button below the disclaimer message.
- Button label - By default this button is displayed as "Accept", but we can change the label. Let's change it's label to "Agree".
- Agree to terms before accept - Enable this option, so the user will have to check the agreement box, otherwise he can't click the Accept button.
- Terms text - Here we need to put the text of agreement that user should read for accepting.
- Terms URL - If you have the terms of agreement on the separate page, you can put here the URL for this page, so Terms text from previous option will be displayed as a clickable link that leads to that page.
Decline Button
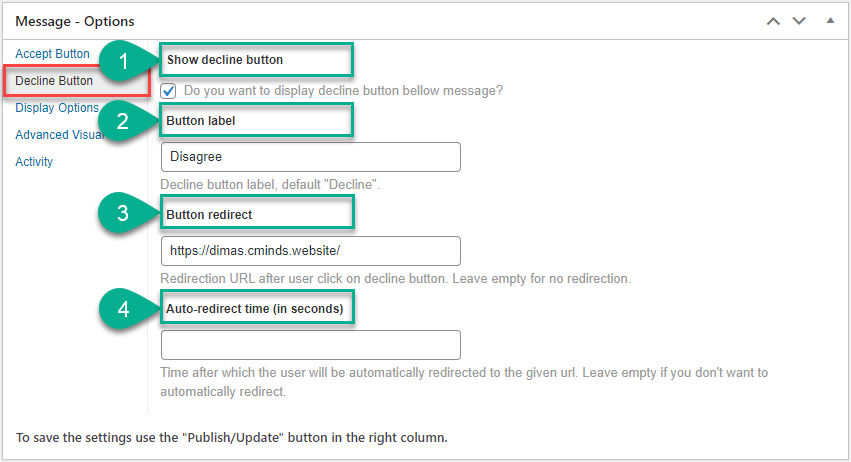
Second tab is Decline Button. The options are:
- Show decline button - Enable it to display the Decline button below the disclaimer message.
- Button label - By default this button is displayed as "Decline", but we can change the label. Let's change it's label to "Disagree".
- Button redirect - If the user disagrees with our terms, we can redirect him to another page - for example, homepage of our site, just write there needed URL. This way we can restrict our page from the users who don't accept the terms.
- Auto-redirect time (in seconds) - We can limit the time of being the user on the page, before he accepts the terms. If the user doesn't accept or decline the terms within defined period of time, he will be redirected to the URL that we set in the previous option.
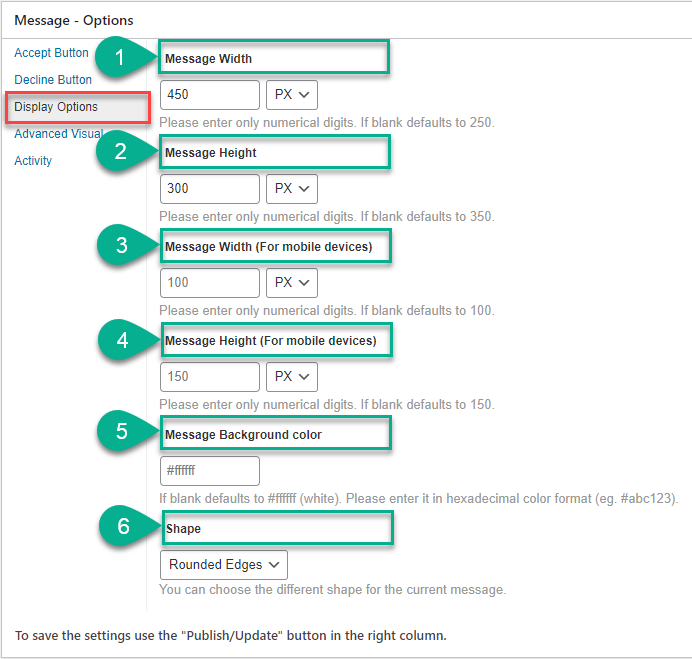
Display Options
Third tab is Display Options. The options are:
The options 1 and 2 are for Width and Height of the message box. The options 3 and 4 are the same but for mobile devices.
In the 5th option you can change Message Background color. The value must in hexadecimal color format (#ffffff).
And the 6th option - we can choose the Shape of the message box - with rounded or sharp edges.
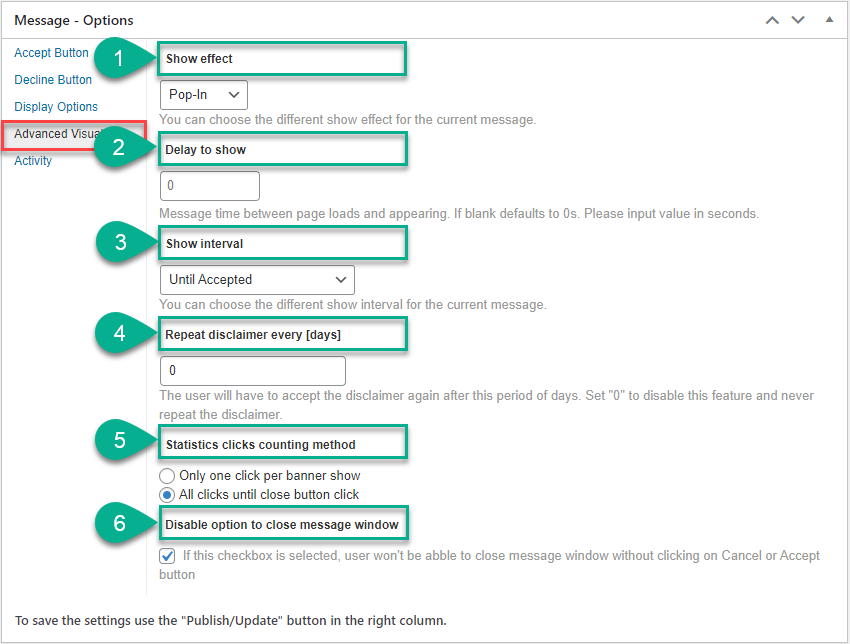
Advanced Visual
Next tab is Advanced Visual. The options are:
- Show effect - Choose here the effect of the disclaimer message appearance.
- Delay to show - We can set the time in seconds, when the disclaimer message will appear after the page is loaded. As there is no need in this for us, we can leave it empty, so the message will appear without any delay.
- Show interval - We can set, how often the disclaimer message will appear for the user. In our example it's enough to show the disclaimer message only Until Accepted.
- Repeat disclaimer every (days) - Even though the user accepts the terms, we might need to remind him the terms from time to time. So we can show the disclaimer every 7 days, or every 30 days, for example - you can set any interval in days. Now we can set it to 0.
- Statistics clicks counting method - Choose the method how to collect the statistics.
- Disable option to close message window - Check this box, so the user will be able to close the message window only by accepting or declining the terms.
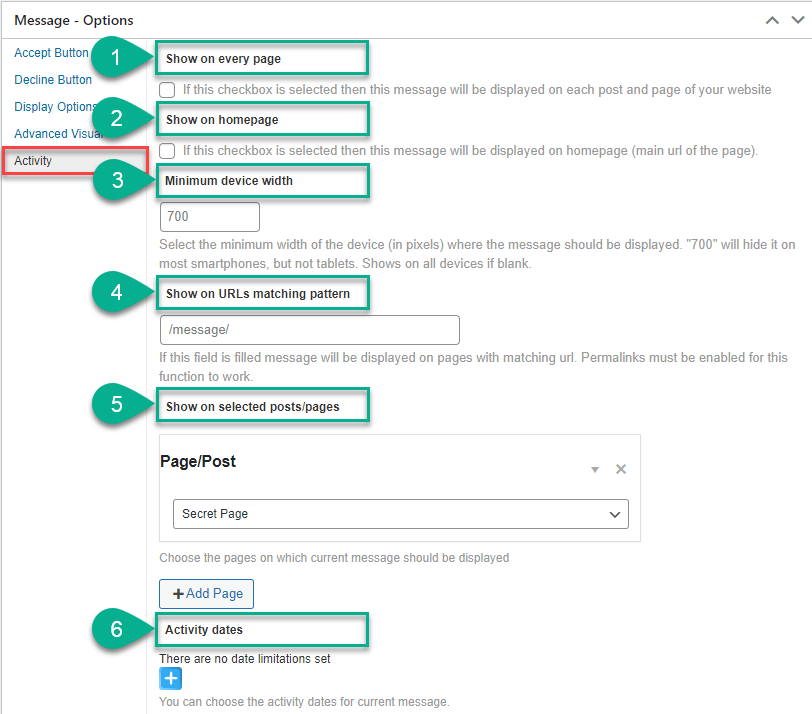
Activity
Last tab is Activity. The options are:
- Show on every page - Check this box to display the disclaimer message on every post or page of your website.
- Show on homepage - Check this box to display the disclaimer message on homepage either.
- Minimum device width - Select the minimum width of the device (in pixels) where the message should be displayed. Note: if you want to make the page restricted by the disclaimer until the terms are accepted then leave this option blank. Because if you set some minimum device width some users will be able to get to that page using their smartphones and the disclaimer message will not appear, if their devices have the width that is less than the value that you set.
- Show on URLs matching pattern - If you haven't selected to show the message on every page, you can define a pattern in which this message will appear. It can be a category or a permalink path - for example, your blog articles /blog/. This will cover all URLs with the following pattern /blog/*.
- Show on selected posts/pages - Choose from the dropdown menu to display the message on specific posts or pages, or add a page. You can select multiple pages and add them one by one using the +Add Page button. Let's choose for our example the page that we called "Secret Page".
- Activity dates - Click on the blue plus button to set an activity date for the disclaimer message. This will determine appearing the disclaimer message only on specific dates. You can define multiple date range including exact time per each.
Now when everything is configured click the Publish or Update button at the top right.
End Result
In result we have a page, where user must accept Terms of Service, otherwise he will be redirected to homepage.
Use Case Front-End
Extra - Changing the Background
If you want to change the background of the underlay, so the user couldn't see the information on the page before accepting the terms, you can use the following CSS rule.
#ouibounce-modal .underlay { background-color: rgba(0,0,0,1) !important; }
Where rgba(0,0,0,1) is the color of the background (black in this case).
If you want to just change the opacity, then you need to modify the last number in the series having in mind that:
- 0 - means fully transparent.
- 1 - means full color (no transparency).
How to do this?
Navigate to Dashboard → Home → Customize Your Site.
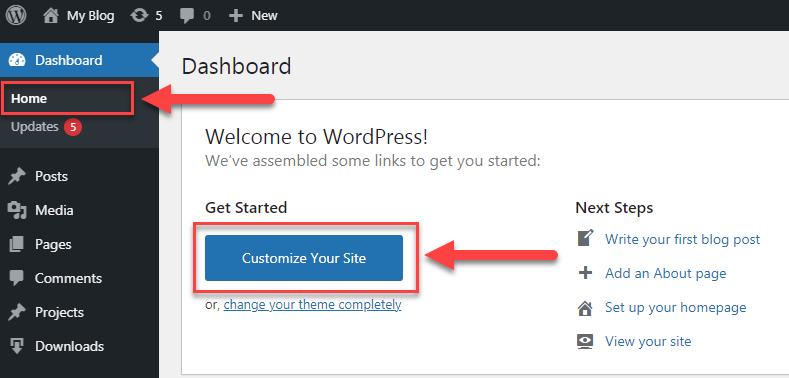
Then you need to choose the page you want to customize, navigate to the Additional CSS section, put there a code and then click the Publish button.
Result on the Front-end:

 |
More information about the WordPress Disclaimer Plugin Other WordPress products can be found at CreativeMinds WordPress Store |
 |
Let us know how we can Improve this Product Documentation Page To open a Support Ticket visit our support center |