WordPress Interactive Map Plugin (CMML) - External API - Tracking User Location in Real Time (REST API)
Tracking User Location in Real Time (REST API)
REST API Uses
You can build an app with these buttons: "Create Location" and "Track Location".
- Generate Location - When accessed, creates a location entry in the plugin (read the separate guide)
- Track Location - When accessed, starts tracking the user location in real time
What is This Feature
With WordPress Interactive Map plugin it's possible to track the user location and send that information to the plugin.
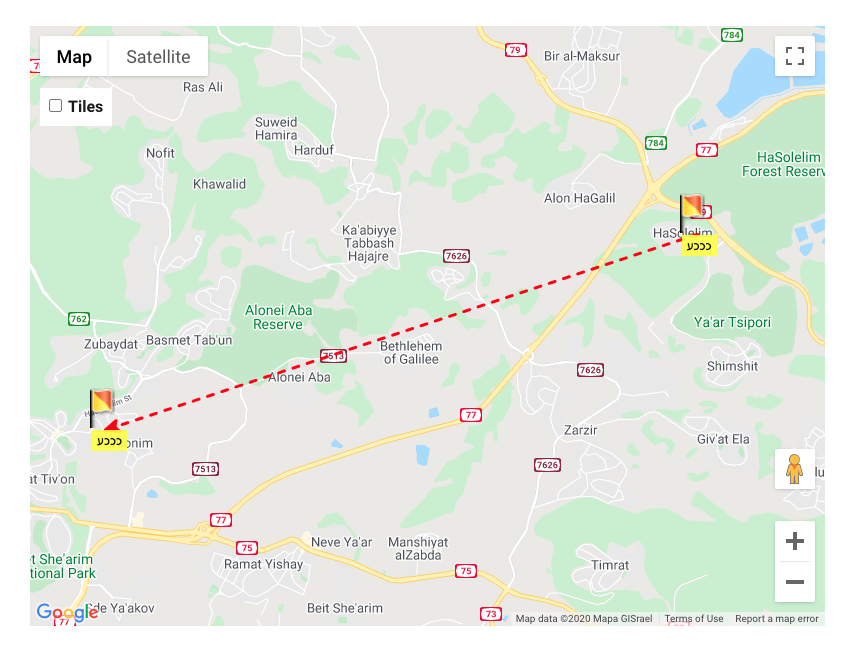
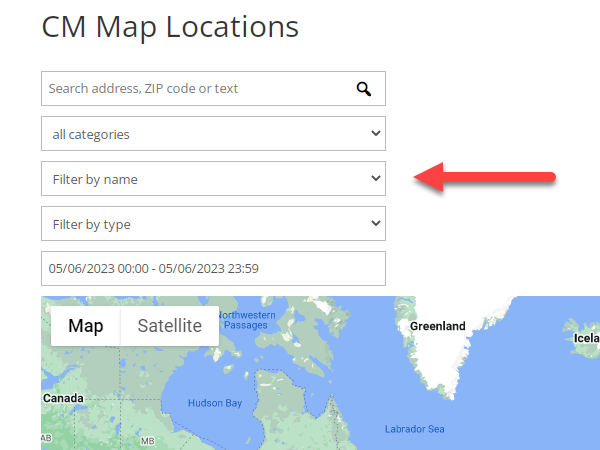
Example
How To Use Track User Location
Using the feature is simple:
- Adjust the settings (read more below)
- Create or generate a key
- Customize the URL, including the key
- Add the URL to your app
Track Location URL - How to Use
The URL you will add in your app is structured like this:
http://your-site.com/wp-json/cmloc/v1/current_location?key=abc123&username=name of user&ip=user IP&coordinates=latitude,longitude&description=yourdescription&type=1
The underlined green elements above can be customized.
- username (name of user can be anything and not related to a WP user)
- ip (IP address)
- description (any text)
- type=1 - this parameter is needed to pass current location
- coordinates (latitude,longitude) - this parameter is needed to pass current location
- latitude - this parameter is needed to pass temporary location
- longitude - this parameter is needed to pass temporary location
- bgcolor - User marker label background color, You can add it with and without "#", e.g. #ff0000, #008000, FFFFFF etc
- bgcolor_label - User marker label background color text. You can add any text, e.g. Red, Green, Blue etc. And this is used in the filter
- polygon - the client needs to pass coordinates set in polygon=[polygon]
- key - has to match the key set in the plugin's settings:

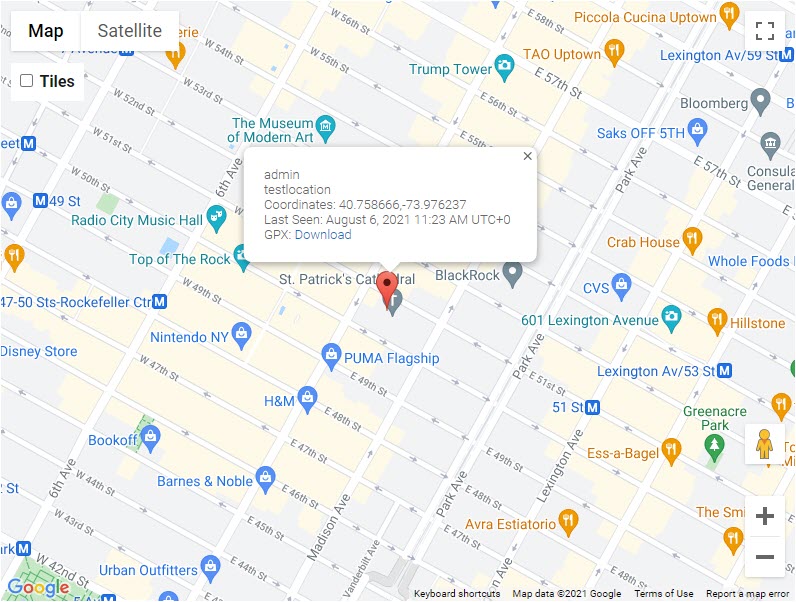
Example with attributes for posting Current Location
https://example-site.com/wp-json/cmloc/v1/current_location?key=xxxx-xxxx&username=admin&ip=128.64.32.137&coordinates=40.758666,-73.976237&description=testlocation&type=1
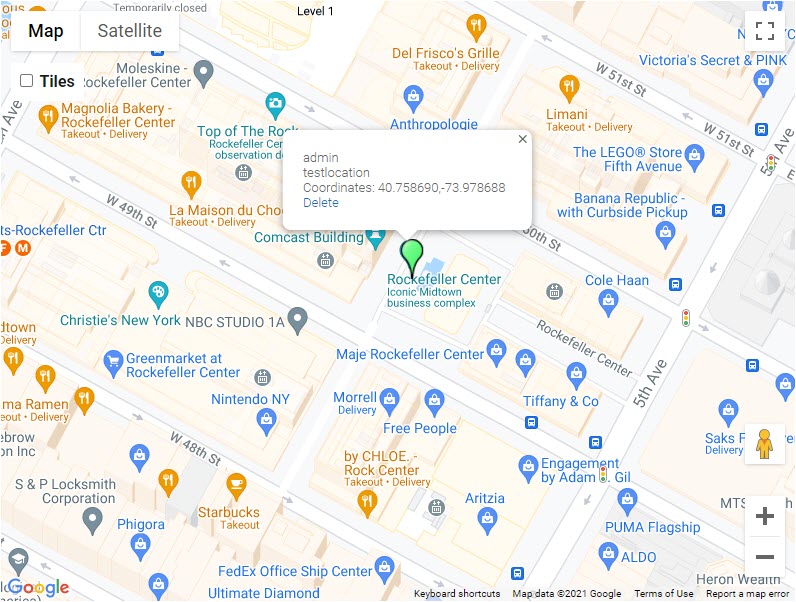
Example with attributes for posting Temporary Location
https://example-site.com/wp-json/cmloc/v1/current_location?key=xxxx-xxxx&username= admin&ip=128.64.32.137&latitude=40.758690&longitude=-73.978688&description=testlocation
Plugin Settings
Navigate to the Admin Dashboard → CM Map Locations Pro → Settings. Click on the User Tracking tab.

User Tracking
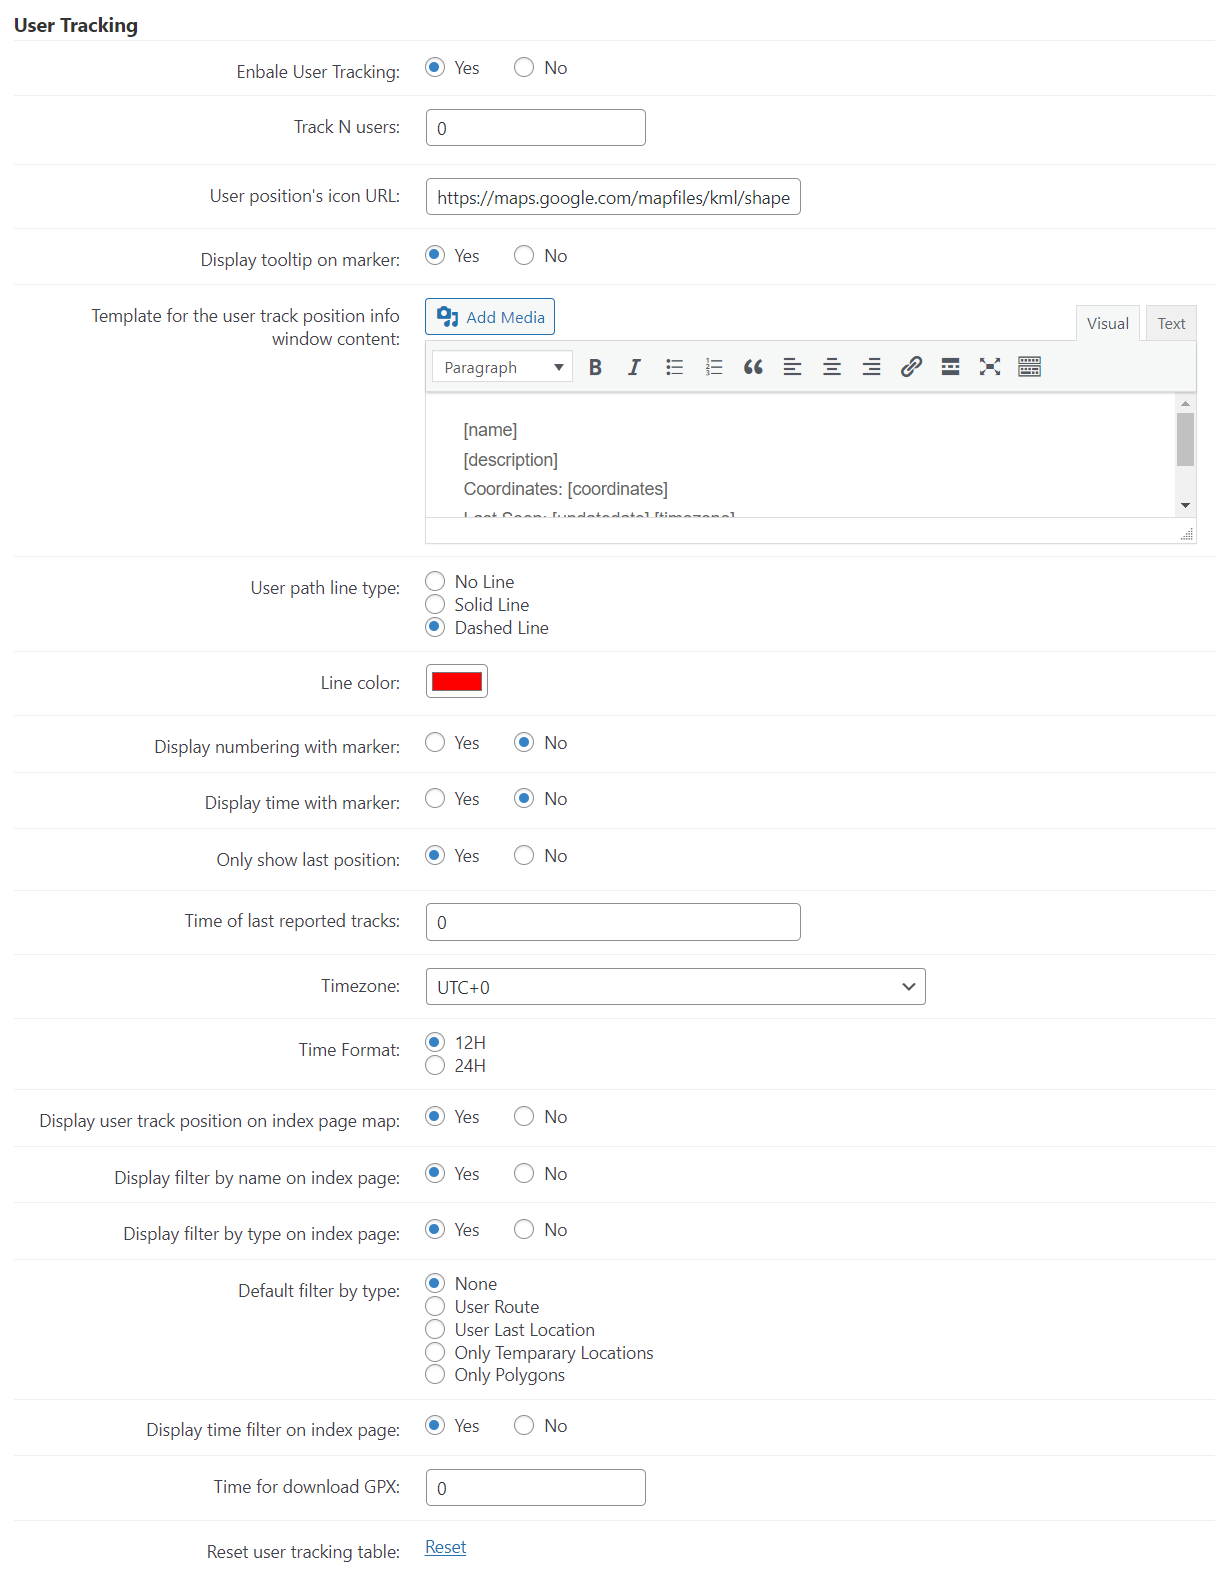
- Enable User Tracking - Turn on the feature.
- Track N users - How many devices can connect to the API and. 0 means then no limit, which might be dangerous.
- User position's icon URL - Example: https://developers.google.com/maps/documentation/javascript/examples/full/images/beachflag.png
- Display tooltip on marker - If enabled, a tooltip will show on marker when the user will clicks on it.
- Template for the user track position info window content - You can use HTML and the following placeholders:
- [identifier]
- [name]
- [description]
- [coordinates]
- [UTMcoordinates] (note: this placeholder was introduced in version 2.7.5)
- [updatedate]
- [timezone]
- [downloadlink]
- [bgcolor] (note: this placeholder was introduced in version 2.6.6)
- [bgcolorlabel] (note: this placeholder was introduced in version 2.6.6)
- [deletelink] (note: this placeholder was introduced in version 3.1.1)
- [timediff] (note: this placeholder was introduced in version 3.1.9)
- User path line type - Choose between:
- No Line (just the points will show on map)
- Solid Line
- Dashed Line
- Line color - Will be applied to the user track if either "Solid" or "Dashed" was selected above.
- Display numbering with marker - If enabled, the numbering will be shown with the user current location marker. Note: this option was introduced in version 3.1.2.
- Display time with marker - If enabled, the time will be shown with the user current location marker. Note: this option was introduced in version 3.1.2.
- Only show last position - If enabled, only shows the user last position. If disabled, shows all.
- Time of last reported tracks - Set time of last X hours:minutes e.g. 01:00 (1 hour), 5:15 (5 hour and 15 minutes), 7:30 (7 hours and 30 minutes), 9 (9 hours) and If set 0 means show always. Note this will work if above setting is disabled.
- Timezone - Self explanatory.
- Time Format - Choose between 12H and 24H.
- Display user track position on index page map - Shows locations in the map on the index page.
- Display filter by name on index page - If enabled, the user will be able to filter the user track position by name/identifier on the index page. Note: this option was introduced in version 3.1.4.
- Display filter by type on index page - If enabled, the user will be able to filter locations by type on the index page. Note: this option was introduced in version 3.1.4.
- Default filter by type - If the option above is enabled, you can choose the filter that will be chosen by default in the dropdown. You can choose between:
- None
- User Route
- User Last Location
- Only Temporary Locations
- Only Polygons
- Note: this option was introduced in version 3.1.4.
- Default filter by type - If the option above is enabled, you can choose the filter that will be chosen by default in the dropdown. You can choose between:
- Display time filter on index page - If enabled, the user will be able to filter locations by date and time on the index page. Note: this option was introduced in version 3.1.4.
Front-End Example
- Time for download GPX - This option is used with the GPX download link. Here you can set the time of last X hours to download GPX, e.g. 1 (1 hour), 5 (5 hours), 10 (10 hours). If set to 0, then there will be downloaded only the current location (single point). Note: this option was introduced in version 3.1.1.
- Reset user tracking table - Click it to delete all user tracking entries from the table. Note: this option was introduced in version 2.7.2.
Temporary Locations
Note: this section with options was introduced in version 2.7.2.
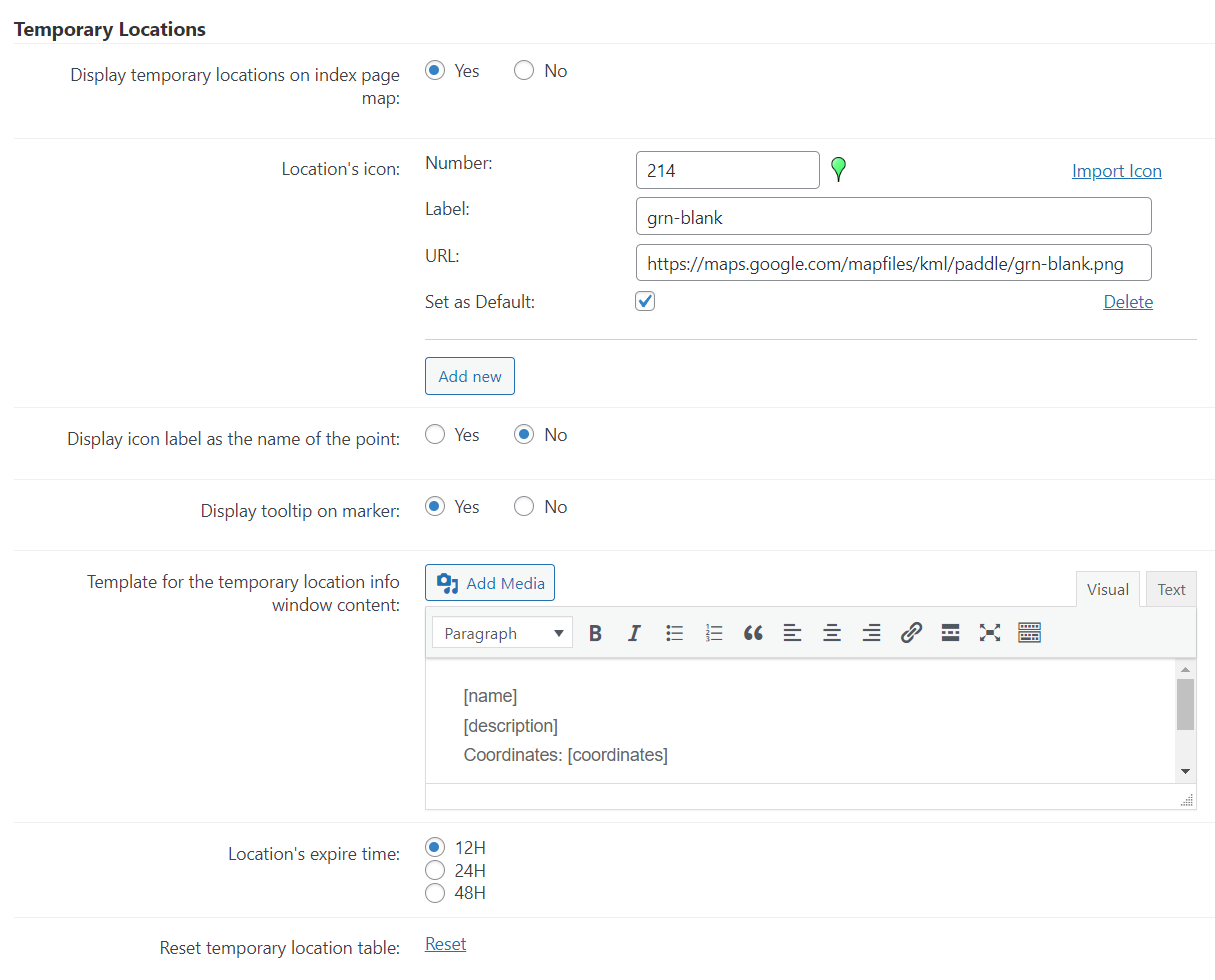
- Display temporary locations on index page map - If enabled, then user posted temporary locations will be shown on locations index page map.
- Location's icon - You can specify one or multiple icons for temporary locations. Note: this feature was introduced in version 3.1.9. For each icon you can specify the following:
- Number - Number of the icon in the library with predefined icons or other custom number.
- Import Icon - Clicking on this link shows the library with predefined icons. Choosing any of them will automatically fill all related fields with the icon number, label and URL.
- Label - Specify the icon label.
- URL - Specify the icon URL.
- Set as Default - Check this box to use the icon as default.
- Delete - Click it to delete the icon.
- Add New - Click it to add new icon.
- Number - Number of the icon in the library with predefined icons or other custom number.
- Display icon label as the name of the point - If enabled, then icon label will be shown as the name of the point below marker. Note: this feature was introduced in version 3.1.9.
- Display tooltip on marker - If enabled, then a tooltip will be shown on the marker when the user clicks on it.
- Template for the temporary location info window content - You can use HTML to customize this template. It also supports the following shortcodes:
- [name]
- [description]
- [coordinates]
- [UTMcoordinates] (note: this placeholder was introduced in version 2.7.5)
- [updatedate]
- [deletelink] (note: will work only for admin privilege user and return output with anchor tag)
- [timediff] (note: this placeholder was introduced in version 3.1.9)
- [iconlabel] (note: this placeholder was introduced in version 3.1.9)
- Location's expire time - Choose location's expire time. You can choose between:
- 12 hours
- 24 hours
- 48 hours
- Reset temporary location table - Click it to delete all temporary location entries from the table.
Temporary Polygons
Note: this section with options was introduced in version 2.7.3.
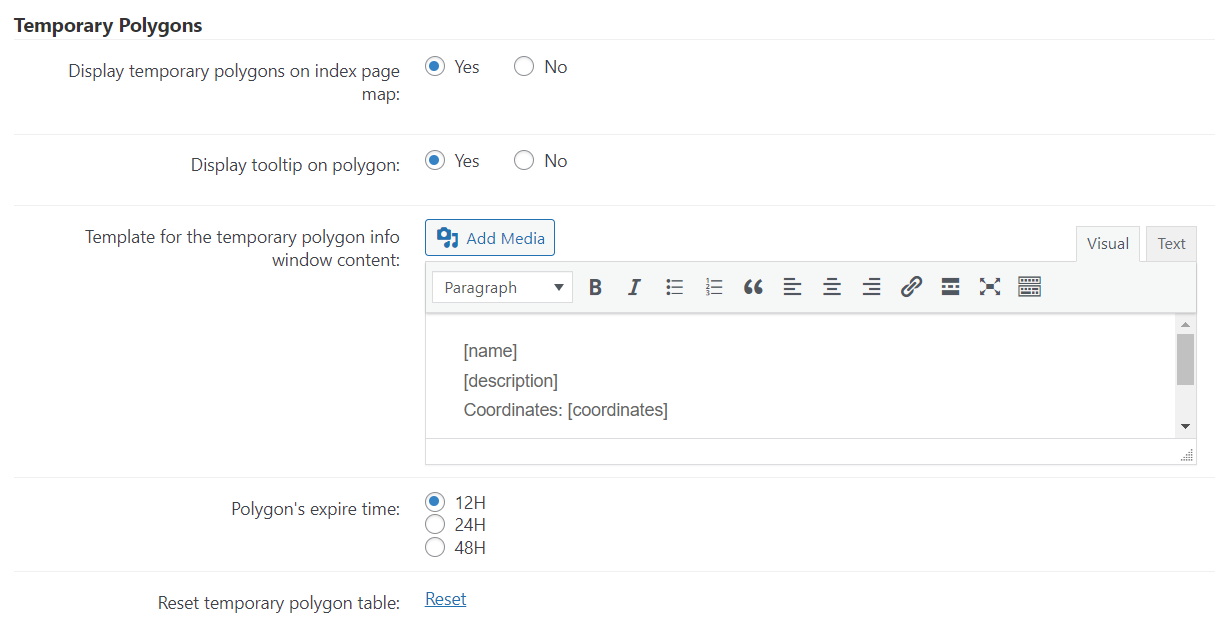
- Display temporary polygons on index page map - If enabled, then user posted temporary polygons will be shown on locations index page map.
- Display tooltip on polygon - If enabled, then a tooltip will be shown on polygon when user will click on it.
- Template for the temporary polygon info window content - You can use HTML and the following shortcodes:
- [name]
- [description]
- [coordinates]
- [UTMcoordinates] (note: this placeholder was introduced in version 2.7.5)
- [polygoncoordinates]
- [updatedate]
- [deletelink] (note: will work only for admin privilege user and return output with anchor tag)
- [timediff] (note: this placeholder was introduced in version 3.1.9)
- [iconlabel] (note: this placeholder was introduced in version 3.1.9)
- Polygon's expire time - Choose ploygon's expire time. You can choose between:
- 12 hours
- 24 hours
- 48 hours
- Reset temporary polygon table - Click it to delete all temporary polygon entries from the table.
Project Site Polygons
Note: this section with options was introduced in version 2.7.8.
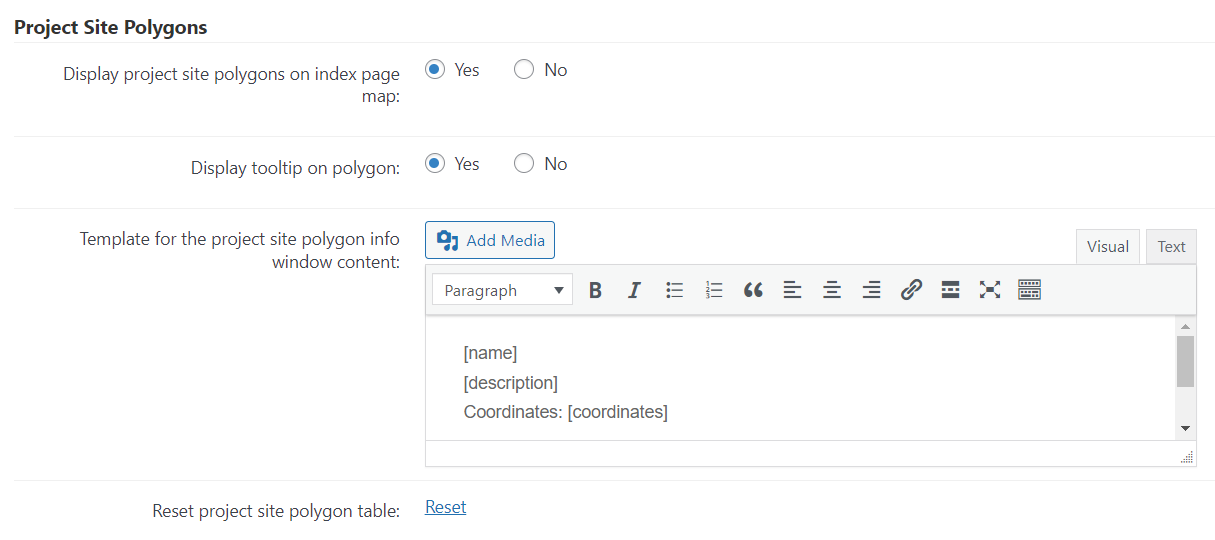
- Display project site polygons on index page map - If enabled, then user posted project site polygons will be shown on locations index page map.
- Display tooltip on polygon - If enabled, then a tooltip will be shown on polygon when user will click on it.
- Template for the project site polygon info window content - You can use HTML and the following shortcodes:
- [name]
- [description]
- [coordinates]
- [UTMcoordinates]
- [polygoncoordinates]
- [updatedate]
- [deletelink] (note: will work only for admin privilege user and return output with anchor tag)
- [timediff] (note: this placeholder was introduced in version 3.1.9)
- [iconlabel] (note: this placeholder was introduced in version 3.1.9)
- Reset project site polygon table - Click it to delete all project site polygon entries from the table.
 |
More information about the WordPress Interactive Map Plugin Other WordPress products can be found at CreativeMinds WordPress Store |
 |
Let us know how we can Improve this Product Documentation Page To open a Support Ticket visit our support center |