General Support - Advanced - Custom CSS
Advanced - Custom CSS
Some CreativeMinds plugin help you applying custom CSS to elements handled by the plugin. This article provides an overview of what that means and gives suggestions and examples.
CreativeMinds Can Help
If you prefer not modifying CSS and visual elements by yourself, CreativeMinds can help adapting CM plugins to your theme.
Learn more: Plugin Installation Service for WordPress by CreativeMinds
Basics - What is CSS? What Can I Accomplish With It?
CSS stands for Cascading Style Sheets. In simple terms, it can define how your pages look and feel: the color of the buttons, the size of a table, the background image and so on.
Use With Caution
CSS allows you to make changes that WordPress, themes and even the plugins don't support. Be sure to test all changes before applying!
In CreativeMinds plugins you can, for example:
- Make a title red and bigger
- Change the color of a registration form
- Add borders to logos in directories
Video Example: Business Directory
Editing CSS
Basic - When The Plugin Supports
Many of our products have specific settings where you can apply CSS rules.
CreativeMinds Plugins With Custom CSS Feature
CM Expert Directory | CM Product Directory | CM Tooltip Glossary | CM Business Directory | CM Download | CM Answers | CM Registration | CM Table of Contents | Course Catalog LMS | CM Video Lessons Manager
Advanced - Using External Tools
There are many ways to change CSS styling. In this guide we will show you how to use a plugin to add new classes and id attributes.
You can also add custom CSS code in the Additional CSS option in the WordPress customizer, or change your themes styles by using a child theme.
To style any element in this plugin you need to:
- Install an additional plugin that lets user to apply custom CSS styles: Visual Theme Customizer.
- Know how to use the browser tools Inspect function to find elements classes or id names.
- Use Visual Theme Customizer to apply new class/id attributes.
Tooltip Example
To customize the Tooltip container, we need to find its ID name. In this case: ( id="ttcont").

Open the Visual Theme Customizer plugin page and click on the Customize link.

Click on the CSS Editor icon on the left menu and write your css styles here.
Click on Save and then close the Visual Theme Customizer's edit mode.

Your new styles should be applied successfully now.

Samples and Tips
Change Font Size
Apply font-size: xpx to the element
Example: h3 {font-size 20px;}
Change Background Color
Apply background-color: x to the element.
Example: div {background-color: coral;}
Style links on hover
To style links on hover, find the links class name and add attributes for this class name with a ::hover pseudoclass. Example: .some_link_class::hover { }.
TIP : Making your custom CSS priority with !important
If your custom CSS is not working and appearing crossed out, it means other rules have higher priority. 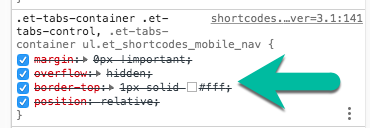
You can set your rule as more important by adding the !important property.
For example, this line
External Resources
 |
Get more information about the CM Answers WordPress Plugin Find other WordPress products at the CreativeMinds WordPress Store |
 |
Let us know how we can Improve this Product Documentation Page Visit our support center to open a Support Ticket |