Installation guide
There are two ways to install a Magento Extension:
Install via Magento Connect
If you are unfamiliar with extensions installation via Magento Connect, please read this article.
Install Manually
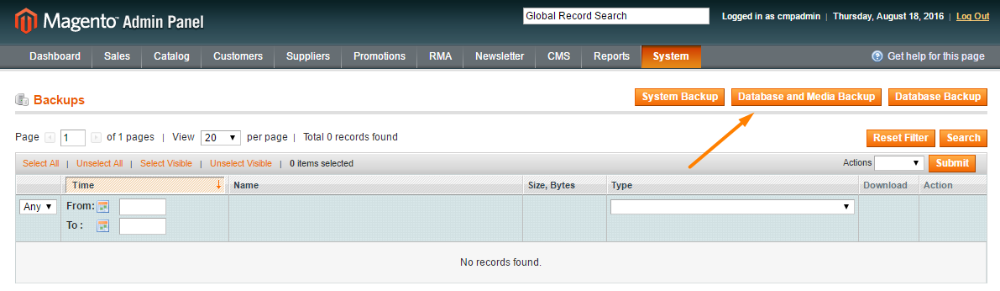
- Data Backup.
Backup your Data to your Magento database and web directory.
In the Magento admin panel, go to System → Tools → Backup. - Disable Compiler. (If you are running an older version, 1.4 and lower, you can skip this step.)
In the Magento admin panel, go to System → Tools → Compilation.In case "Compiler Status" is "Enabled", click on the “Disable” button. - Download Extension and Extract Download.
When you download the extension, it will appear as a zip file. Unzip extension contents on your computer and navigate inside the extracted folder. - Upload Files to Magento Folder.
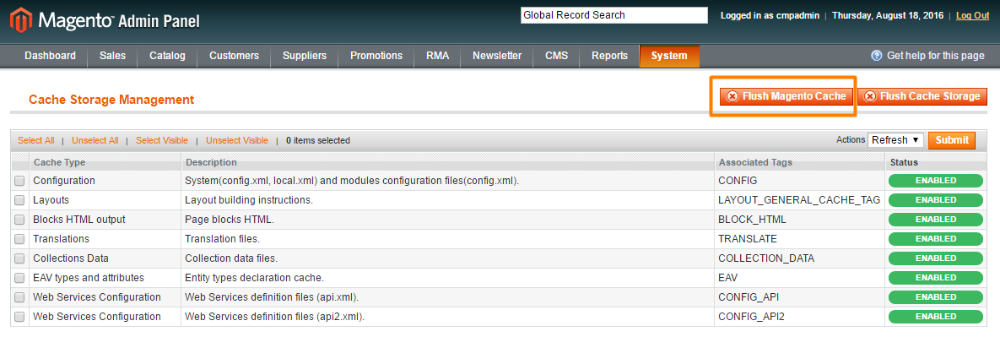
Upload extension files to the main Magento folder. - Clear Cache.
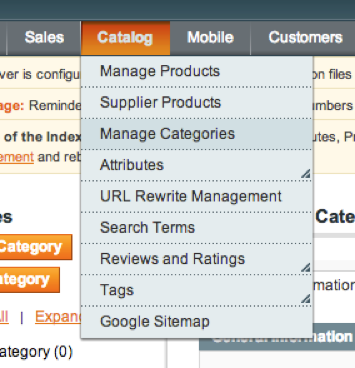
In the Magento admin panel, go to System → Cache Management and press the Flush Magento Cache button. - Final Step. Navigate to Catalog → Manage Categories.
- Module enabled: Admin chooses to enable or disable the module. If module is disabled, then rest of the options are hidden.
Default is disabled. Supplier needs to be approved: Admin chooses if new suppliers need to be approved byadmin or not. If approval of admin is required suppliers can'tlogin untilget approval. Adminget the email notification about new suppliers - Supplier alsoget the notification that he or she needs to be approved.- Allow auto approval of products: Admin chooses to let the suppliers add/edit their products with or without an approval of admin.
Default is No. - Link label in customer account panel: Determines the label of the link to the supplier panel in the customer account dashboard on the front-end.
Default is “Vendor Portal”. - Header in Supplier Panel: Shows the header in the supplier panel. You can determine what header you want to show. Options:
- Don’t Show – Doesn’t show any header
- Show Custom – Show custom header created in extension template
- Show Default – Show default header of the template used in the store
- Footer in Supplier Panel: Shows footer in supplier panel. You can determine what footer you want to show. Options:
- Don’t Show – Doesn’t show any footer
- Show Custom – Show custom footer created in extension template
- Show Default – Show default footer of the template used in the store
- Include jQuery: if you use a custom theme and you include jQuery by default, please select 'No' to prevent errors.
- Use separated login page: allows suppliers to login in separate page, the path to this page is http://yourdomain.com/supplier/login.
- Allow suppliers to register: allows suppliers to register in separate page, the path to this page is http://yourdomain.com/supplier/login
- Group of registered supplier: this option defines what group of customer
new registered suppliers are going to be. - Supplier group: Group of customers which will have access to the supplier panel. This group of suppliers can add products.
Default is Supplier. - Supplier group which can edit own products: Group of customers that will have access to the supplier panel. Customers can add products and have access to edit their products.
Default is Supplier Pro. - Notify supplier when
product was approved: Defines ifsupplier will be notified if his or her product was approved by admin. - Email title when product was approved: Title of the email which will be sent to the supplier when his product was approved.Default is empty.
- Email text on product was approved: Body of the email which will be sent to the supplier when his product was approved. Default is empty.
- Notify supplier when product was ordered: Defines if supplier will be notified if his or her product was ordered.
- Email title when product was ordered: Title of the email which will be sent to the supplier when his product was ordered. Default is empty.
- Email text on product was ordered: Body of the email which will be sent to the supplier when his product was ordered. Default is empty.
In the 'General' tab, change the value of ' Available for Supplier?' to 'No'.
Configuration
You can access the main configuration screen by clicking System → Configuration, and on the left menu: SUPPLIER FRONTEND PRODUCT UPLOADER → Configuration.

General

Presentation

Registration and Login

Suppliers Group

Suppliers Notifications

Finally, remember to Save the Configuration!