WordPress Glossary Plugin (CMTG) - Integrations - Gemini
Adding Content Generated by Gemini to the Glossary
Note: This feature is available only in the Ecommerce edition since the version 4.3.4 of the WordPress Glossary plugin.
Introduction
The plugin allows to automatically generate definitions for glossary terms using Gemini.
Gemini, also known as Bard, is a friendly artificial intelligence chatbot created by Google. It is built on the large language model (LLM) of the same name and was developed as a direct response to the rapid growth of OpenAI's ChatGPT. Gemini was introduced in a limited capacity in March 2023 and later expanded to other countries in May. It was previously built on PaLM and initially belonged to the LaMDA family of large language models.
Front-end Example
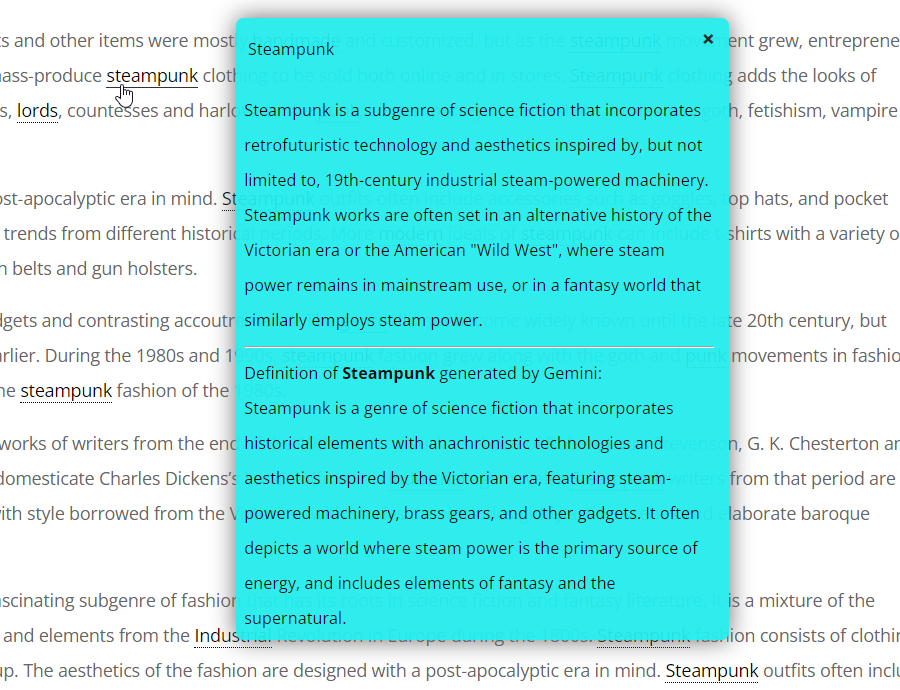
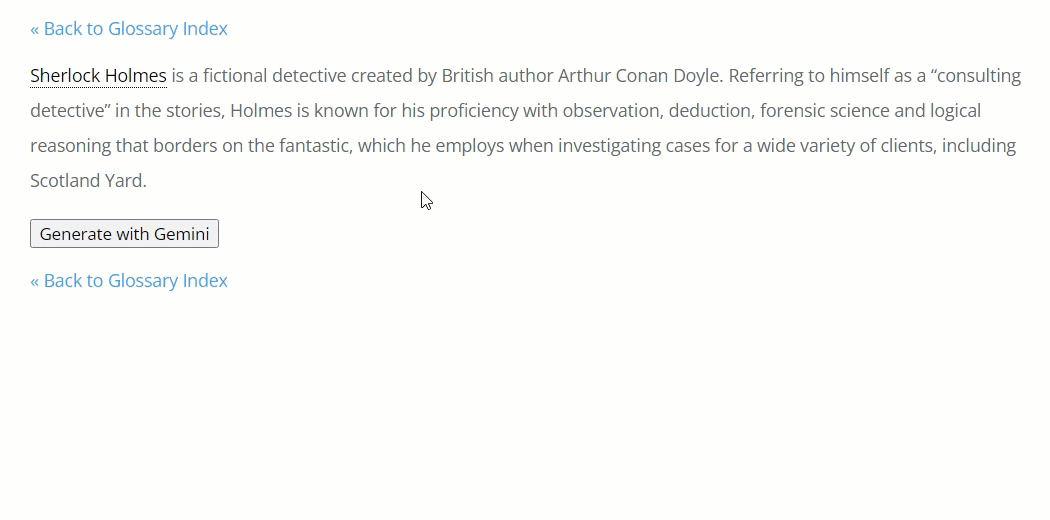
Example of the Gemini definition generated for empty term:

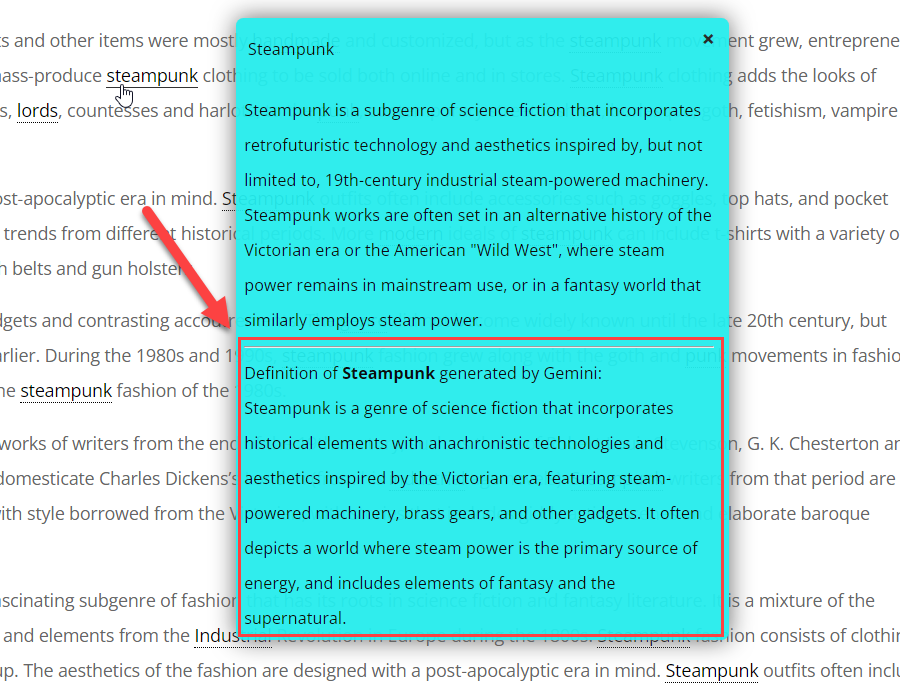
Example of displaying Gemini definition together with manually added definition:
Enabling Gemini in the Plugin Settings
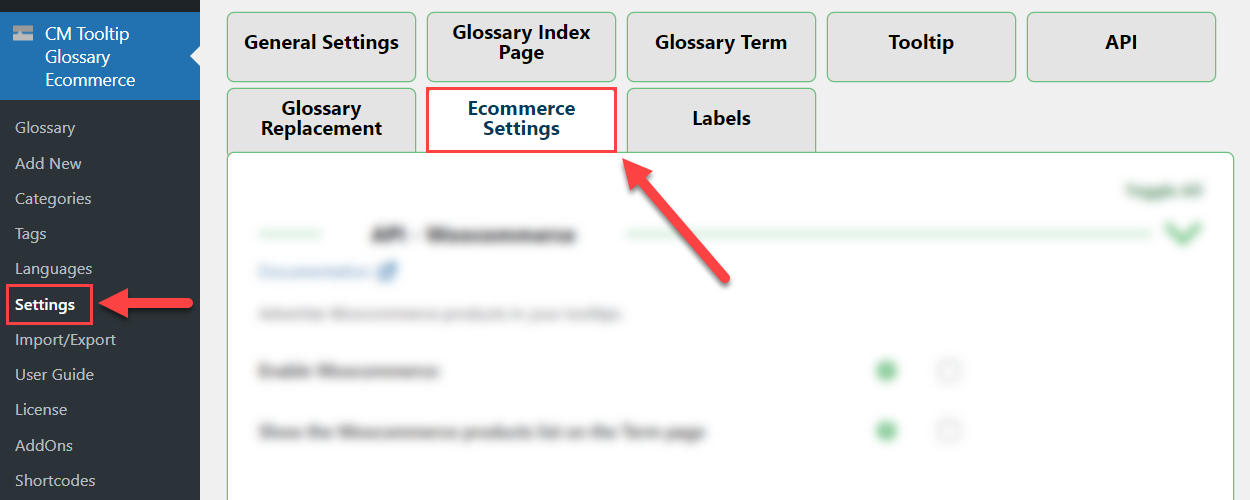
To find the settings of the integration, navigate to Admin Dashboard → CM Tooltip Glossary Ecommerce → Settings → Ecommerce Settings tab.
Scroll down and find the section Gemini. It has the following options:
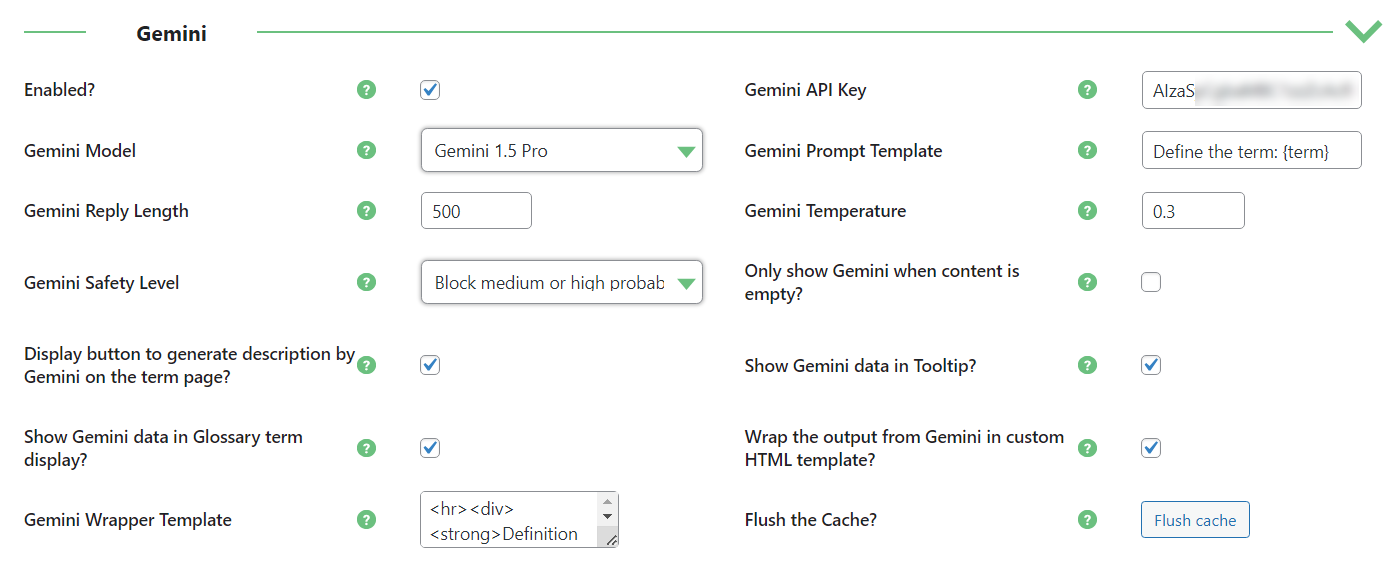
- Enabled - Enable the feature to automatically generate term definitions using Gemini.
- Gemini API Key - In order to make the feature work, you need to enter Google AI Studio and obtain there an API key. It's simple - head to the site, sign up and follow the instructions.
-
Gemini Model - This option allows you to choose a Gemini model. This option is inactive until you enter your API key in the option above and save the changes. Once it's done, you will be able to choose any model supported by your API in the dropdown. Note: this option was updated in version 4.3.10.
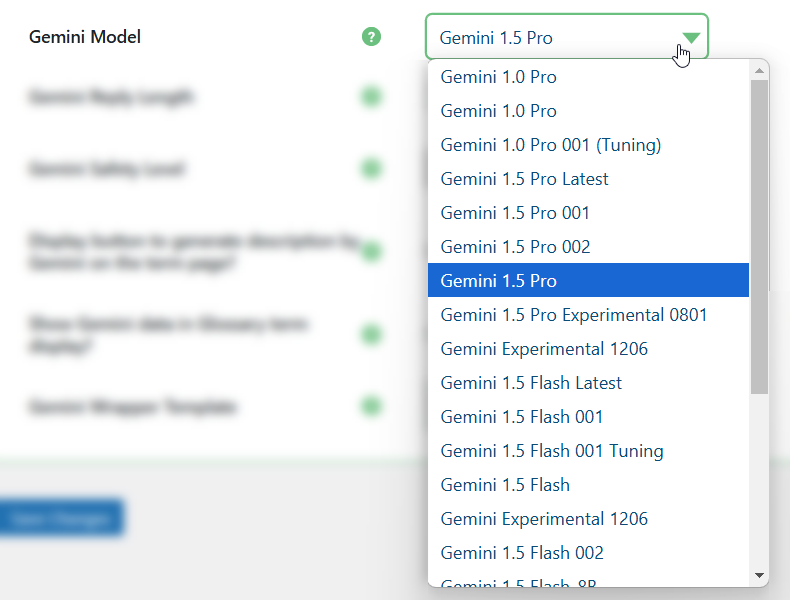
Choosing Gemini model - Gemini Prompt Template - Specify the request which the plugin will be sending to Gemini for getting the term definition. Important: this template must contain the placeholder {term}.
- Gemini Reply Length - Define the maximum length of the reply from Gemini. This affects the final length of the term.
- Gemini Temperature - This option allows to define how accurate the generated definition will be. This value ranges from 0 to 1. Lower temperatures are good for prompts that require a more deterministic and less open-ended or creative response, while higher temperatures can lead to more diverse or creative results.
- Gemini Safety Level - The Gemini API blocks content based on the probability of content being unsafe. By default, safety settings block content (including prompts) with medium or higher probability of being unsafe across any dimension. You can change safety level to the one is appropriate for your use case:
- Always show regardless of prabability of being harmful
- Block low, medium or high probability of being harmful
- Block medium or high probability of being harmful
-
Block high probability of being harmful
Note: this option was introduced in version 4.3.5.
- Only show Gemini when content is empty - Enable it, if you want the definition generated by Gemini to be displayed only in case if the term is empty (when you didn't add the definition manually). If the option is disabled, the Gemini definition will be shown below the definition which you wrote by yourself.
-
Display button to generate description by Gemini on the term page - If enabled, a button for generating a temporary Gemini definition will be displayed on each term page on the front-end. The generated definition will be stored in cache until it's cleared or until the button is clicked again while the definition is already displayed - in this case, the definition will be regenerated .This button can be disabled specifically for each term in the metabox CM Tooltip - Term Properties. Note: this option was introduced in version 4.3.8.
Button for generating temporary definition by Gemini -
Show Gemini data in Tooltip - Enable it, if you want the definition generated by Gemini to be displayed in tooltips.
Displaying Gemini definition in the tooltip -
Show Gemini data in Glossary term display - Enable it, if you want the definition generated by Gemini to be displayed on the term page.
Displaying Gemini definition on the term page - Wrap the output from Gemini in custom HTML template - Enable it, if you want to wrap the definition generated by Gemini with custom HTML template. The template can be specified in the option Gemini Wrapper Template.
-
Gemini Wrapper Template - Specify the custom template to wrap the definition generated by Gemini. The template accepts placeholders {term} as a requested term, and {content} as an obtained definition.
Example
Let's use the following HTML template:
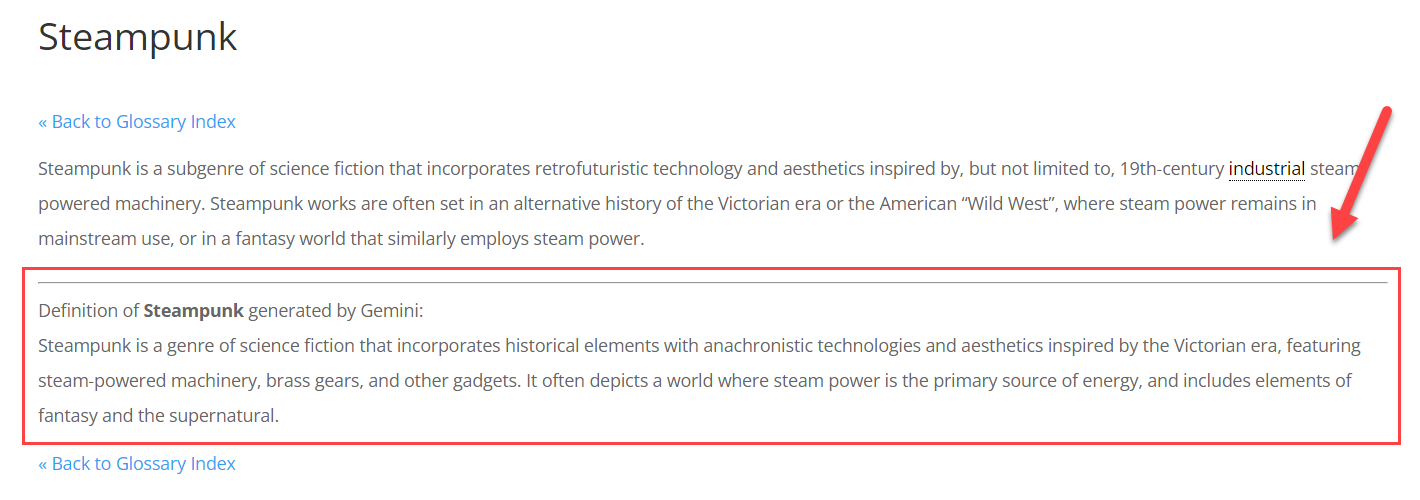
<hr>Definition of {term} generated by Gemini: {content}- With custom template
-
Without custom template
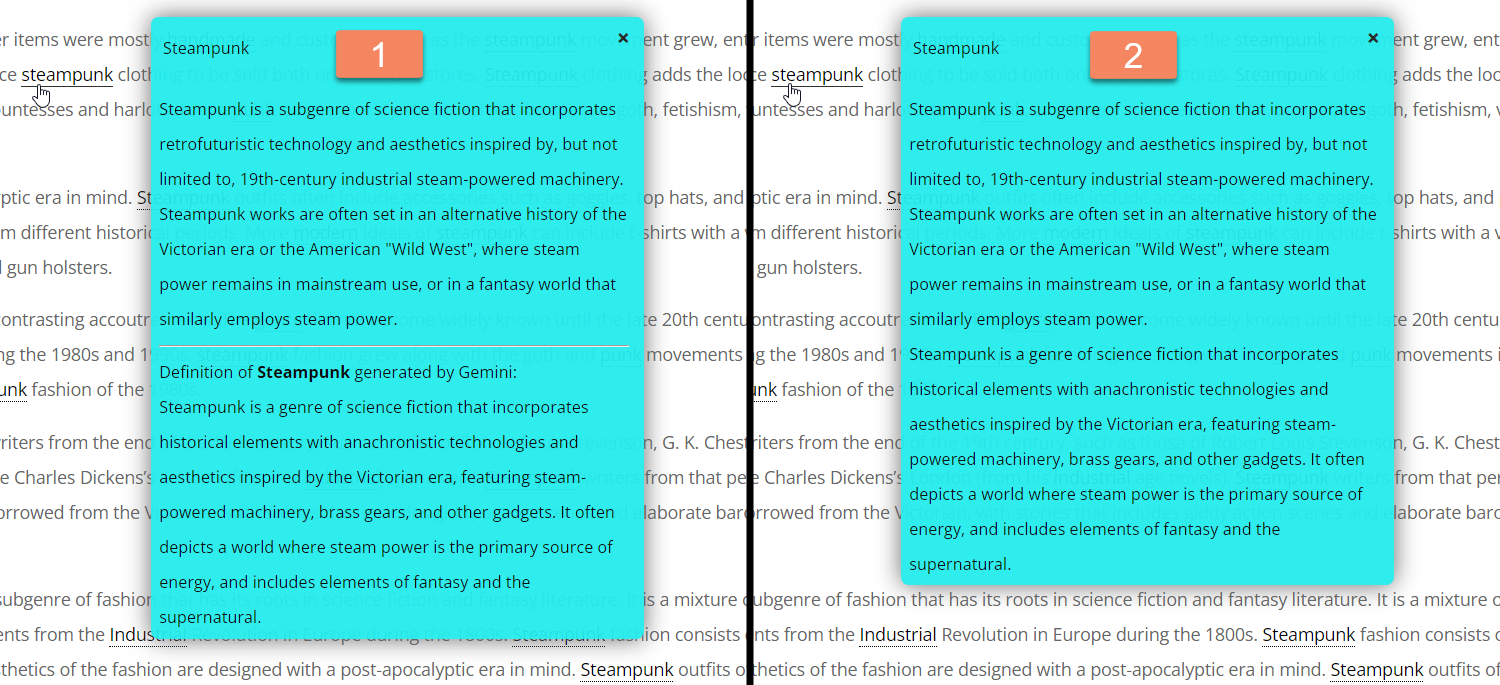
Example of using custom HTML template
- Flush the Cache - Click this button to clean the database from third-party services definitions, including definition generated by Gemini. Once the definition of the term is generated, the plugin stores the Gemini definitions in the database to save the resources and to make sure that the content of your website stays the same. But if you want to, you can flush the cache and have AI regenerate the answer.


Disabling Gemini definitions in specific terms
You can override the general plugin settings for showing definitions generated by Gemini in specific terms. To do this, find the metabox CM Tooltip - Term Properties on the term editing page. There you can find 2 relevant options:
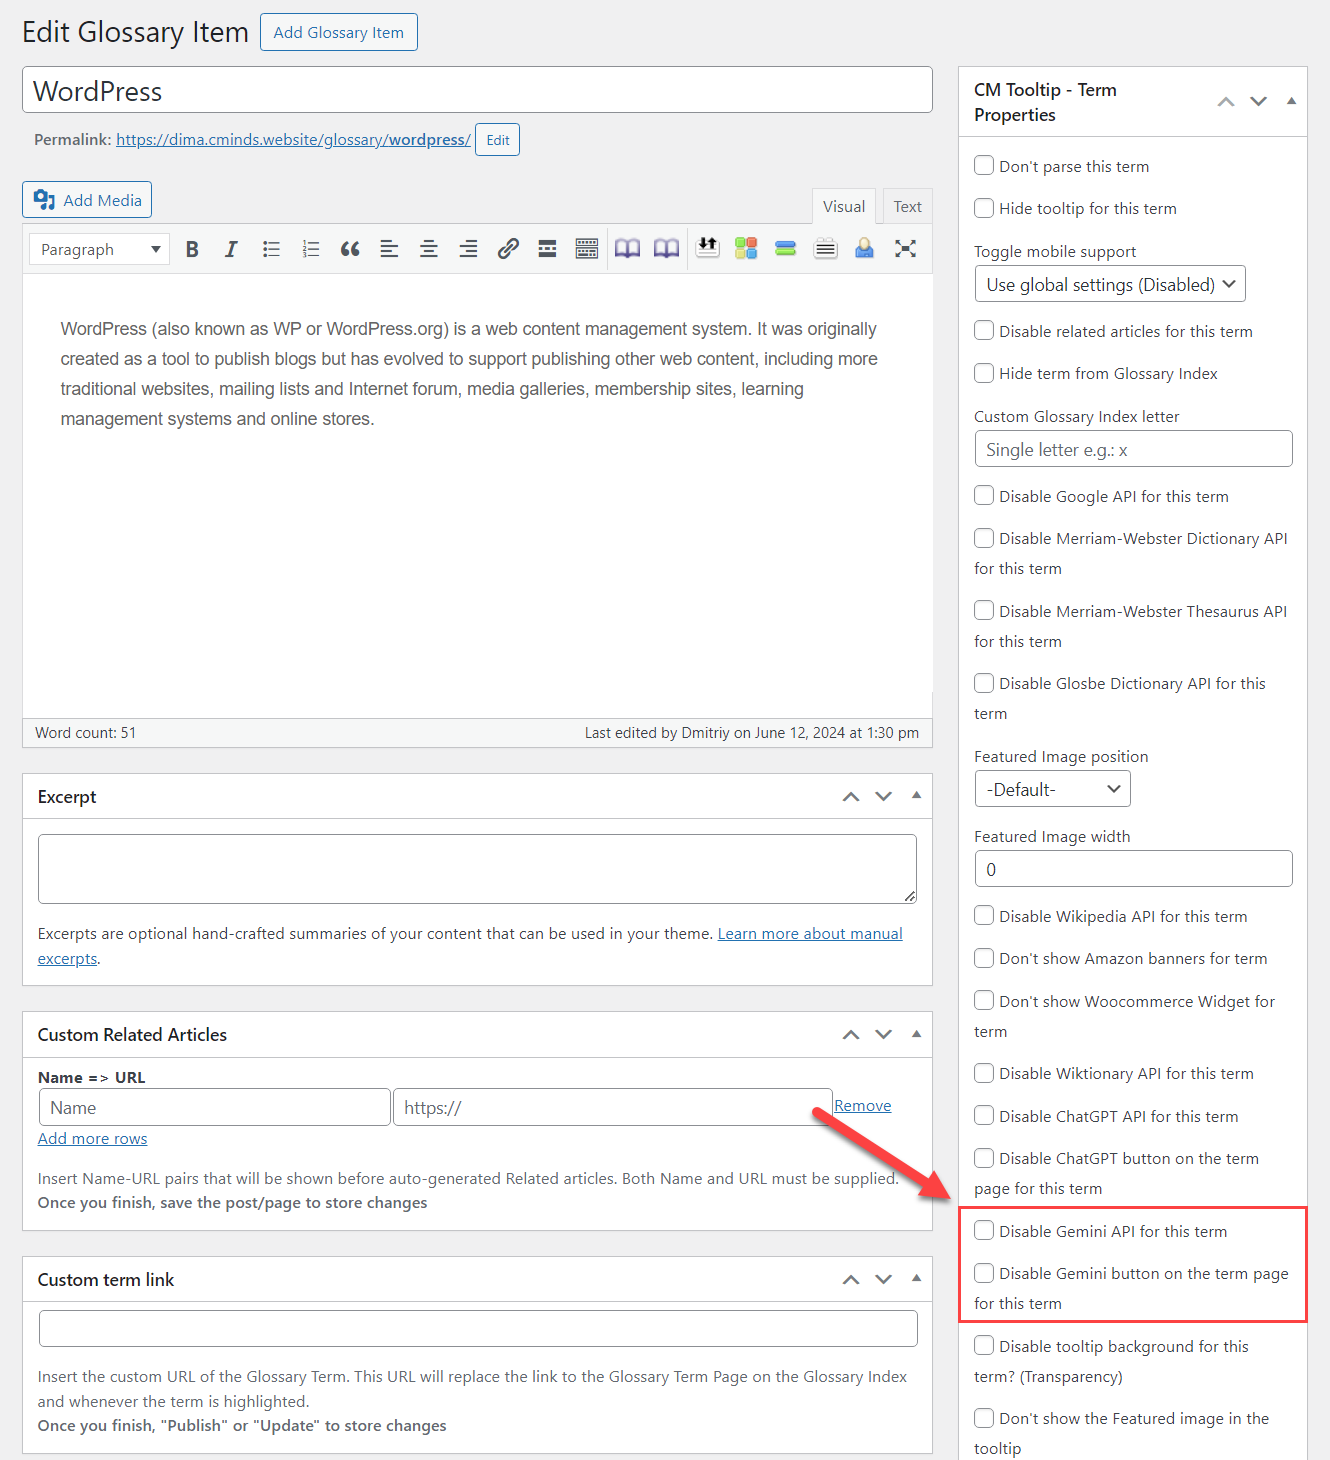
- Disable Gemini API for this term - If checked, then Gemini definitions will not be automatically generated and displayed on the term page and in the tooltip for this specific term.
- Disable Gemini button on the term page for this term - This option disables the front-end button for generating a temporary Gemini definition on the term page. Note: this option was introduced in version 4.3.8.
Double Click Support
The plugin supports a double-click feature with Gemini integration.
It means that every time a word is double-clicked anywhere on the page (even without being defined as a Glossary term), a temporary tooltip will be displayed, containing the definition generated by Gemini. If somebody double-clicked on some word, the definition generated by Gemini will be cached on your site. So the plugin will not request this word every time somebody double clicks on it, as the result is already stored on your site (until you flush the cache).
Learn more about the Double Click support: WordPress Glossary Plugin (CMTG) - Integrations - Double Click
 |
More information about the WordPress Glossary Plugin Other WordPress products can be found at CreativeMinds WordPress Store |
 |
Let us know how we can Improve this Product Documentation Page To open a Support Ticket visit our support center |