CM Registration Approve New Users - Admin Email Notifications
Admin Email Notifications
 New User Registration emails can be sent to Admin, Non-Admin users or even Email Addresses not registered as users on the site. The email can be customized as you need. By default, it contains some standard text informing the recipient that a New User has registered and includes a link to either Approve or Reject the new user.
Assigning Admin Notification Recipients
As mentioned, recipients of the new user email do not need to be registered users on the site and can approve new users registration attempts.
To assign recipients of the admin email notifications, from the admin panel navigate to CM Registration Pro → Settings → Approve New Users → Admin Notifications.

Next. In the field labeled Email addresses list to send the notification to, add the email address or email addresses that are to receive the email, separating them with commas.
Scroll to the bottom and click Save to save your changes.
Modifying the Email Template
The fields below the recipient field allow you to modify the Subject and the Body of the email.
Use the Shortcodes provided on the right in the description section to add dynamic content to the Subject or Body of the email.
For example, you can use: [userdisplayname] in the Subject to show the display name that the user has chosen.
You can also add a link to Approve the new User directly from the email:
[approveurl]
... or to Reject the new User directly from within the email:
[rejecturl]
The complete list of shortcodes you can use:
[blogname] [siteurl] [userlogin] [useremail] [userdisplayname] [userrole] [userfirstname] [userlastname]
Using Other Profile Fields
Starting from version 1.0.7 of the add-on, you can apply any user profile field to the template. This works by adding the respective meta key as a shortcode.
For example, let's say you want to add the message "Your user type is ____" to the template.
Checking the Type field, we see that its meta key is "emp_non_emp".
 So, adding the shortcode
 [emp_non_emp] will produce the user type. Further examples:

Add HTML to the email
HTML Emails can be included or created. To use HTML click on the Text button on the top right of the text box labeled Template of the notification email: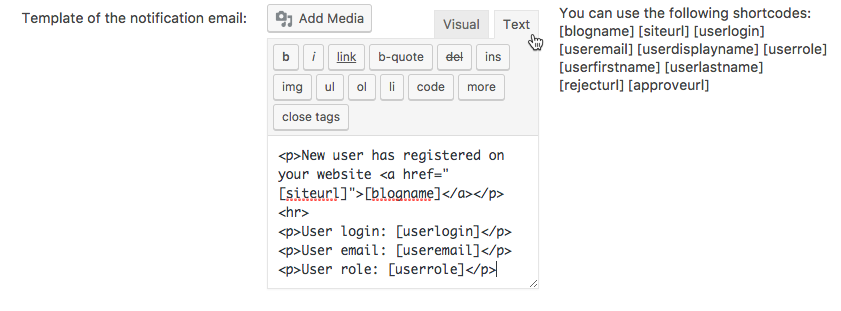
 |
More information about the CM Registration Approve New Users Add-On WordPress Plugin Other WordPress products can be found at CreativeMinds WordPress Store |
 |
Let us know how we can Improve this Product Documentation Page To open a Support Ticket visit our support center |