WordPress Video Lessons Manager Plugin (CMVLM) - Use Case - Creating a Video Lessons LMS And Tracking Student Progress
Use Case - Creating a Video Lessons LMS
Requirements This use case requires WordPress Video Lessons Manager Plugin to be installed and activated - This document uses version 3.4.2
Video Use-Case
Introduction
The WordPress Video Lessons Manager plugin gives the ability to organize videos into lessons to create a video-based learning environment on your WordPress site.
Example
Video Lesson
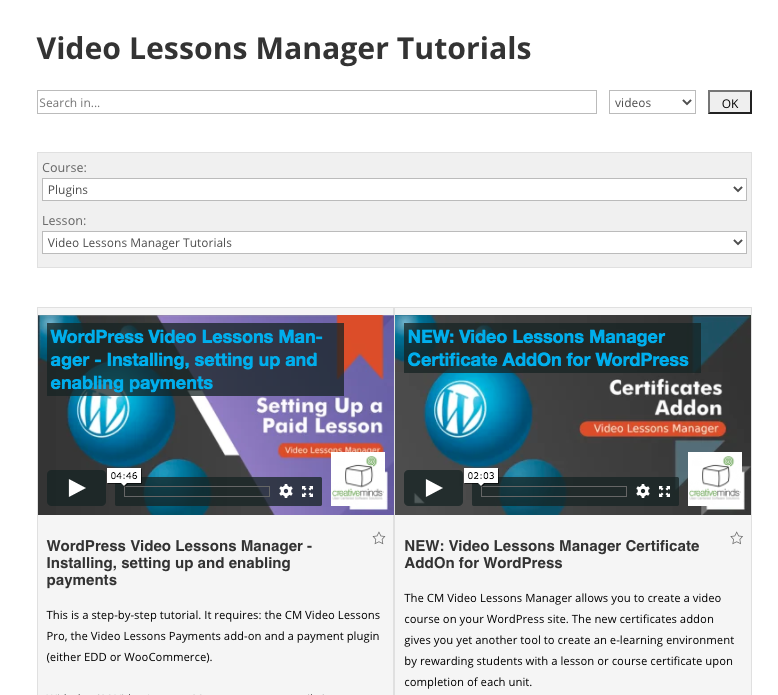
Student Dashboard
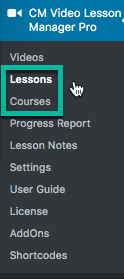
Where Are The Videos Located?
Videos can be fetched from Vimeo or Wistia and shown on your site.
The videos are hosted by Vimeo/Wistia and not your server.
Use Case Assumptions
In this example use case guide, we'll cover how to create a simple video LMS with content from Vimeo where you can track your students' progress.
We consider that you already have content in either Vimeo or Wistia but have not installed the base plugin yet.
It follows:
- Installing the plugin
- Connecting Vimeo or Wistia
- Importing videos from Vimeo or Wistia
- Changing the appearance of the video platform
- Organizing videos into lessons and courses
- Showing lesson and courses to users
- Student progress and report
- User interface - The dashboard
- Notifying the admin and students
- Translating the interface
- Extra - Restricting how much time users have to watch videos
Installing the Plugin
The process is the same for all CM plugins and add-ons.

- Download the add-on from your customer dashboard.
- Log in to WordPress and navigate to the WordPress Admin → Plugins settings.
- Click on Add New.
- Activate it and add the license.
Connecting Vimeo or Wistia
For the WordPress Video Lessons plugin to work, API keys must be obtained from either Vimeo or Wistia, whichever platform has been chosen.
Vimeo or Wistia?
For the purposes of our plugin, the only difference between Vimeo and Wistia is that you can integrate two Vimeo accounts and only one Wistia account.
Vimeo Free Accounts Are Supported
It's possible to connect to Vimeo even if your account is Basic (free). Vimeo limits Basic accounts to 25 API calls/minute, but the plugin only makes calls when importing videos. So it's likely the limit won't be a problem.
Learn more from Vimeo API Rate Limiting | Vimeo - Vimeo Free vs. Vimeo Premium Accounts
Where Should I add The Keys?
API keys are entered on the Settings page. From the WordPress dashboard, navigate to CM Video Lesson Manager Pro → Settings, then click on the General tab.
From there, the keys should be copied to the relevant section (Vimeo API or Wistia API)
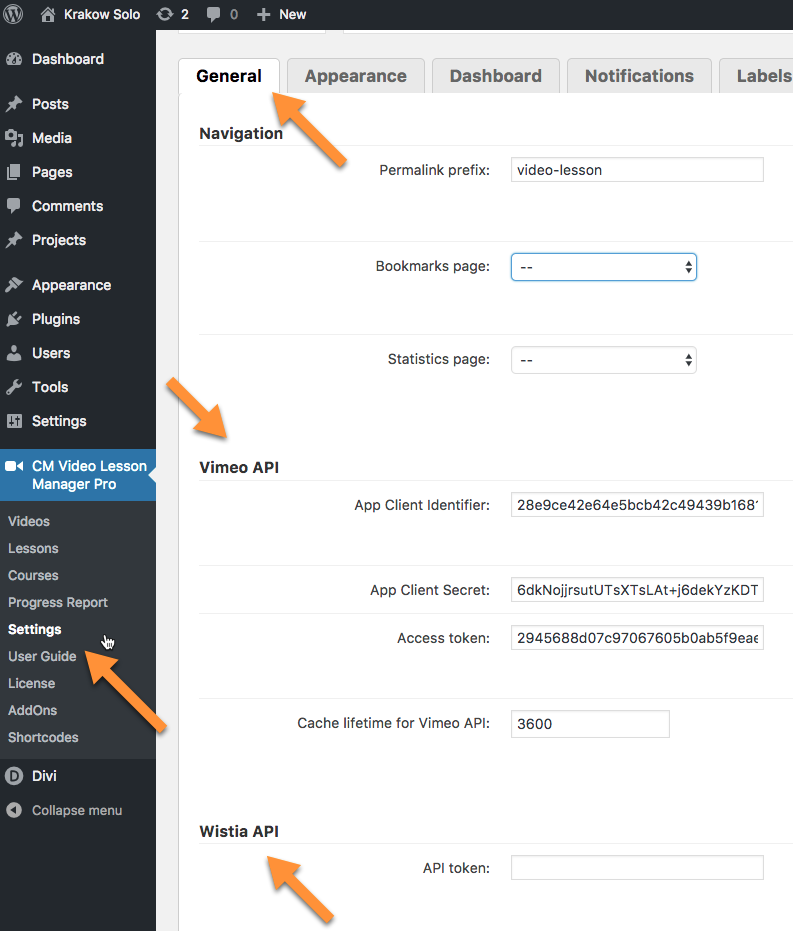
Vimeo API Key
Guide with more pictures: WordPress Video Lessons Manager Plugin (CMVLM) - Getting Started - Initial Setup (API Keys)
1) Access Vimeo App
Log in to Vimeo. Then, visit the Vimeo developer website by clicking this link. Choose an existing app or click on "+ Create App".
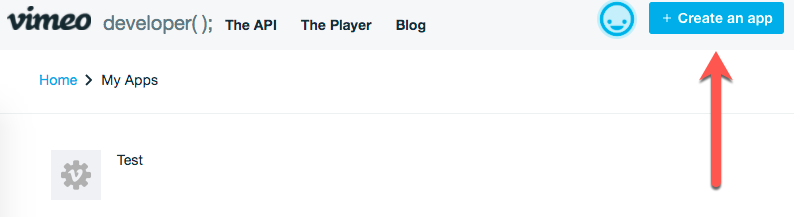
You need to have verified your email in order to do this.
2) Create a New App
Fill out the required fields and click on the "Create App" button at the bottom of the page.
- App name - Used for your control only.
- App Description - It's preferable to mention the plugin name
- Will people besides you be able to access your app - Choose "No"
Enter the Authentication Page for that app. In here:
- Copy the Client identifier
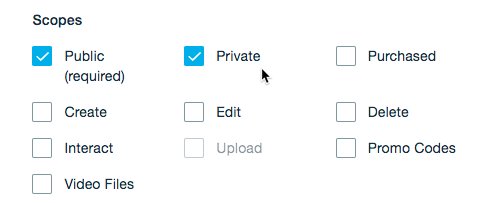
- Generate an access token. If you plan to import private Vimeo videos, be sure to check the "Private" box when generating the key.
-
Copy the Client Secrets.

Getting Vimeo API Key

Reminder: Extra Setting for Private Videos
If you plan to import private Vimeo videos, be sure to check the "Private" box when generating the key.
Wistia API Key
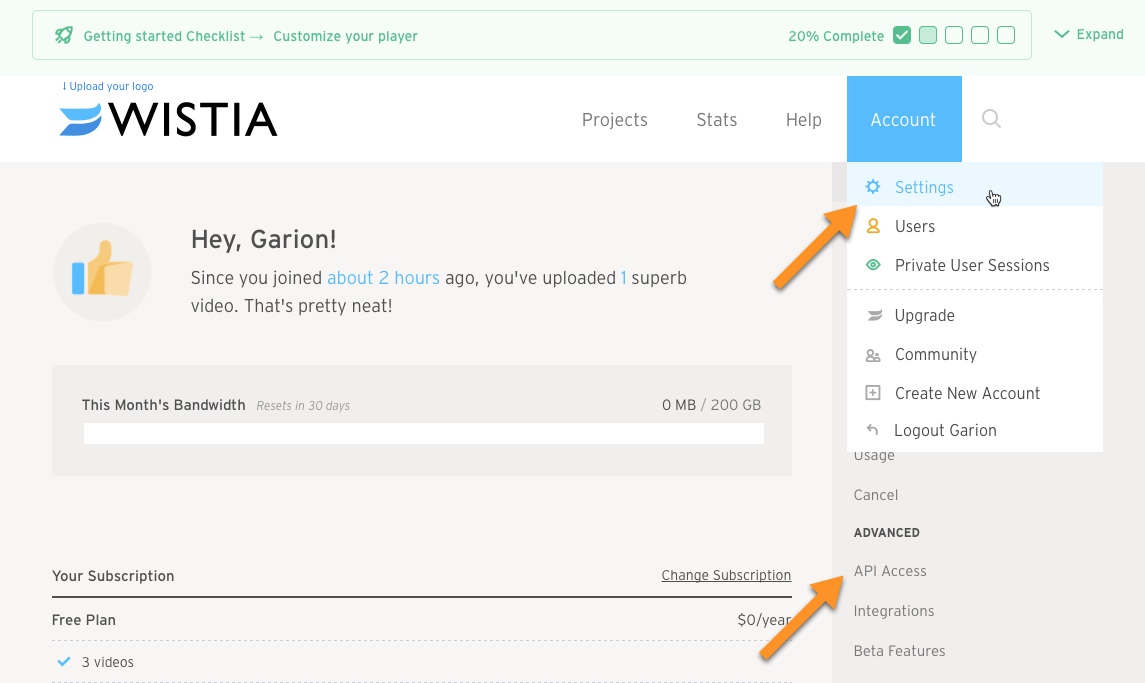
On your Wistia Dashboard navigate to Account → Settings. On the Settings page Choose API Access from the menu on the right.
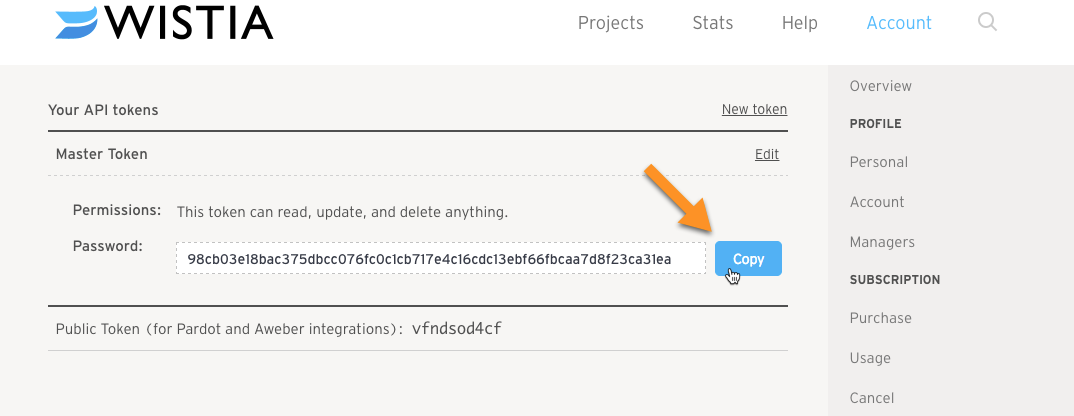
The Master API token will be displayed. Click the "Copy" button to the right of the password to copy it to the clipboard. Then paste this into the Wistia API token field back on the WordPress dashboard.
Importing Videos from Vimeo and Wistia
TIP: Import/Export
It's also possible to import/export videos between different websites with WordPress' tool. Read our guide about this feature.
Step by Step
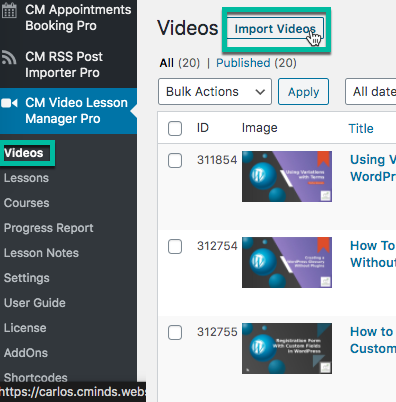
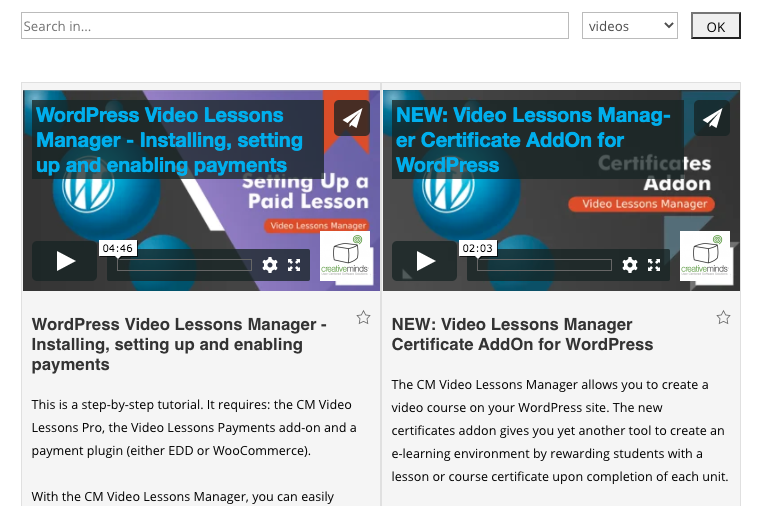
To begin the process, click on "Import Videos" at the top of the Videos screen, and then you will be at the import page show below.
Next, follow these steps:
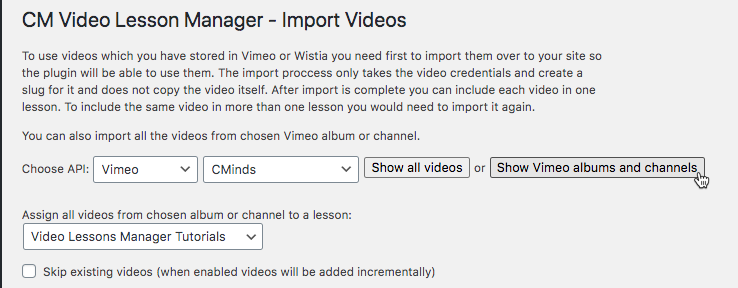
1) Choose platform
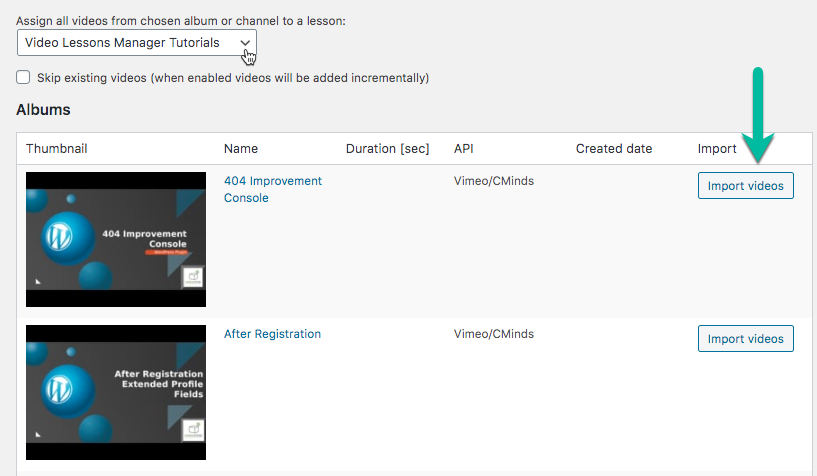
First, choose your video platform (Vimeo or Wistia). Then you can select from either " Show all videos" or "Show Vimeo albums and channels".
2) Assign the videos to a lesson (optional)
Decide which lesson to assign the video to, or whether to do it later. Don't worry about skipping this, because you can modify the setting at any time.
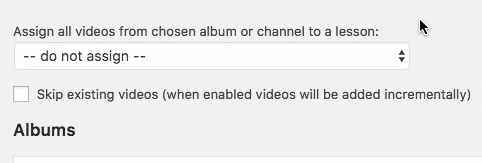
3) Skip existing videos (optional)
It's possible to skip videos that were already uploaded by checking this option:

4) Import the selected videos
Click on the check boxes beside the videos that are to be uploaded then click " Import chosen videos".
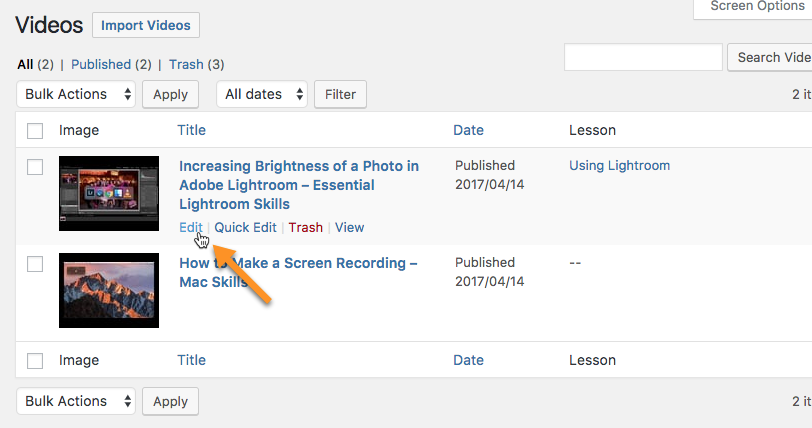
A message will appear to indicate the successful import. Upon successfully being imported, the chosen video or videos will appear at the top of the list of videos shown on the videos page.
The videos associated with the chosen API will appear. The Thumbnail, title, video duration and release date are also displayed.
Learn more: WordPress Video Lessons Manager Plugin (CMVLM) - Admin - Managing, Importing, Deleting Videos
TIP: 50 Videos Per Page
Only 50 videos will appear at once. This limit helps preventing overburdening the server.
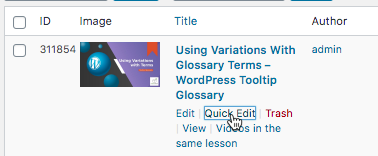
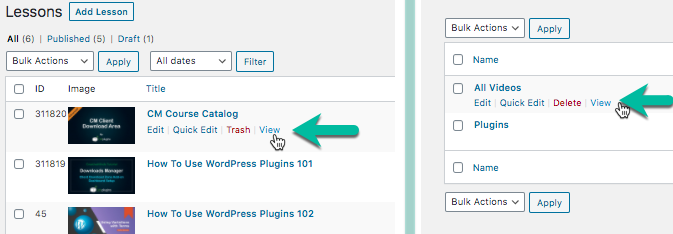
Editing Video Data After Upload
To Edit a video's meta information hover over the row of the video to be edited. Options should appear below the video's title and description. Click the "Edit" option to open the full Edit screen or "Quick Edit" to open the short drop down edit option.
For each video that is added to the site with WordPress Video Lessons plugin a Custom post is created. This Post contains all the Meta information relating to the video. These various fields can be edited manually here.
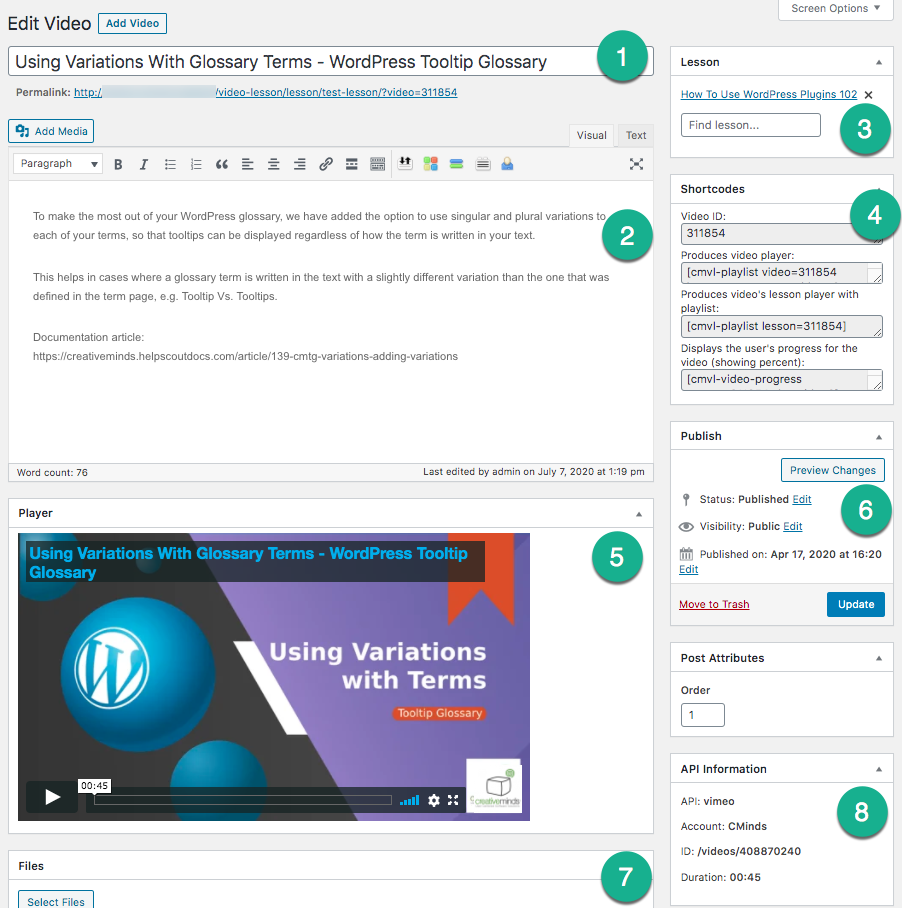
- Title - By default this appears the same as it does on Vimeo or Wistia.
- Description - Also imported from Vimeo or Wistia by default. Shortcodes are accepted in this field.
- Assigned to Lesson - Videos can only be assigned to one lesson at a time. To assign the same video to different lessons import the video more than once and assign each import to a different lesson.
- Shortcodes - Provides handy shortcuts for shortcodes related to this content
- Player - Indicates the platform that the video is being hosted on. It also shows how the video will appear on the page.
- Status and Visibility - Applies to the front-end of the site. For videos to appear this must be set to "Public", which is the default for newly imported videos.
- Files - Attaches files to this specific video (feature added in version 3.1.7).
- API information - Indicates clearly where the video was imported from.
Quick Edit
Hover over the chosen video row until the hidden options appear below the video title/description and select "Quick Edit" .
This will hide the video thumbnail and information and will display the quick edit fields. The Quick edit is more limited.
Changing Appearance of The Video Platform
To alter the appearance settings of the platform in courses and, navigate to Settings → Appearance tab.

The list of aspects you can change is long. Highlights:
- Videos per page
- Default view - Playlist or tiles
- Show or not full description
- Show lesson author name
- Video autoplay
Two Examples With Different Settings
Learn more: WordPress Video Lessons Manager Plugin (CMVLM) - Settings - Appearance.
Organizing Videos Into Lessons and Courses
Videos can be organized in lessons and in courses.
Hierarchy: Courses > Lessons > Video
A course contains lessons; a lesson contains videos.
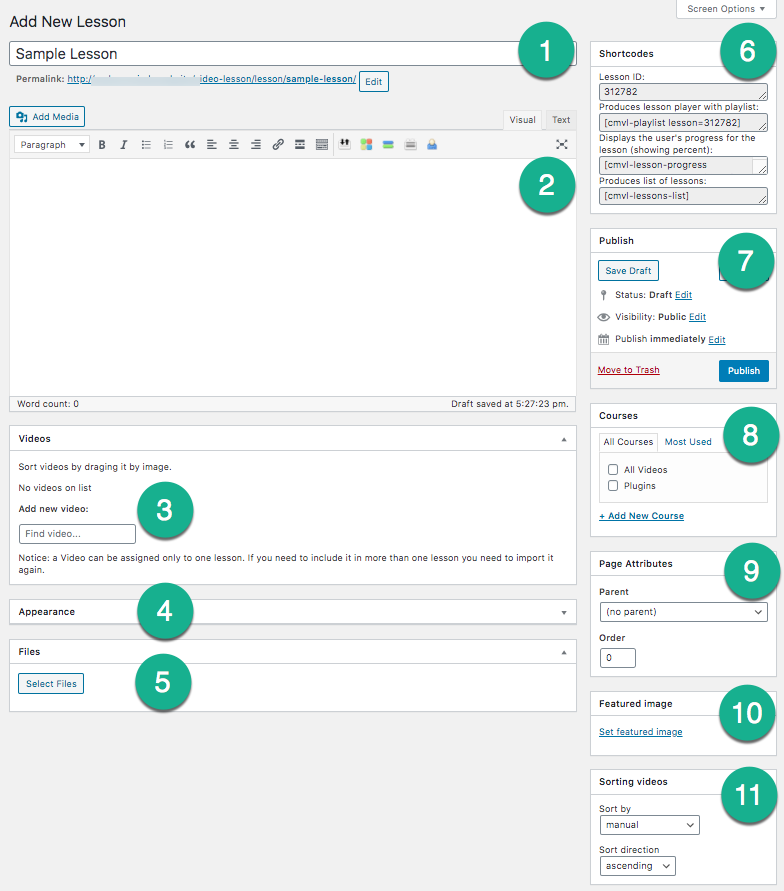
Lesson - Specifics
The Meta information that can be altered in this page are as follows.
- Lesson Title - The title that is assigned to the lesson must be entered manually.
- Lesson Description - This text area can be used for describing the Video content. There are various tools for formatting the text or alternatively the description can be written in HTML. Shortcodes are accepted.
- Videos - Assigned videos can be added and removed for the lesson. All videos shown here also exist in the videos dashboard. Ordering videos can be done by dragging and dropping or by selecting any of the existing ordering options available. Adding more videos to the lesson can be done by typing the video name, and clicking on it from the list of videos appearing below the search box.
- Appearance - Various settings can be altered here (they will override the default settings). Customers can also override the Note text area option for an individual lesson. Learn more below
- Files - Files attached to the Lesson
- Shortcodes - allows entering shortcodes, for example, Lesson ID or Produces lesson player with playlist.
- Status and Visibility - The current draft status and Public visibility of the Lesson.
- Related Courses - The lesson can be assigned to a course. To do this, check the box to the left of the selected course. Alternatively a new course can be created and the lesson assigned to it by clicking + Add New course.
- Post Attributes - This sets the order in which the lessons will appear in the Lessons page. The lowest number appears first.
- Featured Image - allows adding a featured image to the entire lesson.
- Sorting Videos - Determines how the videos are sorted in the lesson.
Learn more: WordPress Video Lessons Manager Plugin (CMVLM) - Admin - Managing Lessons
Courses Specifics
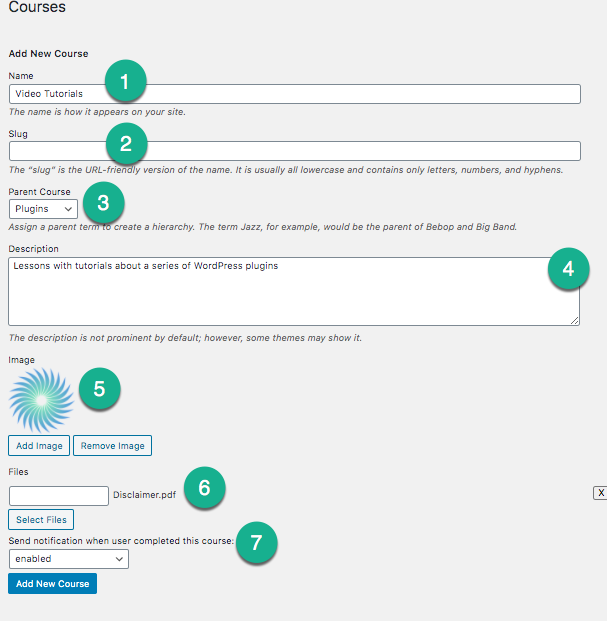
To create a new course enter the details on the left of the Courses page and hit the "Add New Course" button
- Name - Give the course a name.
- Slug - This is what will appear in the URL for the course to help make it address bar friendly.
- Parent - Choosing a Parent course will make this 'course' a module of that course.
- Description - The way they are displayed is dependent on the theme. This field accepts shortcodes.
- Image - Add a thumbnail for the course.
- Files - Attaches files to this specific course.
- Course Notifications - Toggles whether or not to send notifications when a user completes the course. Learn more below
Learn more: WordPress Video Lessons Manager Plugin (CMVLM) - Admin - Managing Courses
Showing Lessons and Courses To Users
Now you have the content and it's organized. But how to show it to users? It's really easy. We'll discuss two ways.
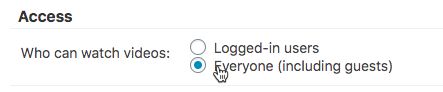
Who Can See The Video Content?
You can restrict the videos of your site to logged-in users only or show them to everyone. This setting is in General tab → Access section.

1) Automatically-Generated Pages (Easy Way)
TIP: New Lesson or Course = New Link
All new lessons and courses receive a new URL when they are created. So, in most cases, there's no need to add them elsewhere on your site.
You can find specific Frontend links from the lesson or course management screen.
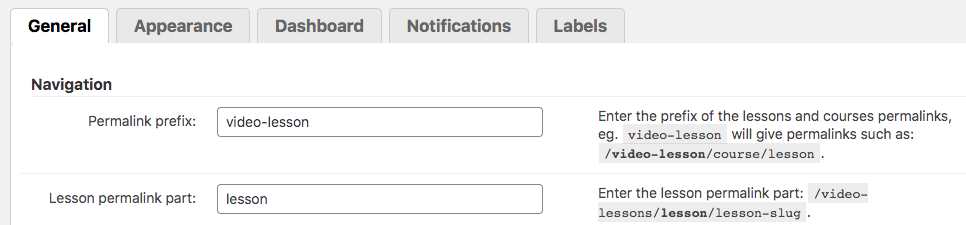
You can change the link path of these automatically-generated pages from the General tab → Navigation section.
2) Shortcodes (More Flexible Way)
TIP: What Are Shortcodes
Shortcodes add dynamic content to your site via a small piece of code. Learn more: Shortcodes - How To Use
Use shortcodes to add courses and lessons anywhere on your site. One benefit of this method is that you can customize its interface, along with the content of the whole page.
General Playlist - [cmvl-playlist]
This is the most important shortcode.
Shortcode with all attributes: [cmvl-playlist view="playlist|tiles" layout="left|right|bottom|nomenu" course="id|slug" lesson="id|slug" video=id navbar=1 searchbar=1 linksbar=1 ajax=1 urlsearch=0 maxwidth=0]
Visual Attributes:
- Option to turn off the linksbar, navbar and searchbar and ajax for enabling/disabling Ajax calls.
- Set the maximum playlist width in pixels by parameter maxwidth (0 means no limit).
- With view, set specific videos positioning for each playlist: tiles or playlist (list of videos).
- With layout, decide where to display the video list (only if using view=playlist) - left, right or bottom.
- urlsearch is used for the developers to allow searching a keyword passed by the URL parameter.
Learn more: WordPress Video Lessons Manager Plugin (CMVLM) - Admin - Shortcodes.
Example 1: Course, Default Interface
[cmvl-playlist course="all-videos"]

Example 2: Lesson, Modified Interface
[cmvl-playlist view="tiles" lesson="video-lessons-manager-tutorials" navbar=0 searchbar=1 linksbar=0 maxwidth=720]
Showing Lesson or Course List
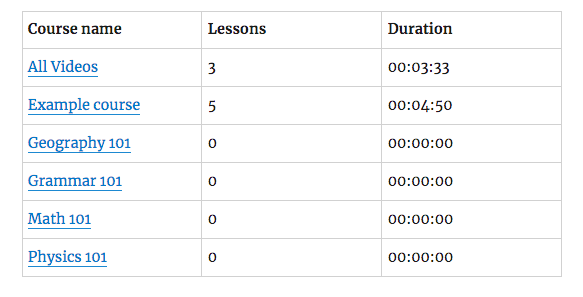
Use [cmvl-lessonlist] and [cmvl-courses-list] to show the list of lessons and courses, respectively.
Examples
Lesson List
[cmvl-lessonlist group_by_course=1] groups the lessons by group
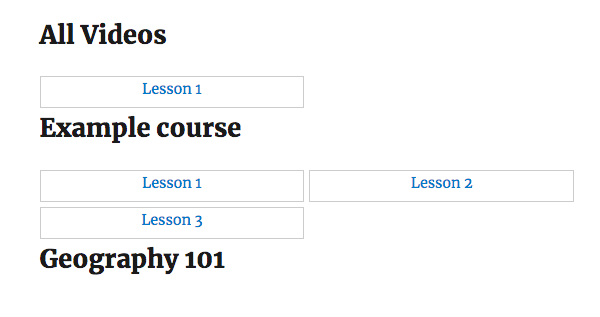
Course List
[cmvl-courses-list]
Learn more: WordPress Video Lessons Manager Plugin (CMVLM) - Admin - Shortcodes .
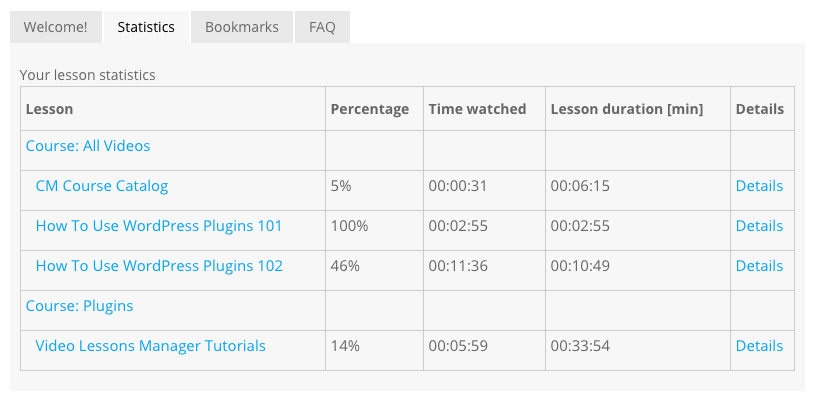
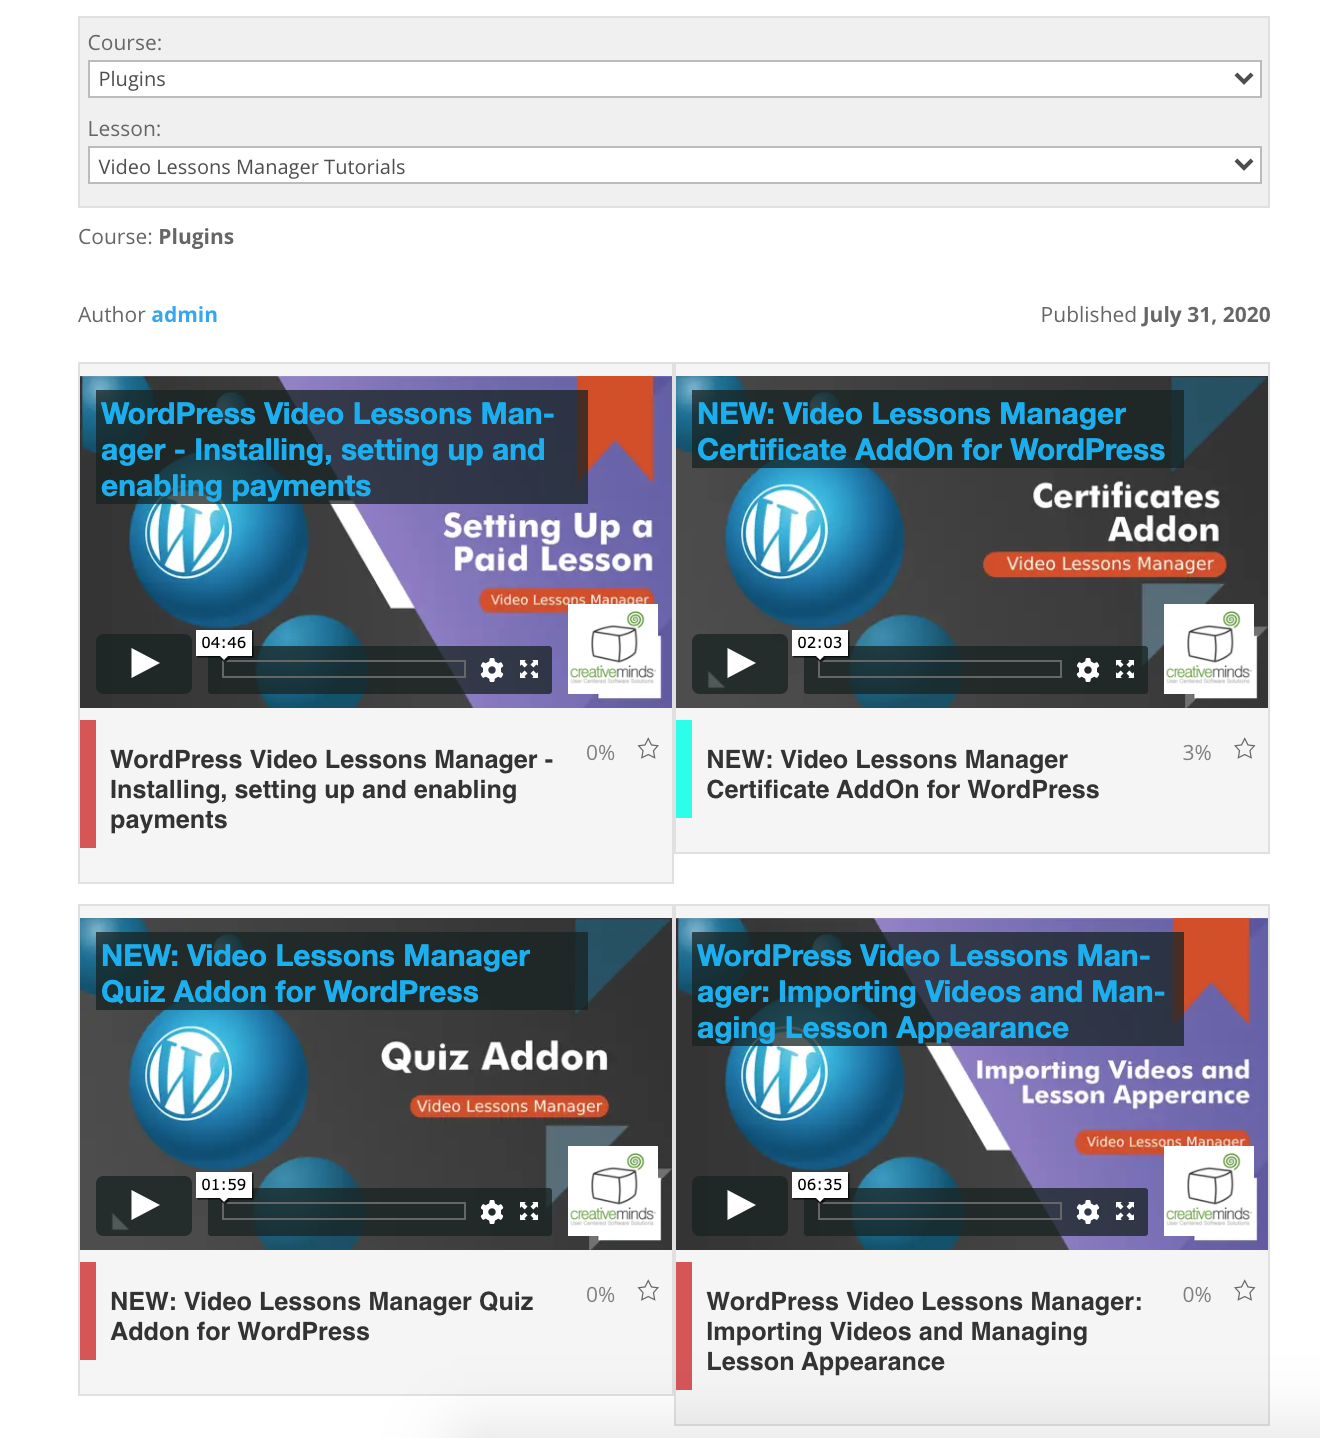
Student Progress and Report
One of the main benefits of the plugin is that you can track the progress of your students.
Quick Definitions
- Students - All registered users are listed as students. There is no specific role.
- Progress - How much of a certain video that student has watched.
Student Report - Admin Backend View
Admin users can access the progress report from the Backend.
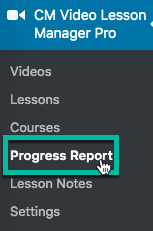
Admins can group the report by user, course, video or lesson, as well as filter the data.
Example
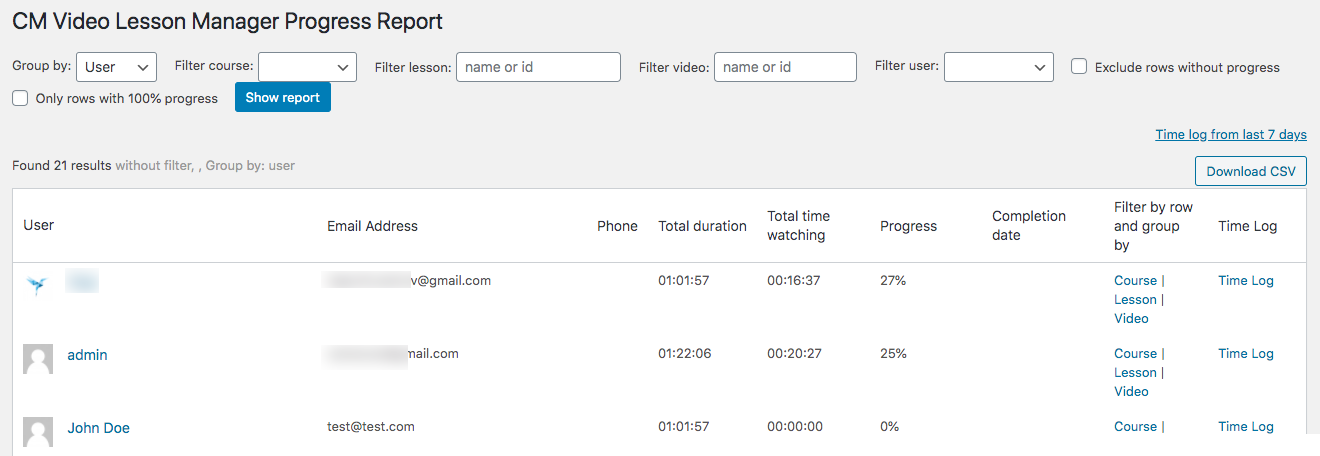
Optionally, it's possible to log the precise date and time when users watched content.
Learn more: WordPress Video Lessons Manager Plugin (CMVLM) - Admin - Report (Admin Panel)
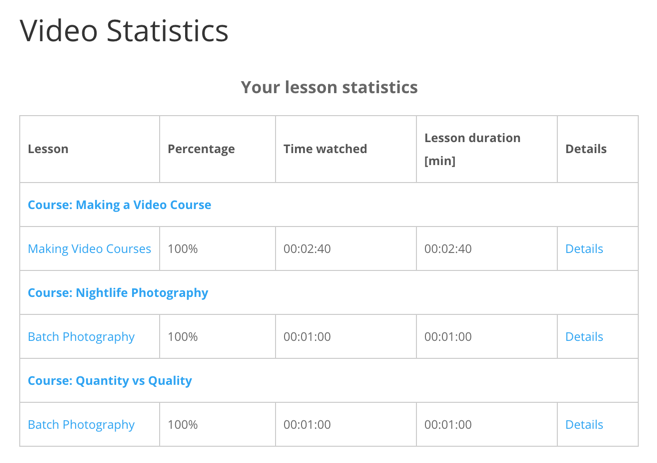
Student Report - Frontend View
Report of Each Student
The shortcode [cmvl-stats] generates the user statistic for the specific user that is logged-in.
Student Report - Frontend View
Learn more: WordPress Video Lessons Manager Plugin (CMVLM) - User - User Statistics (Front-end)
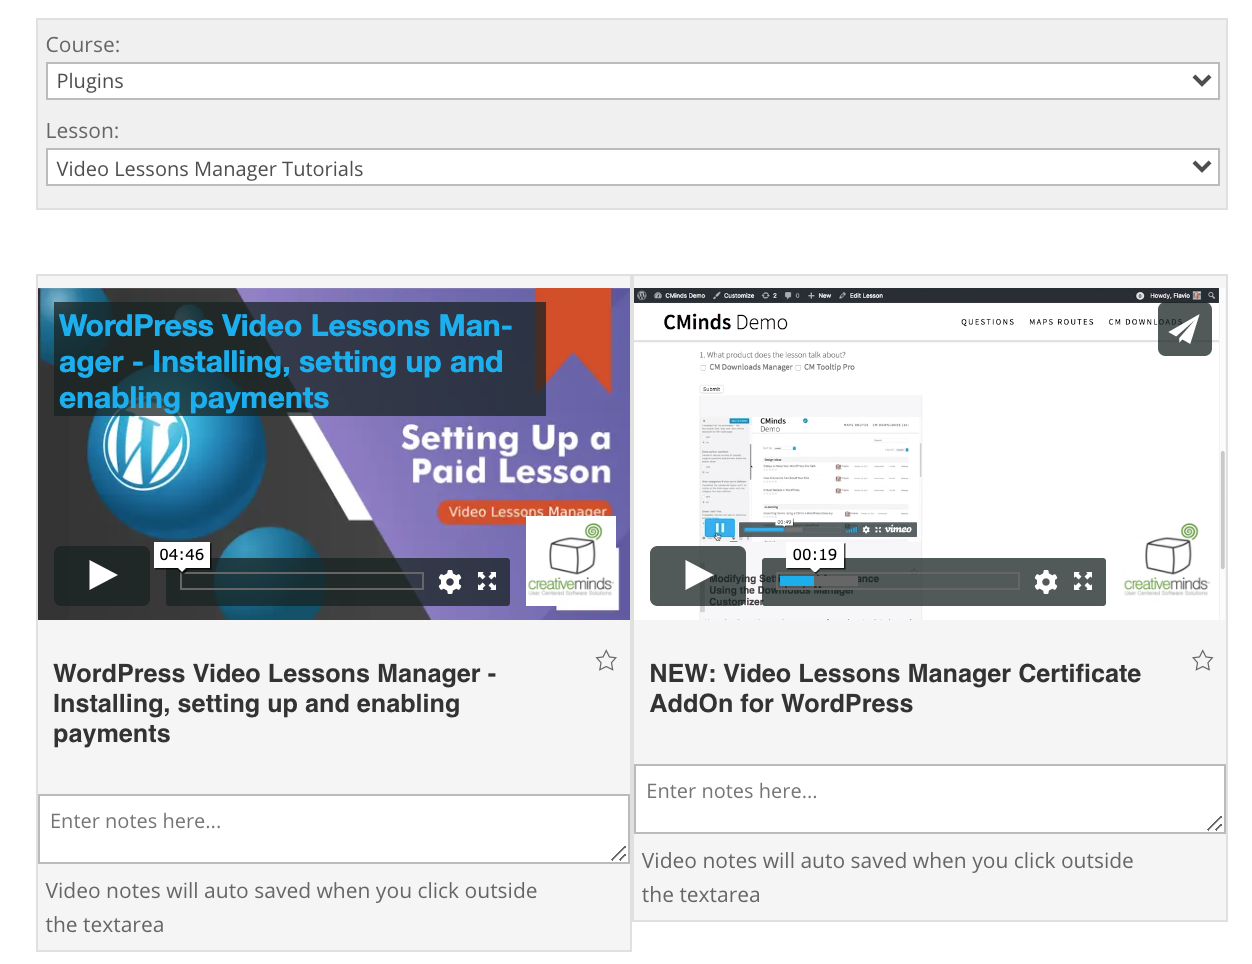
User interface - The Dashboard
Displaying the Dashboard
The dashboard will be displayed on any page or post using the shortcode [cmvl-dashboard]
The plugin allows you to add a dashboard with multiple tabs for site users. In each tab you can have different information shown to the users by inserting either text, shortcodes and more.
You can configure if from the Dashboard tab in the settings.

The settings are:
- Dashboard page - Select a page to display the user's dashboard or choose "-- create new page --" to create such page.
- Show dashboard after login - If enabled, users will be redirected to the Dashboard page assigned above by default after logging in to Wordpress.
-
Dashboard tabs - The tabs that will appear in the dashboard can be named and their shortcodes added here. To rearrange them click and hold the space between the title and the space for the shortcode and drag them up or down.

Changing student dashboard tabs order

Example
Learn more: WordPress Video Lessons Manager Plugin (CMVLM) - Settings - Dashboard.
Notifying The Admin And Students
You can (and should) use email notifications to make sure your students are engaged and your teachers, up-to-date.
Available Notifications
- Course Progress - Sent each time the user finishes watching a course
- Lesson Progress - Sent each time the user finishes watching a lesson
- Video Progress - Sent each time the user finishes watching a video
- Notes Overview - Sent at the end of the month with all notes created by the user that month
- New Lessons Notification - Sent as soon as the admin adds a lesson
General Notification Settings
General notifications settings are managed from Settings → Notifications tab.

You can configure each of the messages listed above.
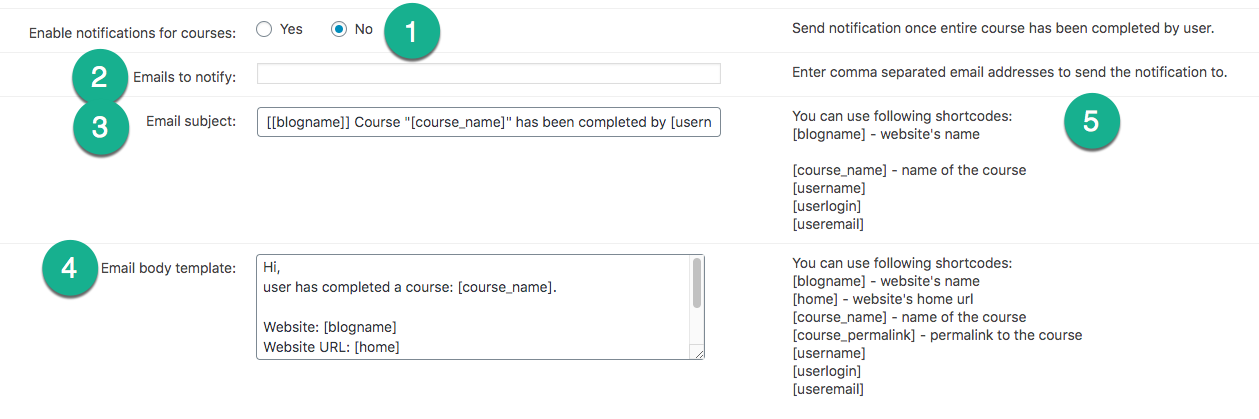
- Enable / Disable the notification.
- Add one or more email addresses to notify (separated by commas).
- Add the email subject using placeholder for dynamic info.
- Create the email template, again using placeholder for dynamic info.
- Check the placeholder reminders
TIP: Specific Settings
You can define specific notification settings for each course or lesson when editing them.
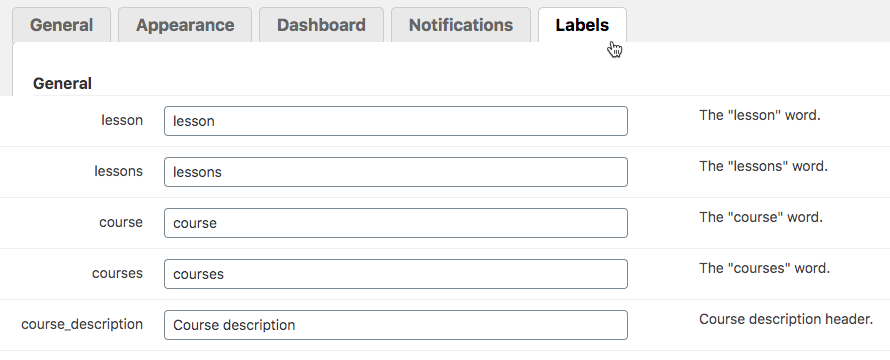
Translating Interface
You can adapt all text related to the plugin. Head to Settings → Labels and edit all relevant text.
Example
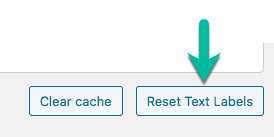
TIP: Reset Labels
At any time you can reset the labels to their original labels via the button at the lower right of the settings screen.
Learn more: Settings - Labels
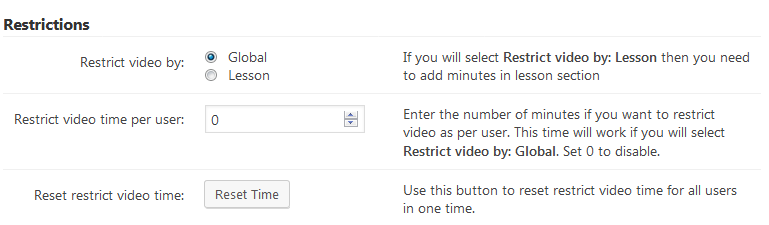
Extra - Restricting How Much Time Users Have To Watch Videos
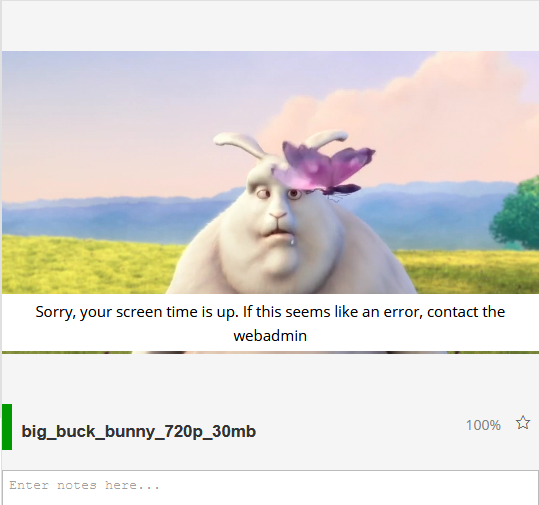
Admins can prevent users from watching videos after they have already watched content for a certain time.
If the time is up, the user will see a warning such as this when trying to watch a new video.
Example
The settings are in the General tab → Restrictions section.
Learn more: WordPress Video Lessons Manager Plugin (CMVLM) - How To - Restrict How Much Time Users Have To Watch Videos

Recap
Below we show a lesson page and a fully-fledged dashboard.
Example
Video Lesson
Student Dashboard
 |
More information about the WordPress Video Lessons Manager Plugin Other WordPress products can be found at CreativeMinds WordPress Store |
 |
Let us know how we can Improve this Product Documentation Page To open a Support Ticket visit our support center |