WordPress Ad Server (CMAC) - Campaigns - Displaying a Campaign
Displaying a Campaign
After installing the Ad Changer Client plugin on your client website, you’ll need to define the server from which ads are served.
Two Ways of Displaying: Pages vs. Sidebar
Then, you’ll be able to display all campaigns and campaign groups by using a simple shortcode that can be placed on any page or post.
Alternatively, you can use the ad changer client widget for cases when you want to display ads on one of your widget areas.
While the instructions on this page apply to both the client and server sides of the WordPress Ad Server, bear in mind to never install the client and server plugins on the same website.
1) Pages/Posts: Using and Customizing the Ad Changer Client Shortcodes
To add banners to a post or page simply insert the shortcode [cm_ad_changer], along with the relevant parameters.
Here is a list of parameters that can be used to display custom features and ad styles:
- campaign_id - ID number of the advertising campaign (required).
- linked_banner - Banner can be a linked image or just an image. This value can be 1 or 0 (default: 1).
- debug - Settings to show the debug info. Can be set as 1 or 0 (default: 0).
- wrapper - Image Wrapper On or Off. Can be 1 or 0 (default: 0).
- class - Banner (wrapper) class name.
- no_responsive - Banner is not responsive. Can be set as 1 or 0 (default: 0). Note: Adding the no_responsive attribute cancels the usage of banner variations, instead only banners with original dimensions are requested by the client.
2) Sidebar: Displaying Ads Using the Ad-changer Client Widgets
Ad campaigns and campaign groups can also be displayed in widget areas such as your sidebars, headers, and footers on both client and server sites.
Add the CM Ad Changer widget to the selected widget areas under Appearance → Widgets.
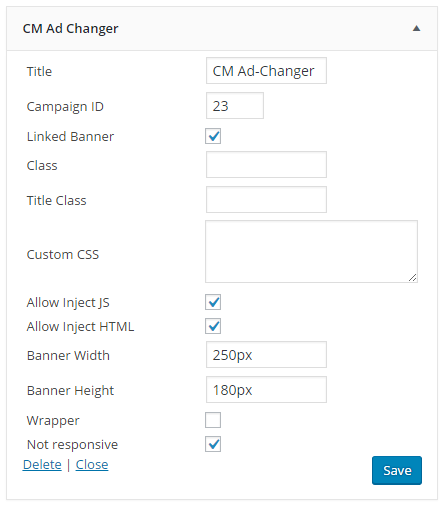
- Title - Title that will appear above the widget
- Campaign ID - ID of an existing campaign from to be displayed on the ad-server widget (required)
- Linked Banner - Define whether or not your banner should link to the campaign URL or not.
- Class - Banner (wrapper) class name CSS Class of wrapper. Note: If a wrapper is turned off then the class is added to widget wrapper.
- Title Class - Widget Title class name
- Custom CSS - The CSS code to be displayed with the banner
- Allow Inject JS - Choose if the JS sent from the WordPress Ad Server should be injected.
- Allow Inject HTML - Choose if the HTML sent from WordPress Ad Server should be injected.
- Banner Width/Height - Set banner dimensions.
- Wrapper - Decide if the banner should have been wrapped with div element (works only if class is set).
- Not Responsive - If banners are not responsive, shut this setting off. Can be a value of 1 or 0 (default: 0). Note: Not using responsive settings cancels the option of banner variations, in this instance, only banners with original dimensions will be provided when requested.
Below: This is where you’ll enter your campaign group details to display multiple campaigns on the same ad spot. Additional fields work just like in the Ad Changer widget.
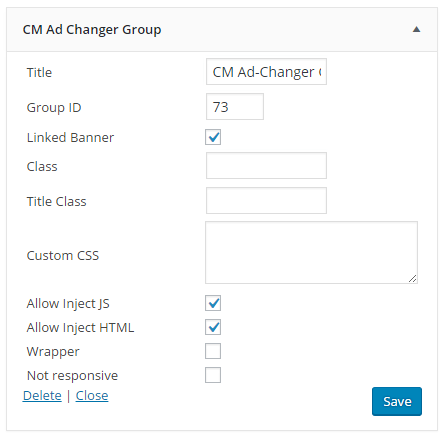
Once you’ve entered a campaign’s parameters, they will permanently be displayed on that specific widget area.
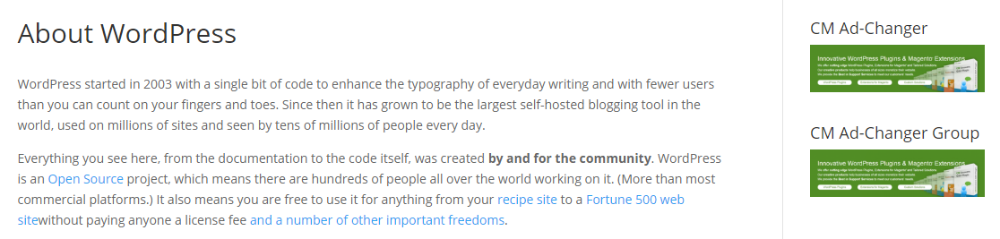
Below: Ad Changer campaign displaying in the sidebar.
 |
More information about the WordPress Ad Server plugin Other WordPress products can be found at CreativeMinds WordPress Store |
 |
Let us know how we can Improve this Product Documentation Page To open a Support Ticket visit our support center |