Appointment Booking Calendar - Use Case - How to Set Up User Time Credit
Use Case – How to set up user time credit
Note: This guide requires:
- Appointment Booking Calendar - This document uses version 2.5.0.
- Booking Payments Add-on - This document uses version 2.1.0.
The payment add-on works with two payment systems, so you also need to install and activate one of these plugins:
- Easy Digital Downloads (EDD) / WooCommerce - To connect payment gateways such as PayPal or Stripe.
Video Use-Case
Note: the video uses the older plugin version 2.2.0, there might be some differences in features.
Introduction
Appointment Booking Calendar allows you to manage and display multiple calendars with open spots for visitors to book. Users can book slots either for free or for money, when using the Booking Payments Add-on. It is also possible to set up a Time Credit feature for specific registered users, so these users can book slots only with the Time Credit that they have.
Use Case Front-End
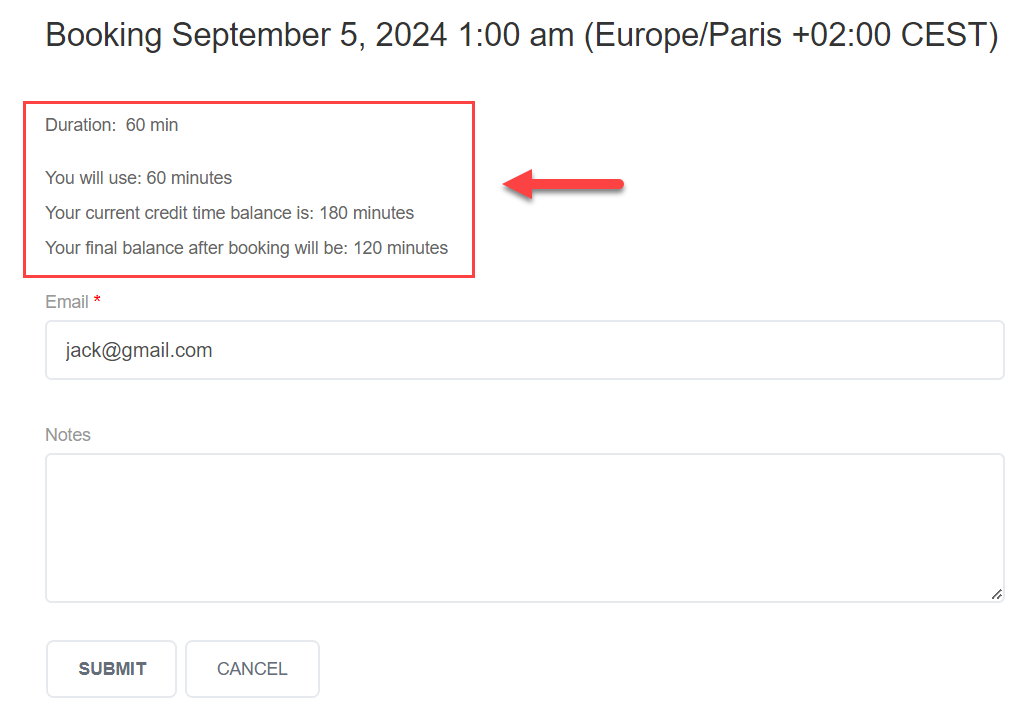
Spending Time Credit for booking an appointment:
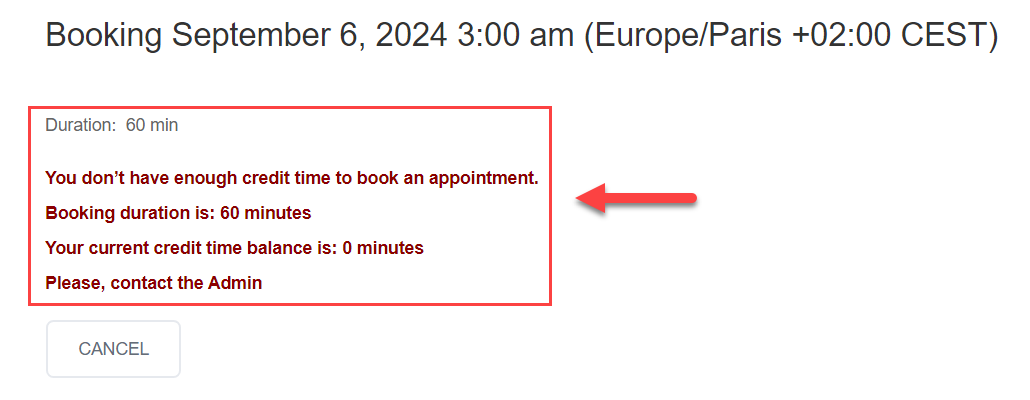
Not enough Time Credit for booking an appointment:
Use Case Assumptions
Want to Learn From The Start?
If you still haven't configured your first calendar, check this use case:
In this example use case guide, we'll cover how to set up Time Credit for all or specific users, how to create a user dashboard for them, hot to let purchase time credit and how this feature works for the user side.
We consider that you have already bought the Appointment Booking Calendar plugin, but not installed yet.
It follows:
- Installing the plugin
- Setting up calendars recap
- How this feature works
- Time credit settings
- Enabling time credit for specific users
- User dashboard
- Reject booking - admin view
- Booking - user view
- Translating front-end interface (labels)
- Purchasing time credit minutes
- Compatibility with paid booking slots
- End result
Installing the Plugin
The process is the same for all CM plugins and add-ons.

- Download the plugin from your customer dashboard.
- Log in to WordPress and navigate to the WordPress Admin → Plugins settings.
- Click on Add New.
- Activate it and add the license.
Learn more: Getting Started - Plugin Overview
Setting Up Calendars Recap
Recap
If you still have questions about
- Setting up a calendar
- Showing calendars on your site
- Improving the calendar
- Managing bookings
- Email notifications
- The discussion form
Head back to the use case Appointment Booking Calendar - Use Case - How to Create a Calendar Booking System in WordPress
How This Feature Works
The user will be able to book the appointments only for definite amount of time according to the time credit that his has (either given by the admin or purchased). The user has a dashboard, where he can view available Time Credit balance, view all transactions, view all his bookings made using Time Credit and reject them. Rejecting the appointment returns to the user the Time Credit that was spent for it.
Now let's consider configuration and how it all works step by step.
Time Credit Settings
First, let's check the general Time Credit settings.
To do this, navigate to Admin Dashboard → CM Appointments Booking Pro → Settings → Time Credit tab.
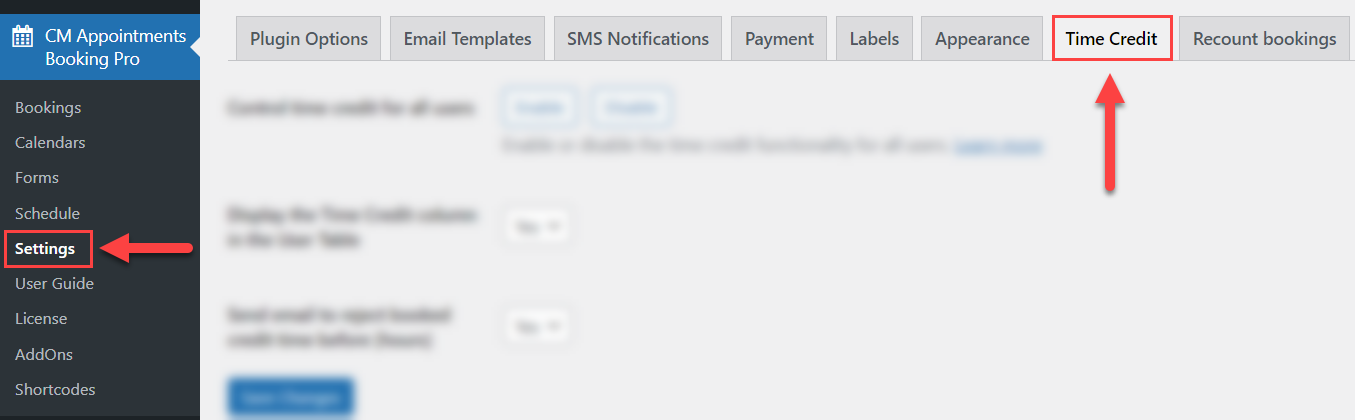
There you can find the following settings:
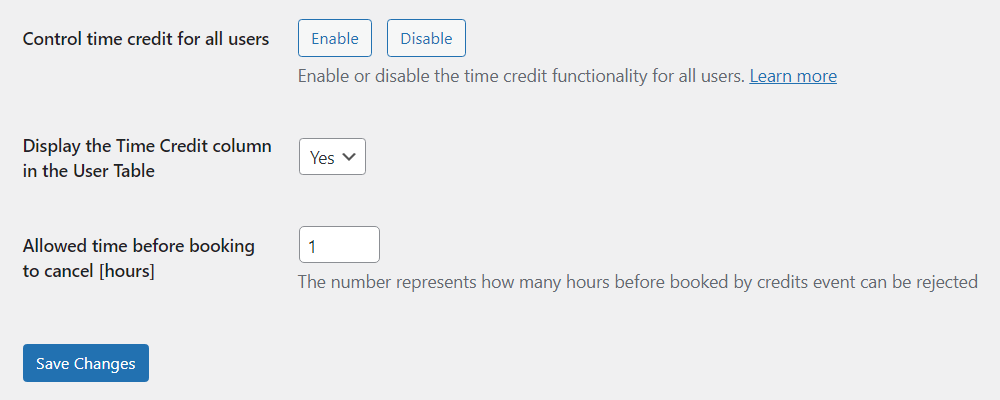
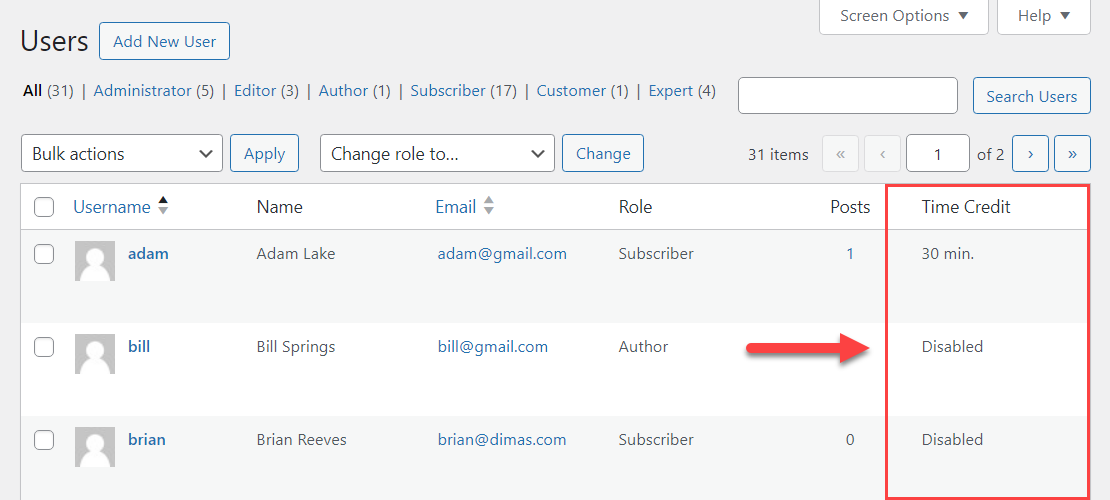
- Control time credit for all users - This option allows you to enable or disable in bulk the Time Credit functionality for all users that are registered on your site. Alternatively, you can enable or disable it specifically for each user, we will consider it further in this guide.
- Display the Time Credit column in the User Table - If enabled, in the users list there will be displayed a column Time Credit which shows if this feature is enabled for the user, and how many time credit he has.
- Send email to reject booked credit time before [hours] - In this field you need to put the amount of hours that the user will have before the beginning of an appointment to reject it. We will talk about the rejection further in this guide.
When you configured this option, click the button Save Changes on the bottom of the page.

Enabling Time Credit for Specific Users
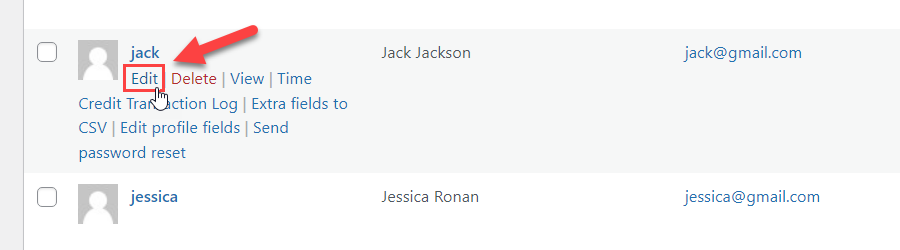
To enable the Time Credit feature specifically for each user, navigate to Admin Dashboard → Users → All Users.
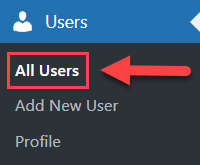
Hover on the needed user and click Edit.
Find there the section Time Credit User Control and enable the option Allow Time Credit for User. A few new options will appear there:
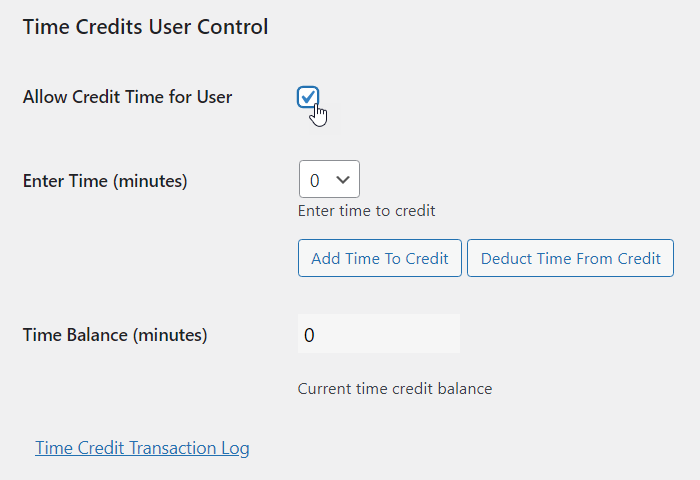
- Enter Time (minutes) - Choose the amount of minutes that you want to add or deduct from the user. You can choose between 15, 30, 45, 60 or 90 minutes.
- Add Time To Credit - Click this button to add chosen amount of minutes to the user.
- Deduct Time From Credit - Click this button to deduct chosen amount of minutes from the user.
- Time Balance (minutes) - This field shows the amount of time that is currently available for the user. This value increases when the admin adds minutes or when the user purchases minutes, and decreases when the admin deducts minutes or when the user spends this time for booking appointments.

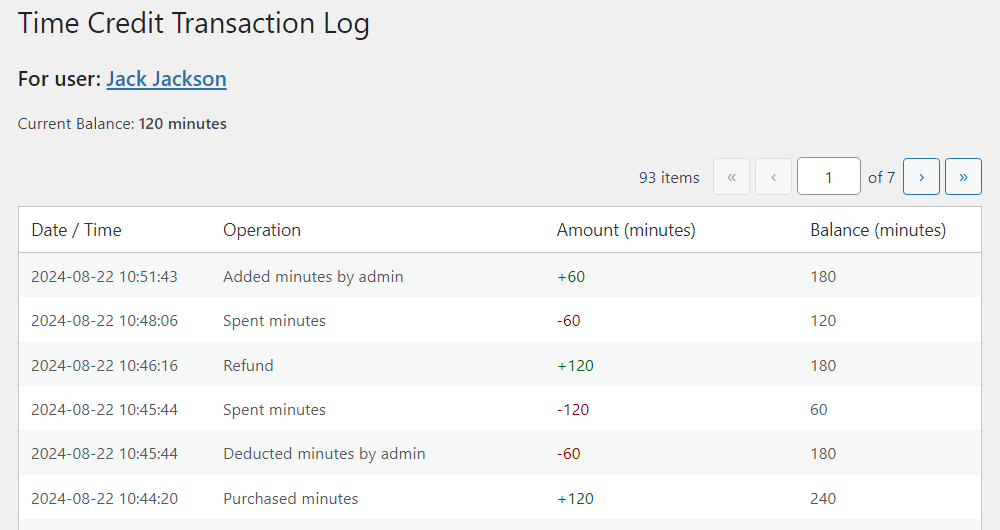
- Time Credit Transaction Log - Click it to see the current user balance and the transaction history of operations with time credit.
Example of the Log
TIP
Alternatively, the admin can access this log from the list of all users, by hovering on the user and clicking Credit Transaction Log.
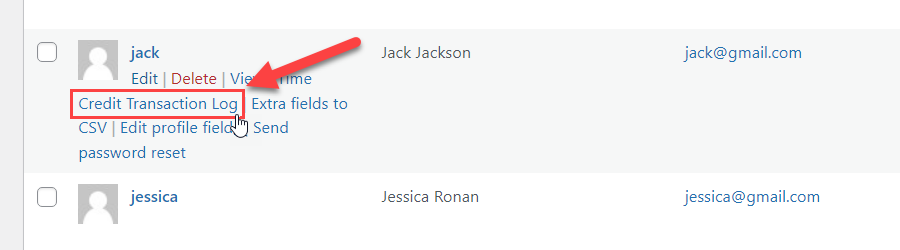
When you finished operations with the Time Credit, click the button Update User on the bottom of the page.
User Dashboard
Logged in users with enabled Time Credit can access the dashboard with detailed info about all Time Credit actions and a table booked appointments.
Creating a Page With the User Dashboard
The User Dashboard page can be generated in two ways:
-
When you install and activate the plugin, the User Dashboard page is generated automatically.

Time Credit User Dashboard page -
You can create your own page and place there the shortcode
[cm_user_credit_time_stat_report]. The shortcode also has a parameter calendar_col which allows to show or hide a column with the calendar name in the table with booked appointments. By default, this column is not displayed. To display it, you need to use the value "1".
Using a shortcode for displaying user dashboard


TIP: Add User Dashboard to the Menu
For the convenience of your users, you can add the page to the menu of your site:
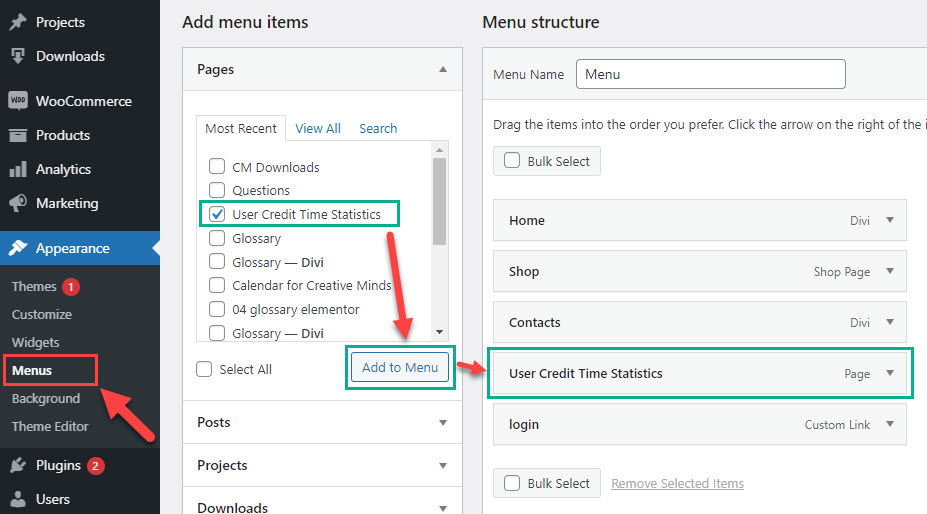
Front-end:

User Dashboard - User View
Only users with turned on Time Credit feature can access the user dashboard.
The dashboard consists of two parts:
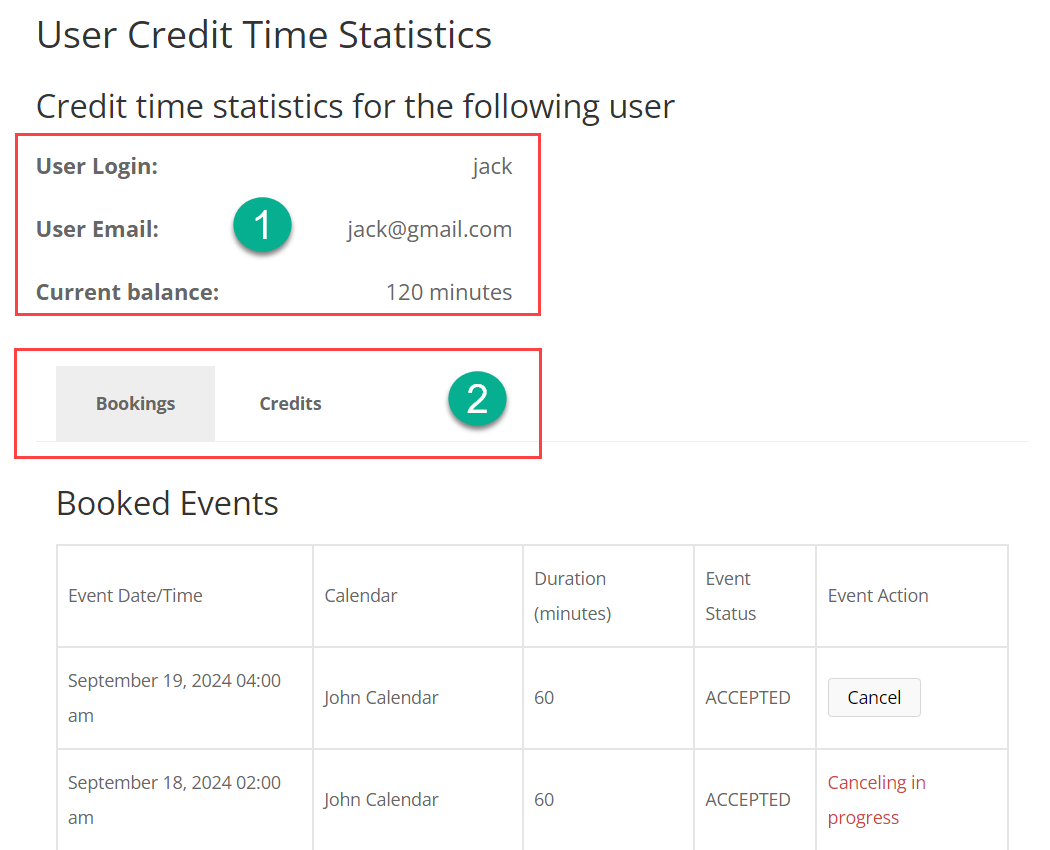
- Upper part - General info about the user and info about his Time Credit. The user can see there the following:
- User Login
- User Email
- Current balance - Available amount of Time Credit that the user can spend for booking.
- Lower part - Two tabs: Bookings and Credits.
Bookings Tab
In the Bookings tab the user can see all bookings he made using Time Credit:
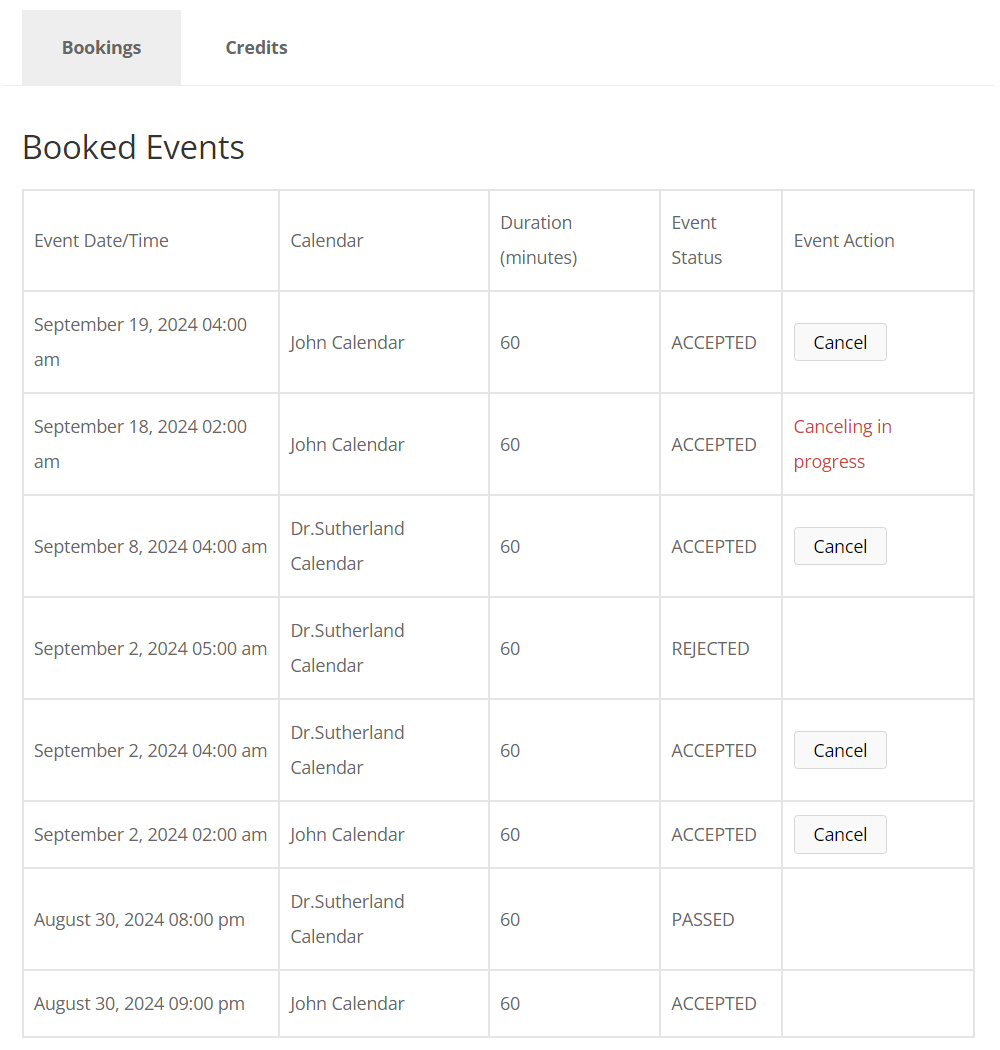
There are 5 columns in the table:
- Event Date/Time - The date and time of the booked appointment.
- Calendar - This column shows which calendar the booking is related to. This column can be optionally displayed using the shortcode parameter mentioned above.
- Duration (minutes) - The duration of the booked appointment.
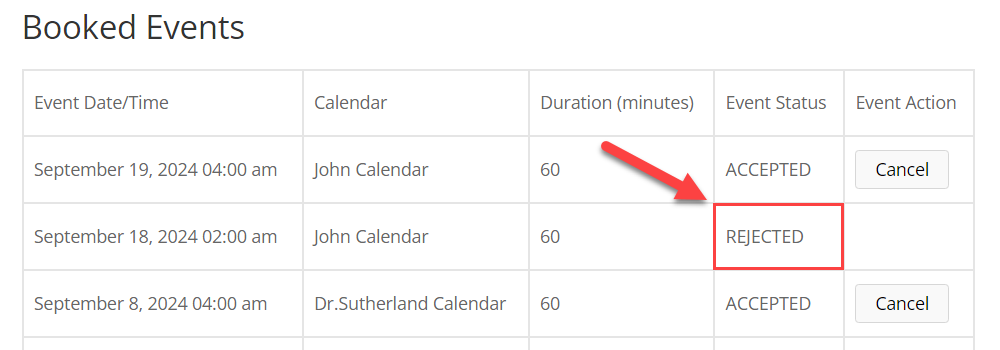
- Event Status - The status of the booked appointment. Can be Accepted, Passed, Rejected, trash (when the appointment is deleted) and other.
- Event Reject Link - This column contains the Cancel button. The button won't be displayed in three cases:
- If the appointment is already rejected or deleted.
- If the time when the user could reject the appointment has passed. The time before the appointment when the user is able to reject it is defined by the admin in the plugin settings.
- If the appointment date and time has already passed. After rejecting the appointment, the user will be added the amount of minutes that were spent for this booking. We will talk about the reject link more detailed lower in this guide.
Credits Tab
In the second tab Credits the user can see all information about admin operations with adding and deducting Time Credit to the user. Above the table the user can see his Current Balance.
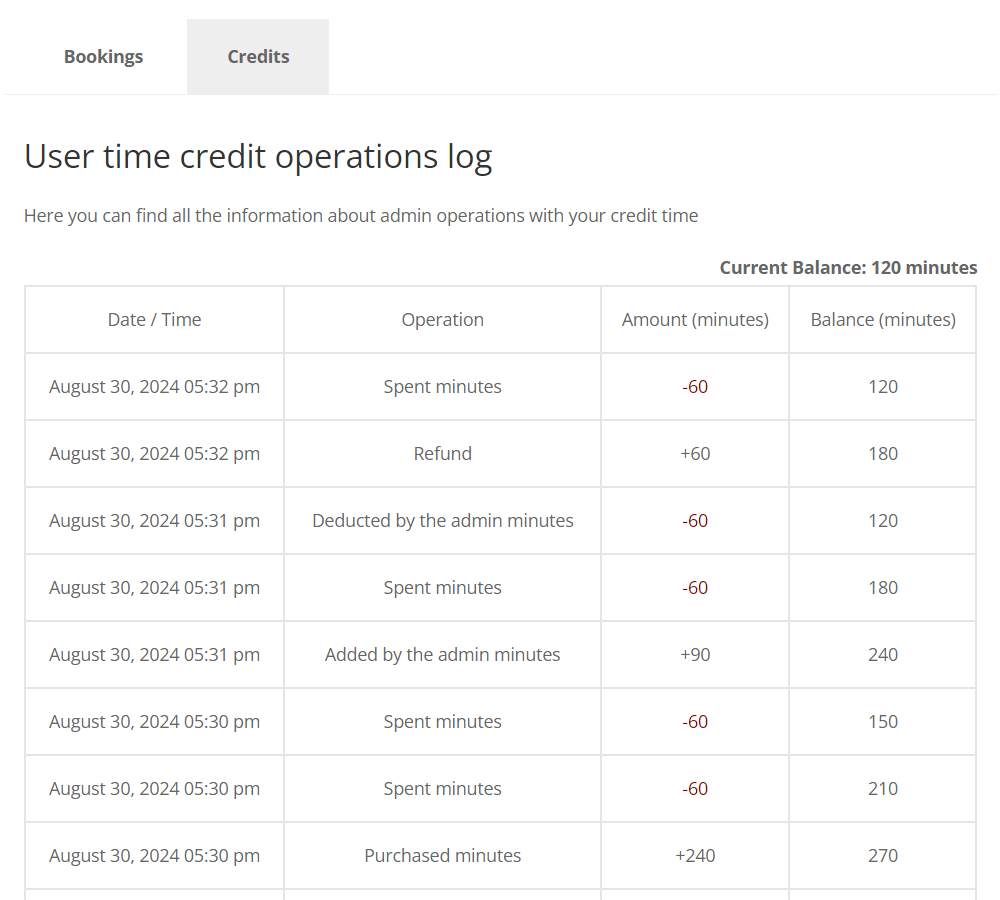
The columns in the table are:
- Date / Time - The date and time of the transaction.
- Operation - Here the user can see the following operation types:
- Added by the admin minutes
- Deducted by the admin minutes
- Purchased minutes
- Spent minutes
- Refund
- Amount (minutes) - The amount of minutes that was added or deducted.
- Balance (minutes) - The amount of minutes that left after the operation.
Reject Booking - Admin View
When the user clicks the Cancel button, the button will be replaced by the message "Canceling in progress".
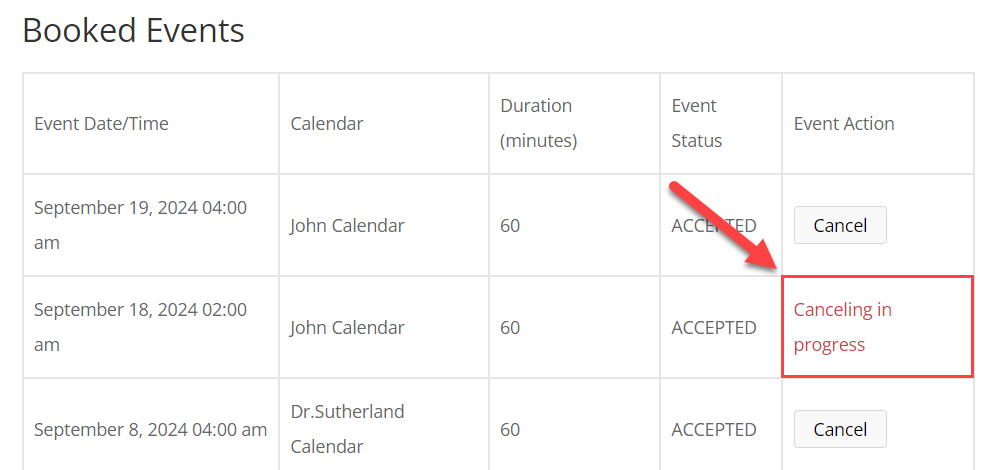
The admin gets an email notification that the user wants to reject the appointment. The admin can also see that message on the booking editing page.
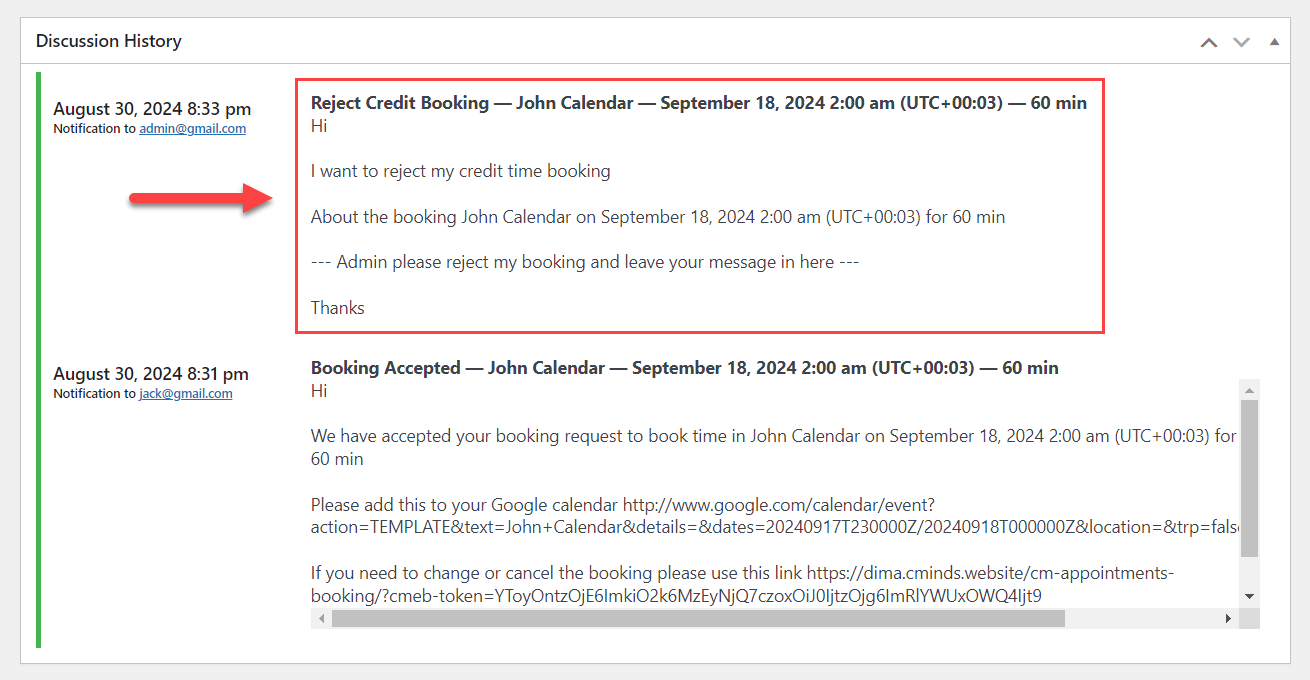
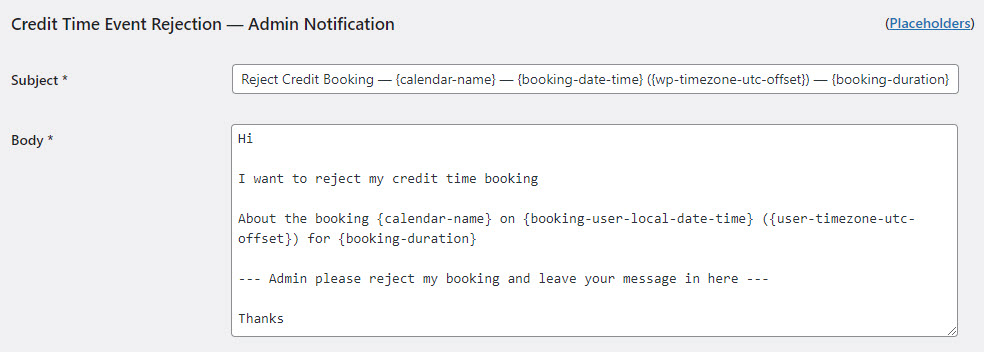
TIP: Change the Email Template
The admin can change the subject and body of the email notification in plugin settings in the Email Templates tab. Learn more about it in this guide: Appointment Booking Calendar - Appointments - Email Notifications To User and Admin
There are two ways how the admin can reject the booking.
-
To reject the appointment, the admin needs to click the Reject button in the metabox Status and click the Update button.

Rejecting the booking -
In the list of all bookings, the admin can use either the button Quick Edit while hovering on needed booking or the relevant button Reject.

Rejecting the booking


As a result, the status of the booking will be changed on the User Dashboard, and the user will be added the amount of minutes that were spent for this booking.
Booking - User View
When the user tries to book an appointment, there can be two cases.
First case, when the user has enough Time Credit for a booking. Above the submitting form the user can see:
- The amount of minutes that will be spent for this booking.
- Current amount of minutes that he can spend.
- The amount of minutes that will remain after making this booking.
Second case, when the user doesn't have enough Time Credit for a booking. Above the submitting form the user can see a message that he doesn't have enough Time Credit to book an appointment:
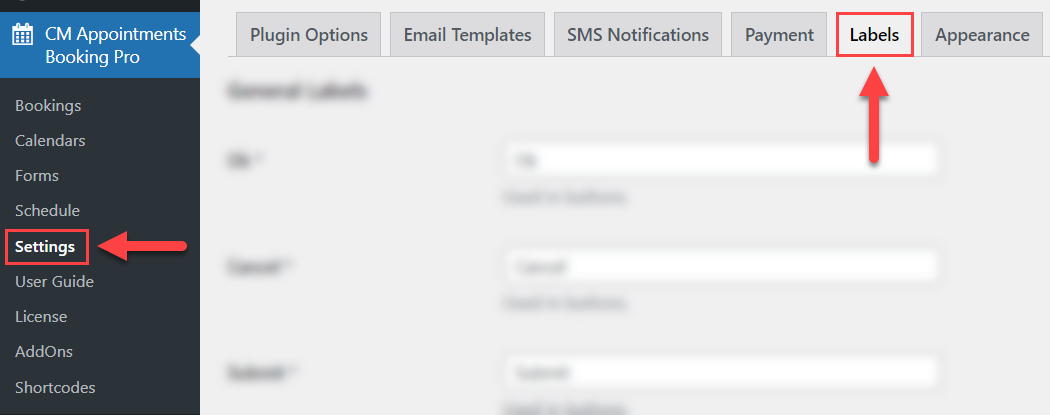
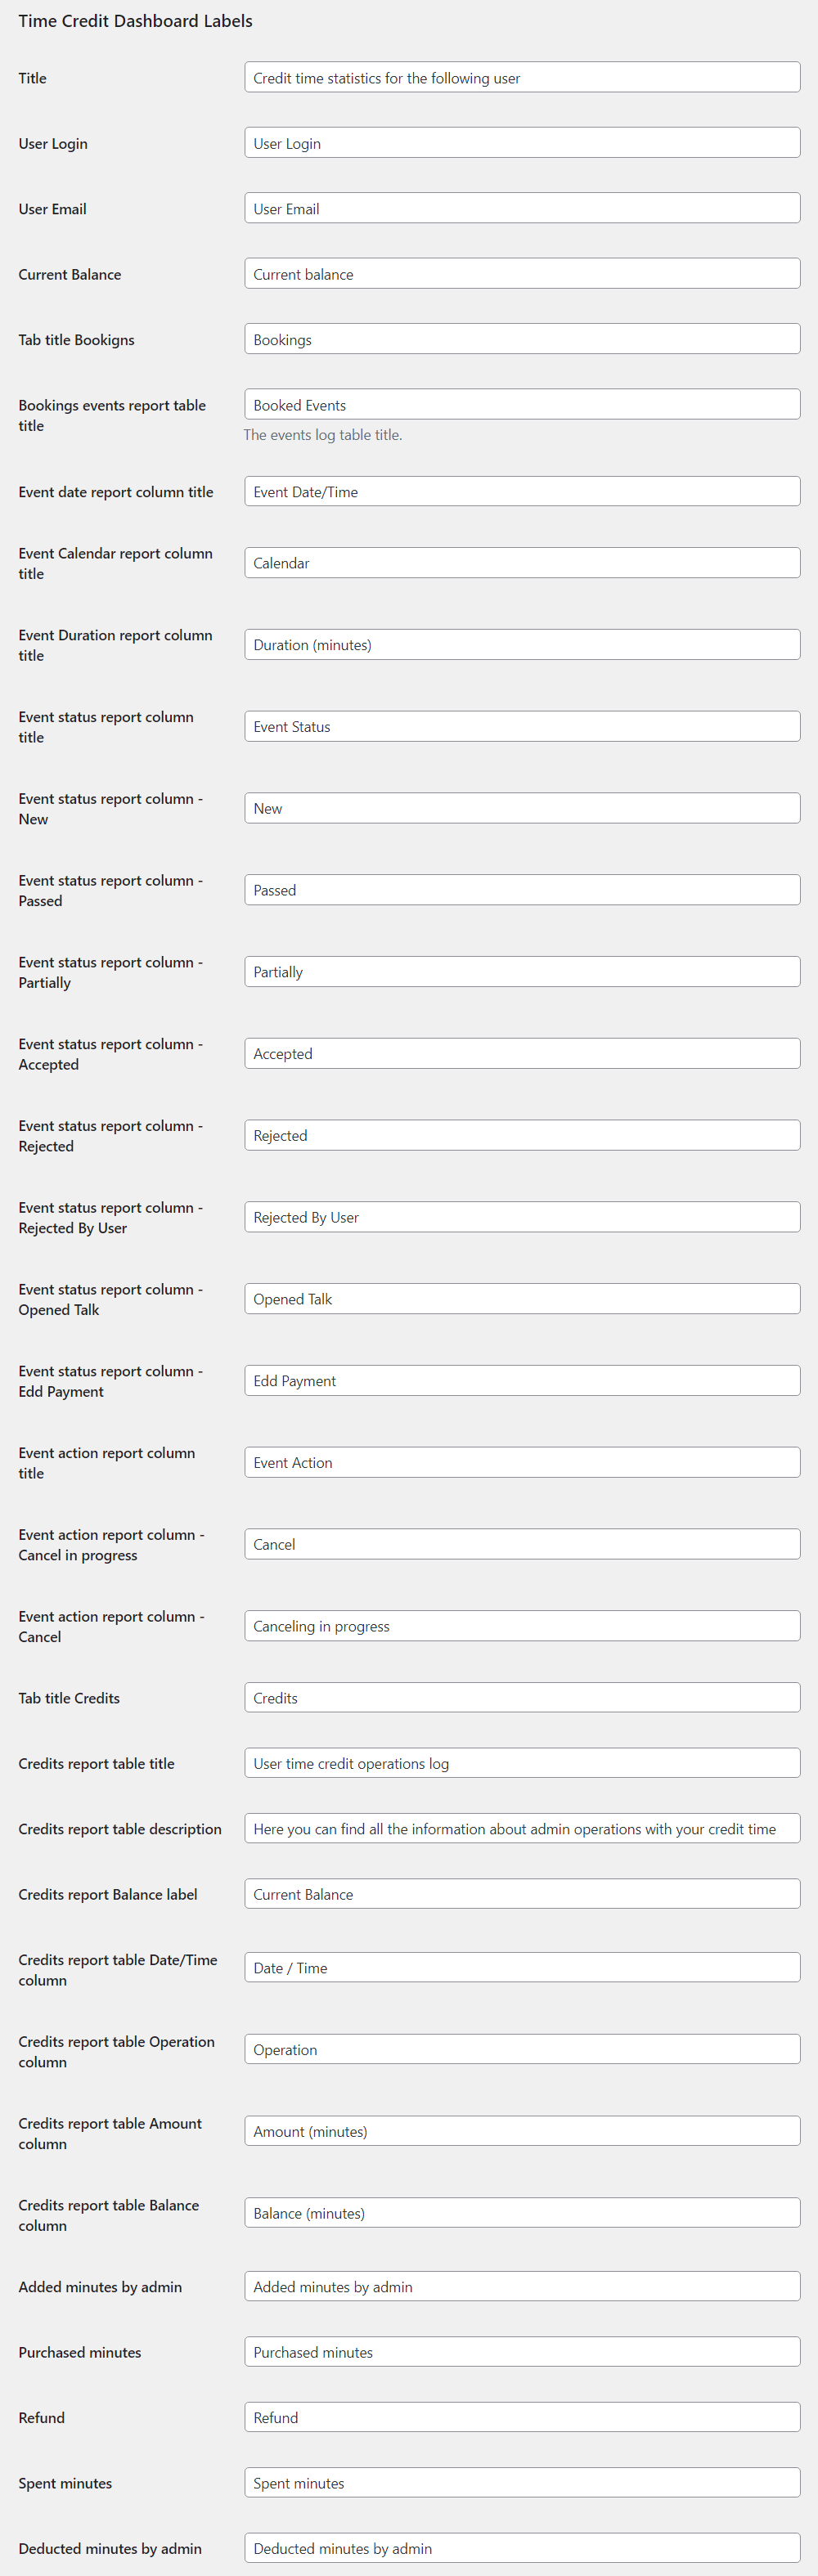
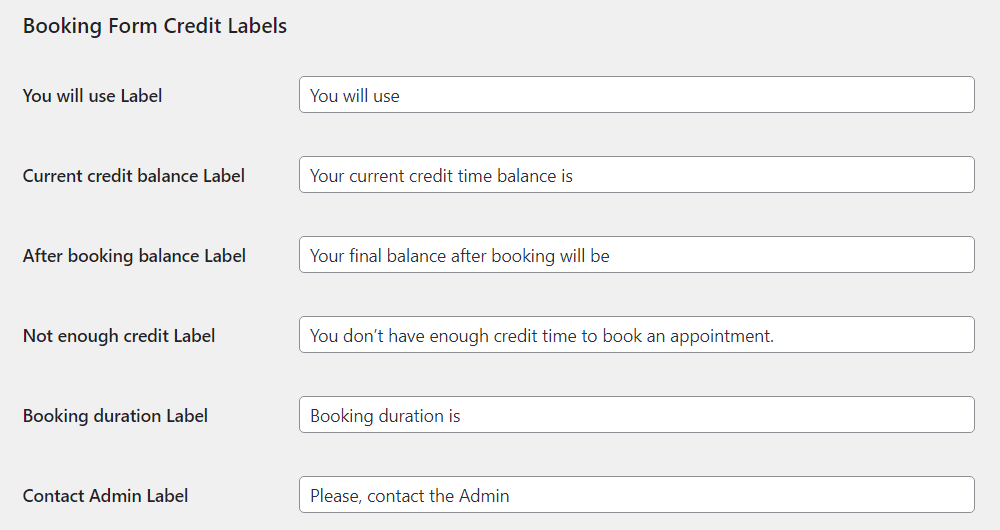
Translating Front-end Interface (Labels)
You can edit or translate all front-end labels related to the user dashboard in the plugin settings. To find them, navigate to Admin Dashboard → CM Appointments Booking Pro → Settings → Labels tab.
First section with needed labels is Time Credit Dashboard Labels:
And the second section with needed labels is Booking Form Credit Labels:
Purchasing Time Credit Minutes
To let users purchase Time Credit minutes, you need to use the Booking Payments Add-on and one of the payment plugins - either Easy Digital Downloads or WooCommerce.
If both payment plugins are activated on your site, don't forget to choose the needed one in the plugin settings:
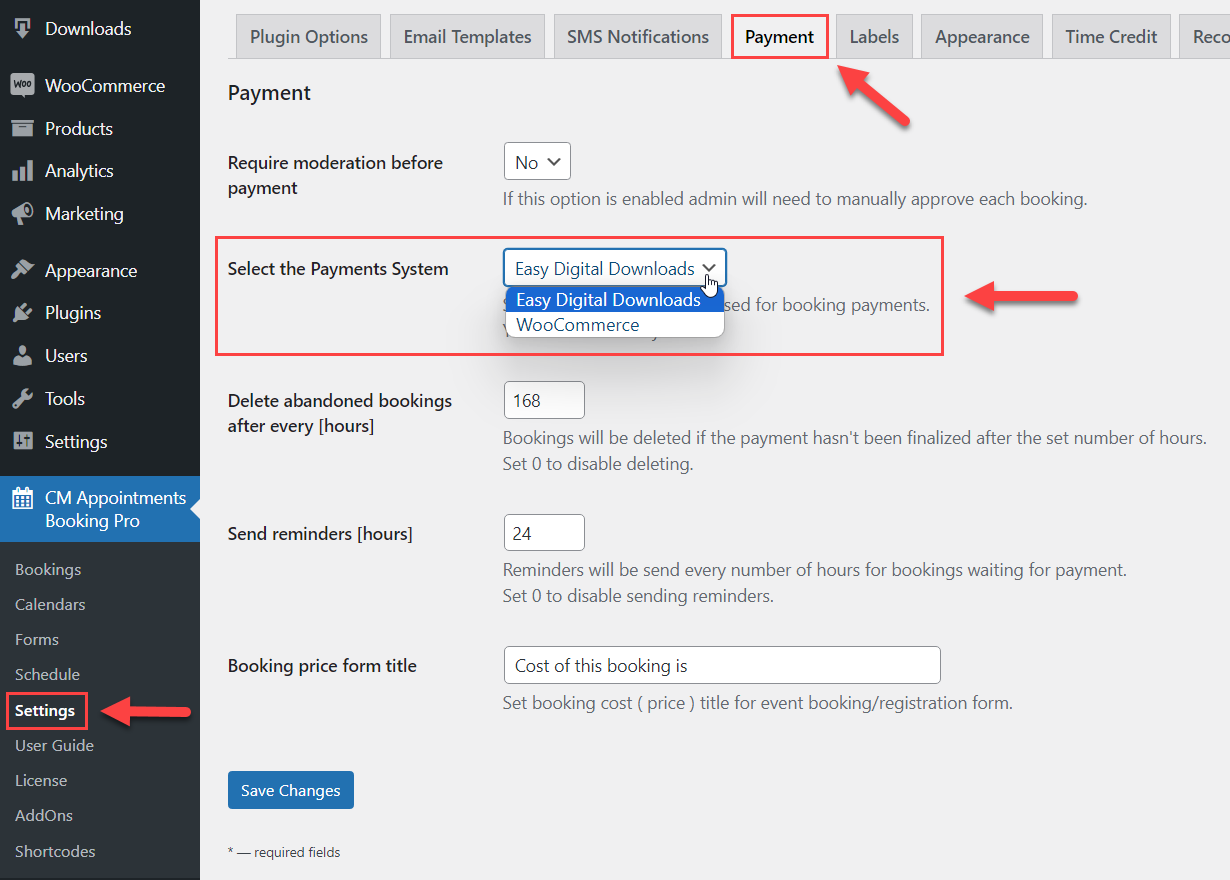
In this use case guide we choose Easy Digital Downloads, but it works the same for WooCommerce.
TIP
Learn more about how to work with the Payments add-on: Appointment Booking Calendar + Payments - Use Case - How to Charge Users for Booking Appointments
When the Booking Payments add-on is installed and activated, you will see 2 more options under the Time Credit tab in the plugin settings:
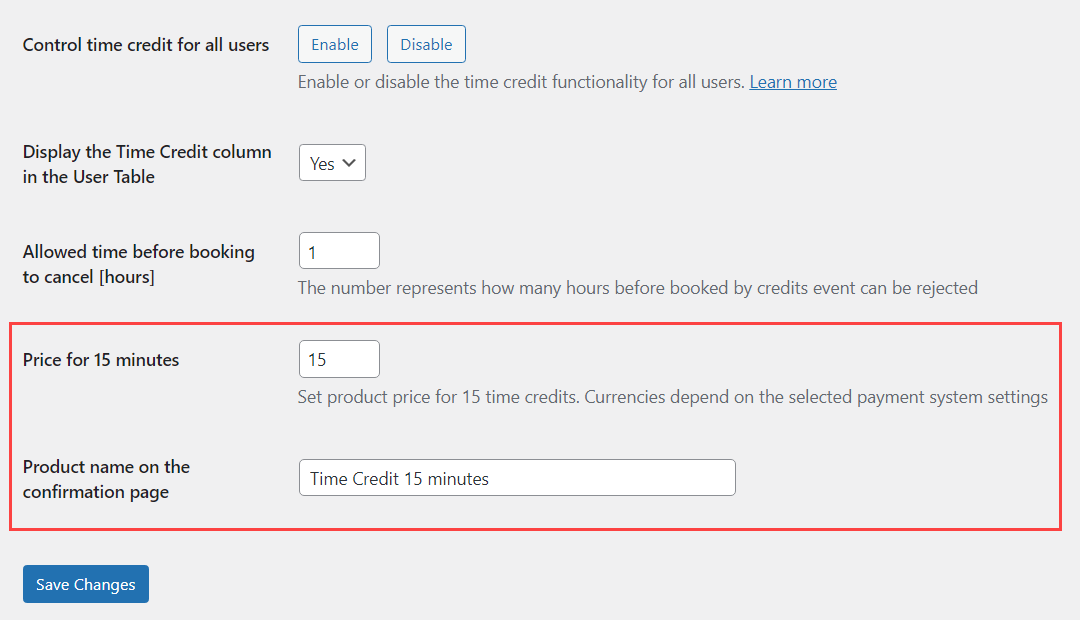
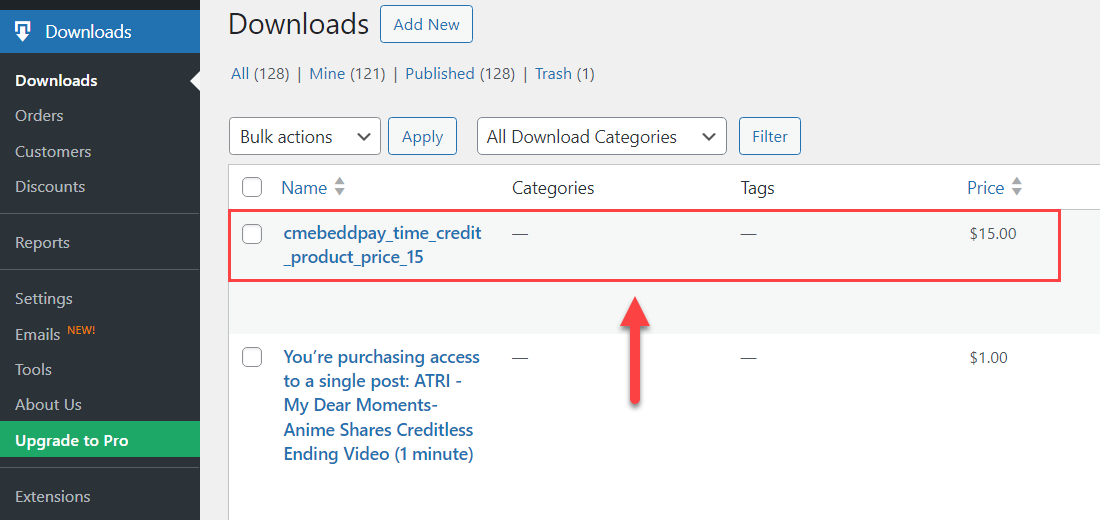
- Price for 15 minutes - Set the price for purchasing 15 minutes of Time Credit. The product will be automatically created in the relevant payment plugin.
Example of the created product in EDD
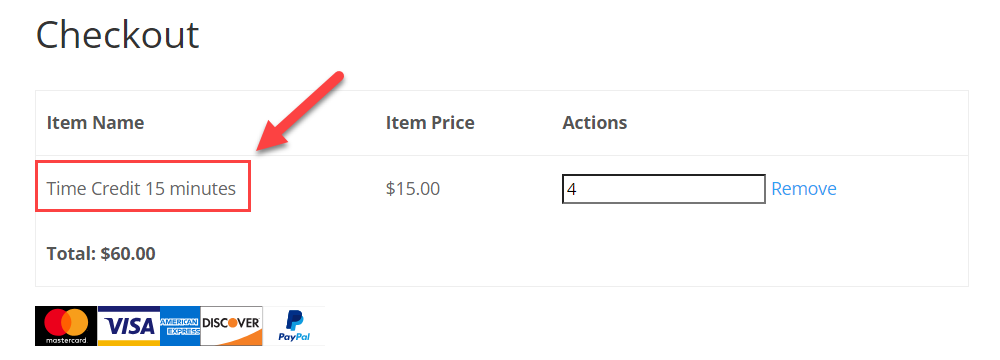
- Product name on the confirmation page - Define the nice-looking name to display in the checkout.
Example of the product name in EDD checkout
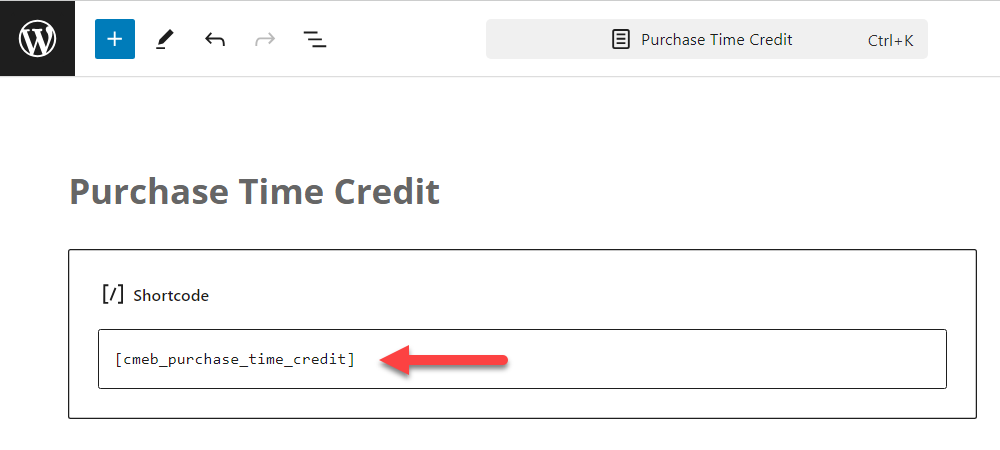
To display the functionality of purchasing minutes on the front-end, we need to use the shortcode [cmeb_purchase_time_credit] .
So let's add it to the page:
Result on the front-end:
Here the user can see his current balance, the price for 15 credits (defined by you in the plugin settings), and the buttons "-" and "+" to choose the amount of minutes to buy.
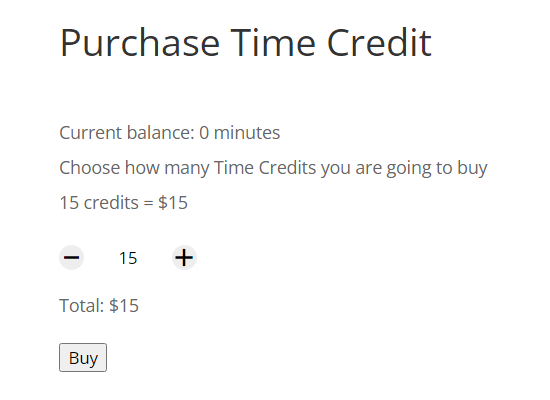
When clicking "+" or "-" the user can also see the total price that he will have to pay.
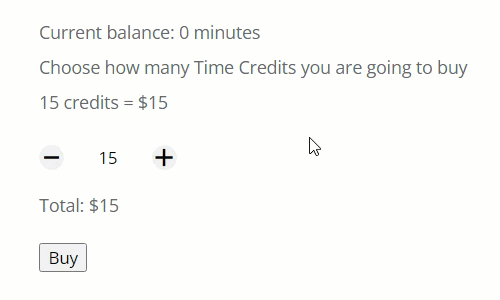
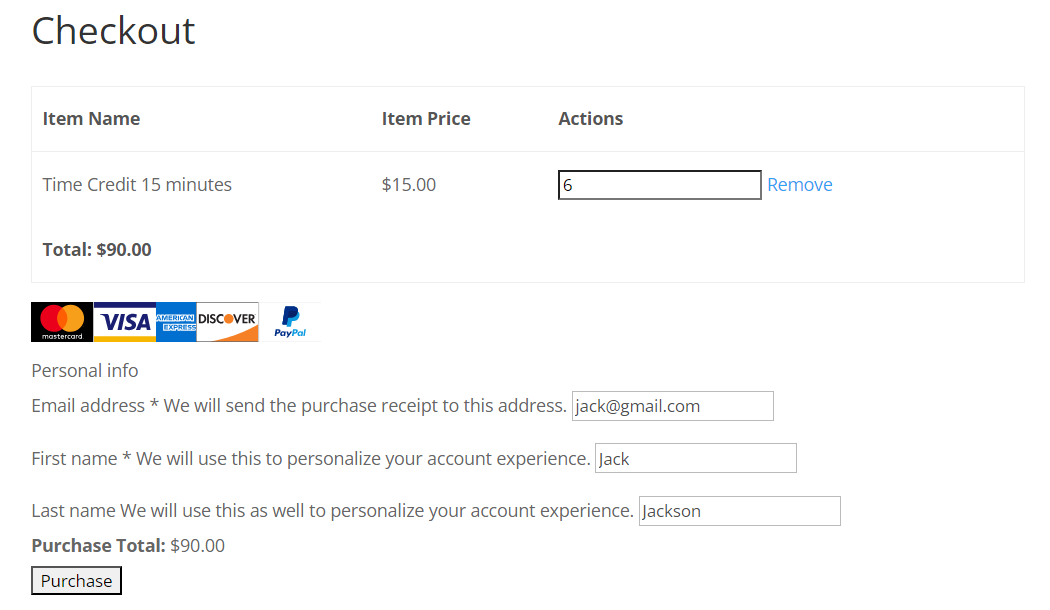
After clicking Buy the user will be redirected to the checkout page. Here the user can finalize the payment by clicking the button Purchase:
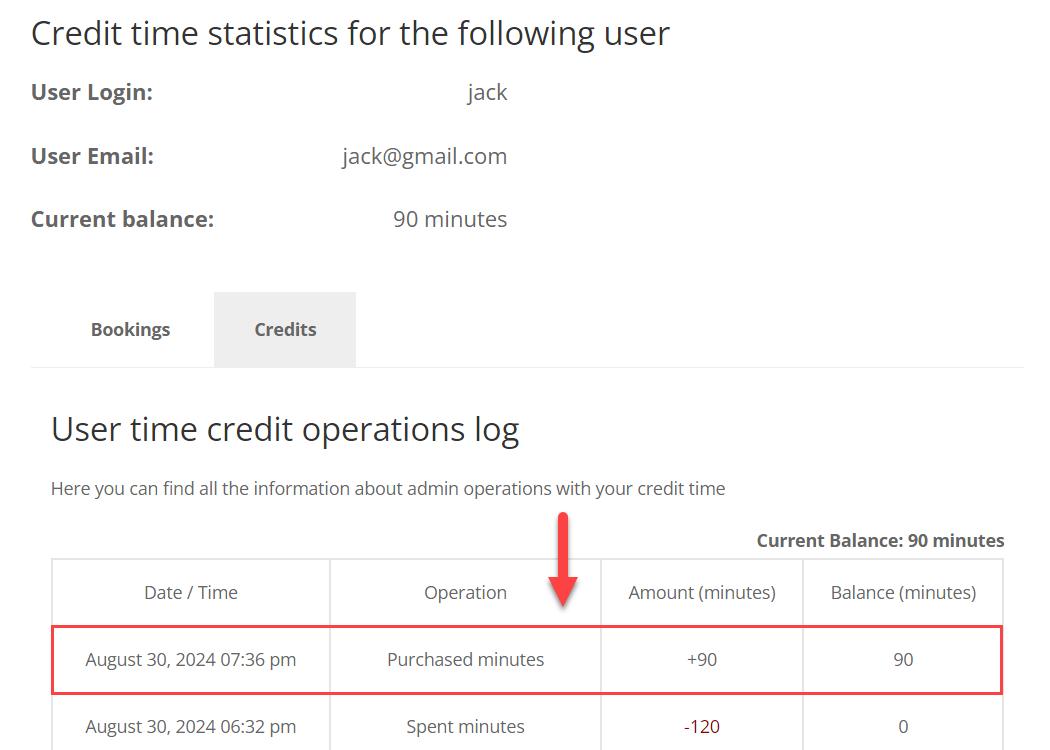
This amount of minutes will be added to the user balance, and he will be able to see a relevant record in the operations log under the Credits tab of his user dashboard:
Compatibility With Paid Booking Slots
The booking slots in the calendar can be either free or paid. Paid slots are marked in the calendar by the relevant labels:
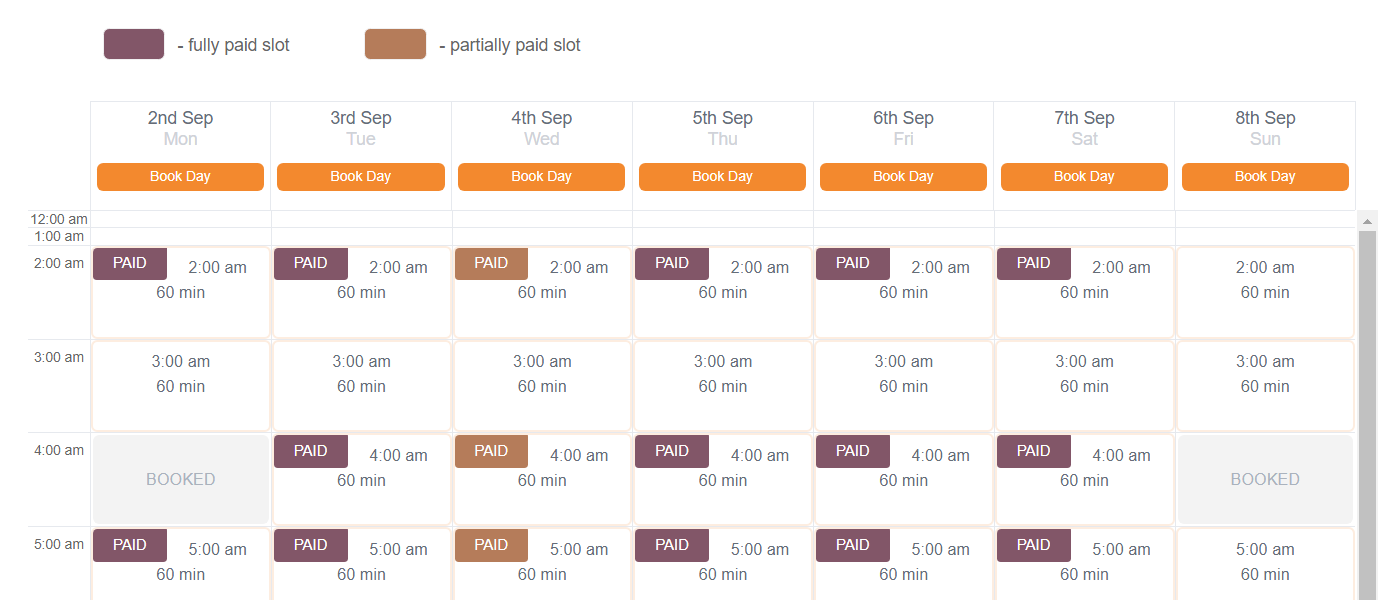
But the difference between free and paid slots is applicable only to users with disabled Time Credit functionality. The user with enabled Time Credit functionality can book both types of slots only with their Time Credit, without need to pay extra money for booking slots that are marked as "Paid".
End Result
Following instructions found in the plugin and guides, you should be able to set up Time Credit for all or specific users, how to create a user dashboard for them, hot to let purchase time credit and how this feature works for the user side.
Front-End Use Case:
Spending Time Credit for booking an appointment:
Not enough Time Credit for booking an appointment:
 |
More information about the Appointment Booking Calendar plugin for WordPress Other WordPress products can be found at CreativeMinds WordPress Store |
 |
Let us know how we can Improve this Product Documentation Page To open a Support Ticket visit our support center |