WordPress Registration Form Plugin (CMREG) - Use Case - Adding Login and Registration Pop-ups With Invitation Codes
Use Case - Adding Login and Registration Pop-ups With Invitation Codes
Note: This guide covers features from the Pro version of WordPress Registration Form Plugin - This document uses version 3.1.0
Video Use-Case
Introduction
WordPress Registration Form Plugin allows your users to login and register to your site via a beautiful pop-up.
Additionally, the admin can create invitation codes that, when used, register a user with a certain user role.
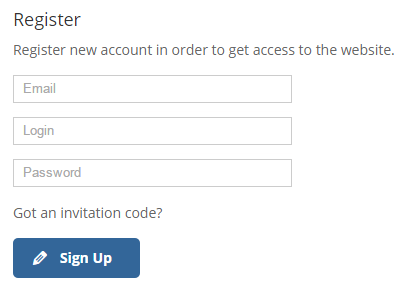
Use Case Front-End

Use Case Assumptions
In this example use case guide, we'll cover how to allow users to register and login to your site via pop-up and links. We consider that you have already bought the WordPress Registration Form Plugin, but not installed it.
It follows:
- Installing the plugin
- Initial setup (form)
- Login and/or Registration?
- How to show the pop-up
- Hide or display fields dynamically (conditional logic)
- Login
- Access restriction content (locking site to logged-in users)
- Limit login attempts
- IP restriction
- Redirection per role
- Other settings that affect login
- Social login
- Registration
- Password
- Email Verification
- S2Member Integration
- Tips
- Email notifications
- Invitation
- Making codes
- Letting users create codes
- Reviewing, managing and exporting codes
- Labels
- Extras
- Next steps
Installing the Plugin
The process is the same for all CM plugins.

- Download the plugin from your customer dashboard.
- Log in to WordPress and navigate to the WordPress Admin → Plugins settings.
- Click on Add New.
- Activate it and add the license.
Initial Setup - Login and/or Registration? Enabling and Configuring Pop-Up
The pop-up is a core part of the plugin. It allows users to register and/or log in to your site.
We'll explain now how to show and configure the pop-up. Later on, we'll cover specifics about login, registration, and invitation codes.
How To Show The Pop-Up
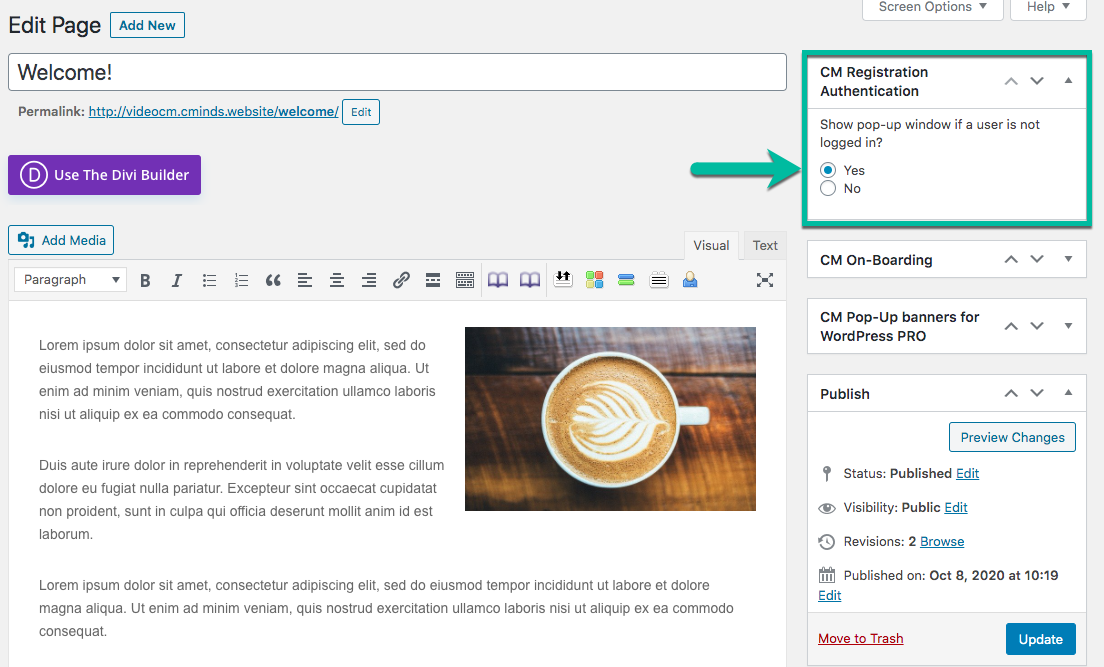
Perhaps this is the most important information. By default, the plugin will display the pop-up on all pages to non-logged in users.
1) Enable/Disable on Each Page
Edit a page and, if the plugin is activated, you will see the CM Registration Authentication metabox. Choose "Yes", and non-logged-in users will see the pop-up.
2) Adding Registration/Login Link
To add a link anywhere on your site, use the css class "cmreg-login-click" and add it to a link in your site navigation.

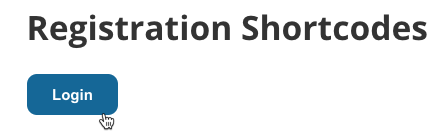
3) Shortcodes
Similarly to the last option, you can add the link anywhere by using certain shortcodes. For instance [cmreg-login] will show the login button.
There are many more useful shortcodes. Learn more: WordPress Registration Form Plugin (CMREG) - Shortcodes - Displaying Login Button, Registration Form, Changing Password, and More
Settings - Changing The Pop-Up
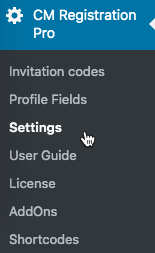
Navigate to the Admin Dashboard → CM Registration Pro → Settings.
These options are found in the General tab.

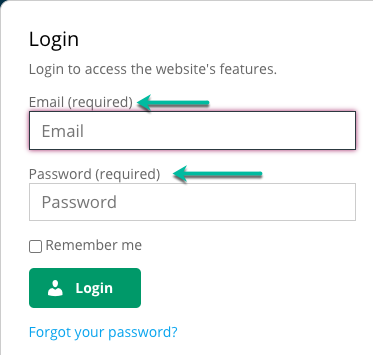
General - Login and/or Registration?
- Authentication pop-up window - What forms will the pop-up contain. You can choose between:
- Login
- Register
-
Login & Register

Front-end example of the Login and Registration popup form
-
Allow users to close the pop-up - If enabled, the user will able to close the pop-up via the button.

Close form button


Appearance
-
Overlay background opacity - The opacity of the login dialog box overlay background.

Example of overlay background opacity - Preload login form overlay - If enabled, the login form will be preloaded on the page load. Disable this option if you experience performance issues (it will cause the form to show up after a delay).
- Display form fields label - Show or hide.

Hiding or Displaying Registration Fields Dynamically (Conditional Logic)
It's possible to hide or display fields based on certain conditions. For example, if the user chooses "User Type: Premium User", the fields "Referral" and "Plan" appear

Implementation
You must add certain tags to the CSS class of the relevant fields when editing them in the profile fields page.
First, edit the fields that will affect the conditions:
- Optional fields - add hide_show_optional to the CSS class. Note: don't make affected fields Required!
- Required fields - add hide_show_required to the CSS class
Then, edit the CSS class of the fields that will be affected.
- Affected fields - add hide to the CSS class
- Premium Plan - Should be affected by the condition, so add hide to the CSS class
Learn more: WordPress Registration Form Plugin (CMREG) - How To - Hide or Display Fields Dynamically (Conditional Logic)
Login Settings
Users can already register and log in, so now let's customize the experience.
From the WordPress dashboard navigate to CM Registration Pro → Settings → Login tab.

Access Restriction Content
From here,it's possible to fully or partially restrict access to the website.
- Global Site Access - Choose between
- Site accessible to everyone
- Site accessible to logged-in users
- Custom Redirect URL - If you restrict access to guest (logged out) users, they will be redirected to this address.
- Exclude the following URLs - Add exceptions if needed. Separate them by lines.
Login
-
Redirect after login to URL address - Specifies where the site user will be redirected to after successfully logging in.
TIPS
You can use these inside the URL:
-
%usernicename% - will be replaced by the username
%userlogin% - will be replaced by the user login
%usersitename% - will be replaced by the micro-site assigned to the user created.
For example, if the user's login is "tom123", for that user, www.site.com/%userlogin% will become www.site.com/tom123
Resources:
-
-
Enable the "Remember me" option - Allows the Plugin to identify the site user in the future so that they don't have to go through login again.

'Remember me' option - Log user last login date - Stores the moment when every user logged in for the last time. This information is shown:
- With the shortcode
[cmreg-edit-profile]. Learn more: WordPress Registration Form Plugin (CMREG) - Shortcodes -
In the user management screen

Displaying the date and time of last login
- With the shortcode
-
Enable the lost password form - Adds the option for site visitors to attempt to recover their password if they've forgotten it.

Form for recovering the password - Login using field - Choose whether the user should use their email address, password or both to log in.
- Disable wp-login.php and redirect to this URL - Replaces the standard WordPress login page with the chosen page. Leaving this field blank leaves the WordPress Login option available.
- Disable wp-login.php and lost password page redirect to this URL - Replaces the lost password page to a new URL. This page should have the reset password shortcode [cmreg-reset-password] in order to be effective
- Prevent from calling login_footer action in the front-end - Enabling this option can help with some issues with the login form on the front-end. For example. it solves the problem if your login form doesn't work when you're using the NextGEN Gallery plugin.
- Enable reCAPTCHA on the login form - Toggles the reCAPTCHA tool on or off.


Limit Login Attempts
Adds a layer of security for when users try to login with wrong credentials too many times in a row.
- Action after user exceeds login attempts - Choose between
- Nothing
- Show Captcha - Requires reCAPTCHA to be enabled (learn more)
- Let user wait - User will have to wait before attempting again
- Number of attempts - After this many attempts, the action above will be triggered
- Wait time [minutes] - How much time the user will have to wait before attempting to login again. Only works with the "Let user wait" setting
IP Restrictions
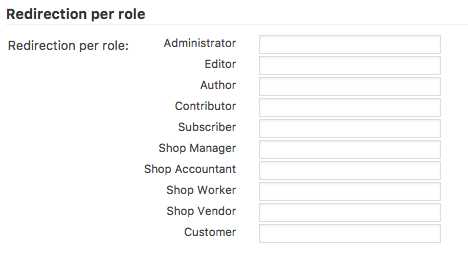
Redirection Per Role
Other Settings That Affect Login
- Login user after successful email verification - If enabled, the user will logged-in automatically after verifying the email address.
Extra: Social Login
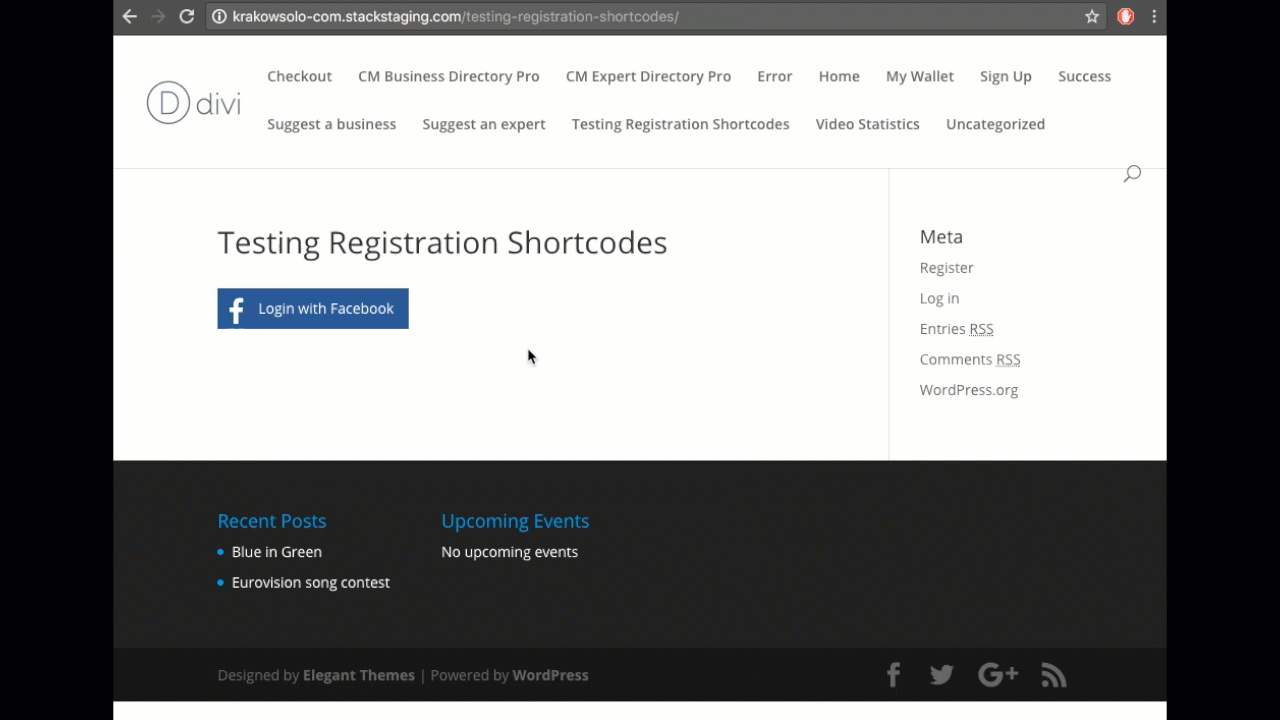
With the WordPress Registration Form Plugin, it is possible to allow users to register and log in to the site using their Facebook or Google accounts. This streamlines both the registration and login process for users and customers and makes them much more likely to sign up to your site and use it.
To configure this, scroll down to the Social Login section.
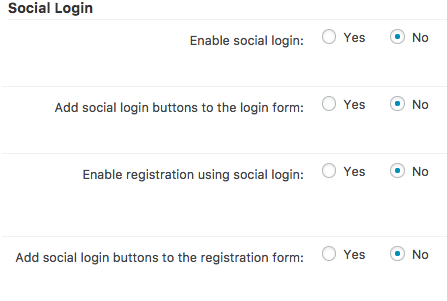
- Enable Social Login - Toggles the Social Login feature on and off.
- Add social login buttons to the login form - Toggles whether or not the Social Login option will appear on the login form by default.
- Enable registration using social login - Setting this to yes allows site visitors to create user profiles for the site using Social Login.
- Add social login buttons to the registration form - Gives site visitors on the registration page the option to speed things up by opting for the Social Login option.
There are specific needs to enable each social login. Read more in the Facebook guide and the Google guide.
Registration
Registration is a core part of the plugin.
You can register users to certain user roles (subscriber, admin...), change the registration form fields, notify the admin, and much more.
Plugin Does Not Create/Handle User Roles
The plugin does not support creating or deleting user roles (such as Admin, Subscriber) and their capabilities (such as editing posts). To manage user roles, you must use a third-party plugin.
Learn more about user roles: General Support - WordPress - WordPress User Roles
From the WordPress dashboard navigate to the CM Registration Pro → Settings → Registration tab.

Registration Options
- Allow user to enter his login - Allows Users to make a custom Login Username rather than automatically assigning one to them based on the email address they use (note: generates a Custom Field - read more).
- Allow users to enter a publicly displayed name - Allows users to customize the name that displays beside their comments and posts rather than the default of displaying their email address (note: generates a Custom Field - read more).
- Allow user to add organization - Adds the "Organization" field. By default, it's a simple text field. If Business Directory is also installed, the user will be able to select it based on the business listings. Learn more
- Require email - The email field will be obligatory.
- Require to repeat email - Forces the user to repeat the email. This setting is useful to prevent the user from mistakenly writing the wrong address. Enabling this option automatically creates the field "Repeat email" in the Registration Form. Learn more
-
Notify admin about new registration - Toggles whether or not the site Admin will receive notification emails for new registrations.
Example

Example of the email notification - Prevent sending the standard WP welcome email - Toggles whether or not registrants will receive the WordPress welcome email after signing up.
- Disable WP registration page and redirect to this URL - Replaces the WordPress default registration page with the WordPress Registration Form plugin registration page.
-
Toast Message Time [Seconds] - Toast messages are non-intrusive alerts that pop up over the content. The default value is 20 seconds.

Example from Android. - Enable reCAPTCHA on the registration form - Toggles the reCAPTCHA tool on or off for the Registration form to filter bots.
- Ask for invitation code - Choose between
- disabled
- optional
- required To require/disable an invitation code or make it optional when a user registers. If the user does not have an invitation code and it is required he will not be able to register. When it is optional, you may want to use it in case the invitation code is used to assign a specific user role.
- Default role - User's role granted after the registration.
- Terms of acceptance text - Will be displayed next to the checkbox the user must check in order to register.
- Auto login after registration - Logs in the user as soon as they register.
- Redirect after register to URL address - After registration, the user will redirected to this URL. You can use some parameters in the URL - learn more: WordPress Registration Form Plugin (CMREG) - Settings - Registration Settings.

Password
- Require password - If enabled, the registration form will require a password field. If disabled, the user will not require to choose a password upon registration. Instead, he/she will receive an email with instructions to generate a password. The message can be configured from the Email Settings. Learn more: WordPress Registration Form Plugin (CMREG) - Settings - Email Notifications Settings.
- Require a user to repeat the password during registration - This is a common practice in registration forms to make sure the user password was not mistyped. Once selected two password fields (original and repeat) will appear in the registration box (read more in the specific guide). The original has the Meta Key value cmregpw and the repetition, cmregpwrepeat.
- Require strong passwords - If this is enabled, the password must be at least 8 characters long and must contain at least one lowercase letter, one uppercase letter, and one digit.
Email Verification
Tips
- Using activation links forces the users to use a real email address.
- Demanding a secondary email can be useful for parents or guardians. For instance, if a child wants to register, the parent will also receive an email with another activation link and the child's user will only be created after both parent and child clicked their links.
- Require email verification - Require or not require email verification for complete registration. If enabled, the user will receive an email with an activation link that must be clicked before an account is active and the user can log in.
- Email verification on secondary email - Adds an additional email address to the verification process, with a different activation link. The account will only be active if both activation links are clicked.
-
Meta key of the secondary email field - The "name" of the secondary email field to be added in the Registration Form. Only works if the previous setting is set to "Yes".
Note that the secondary email field has to be added manually to the registration form. Learn how.
- Days for verification - Customize the number of days users have to verify by email before they need to re-register. The account will be automatically removed from your site database once the amount of days has passed.
- Page loaded after email verification - Specify a page on your site that loads after an email are verified. This can be a welcome or thank you page when the user verifies his email.
- Login user after successful email verification - If enabled, the user will logged-in automatically after verifying his/her email address.
IP restrictions
You can allow or deny registrations requests from specific IP addresses. In both cases, the IPs must be separated by lines.
Example
1.1.1.1, 2.2.2.2, 3.3.3.3
S2Member Pro integration
- Enable S2Members integration - If enabled, the invitations code can be related to the S2Members Pro membership level and new users will be assigned to the chosen level.
- S2Member Pro default level - Assign user which is not using the invitation code to the chosen S2Members Pro membership level.
TIP: Role-Specific Forms
You can set role-specific fields in the Example Form. This will support use cases in which you want to allow each role different access permissions and also ask for different information upon registering.
Note that the registration form will only appear to guests (non-logged-in users). If a logged-in user accesses the page, they will not see the form. Learn more: WordPress Registration Form Plugin (CMREG) - Extra - Creating Role Specific Registration Forms
TIP: Age Verification
The plugin supports age verification. This is useful for websites with age-sensitive content.
It can be implemented via custom profile fields. Learn how to apply it: WordPress Registration Form Plugin (CMREG) - Extra - Age Verification
Email Notifications
Email notifications are essential, so don't forget to configure them!
You can enable/disable and configure automatic emails for these situations:
- User registered without inputting a password
- User has been registered ("Welcome email").
- User has to confirm his account in order to activate it
- User's account has been deleted
- User wants to reset the password
To customize the email settings, navigate to Admin Panel → CM Registration Pro → Settings → Email tab.

Here, you can customize the emails sent to users who register on your site. HTML and placeholders are supported.
TIP: Admin Notification
The notification to the admin is configured from the Registration settings
User registered without inputting a password
If you let users register without a password, they will receive this email with instructions on how to create one. Learn more: WordPress Registration Form Plugin (CMREG) - Settings - Registration Settings.
Customize the email subject using the placeholder:
- [blogname]
Customize the email body template with the placeholders:
- [userlogin]
- [siteurl]
- [resetpasswordurl]
Welcome Email
The welcome email is sent to the user after the account is activated.
Customize the email subject and body template using the placeholders:
- [blogname]
- [siteurl]
- [userdisplayname]
- [userlogin]
- [useremail]
- [linkurl]
Activation Email
This is the email sent to users containing the link to verify the email address and activate the user's account.
Customize email subject and body template with the placeholders:
- [blogname]
- [siteurl]
- [userdisplayname]
- [userlogin]
- [useremail]
- [linkurl]
Account Deleted Email
This email is sent to users who had their accounts deleted. The first option allows you to turn this feature on or off.
Customize email subject and body template with the placeholders:
- [blogname]
- [siteurl]
- [userdisplayname]
- [userlogin]
- [useremail]
- [linkurl]
Reset Password Email
This email is sent to users who ask for a password reset. Customize the subject with the placeholders:
- [blogname]
Customize the body template with the placeholders:
- [siteurl]
- [resetpasswordurl]
- [userlogin]
Invitation Codes
Introduction
This plugin allows for invitation codes that can be sent to certain users and required for registration.
Using invitation codes you can achieve the following:
- Limit and control the amount of registrants
- Manage registration campaigns to your pre-launched site
- Define specific roles to be assigned to users when using a specific invitation code
- Define a membership level once using a specific invitation code
- Require or not require email verification for specific invitation codes
To customize the email settings, navigate to Admin Panel → CM Registration Pro → Settings → Invitations tab.

Video Tutorial
Creating and Managing Invitation Codes
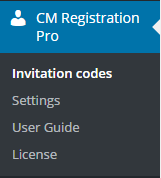
To create an invitation code, go to Invitation codes in the plugin dashboard.
Here you will see a list of all invitation codes created, date created, expiration date, user limit, and S2Members Level. You can also manage invitation codes from here.
Configuring the Invitation Code
To add a new verification code, click on the Add Invitation Code.
Here you can edit:
- Title - add the name of the code. This is for internal usage and the users won't have access to it.
- Code - You can either type a code yourself (for instance "Welcome"). The plugin is flexible and accepts virtually any value - you can use as many characters as you would like. Alternatively, click the Generate new button to instantly generate a randomized 12-characters code.
- Expiration date - add a code expiration date. After this date, the invitation code can not be used
- Users limit - The number of times this invitation code can be used.
- Require email verification - choose whether to require email verification or not or follow global plugin settings.
- User role - Admin can choose which WP role will be set for a user that registered with the specific invitation code.
- Require to use the following email - This feature lets you restrict the usage of a specific invitation code to a specific user. So users can not send the invitation code to someone else If an email address is set, the plugin will send an email with the invitation code to the user as soon as it is created.
Learn more: WordPress Registration Form Plugin (CMREG) - Invitation Codes - Uses and How to Create Them
Recap: Making Codes Required
To make codes obligatory, head to Settings → Registration tab and set the option Ask for Invitation Code as required.
If the user does not have an invitation code and it is required, he will not be able to register. When it is optional, you may want to use it in case the invitation code is used to assign a specific user role.
TIP: Letting Users Create Codes
You can let logged-in users create invitation codes. They will see the following form.
This is done by applying the following shortcode to your site: [cmreg-create-invitation-code] .
It displays the form that a user can utilize to invite his friends or just create the invitation codes. It can be configured with a series of parameters.
Examples
[cmreg-create-invitation-code expiration="2 weeks" verifyemail=1]
[cmreg-create-invitation-code role=contributor userslimit=1]
[cmreg-create-invitation-code emailinput=1 showparams=1]
Learn more: WordPress Registration Form Plugin (CMREG) - Invitation Codes - Letting Users Create Codes
TIP: Exporting Invitation Codes to a CSV File
You can export a list of invitation codes, including a separate list of used codes. This is useful for reviewing a massive number of codes at once.
Learn more: WordPress Registration Form Plugin (CMREG) - Extra - Exporting Data To CSV Files
Translating the Plugin's Interface
You can change the text of the front-end to anything you like.
To do so, navigate to Admin Panel → CM Registration Pro → Settings → Labels tab.

Note that, if you use custom fields, you manipulate their labels directly while editing them. This way, they will not appear in the labels tab.
Learn more: WordPress Registration Form Plugin (CMREG) - Settings - Labels Settings
Improving the Form With Custom Fields
What Are Custom Fields
Custom Fields are a way to enrich the Registration Page people will use to sign up to your website. The possible uses are endless. They can be used for adding a phone number, a short blurb about themselves, a description of the service they provide, asking if a subscriber is over 18 or not. The list goes on.
Since they are so powerful, this article covers only the basics. Learn more: WordPress Registration Form Plugin (CMREG) - How To - Improve the Registration Form With Custom Fields
Example
Video Tutorial
Adding Custom Fields to the Registration Form
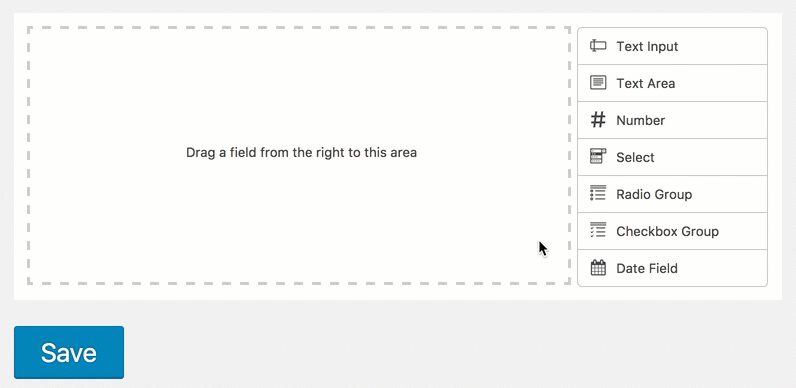
From the WordPress dashboard navigate to CM Registration Pro → Profile Fields.
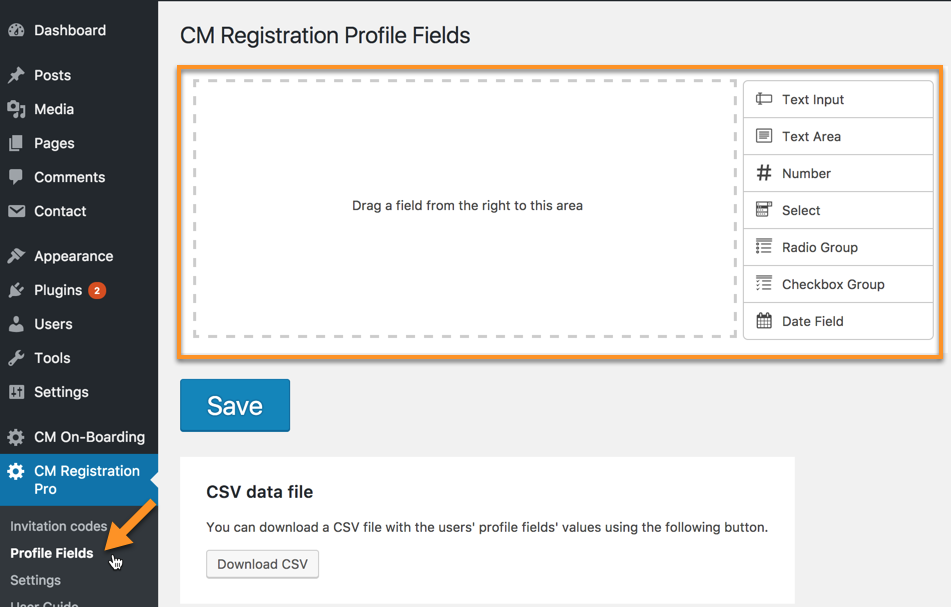
The custom field builder should then appear, as shown above.
Drag the desired input fields from the list on the right into the area on the left. For convenience, the fields can be minimized by clicking on the pencil icon that appears in the top right while hovering over an input field's settings area.
Custom input fields will appear below the default input fields on the registration form. The custom input fields can be reordered by clicking and holding on the field that is to be moved and dragging it up or down as desired.
Types of Input Fields
There is a selection of different input fields available to choose from to control the type of data being entered by users.
- Text Input - Creates a small input area for plain text.
- Text Area - Creates a large input area for play text. Better for blocks and paragraphs of text.
- Number - Creates an input area that will allow numbers only.
- Select - Creates a drop-down menu to choose from.
- Radio Select - Creates a list to choose from by clicking on radio buttons. Limited to one choice.
- Checkbox Group - Creates a list to choose from by clicking checkboxes. Allows multiple choices.
- Date Field - Creates a date selection field with a drop-down calendar date picker, an up-down incremental selector or manual input options. (Relevant: Age Verification Support)
Each of these input types has its own configurations specific to them.
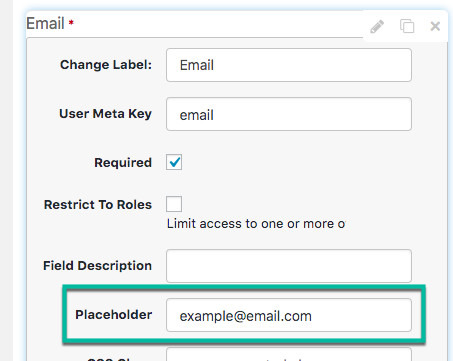
Settings Common to All Input Fields
There are also settings that are common to every field and affect the general behavior of the form. They are highlighted below:

- Change Label - Edit the front-end label for the input field.
- User Meta Key - The key to the user meta record in the database. It's recommended to change this to something more easily remembered using alphanumeric characters and underscores. Learn how to retrieve the meta keys of a given user.
- Required - Check this box to make the input field required for the user to complete the registration form.
- Restrict to Roles - Explained in-depth below.
- Show in Registration Form - If this information appears in the Registration Form
- Show in User Profile - If this information appears in the User Profile.
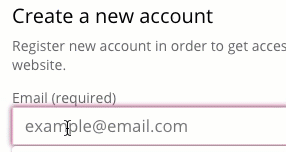
Placeholder
Text fields also have the Placeholder field by default. It allows you to set a text that will be displayed as a tip.
Setting
Result
TIP: Restricting Fields to Specific User Roles
It's possible to show chosen custom form fields only to specified users. This will require different registration pages to be created using shortcodes that have been modified for that user role.
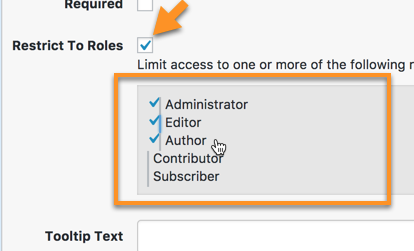
While editing a form field, check the " Restrict To Roles" checkbox to reveal the various default and custom user roles stored on the site.
Click on the users that this custom field is to appear during their registration process.
To learn more about creating user role specific registration forms, view this article.
Learn more: WordPress Registration Form Plugin (CMREG) - How To - Improve the Registration Form With Custom Fields
Adding reCAPTCHA (login and registration)
API Keys
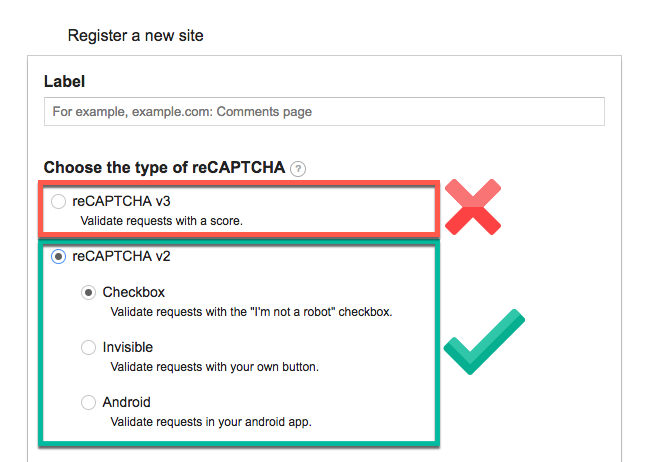
Important! Use reCAPTCHA v2 Keys only
Using reCAPTCHA v3 keys may lock you out of your website.
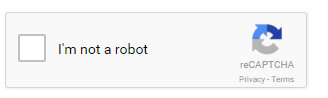
In the API Keys section enter Google reCAPTCHA keys to enable reCAPTCHA for the login area. reCAPTCHA helps prevent bots from crashing a website. They look something like this...
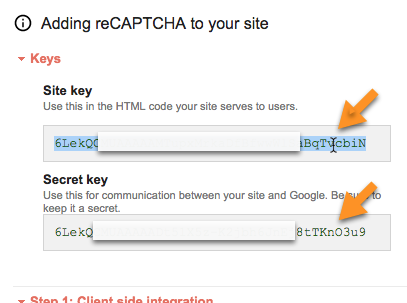
In General Settings click on the "Register new reCAPTCHA key" button to be directed to the Google page for generating new API keys.
Existing keys will appear in the grey box in the top portion of the screen. To generate new reCAPTCHA keys for the site use the form below this.
- Label - A name for the reCAPTCHA key used to identify it.
- Choose the type of reCAPTCHA - Choose one of the options inside reCAPTCHA v2.
- Domains - Enter the Web address that the reCAPTCHA key is going to be used on.
- Accept the reCAPTCHA Terms of Service - Check this box.
- Click the "Register" button.

The Site key and Secret key will then be generated and can be copied and pasted into corresponding fields on the WordPress Dashboard.
Remember to click Save at the bottom of the page.
Note for Wordfence Users: "Verification Required" Error
If you face the error message "verification required" during login attempts, it's likely due to a conflict with WordFence's settings.
The solution is simple: turn off the v3 reCAPTCHA option in Wordfence's Login Security page.
More information: Wordfence documentation
Custom CSS
Quick Read
CSS is a language that describes the styling. It does so by describing how the HTML elements should be displayed.
Registration and Invitation Codes allow you to conveniently place your custom CSS styles to change the layout of the Front-End plugin elements.
Accessing The Feature
From the WordPress dashboard navigate to CM Registration Pro → Settings → Custom CSS tab.

Learn more (with examples): WordPress Registration Form Plugin (CMREG) - Extra - Custom CSS Styling
Widgets
WordPress Registration Form Plugin comes with two widgets - login form and registration form. Forms can be placed on every widget area on your page.
Video Guide
Adding Widgets
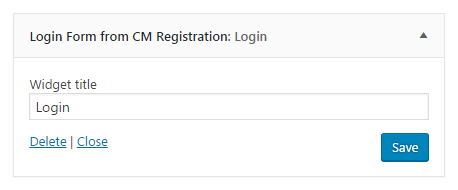
To use the widgets navigate to the Admin Dashboard → Appearance → Widgets.
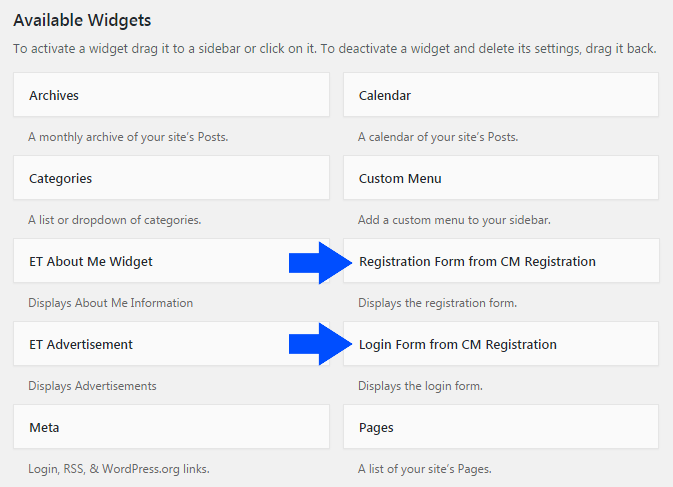
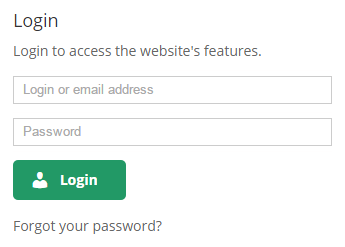
1) Login Form Widget
Front-End
Register Form Widget
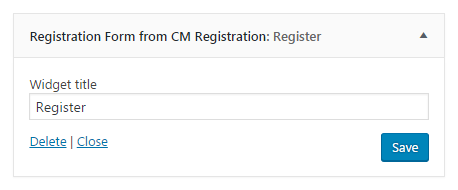
Front-End
Learn more: WordPress Registration Form Plugin (CMREG) - Extra - Widgets
Next steps
Additional steps to improve the experience:
Learn more about Shortcodes
Manipulate user profiles
- WordPress Registration Form Plugin (CMREG) - How To - Edit the Profile Fields (Back-End and Front-End)
- WordPress Registration Form Plugin (CMREG) - Extra - Exporting Data To CSV Files
- WordPress Registration Form Plugin (CMREG) - Extra - Manually Activating Accounts
Integrate the plugin with Gravity Forms
End Result
Following instructions found in the plugin and guides, you should be able to add the configurable pop-ups to your site, including an invitation codes field.
Use Case Front-End
 |
More information about the WordPress Registration Form Plugin Other WordPress products can be found at CreativeMinds WordPress Store |
 |
Let us know how we can Improve this Product Documentation Page To open a Support Ticket visit our support center |