WordPress Glossary Plugin (CMTG) - Free Version Tutorial
Tooltip Glossary Free Version Tutorial
This article covers only features presented in the free version of the WordPress Glossary plugin - 4.0.6.
WordPress Glossary Plugin
Learn more about Pro versions of the WordPress Glossary plugin.
Example
This plugin shows you how to set up a tooltip such as this:

Table of Contents
Installation guide
Here are the steps needed to install the plugin:
- Download - To manually install the plugin, you must first download it from WordPress.org to your computer.
- Navigate to the Plugins tab in the WordPress Admin Dashboard to install the plugin.
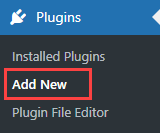
- Activate the plugin.
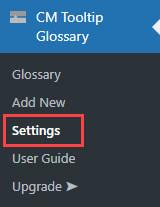
Once the plugin is active you can find the plugin settings under the CM Tooltip Glossary menu:
Registration
If you like, you can register your plugin to receive information about updates and our latest offers. You can complete your registration at any time.
If you don’t want to register right away, you can select the Skip button.
Resources
List of Features Present in the Free Version
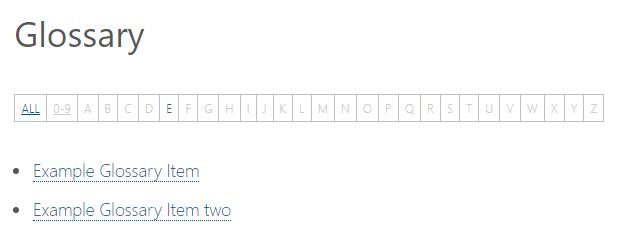
- Automatically generates a Glossary index of terms. Example.
Ability to show your Glossary index list as a list or as tiles:
List view 
Tiles view - Each glossary term has its own unique post, just like regular WordPress posts or pages.
Tooltip windows can optionally appear when a term is hovered over by the cursor.

Hovering on the term - Term pages can optionally be linked directly from posts or pages.
- Includes several filters to optimize the tooltip window and limit the length of the description that is displayed.
- Prevents the glossary from parsing text, when needed, by using a Shortcode
[glossary_exclude] text [/glossary_exclude]. - Forces the glossary to parse text, in case if it's disabled on the post/page, by using a Shortcode
[cm_tooltip_parse] text [/cm_tooltip_parse]. - Supports custom excerpts (if they exist) as the text that appears in the Tooltip window.
- Controls the location and area where the tooltip appears (pages, posts, homepage).
- Controls the settings in cases where the tooltip appears more than once.
- Supports UTF-8.


The WordPress Glossary plugin comes in four different premium versions, fitting in all needs and budgets! Learn more.
Using the Plugin
Note
For your tooltip to work, you may need to save your WordPress permalinks.
- The plugin automatically creates a page that works as a glossary of terms. This page is called the Glossary Index Page.
- Select the CM Tooltip Glossary menu item in the admin dashboard:
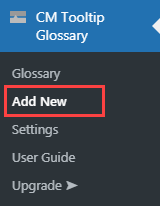
- The most important action is adding terms. Do this by clicking on the “Add New” link. Glossary Terms can be created and edited using the WordPress editor, just like any other post on your site.
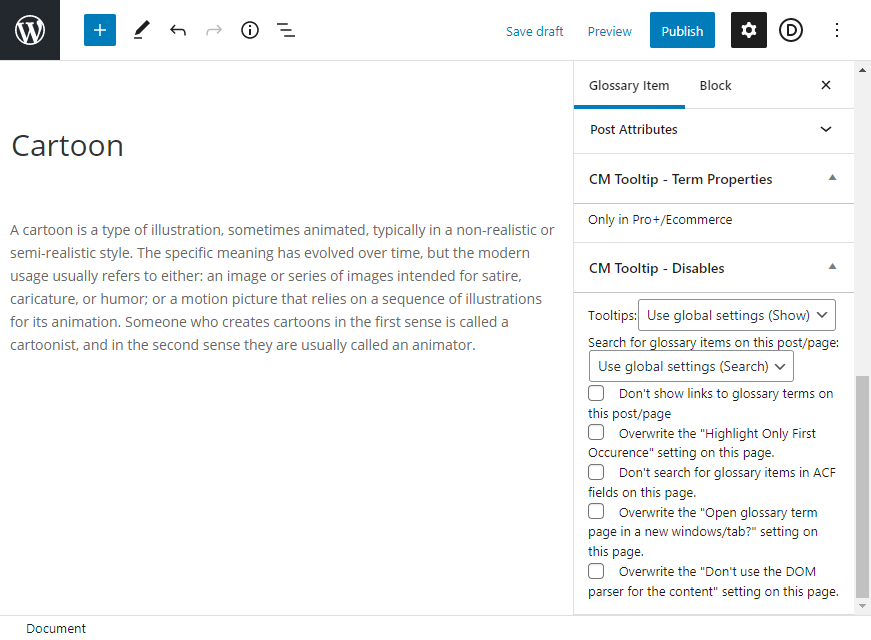
- Terms can contain title, description, and excerpt. Multimedia content, such as images and videos are only displayed in the premium versions of the plugin.
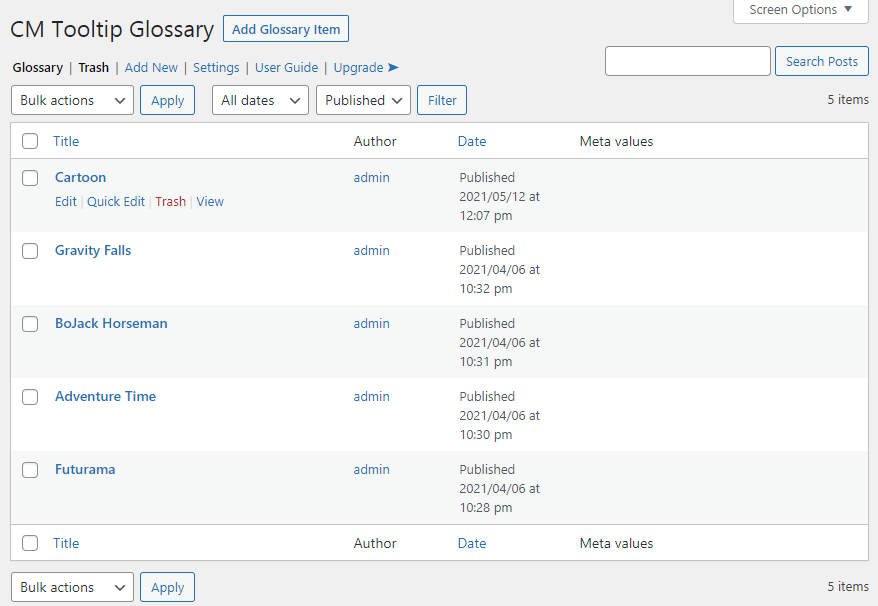
- Click Glossary to manage all your terms:
- You can customize some of the behavior of the plugin by adjusting the settings.
- Warning: The free version of the Tooltip Glossary plugin has a limit to show only 500 terms on the Glossary Index Page, for performance reasons. In all of the Pro editions, the issues have been solved and this limitation is lifted.
Settings
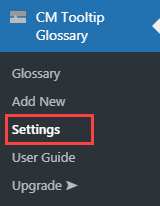
You can access the settings in the path Admin Dashboard → CM Tooltip Glossary → Settings.
At the top of the page you can find the following options:
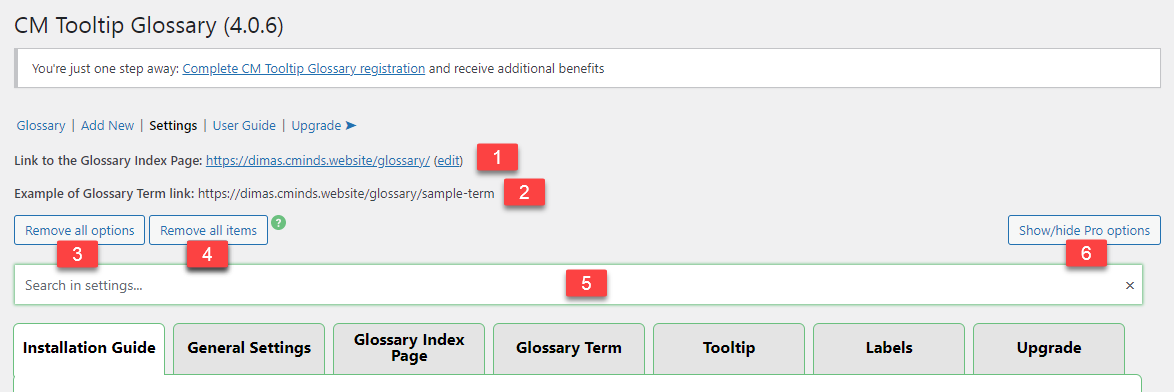
- Link to the Glossary Index Page - Here you have a link to your Glossary Index Page that you can click to view it or click edit for editing.
- Example of Glossary Term link - This is an example of how looks like a standard permalink of your terms.
- Remove all options - Click this button to reset your options to default.
- Remove all items - This option will completely erase all of the data stored by the WordPress Glossary plugin in the database: terms, options, synonyms etc. It will also remove the Glossary Index Page. It cannot be reverted.
- Search bar - This bar can help you to find any option by its name. Just start typing and below you will see the most relevant options for what you have typed.
- Show/hide Pro options - Click it to show or hide the options that available only in Pro version of the plugin.

To learn more about every option including the ones that are available in Pro version, you can hover over the blue icon with the question mark to see more information about it.
General Settings
General Settings
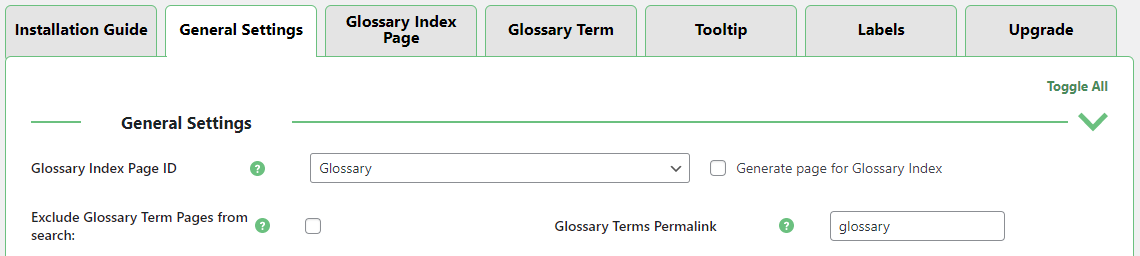
- Glossary Index Page ID - Here you need to select the page that you would like to use as the Glossary Index Page. If you select -None- terms will still be highlighted in relevant posts/pages, but there won't be a central list of terms (Glossary Index Page).
- Generate page for Glossary Index - If you check the checkbox, a new page will be generated automatically. Note: you have to manually remove old pages.
- Exclude Glossary Term Pages from search - Uncheck this option to remove Glossary Term pages from search results.
- Glossary Terms Permalink - Enter the name you would like to use for the permalink to the Glossary Terms. By default this is "glossary", however you can update this if you wish. If you use a parent, please, indicate this in path eg. "/path/glossary", otherwise just leave glossary or the name you have chosen. The permalink of the Glossary Index Page will change automatically, but you can also change it manually using the edit link near the Link to the Glossary Index Page above. Note: if you already use this permalink the plugin's behavior may be unpredictable. This option cannot be empty.
Term highlighting
The are several settings that helps you select where to highlight the term. You can choose to disable the highlights on posts or pages, or any other custom page.
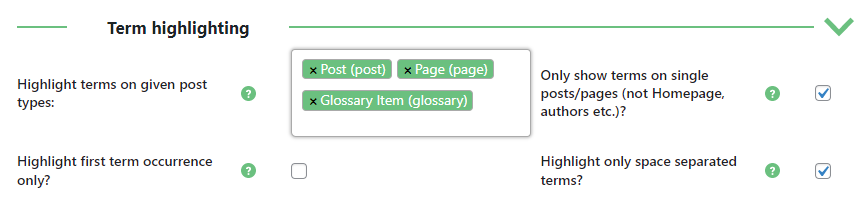
- Highlight terms on given post types - Select which post types will have highlights/tooltips. Note that you can also control if tooltips appear on specific pages while editing those pages.
- Only show terms on single posts/pages (not Homepage, authors etc.)? - Select this option if you want to highlight glossary terms only on a single page/post. This is for cases when you don't want terms to be highlighted on your homepage, or author pages and other taxonomy related pages.
- Highlight first term occurrence only? - Select this option if you want to highlight only the first occurrence of each term on a page/post.
- Highlight only space separated terms? - Select this option if you want to search only for the terms separated from other words (usually by space).
Performance & Debug
Here you will find settings that may help solving conflicts with themes or other plugins.
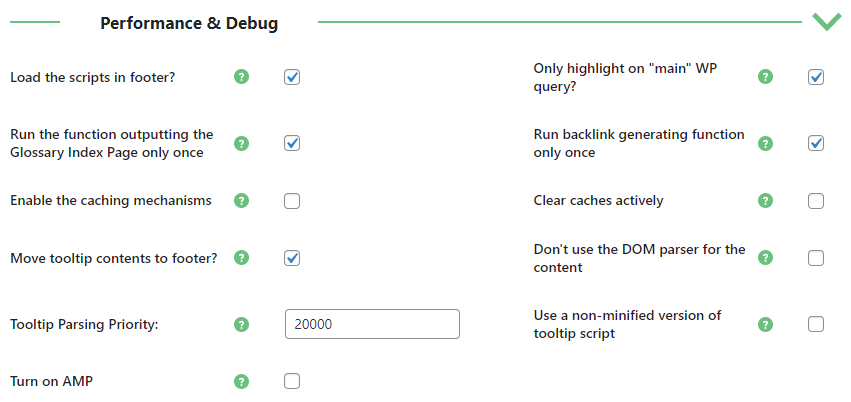
- Load the scripts in footer? - This setting allows you to load the scripts and CSS styles ay the end of your page, which can speed up the initial loading of the pages, but can create problems. Try unchecking this setting option if:
- You notice some errors related to the WordPress Glossary plugin in the Chrome Developer Console.
- The tooltips are not displaying although the terms are correctly highlighted and tooltips are enabled in the settings.
- Tooltips are styled incorrectly.
- Only highlight on "main" WP query? - Some themes are using more than one query on each page (eg. for some data manipulation) which results in the terms being parsed only on the first "main" query and not on the one which outputs the data on the screen. This is most often the case in the themes using page builders. Try unchecking this setting option if:
- Terms are not being highlighted at all (although you're sure the page/post contain the term).
- Run the function outputting the Glossary Index Page only once - In extremely rare cases the Glossary Index appeared multiple times on the same page. Try checking this setting option if:
- The Glossary Index is appearing multiple times on the same page
- Run backlink generating function only once - Select this option if you want to show a backlink to Glossary Index on glossary term page only once.
- Enable the caching mechanisms - For performance reasons we've developed an internal caching system for the complex queries. However, enabling it can make the plugin unstable.
- It's advised to only use this option if the Glossary Index Page or a page with lots of terms is extremely low. Try unchecking this setting option if:
- Newly added terms are not being parsed in your older pages.
- Clear caches actively - Select this option if you want to actively clear the internal caching mechanisms. Only works if the mechanisms are already disabled, also increases the database usage, so it's best to deactivate after a while (week).
- Move tooltip contents to footer? - Makes the tooltip content to not be passed directly to JS with the HTML attribute. Try checking this setting option if:
- The tooltips seem to be breaking your layout. This sometimes happens with the builders or very long term descriptions.
- Don't use the DOM parser for the content - Warning: Only those very familiar with WordPress development should change this setting. Select this option if you want to parse the content using the simple parser (preg_replace) instead of DOM parser. Try checking this setting option if:
- You are having compatibility issues
- Tooltip Parsing Priority - Warning: Only those very familiar with WordPress development should change this setting. Choose in which priority the tooltip will be parsed, compared to other plugins or themes (default value is 20000). Try checking this setting option if:
- You need to solve compatibility issues with specific themes or plugins.
- Use a non-minified version of tooltip script - Select this option if you want to use non-minified version of the tooltip.js file. Try checking this setting option if:
- You are having compatibility issues.
- Turn on AMP - Select this option if you want to show tooltips in AMP pages. Learn more about it in this guide: Showing Tooltips on AMP Pages (Accelerated Mobile Pages)
Referrals

Refer new users to any of the CM Plugins and you'll receive a minimum of 15% of their purchase! For more information please visit the CM Affiliate page.
Page Builder Support

Support Advanced Custom fields (ACF) and Page Builders including Divi, Beaver Builder, WPBakery, Elementor and more. This feature is avialable only in Premium versions of the plugin.
Glossary Index Page
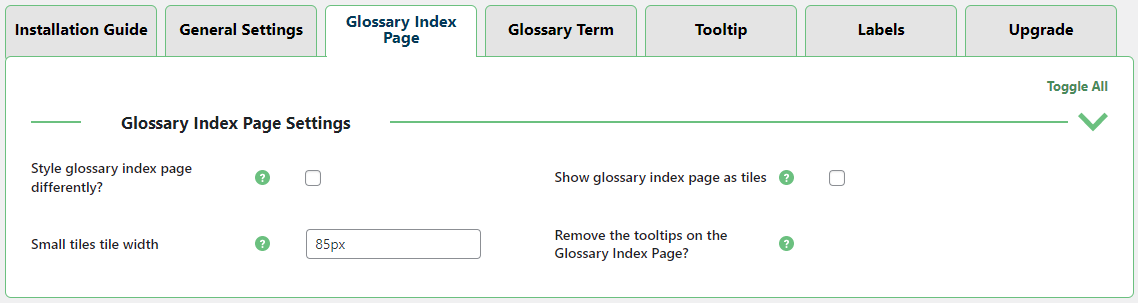
- Style glossary index page differently? - The first options allows you to use the CSS class
glossaryLinkMainto style the links on the Glossary Index Page separately; otherwise, they will retain the classglossaryLinkand will be identical to the linked terms on all other pages. You can add the custom styles to your themes stylesheet, or in the Additional CSS option in the WordPress Customizer. Show glossary index page as tiles - You can choose to show the index in the classical view (as a simple list of terms) or as tiled list.
Glossary Index in Pro versions
Note: Premium versions have over 10 different views. Read more.
- Small tiles tile width - Select the width of the single tile in the "Small tiles" view.
- Remove the tooltips on the Glossary Index Page? - If you want to remove the tooltip from the Glossary Index page, you should edit the page using Wordpress's Pages menu. And in the CM Tooltip - Disables metabox in the dropdown Tooltips choose Don't show.
Glossary Term
Display

Show back link on the bottom - Select this option if you want to show link back to Glossary Index from glossary term page.

Example of the backlink

Links

This tab affects the Glossary Term Page and the link that is available when the visitor hovers over a term in the post or page content.
- Remove link to the glossary term page? - Select this option if you do not want to show links from posts or pages to the glossary term pages. This will only apply to Posts/Pages and not to the Glossary Index page. For Glossary Index page, please, visit index page tab in settings. Keep in mind that the plugin use a <span> tag instead of a link tag and if you are using a custom CSS you should take this into account.
- Open glossary term page in a new windows/tab? - Select this option if you want glossary term page to open in a new window/tab.
Show HTML "title" attribute for glossary links - Select this option if you want to use glossary name as HTML "title" for link.

Example of the HTML 'title' attribute for glossary links - Link underline - Set style of glossary link underline:
- Style (Solid, Dotted, Dashed)
- Width
- Color
- Link underline (hover) - Set style of glossary link underline on mouse hover:
- Style (Solid, Dotted, Dashed)
- Width
- Color
- Link text color - Set color of glossary link text color.
- Link text color (hover) - Set color of glossary link text color on mouse hover.
Tooltip
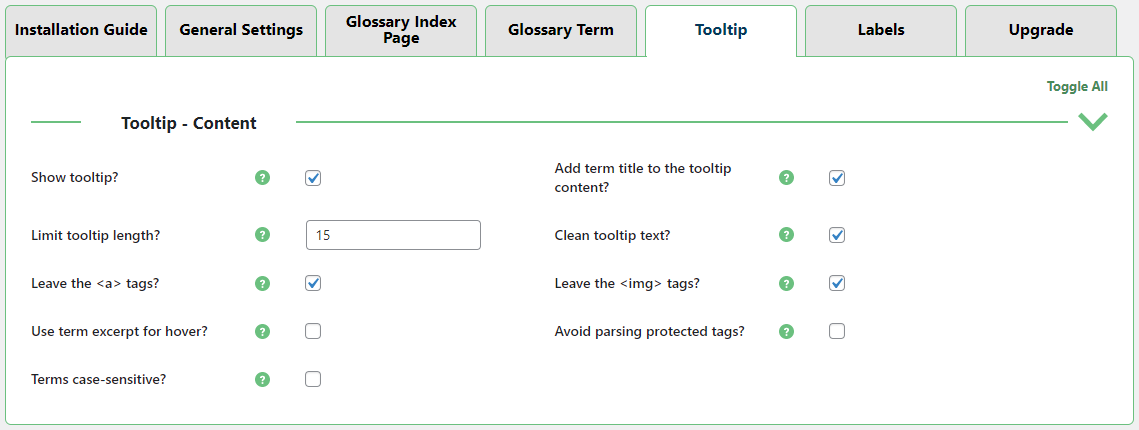
Finally, this tab allows you to modify the behavior of the tooltip.
- Show tooltip? - Select this option if you wish to show a tooltip. The tooltip will appear on hover. The tooltip can be styled differently using the tooltip.css and tooltip.js files in the plugin folder.
- Add term title to the tooltip content? - Select this option if you want the term title to appear in the tooltip content.
- Limit tooltip length? - Enter a numerical value if you want to show only a limited number of characters (minimum is 30) and add "Term details" at the end of the tooltip text. The tooltip has to be clickable for users to be able to click this link.
- Clean tooltip text? - Select this option if you want to remove extra paragraphs, linebreaks and some html elements like headings from tooltip text.
- Leave the <a> tags? - Select this option if you want to preserve the html anchor tags in tooltip text.
- Leave the <img> tags? - Select this option if you want to preserve the images in tooltip text.
- Use term excerpt for hover? - Select this option if you want to use the term excerpt (if it exists) as hover text. Note: You have to manually create the excerpts for term pages using the "Excerpt" field.
- Avoid parsing protected tags? - Select this option if you want to avoid using the glossary for the following tags: Script, A, H1, H2, H3, PRE, Object.
- Terms case-sensitive? - Select this option if you want glossary terms to be case-sensitive.
Labels

In this tab you can change or translate the labels that appear on the Front-end.
 |
More information about the WordPress Glossary Plugin Other WordPress products can be found at CreativeMinds WordPress Store |
 |
Let us know how we can Improve this Product Documentation Page To open a Support Ticket visit our support center |