WordPress Travel Map Plugin (CMMRM) - Settings - Route Page
Settings - Route Page
To configure the route page settings in the WordPress Travel Map plugin, navigate to the Admin Dashboard → CM Maps Route Manager Pro → Settings. Click on the Route Page tab.

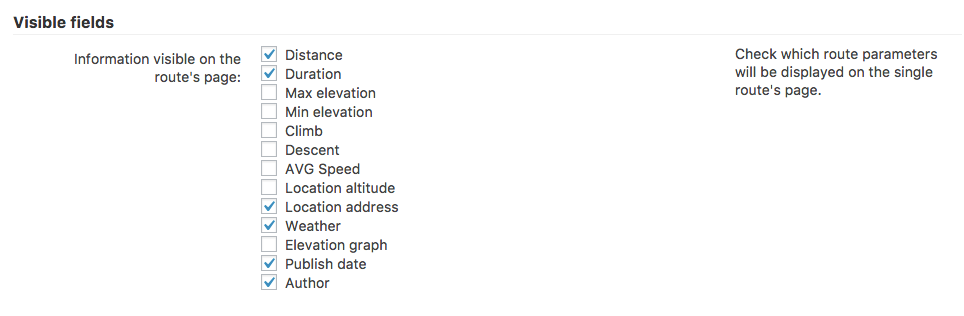
Visible fields
- Information visible on the route's page - Check which route parameters will be displayed on the single route's page.
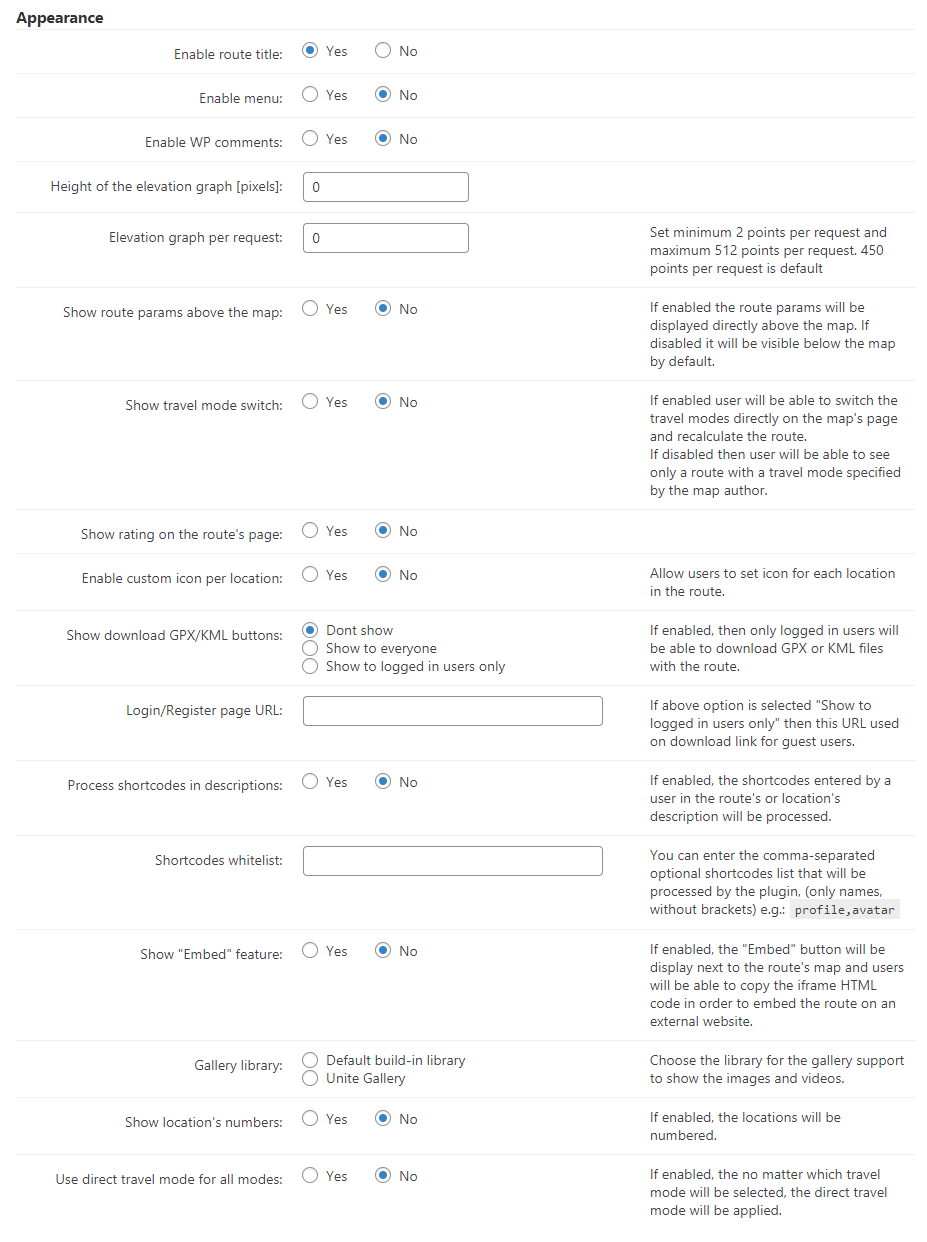
Appearance
- Enable route title - Enable this option to display route title on the route page. This option is useful only in case if your theme doesn't show titles in posts or pages by default. Note: this option was introduced in version 4.7.0.
- Enable menu - Enable this option to display menu.
- Enable WP comments - Toggles whether or not to allow WordPress comments for routes.
-
Height of the elevation graph [pixels] - Defines the height of the graph in pixels. A value of 100 will result in the following:

Appearance settings -
Elevation graph per request - Define the detail level of each elevation graph. The default value is 450. (Feature added in version 3.9.5)
This option is useful if you are using many maps and exceeding Google Maps' API limit. Read more.
The screenshot below compares the same map with values 2 and 512 in this settings:

Examplex of elevation graphs - Show route params above the map - Toggles whether to display route params above or below the map. The default is below.
- Show travel mode switch - Toggles whether or not to allow users to change travel mode on the route. When disabled the user can only view routes with travel modes specified by the route author.
-
Show rating on the route's page - Toggles ratings on or off.
Enable custom icon per location - Allows the user to set icons for each location or marker.
Show download GPX/KML buttons - These buttons will appear on the top left of the map.

Buttons for exporting route to KML or GPX file - Who can access them - Choose between no-one (Don't show), everyone or logged-in users only.
- Login/Register Page URL - If only logged-in users can see the buttons, unregistered users will access this URL when trying to download.
- Process shortcodes in descriptions - See the shortcode documentation for the full list of shortcodes.
- Shortcodes whitelist - Includes shortcodes list. The names should be entered without brackets and comma-separated (for instance: profile, avatar).
- Show "Embed" feature - If enabled, the button will appear on the top left of the map.
- Gallery library - Changes how the series of images or videos are visualized.
- Show locations' numbers - Enables numbers for each location.
- Use direct travel mode for all modes - If enabled, every route will always be on direct travel (straight-line) mode.


Map
- Embed the map script in the footer - Enabling this option can solve some JavaScript issues.
- Enable directional arrows by default for all routes - Sets the default behavior for showing directional arrows for all routes.
- Marker label type - Sets whether to show the marker labels or only while hovering the cursor over the marker.
-
Trails stroke weight - Define the stroke's weight for the trail, in pixels. Comparison with 3 and 6:

Different trails stroke weights - Enable marker clustering - Toggles marker clustering on and off. Clustered markers display more clearly than overlapping markers.
-
Show fullscreen mode button - If enabled, the button shown below will appear in the top right corner of the map, allowing the route embed to occupy the whole window.

Displaying a button for fullscreen mode -
Show share link in a toolbar above map - Displays the clickable icon just above the map:

Displaying a share link - Integrate with CM Map Locations plugin - In order for this feature to work, it requires the WordPress Interactive Map plugin to be activated.
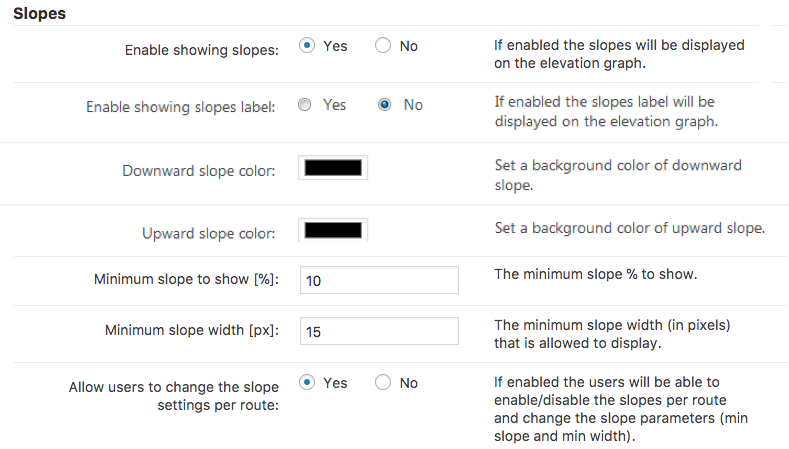
Slopes
Starting from version 3.2.0 of the WordPress Travel Map plugin, users can easily visualize the inclination and declination of slopes with percentage values.
-
Enable showing slopes - Displays slopes on the elevation graph.

Displaying slopes - Enable showing slopes label - Displays slopes label.
- Downward slope color - Customize the background color of downward slopes.
- Upward slope color - Customize the background color of upward slopes.
- Minimum slope to show [%] - The minimum slope % to show (default is 10). Using a value that is too high can pollute the elevation graph.
- Minimum slope width [px] - The minimum slope width (in pixels) that is allowed to display (default is 15). Using a value that is too high can pollute the elevation graph.
- Allow users to change the slope settings per route: If enabled, users will see these options when editing a route.

Info window
Relevant
This setting affects the Location Markers (points of interest inside a route).
Learn more about them: WordPress Travel Map Plugin (CMMRM) - Adding Route Locations Markers
- Show info window for the locations - Toggles display of route info windows on/off.
- Template for the location's info window content - A text box where the info to be displayed in the window can be configured. It supports HTML and the following shortcodes: [title] [description] [address] [latitude] [longitude] [altitude] [imagesrc] [image].
- Max width/height for images inside the info window - The number of pixels that the width and the height of the info window picture will be confined to.
-
Max width for images inside the info window - The number of pixels that the width image will be confined to.

Info window settings

Geolocation
- Show user's position using browser's geolocation - Fetches the geolocation from the user's browser. Only works when using HTTPS protocol.
-
Enable find user location button on map - Displays the "Find Me" button. Requires the previous setting to be enabled.

Geolocation button - Center map to user's location - Centers the map on the user's location by default. Only works when using HTTPS protocol.

Marker

- Enable highlight marker list on click - Turn on this option to let users highlight locations on the route page by clicking on them either on the map or in the list. Note: this option was introduced in version 5.0.3.
Front-end Example
Learn more about how it works in this guide: WordPress Travel Map Plugin (CMMRM) - How To - Highlight Locations On Click
 |
More information about the WordPress Travel Map Plugin Other WordPress products can be found at CreativeMinds WordPress Store |
 |
Let us know how we can Improve this Product Documentation Page To open a Support Ticket visit our support center |