CM Expert Directory Community (CMEDC) - Settings (One Expert Per User Mode, Form, Claim and Recovery)
Settings
Navigate to the Admin Dashboard → CM Expert Directory → Settings.
Click on the Community Expert tab.

General Settings

-
Only one expert per user - Every user will have only one expert profile.
One Expert Per User Mode
Usually, the dashboard shortcode shows the complete list of experts, as shown:

If the setting is enabled, the shortcode will redirect the logged-in user to his/her expert instead.
Creating shortcut
Additionally, you can use the shortcode
[community_expert_form self_edit="1"]to a page. Once logged-in users access this page, they will be directed to the edit form of their expert. So, if the page "site.com/edit-form" has this form, you can add this link to a button to direct users to the form.What if the user already had multiple experts?
In the case that a user created multiple experts when the setting was off, the last expert created will be considered the assigned expert.
- Associate with WordPress users - Click on the Proceed link if you want to associate existing experts with WordPress users on your site. Note: this option was introduced in version 2.1.6.
- CSV Import
- Only update empty values from CSV - When importing files via CSV, no value will be overwritten.
-
Custom field identifier - The field in the CSV file used to identify each user. This is useful if the users have fields such as ID number, Passport etc.
CSV Import
These CSV settings affect the import feature (only in Expert Directory). Learn more: CM Business / Product / Expert (CMBD, CMED, CMPD) - Import and Export With JSON And CSV

Form Settings
- Template Override - Check to enable if you want to override template of
[community_expert_form]shortcode in your theme. After enable you need to create a directory named "CMEDC" in your active theme and you need to place there cmedc_form.php file from plugin views/frontend/cmedc_form.php.
Captcha will be used on places where the user can submit information. This happens on the add/update a expert and the claim an expert functionality.
Captcha Note
You must provide reCaptcha v2 Invisible keys.
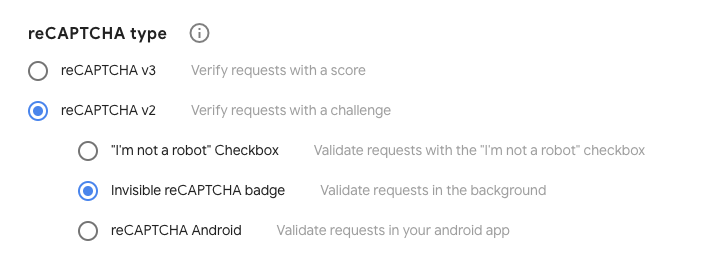
Read more General Support - reCAPTCHA - What is It and How to Enable
- Show Captcha - Check the box to secure the form with Captcha.
- Captcha key - Enter the Captcha key in the provided box.
- Captcha secret key - Enter the Captcha secret key in the provided box.
- Show Social Media Section - Lets users enter social network links.
- Show Categories as Checkboxes - Lets users choose categories as checkboxes, instead of the default dropdown. This will applicable on taxonomies too.
- Show Tags field - Lets users enter tags.
- Use text areas instead of WordPress Editor - Check this box if you want replace WP Editor with simple text areas fields.
- Allowed extensions in documents - Use . before the extension and list them with commas. Example: .pdf, .jpg, .xls.
- Maximum number of documents - How many documents can be added. Enter 0 to allow any number of documents.
- Apply mask on phone field - Restrict the phone to a certain format.
-
Mask format - Which format the phone should follow. By default, is (000) 000-0000. 0 Means any number. For example: (123) 123-4567 will be accepted, while (+12) 1234-567 will not.

-
- Show terms of service - If enabled, users will have to accept before submission
- Terms of service text - What text will be displayed. Accepts HTML
- Show authentication section for guest user - Allows user to register during the process. The user will be able to manage their own data.
- Redirect URL - Enter the URL, where the user will be redirected after submitting the community form. If the field is empty - the user will not be redirected. This feature was introduced in version 1.8.7.
- Disable redirection after update profile - Select this option if you want to disable redirection after update profile. This feature was introduced in version 2.0.3.

Moderation Settings
Scroll down to Moderation Settings. Check the box to have new submitted experts moderated. Select from the drop down menu who can add a new expert. If moderation is set, every expert which is submitted to the directory will have to be approved first before appearing.
Read more about Moderation Settings.
Notification Settings
Notifications are used to send an email to the user submitting their expert status on the expert page and also to the admin managing the directory. In both cases you can customize the email template and decide if it should be sent at all.
Read more about Notification Settings.
Add an Expert Form

- Suggest an Expert Page ID - Edit the link to suggest a expert form. This can be shown in the expert directory index page.
- "Suggest an Expert Form" - Link to the page with "Suggest an Expert" form. You can click the edit to open the page editor.
- Add "Suggest an Expert" link on expert directory index page - Check the box to add a link to the suggest a expert link on the expert directory index page.
- Maximum number of categories - Set the maximum number of categories that users can assign an expert to. The admin can always add more categories.
Expert Claim Settings
Read more about Claim Functionality.
Expert Recovery Settings
Read more about Password Recovery.
 |
More information about the CM Expert Directory WordPress Plugin Other WordPress products can be found at CreativeMinds WordPress Store |
 |
Let us know how we can Improve this Product Documentation Page To open a Support Ticket visit our support center |