Course Catalog Payments - How To - Set Price To Course
Setting a Price to a Course
Important
CM Course Catalog has different editions of the base plugin and its add-ons. The payment process works differently for these versions. So, this guide consists of two parts:
Essential / Ultimate Edition
Note: this guide covers features from Essential / Ultimate versions of:
- CM Course Catalog Pro - this guide uses version 1.3.4.
- CM Course Catalog Payments - this guide uses version 1.0.8.
How Pricing Works
When courses are paid, users have to buy them before being registered. The price range (cheaper and most expensive period) will be shown on the left.
 The Buy button is available on each period.
 And clicking it will direct them to the checkout page.

How It Works: Technical Aspect
Every course can be associated with an EDD product.
Setting variable pricing to an EDD product allows you to offer unique prices for different periods of a course.
Setting Prices
You can set prices for a course while creating or editing it.

1. Free vs. Paid Course
First of all, make sure the course is not free. You can do so by unchecking the option under the Free Course metabox in the right menu.
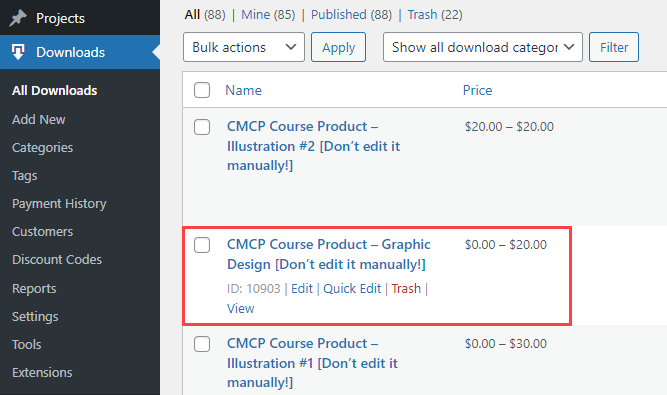
 2. Associate EDD Download
 2. Associate EDD Download
Head to the Price of the course (EDD Download) metabox. If you already have EDD products, you will be able to select them (1) and edit them (2).
If not, you can input a price and create a new download (3).
Learn more about editing EDD products: Creating Products - Easy Digital Downloads

It's necessary now to update the course.

Complete
This completes the process if all periods of the course have the same price. Now, every period will have that price associated to it.

3. Create Different Prices For Each Period (Optional)
If you want each period to have a unique price, edit the EDD download. Inside the Download Prices metabox, be sure to enable variable pricing.
Then, create different options. Their names and prices are important.
 4. Choose Price for Each Period
 4. Choose Price for Each Period
Now, you will be able to set a price from the variable pricing options for each period. It is possible to set multiple prices.

There will be apart buy-button for each option. To make it more clear, you can change the label for this button, so users could see the name and price of each option. To do this navigate to Admin Dashboard → CM Course Catalog Pro → Settings → Labels tab. Under the Payments section find the "Buy" label and change it using the following variables:
- %price_name% - It will be replaced by the name of price that is set in the product.
- %price_amount% - It will be replaced by the price.

How it looks like on the front-end: 
Setting Price When Course Can't Be Paid Online
It's possible to show a course price even if it's not open for registration. One use case would be courses that have to be paid in person. 
Process
- Make sure the course is not free
- Make sure the course has EDD product attached to it
- Under Course Information, add a value or a range. (For instance, $60 - $100).

- Whatever is in this field will be shown in the Front-End.
- You can also show the content of this field in other places of the course page (for instance, description) by using the shortcode
[cmcc_course_price].

Enterprise Edition
Note: this guide covers features from Enterprise versions of:
- CM Course Catalog Pro - this guide uses version 1.4.0.
- CM Course Catalog Payments - this guide uses version 1.1.0.
How Pricing Works
When courses are paid, users have to buy them before being registered. The price range (cheaper and most expensive period) will be shown in the course info box.
 The Buy button is available for each period. Each period can have a group of prices and it is possible to set the limit for the tickets amount.
 When the user chooses the amount of needed tickets of the definite price type and clicks Buy, it will direct him to the checkout page.

How It Works: Technical Aspect
Every course is associated with an EDD product. Setting variable pricing to an EDD product allows you to offer unique prices for different periods of a course.
The product with the group of prices is created automatically for each course:
Important: The prices must be edited only on the course editing page.
Setting Prices
You can set prices for a course while creating or editing it.

To edit prices, scroll down to the section Course Periods. The prices are set in the column Price. Click the button Set Prices.
There you can add a few prices. To create a price, click the button Add price. There you need to fill two fields: Price name and Price amount.
Any price can be deleted by clicking the button Remove.
TIP 1: Price Name
If you have lots of similar names of prices, it is not necessary to write them from scratch every time. You can just choose already created name in the dropdown list. 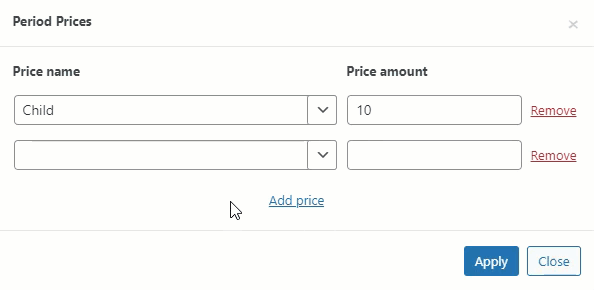
TIP 2: Free Course
If you want to make some course free, then just set the price to "0". 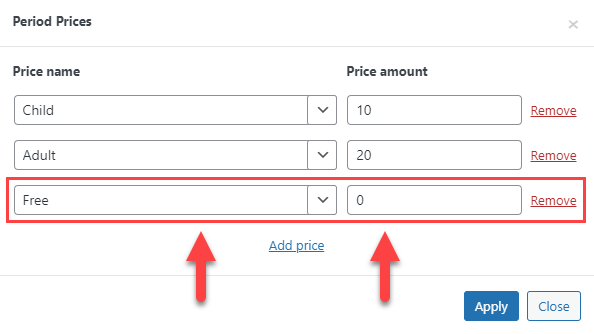
When you've added the prices, click the button Apply. You can see there the price list for each period.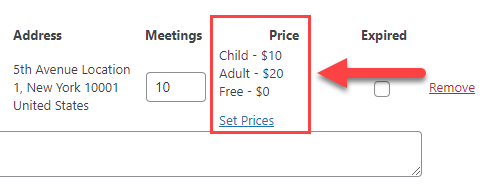
In the same way you can configure the prices for each period.
Amount of Tickets
You can also define the amount of tickets that can be sold for the period. It can be done in the field Number of tickets in each course period.
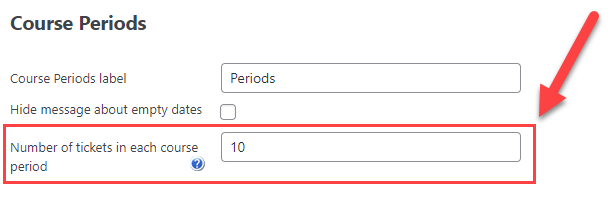 To make the amount of tickets in periods of the course unlimited, set the value to "0".
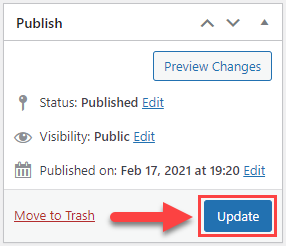
After configuring the prices and amount of available tickets, don't forget to save the changes by clicking the button Update / Publish.
Learn more about the front-end side of the payment process in this guide: Course Catalog Payments - Checkout
 |
Get more information about the Course Catalog Payments add-on for WordPress Other WordPress products can be found at CreativeMinds WordPress Store |
 |
Let us know how we can Improve this Product Documentation Page To open a Support Ticket visit our support center |