WordPress Ad Server (CMAC) - Campaigns - Image Banners
Image Banners
If you chose the option Image Banners under Campaign type on the Campaign Banners tab in the server plugin, you will have the ability to upload images that will be used as your ads.
Adding Campaign Images
Campaign images and banners can be added easily by clicking the “Select file” button. The images are automatically uploaded via AJAX request.
You can add up to 50 banners per campaign with over 10-dimensional variations allowed for each banner.
-
Campaign Type - Pick the type of advertisements in the current campaign from the list currently supported types. Choose Image Banners.

Choosing campaign type -
Cloud Storage URL - Cloud Storage URL is where the campaign banners are stored. Make sure to specify the correct URL of your cloud storage bucket.
All Campaign images will be served from this location if the option Use Cloud Storage is set. All local campaign images are stored under the WordPress upload directory in a sub-directory called ac_uploads.
Make sure to upload them to the cloud storage!

Adding cloud storage URL -
Display Method - The order in which the banners will be displayed.

Choosing display method - Selected Banner - Will only display one banner.
- Random Banner - Will display banners in random order based on weight (read more below).
- Rotated Banner - Will display the banners in sequence. Optionally, you can randomize this sequence by checking Randomize Rotated Banners
- Campaign Images - All banners for this campaign. Variations are different size options for each banner. They are selected when the client is set to work in a responsive mode.


Adding Image Attributes
Each banner has the following meta description fields:
- Name - Banner name.
- Banner Title - Will appear in the banner image title. Relevant for SEO (search engine optimization).
- Banner Alt - Will appear in banner image alt. Relevant for SEO (search engine optimization).
- Target URL - Will override the campaign target URL if specified. If this tag is left empty, the banner will not link anywhere (won't be wrapped into <a> tag).
- Weight - Will define how often this banner will appear compared to other banners in the campaign (read more below)
- Banner Link Behavior - Choose custom banner link behavior. You can choose between
- Campaign default - follows the default setting
- Target blank - opens in a new window or tab
- Target self - opens in the same frame
- Banner Expiration Date -After this date, the banner will not be displayed.
-
Add variations - Choose images for banner variations

Adding variations

Defining a Banner’s Weight
You can use the weight setting to determine how often each banner will appear. This option only applies if the random banner display method is set.
The WordPress Ad Server calculates the weight of each banner using a value from 0 to 100, meaning 0 will never appear and 100 will always appear. Two banners with weight 50 means each will have a 50% chance of appearing.
You can input different values and the plugin will do the calculations for you.
Examples
Here is a table with examples with 3 banners in the campaign:
| If you input | The plugin will store |
|---|---|
| 0,0,0 | 0,0,0 (no banner will appear) |
| 0,0,1 | 0,0,100 (only banner C will appear) |
| 90,90,90 | 33,33,34 (equivalent to 0,0,0) |
| 1,2,7 | 10,20,70 |
| 1,2,3 | 17,33,50 |
| 2,1,1 | 50,25,25
|
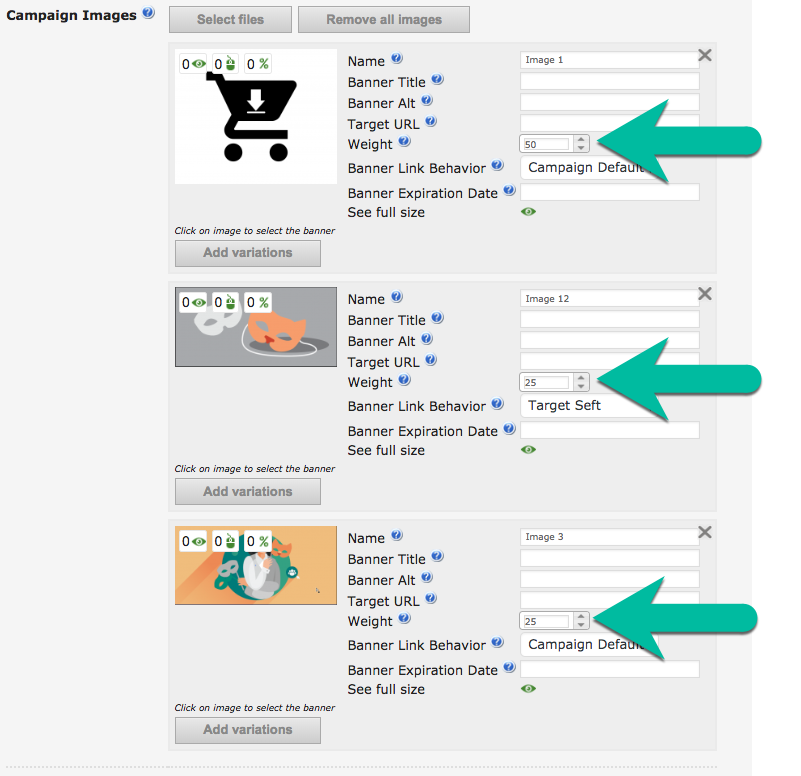
The following image shows a campaign with three banners. The first has weight 50 (will have a 50% chance of appearing) and the other two, weigh 25 (25% chance of appearing).
 |
More information about the WordPress Ad Server plugin Other WordPress products can be found at CreativeMinds WordPress Store |
 |
Let us know how we can Improve this Product Documentation Page To open a Support Ticket visit our support center |