WordPress Ad Server (CMAC) - Getting Started - Installation
WordPress Ad Server Installation
Prefer a Complete Step-by-Step?
Check our use case guide:
The WordPress Ad Server consists of two plugins, the server plugin, and the client plugin. Both plugins need to be installed for the ad campaigns to display. The client plugin can be installed on more than one website that you want to show ads on, depending on the number of licenses you have.
Important! Never install the client plugin and the server plugin on the same WordPress website.
Table of Content
- Install Server Side Plugin
- Install Client side Plugin
- Test the connection between the server and client plugins
- Setting up your first Advertising Campaign
Install Server Side Plugin
- In the WordPress installation that will act as your server, go to the Plugins tab in the menu, and select Add New.
- Click the button Upload Plugin and find the zip file for the Ad Changer Server.
- Activate the plugin.
The plugin will appear in the menu under the name “Ad Changer”. The following screenshots show what the WordPress Ad Server plugin dashboard looks like:
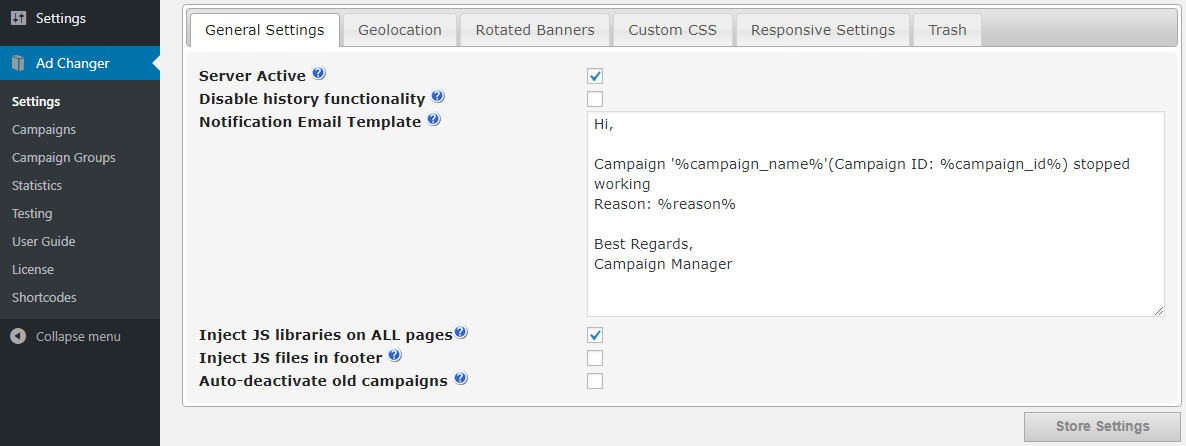
Next, confirm that the server is compatible with the plugin requirements. Open the link to the User Guide, then scroll down all the way to the System Information tab. Before continuing, solve any incompatibilities.
Install Client Side Plugin
- Install the client plugin on the second WordPress website, where you want the campaigns to show.
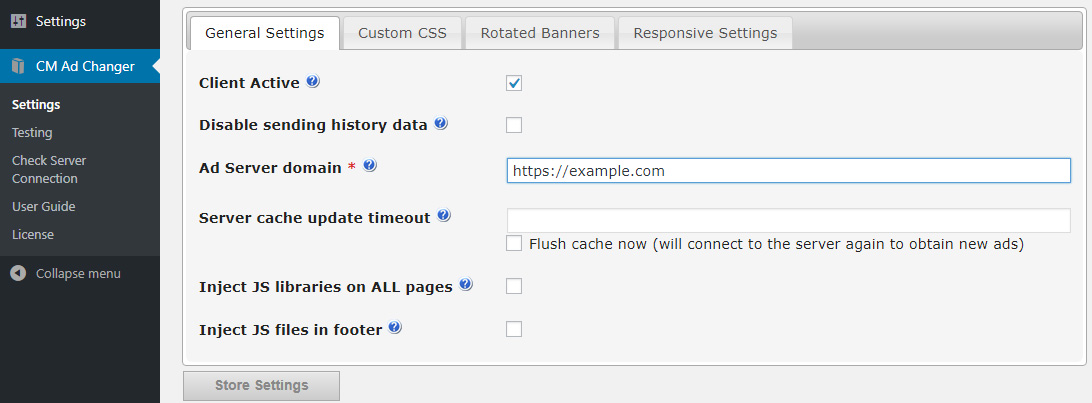
- Next, define the domain address of the server site in the client plugin settings.
- Go to CM Ad Changer → Settings → General Settings tab. Enter the link to the server, including https://, in the Ad Server domain option. Remember to store the settings:
Test the connection between the server and client plugins
Confirm that the connection between the server and client works from inside the client plugins settings.
- Go to CM Ad Changer and select the menu Check Server Connection.
- Click the Test Connection button:
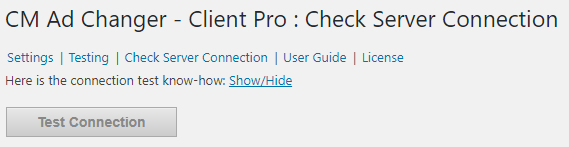
The server should now respond with a message saying Connection Successful!
If you want to know more about the test, you can show more information by clicking the Show / Hide Know-how link above the button.
Setting up your first Advertising Campaign
Advertising Campaigns are created in the server plugin settings.
Go to CM Ad Changer and select the Campaigns menu. All your campaigns will eventually be listed on this page. Since this is your first campaign, the page will be empty.
Select the Create New Campaign button.

You will be taken to the Campaign Settings tab where you can fill out the form and add your first campaign.
To get started, fill out the only required field, which is the internal Campaign Name. Then save the campaign by selecting the Add button:

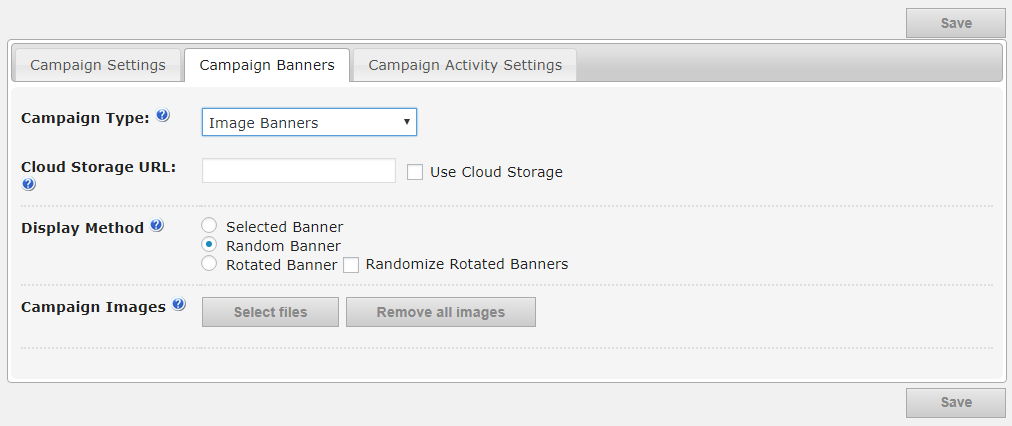
Upload a Campaign image by opening the Campaign Banners tab and selecting a file in the Campaign Images option:
Save your campaign.
You will need the Campaign ID to display the ads on the client sites. You will find the Campaign ID, as well as basic statistics, in the list of campaigns in the Campaigns menu once it is saved:

Display your campaign by placing the following shortcode on any page or post on the client site:
[cm_ad_changer campaign_id="id-of-your-campaign"]You can also test individual campaigns by using the Testing tab in the client plugin menu:

Testing campaigns Enter the Campaign ID and select Start Test. The Campaign data and image should show on the results page. Confirm that all links and images are correct.

 |
More information about the WordPress Ad Server plugin Other WordPress products can be found at CreativeMinds WordPress Store |
 |
Let us know how we can Improve this Product Documentation Page To open a Support Ticket visit our support center |