WordPress Review Plugin - Customization - Review Form
Customization: Review Form
With the WordPress Review plugin, there are 3 ways to customize your front-end Review form:
- Form Display and Position
- Custom Fields
- Labels
- Design and Interface
Below are comprehensive guides to elaborately show you how to customize the form in all 4 different ways!
Customize Form Display and Position
To customize your Review form's display and position:
1) Navigate to the plugin Settings page → Review Form tab.

2) On this page you will find the Form display and Form position options:

- Form display - You have the following options on how you wish to display the Review form to your users: form always visible (form will be visible on the post / page being accessed), form appears on click (a button will be provided), and form appears on click inside a Popup (form will appear inside a modal window).
- Form position - You have the option to display the form above or below the Reviews / Ratings on the post.
- Require Rating - Require or not star ratings.
- Half star rating - Enable the half star rating when adding a review. Note: this feature was introduced in version 2.9.4.
- Field required to fill - Only title, only content or both.
- Use editor instead of text - Enables the WordPress editor on the review form
- Custom fields position - Define where custom fields should be located - above or below the review title, or below the review content. Note: this option was introduced in version 2.8.8.
- Enable image - Allow users to add an image. Learn more: How To - Add Images and Videos to a Review
- Enable video - Allow users to add a video link. Learn more: How To - Add Images and Videos to a Review
Custom Fields
1) Next, head to the Additional custom fields tab.

2) This is where you can add custom text fields to your front-end Review form.
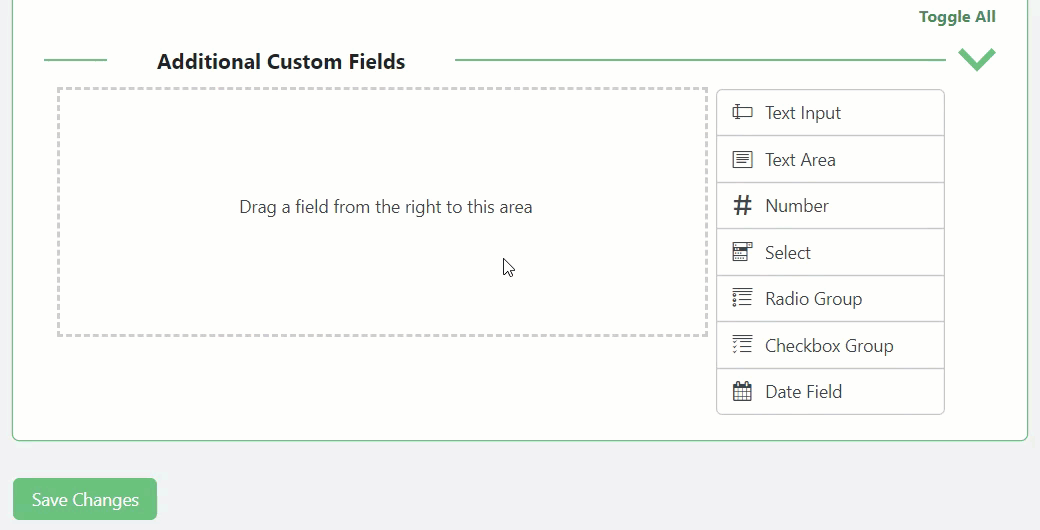
The editor provides the drag-and-drop area and the default fields next to the area. These fields are:
- Text Input
- Text Area
- Number
- Select
- Radio Group
- Checkbox Group
- Date Field
The admin can make each field required or not, add tooltips per field with more detailed information, edit CSS class, default values and more.
Edit, Copy, Remove
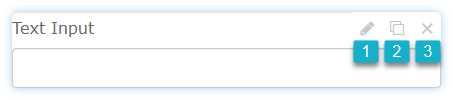
Apply the actions to each chosen field:
- Edit - click on the Edit icon and the field will be open.
- Copy - click on the Copy icon to add the same options.
- Remove - click on the Delete icon to remove a whole field.
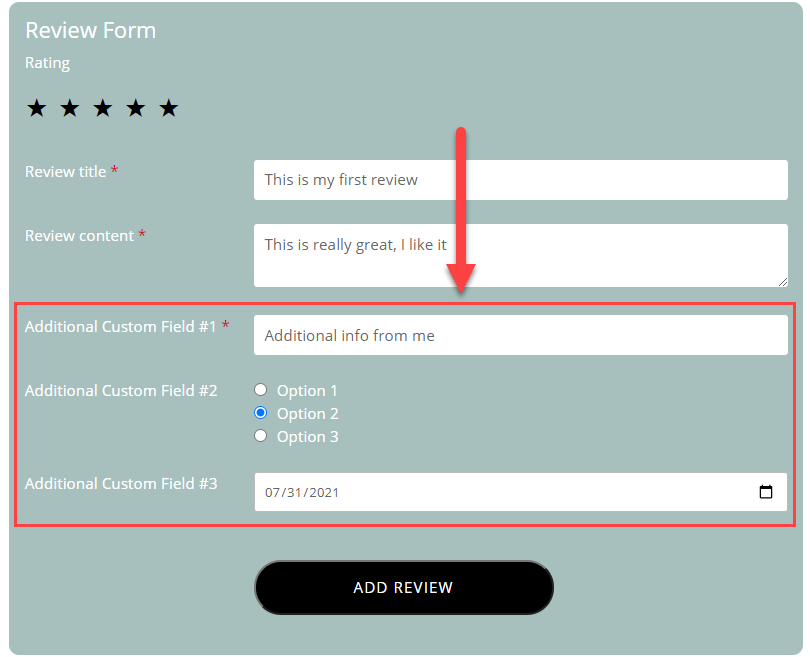
Example on the Front-end:
Review Form:
Customize Labels
Labels are the words / verbage / text being used by the form. You have full control over these text and can replace any of them based on personal preference. If you wish to customize your Review form's labels:
1) Navigate to the plugin Settings page → Labels tab.

On this page, you can modify the phrases being used in your Review form (including titles / headers, labels, placeholders, and any text string by the plugin that is being shown on the front-end of your site).
2) Scroll down to find the Add New Review Form section.
This is where you will find all the text labels your Review form is using on the front-end.

Add New Review Form
- Add review form button - This is the button that will appear on the post if you have opted to display the Review form on-click or inside a Popup (this setting can be found inside the Review Form tab). You can customize what text to show on this button.
- Review Form headline - The title of the Review form.
- Description of the Review Form - The description appearing under the Star Rating Review Form.
- Star rating headline - This is the star rating title / header for the stars shown in the Review form.
- Star rating required message - The star rating required message for the stars in the Review form.
- Review title headline - This is the label for the Review title text field in the Review form.
- Review title placeholder - This is the text that will show up inside the review title field in the Review form while the field is empty. (A placeholder is text that will show inside a text field if the text field is empty)
- Review content headline - This is the label for the review content text field in the Review form.
- Review content placeholder - This is the text that will show up inside the review content text field in the Review form while the field is empty. (A placeholder is text that will show inside a text field if the text field is empty)
- Review image headline - The review imge headline in the Review form.
- Review video link headline - The review video link headline in the Review form.
- Review video link placeholder - The placeholder for review video link text area in the Review form. (A placeholder is text that will show inside a text field if the text field is empty)
- User Name headline - This is the label for your user name field on the Review form.
- User Name placeholder - This is the text that will show up inside the user name text field in the Review form while the field is empty. (A placeholder is text that will show inside a text field if the text field is empty)
- User E-mail headline - This is the label for the user e-mail text field in the Review form.
- User E-mail placeholder - This is the text that will show up inside the e-mail text field in the Review form while the field is empty. (A placeholder is text that will show inside a text field if the text field is empty)
- Review security number headline - The review security number headline in the Review form.
- Review security number placeholder - The placeholder for the review security number text field in the Review form. (A placeholder is text that will show inside a text field if the text field is empty)
- Review security number failure confirmation message - This confirmation text will be displayed to the user after submitting the review form when user will enter wrong security number.
- Share box title - This text appears above the share box.
- Submit button - You can customize the submit button text inside the Review form.
- Review item selector headline - The reviewed items headline in the Review form.
- Current page option - The "Current page" option text in the Review form.
- Successfully published review confirmation message - This is the message that will display for the user confirming that his review has been successfully submitted and published after submitting the Review form.
- Successfully updated review confirmation message - This confirmation text will be displayed to the user after updating the review form.
- Pending review approval message - This message will be displayed to the user after submitting the Review form if you have opted to moderate reviews before publishing (found inside the Access Restrictions tab).
- Review failure confirmation message - This confirmation text will be displayed to the user after submitting the review form when user have already reviewed.
3) Update the labels you wish to modify.
4) Don't forget to save your changes (if any are made) by clicking the Save Changes button at the bottom of the page.

Your label changes should now reflect on your front-end Review form. Congratulations!
Customize Design and Interface
We give you control over how your Review form looks on the front-end of your website. Here are the steps needed for you to customize its design and interface:
1) Navigate to the plugin Settings page → Style tab.

2) From this tab, you can customize the general aesthetic of your front-end Review form.
Of course, the color fields accept any valid HTML/HEX/RGB color code.

3) Complete control: You also have the power to style the form yourself. Scroll down the page to find Disable Form style option.

- Disable Form style - Of course, we expect some users might not want to use the current form design our plugin provides for many reasons, like it might not go well with their current template or they have a specific form design in mind. Although we have created a standard and generic design for the form to try and cater to every website look, we're aware that some users might want to change this form design. And it is not our intention to limit our users at all, so this is what this option is for. Disabling our form style will remove all CSS properties from the Review form and will leave you with a skeleton form which you can leave as is (to inherit your theme's form styles), or style yourself using the CSS class .cmr_form_custom (which is automatically added to the <form> element so you can easily target it and its child elements when styling the form).
3) Make the changes and modifications to your Review form's aesthetics according to your liking.
4) Now of course, don't forget to save your changes!
Your changes should now be applied to your front-end Review form. Congratulations!
And that covers how to customize your Review form in all 4 different ways! Should you have any more questions, feel free to reach out and contact us.
 |
More information about the WordPress Review Plugin Other WordPress products can be found at CreativeMinds WordPress Store |
 |
Let us know how we can Improve this Product Documentation Page To open a Support Ticket visit our support center |