WordPress Glossary Plugin (CMTG) - Terms - Highlight Link Style
Style the Term Link
With the WordPress Glossary plugin, you can customize the style of the highlight as you see fit.
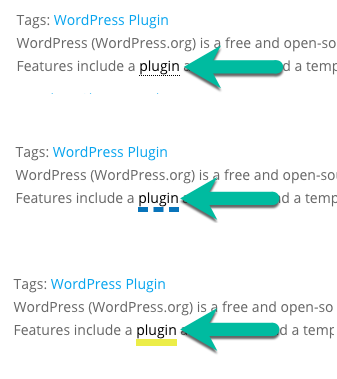
Frontend Example
Navigate to Admin Dashboard → CM Tooltip Glossary → Settings.
Head to the Glossary Term tab. Under the Glossary Term - Links section, you can find the options which control the look and feel of the term link which appears in every post or page:
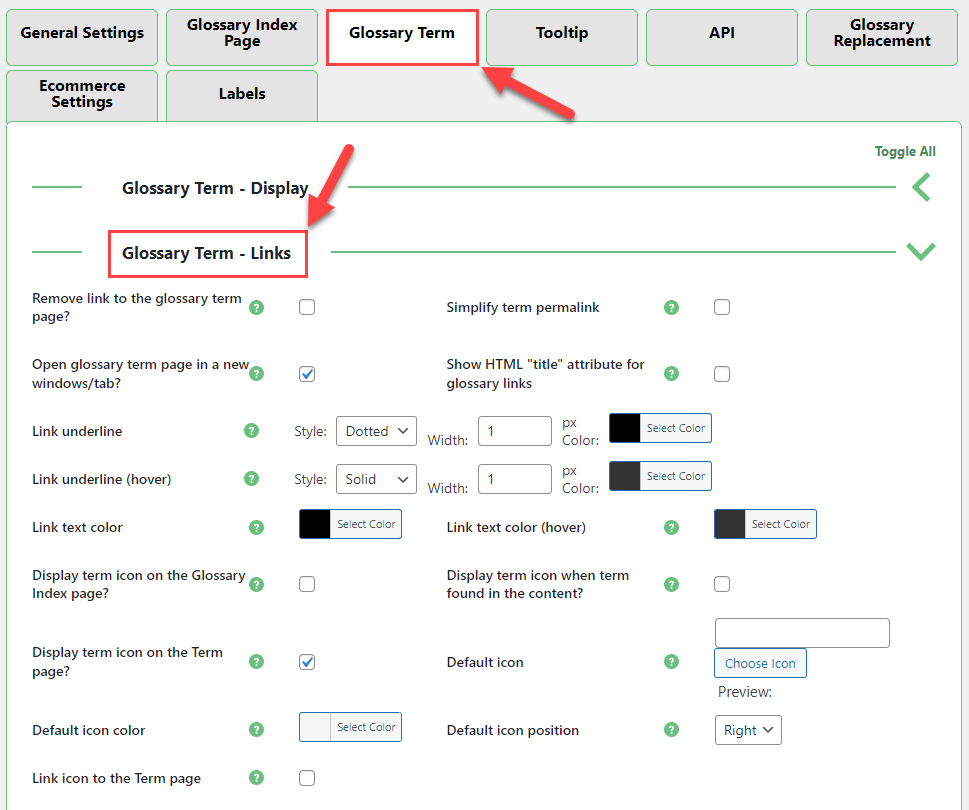
Using these settings you can control the following:
Link behavior
- Remove the link to the glossary term page - Select this option if you do not want to show links from posts or pages to the glossary term pages. This will only apply to Post / Pages,and not to the Glossary Index page. For Glossary Index Page settings, please visit the Glossary Index Page tab instead. Keep in mind that the plugin use a<span> tag instead of a link tag and if you are using a custom CSS you should take this into account.
Simplify term permalink - Enable this option if you want to remove "glossary" slug from term permalink. Note: this option was introduced in version 4.0.0.
Example:
www.example.com/term instead of www.example.com/glossary/term
Warning! Using the same slug for term and post/page will make the latter inaccessible
- Open glossary term page in a new windows/tab - Select this option if you want glossary term page to open in a new window/tab.
- Show HTML "title" attribute for glossary links - Select this option if you want to use glossary name as HTML "title" for link
Link styling
- Link underline (regular and on hover) - Color and also the shape of the line beneath the link.
- Link text color (regular and on hover) - Set color of glossary link text color, and set color of glossary link text color on mouseover.
Icon
Note: the following options are available only in Pro+ and eCommerce versions of the WordPress Glossary plugin.
Icon display
- Display term icon on the Glossary Index page - Self-explanatory
- Display term icon when term is found in the content - Self-explanatory
- Display term icon on the Term page - Self-explanatory
Icon defaults
- Default icon - There's a preview available
- Default icon color - Use the color picker
- Default icon position - Left or right
- Link icon to the Term page - The icons will link to the assigned Term page. Only works if the option "Remove the link to the glossary term page?" is enabled (see above)
Learn more about icons: Terms - Assigning an Icon To a Term
Manually changing the linked term style
You can manually change the linked term style by adding styles to your themes css definitions or the Additional CSS option in the WordPress customizer.
Use the following as an example:
.glossaryLink {font-weight:700;}
or
a.glossaryLink {font-weight: 900;}
Tip: Link with the same color as text
You may want links to have the same color as the text around them if, for instance, you are using a different background color on separate pages or parts of a page.
You can achieve this by using adding the following code snippet to the style.css file:
span.glossaryLink, a.glossaryLink {color: inherit !important;}
 |
More information about the WordPress Glossary Plugin Other WordPress products can be found at CreativeMinds WordPress Store |
 |
Let us know how we can Improve this Product Documentation Page To open a Support Ticket visit our support center |