WordPress MicroPayments (CMMP) - Getting Started - Adding and Managing Wallets
Adding and Managing Wallets
Adding Wallets - As The Admin
Automatic Wallets
While WordPress MicroPayments plugin is active, every time you add a WordPress user, they will receive a new wallet.
Head to WP Admin → CM Micropayment Platform → Settings → General.
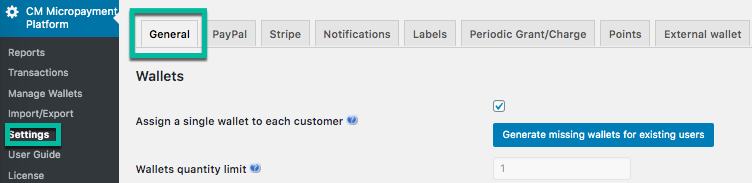
The relevant settings from the Wallets section.
- Assign a single wallet to each customer - if this option is enabled a single Wallet will be tied with each of your WordPress user accounts. (so users won't need to remember their wallet names as long as they're logged in). Note: This setting must be on for the Transfer Shortcode to display a dropdown menu with the accounts. Learn more.
- Wallets quantity limit - You can set any number of wallets to each customer. To change this value, Assign a wallet to each customer has to be disabled
Click the Generate missing wallets button for existing users to create wallets.
Learn about all Wallets settings - WordPress MicroPayments (CMMP) - General Settings
How To Delete All Wallets
To delete all wallets, click on Remove all Wallets. Be careful, as this cannot be undone.

Creating Wallets - As The User
As the admin, apply the shortcode [create_wallet_button] to create a button generates a new wallet code to the current user.
On success, the wallet code will be displayed. You can choose to hide the button by enabling the option "Hide button after wallet creation".

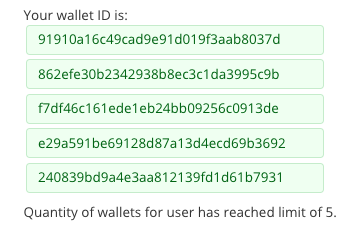
When 'Multiple Wallets' is Active
If users are allowed to have multiple wallets (Wallets quantity limit is bigger than 1), they can use the button to create additional wallets.

Until the limit is reached:
Learn more: WordPress MicroPayments (CMMP) - Shortcodes - Overview
Changing Wallet Nickname - As The User
Since the version 2.1.0 it is possible to assign a nickname to each wallet. This way, users don't have to use Wallet IDs that are long and difficult for remembering, they can use a Wallet Nickname instead of it.
The users can change the nicknames of their wallets on the front-end at any moment. It is done by the same shortcode [create_wallet_button] . When the wallet is already created, the user can see the field with his Wallet ID. He needs just to write there a new nickname and click Update.
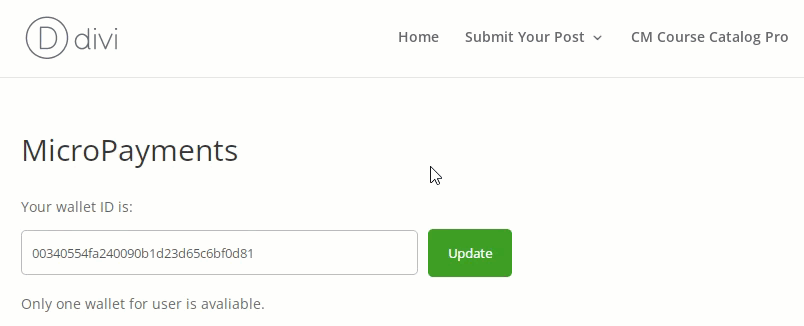
It works the same for one or multiple wallets.
Managing Wallets - As The Admin
To manage the wallets you need to go to Settings → Manage Wallets.
This is a very important screen, as it allows you not only to see the details about Wallets but also to maintain control over all of your user's wallets.
Important: Some of the features are hidden until you hover over the item!
On this page, you can:
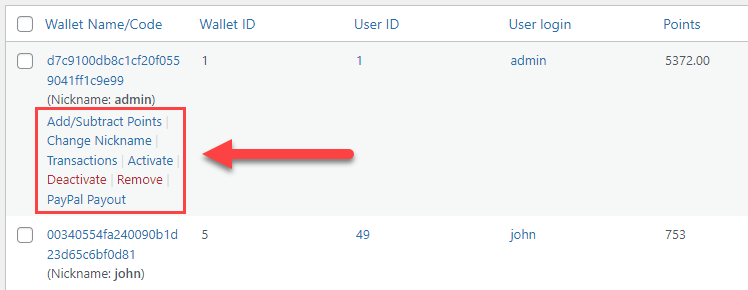
- list all of the Wallets that have been created on your site.
filter users - you can filter users by their type - registered and non-registered users. It can be done using the dropdown User Type above the list of wallets. Note: this option was introduced in version 2.1.0.

Filtering wallets by user types - check the users they're assigned to - you can go to the user's profile by clicking on the login.
- check their balance - in the Points column.
- check if they're active - in the Status column.
- go to the list of their transactions - by clicking on Transactions link in the menu under Wallet Code.
change their points value (charge manually) - by clicking on Add/Subtract Points. When you click on it, you need to set the amount of points, choose the action - Add or Subtract them, write the comment and click Save. Note: this option was introduced in version 2.1.1 instead of the old option Change points value.

Adding/subtracting points in user wallets on the back-end change the Wallet Nickname - Click the button Change Nickname to change the Wallet Nickname of any user. Note: this option was introduced in version 2.1.0.

Changing wallet nicknames on the back-end - activate/deactivate the wallet - deactivated wallets cannot be used.
- remove the wallet.
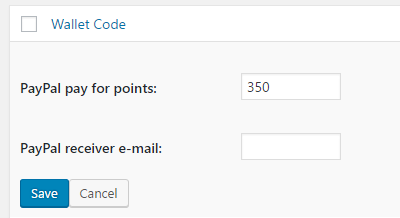
- use PayPal Payout.


Below: The menu under the Wallet Code appears only when you hover over the row.
PayPal Payout
Instead of letting users use the PayPal Payout themselves you can do it manually by using the shortcodes.
Important: Before using this feature you need to go through the PayPal Payout Setup.
To do this you need to fill out the:
- Number of the points to pay out.
- Receiver's e-mail: the e-mail of the PayPal account of the user who you want to receive the money from PayPal Payout.
Below: The form appears after clicking the PayPal Payout button on the menu which appears after hovering over the row.
 |
More information about the WordPress MicroPayments plugin Other WordPress products can be found at CreativeMinds WordPress Store |
 |
Let us know how we can Improve this Product Documentation Page To open a Support Ticket visit our support center |