WordPress Glossary Plugin (CMTG) - Tooltips - Controlling Where Tooltip Appears
Controlling Where The Tooltip Appears
Video Guide
Controlling Where The Tooltip Appears
The WordPress Glossary plugin has several different settings that help determine where on your site or blog your WordPress Tooltips will appear, and how.
TIP: Enabling/Disabling Tooltips
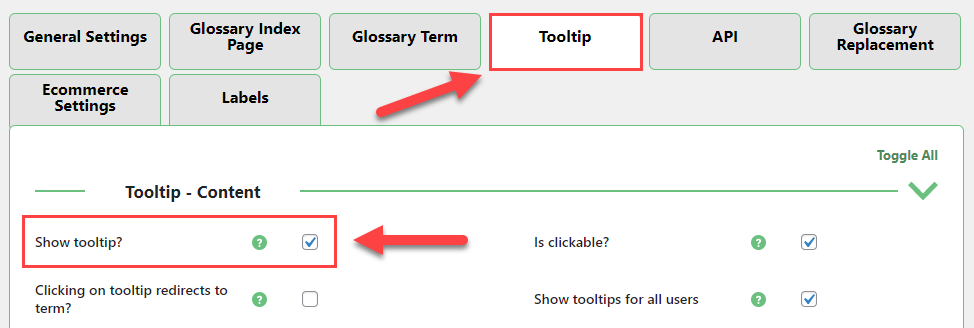
First of all, at any moment you can disable tooltips altogether. You can do so from Admin Dashboard → CM Tooltip Glossary → Settings → Tooltip tab → Tooltip - Content section.
Uncheck Show tooltip and they won't appear at all.
You can access, customize, and set rules for the way you want your WordPress tooltips to appear, by heading to the General Settings tab.

Tooltips Rules
Head to the Term Highlighting section.

Highlight terms on given post types - Select which post types will have highlights/tooltips. Note that you can still control if tooltips appear on specific pages while editing those pages (read below).
Learn more about highlighting terms on custom post types:
- Only show terms on single posts/pages (not Homepage, authors etc.)? - For cases when you want terms to be highlighted across your site, but not on pages such as the homepage, archive pages and author pages.
- Only highlight white-listed and non-blacklisted terms? - Select this option if you wish to only highlight glossary terms on posts/pages, which have: white-listed terms/categories or black-listed terms/categories. This means adding the terms to the glossary won't be enough to highlight. Note: this option is available only in Pro+ and Ecommerce versions of the plugin. Learn more: WordPress Glossary Plugin (CMTG) - Whitelist/Blacklist Terms on a Post/Page
- Highlight terms in bbPress replies? - Select this option if you wish to highlight Glossary Terms in ALL of the bbPress replies.
- Highlight terms on BuddyPress pages? - Select this option if you wish to highlight Glossary Terms in ALL of the BuddyPress pages.
- Highlight terms in BuddyBoss activity content? - Select this option if you wish to highlight Glossary Terms in the BuddyBoss activity content.
- Highlight first term occurrence only? - Only highlight the first term on each page.
- Highlight first term occurrence - exception tag - Use this option if you would like to have an exception tag for the Highlight first term occurrence only or Highlight every nth occurrence only options. The value should be a single HTML tag name eg. "strong". If you want to add a few exception tags, you should separate them by comma, eg "strong,em". Every occurrence of terms directly wrapped with the selected tag will be highlighted. Note: this option was introduced in version 4.1.3.
Highlight first term occurrence - exception class - Use this option if you would like to have an exception class for the Highlight first term occurrence only or Highlight every nth occurrence only options. The value should be a single HTML class name eg. "schema-faq-answer". If you want to add a few exception tags, you should separate them by comma, eg "schema-faq-answer,display-tooltip". Every occurrence of terms directly wrapped with the tag that has this class will be highlighted. Note: this option was introduced in version 4.1.3.
Examples of using exception tags and classes
Here are the tags and classes which we added in plugin settings:

Using exception tags and classes And here is how it works - when the option Highlight first term occurrence only is enabled, only the first term occurrence is highlighted and those occurrences that are wrapped by tags and classes which we added to exceptions.

Examples of using exception tags and classes - Highlight every nth occurrence only? - Select this option if you want to only highlight every N-th occurrence of a term (or it's synonyms/variations) on a page/post. Setting it to 3 means that only every third occurrence will be highlighted. Set to 1 to highlight all occurrences. Important: This option doesn't work if the option Highlight first term occurrence only is enabled. Note: this option was introduced in version 4.0.8 only in Pro+ and Ecommerce edition. Learn more about this feature in this guide: WordPress Glossary Plugin (CMTG) - Term - Highlight Every N-th Occurrence Only
- Highlight each variations/synonyms of the term? - Enable this option, if you want the plugin to parse each of the terms form/variant/synonym the same as base term, eg. if the term is "HTML" and it appears in the content as both "HTML" and "html", both will be highlighted.
- Highlight only space separated terms? - Select this option if you want to only search for the terms separated from other words (usually by space).
- Highlight the terms in comments - Select this option if you want to highlight the glossary terms in the comments. Note: this option is not available in the Pro version of the plugin.
- Highlight the terms in Text Widget - Select this option if you want to highlight the glossary terms in the Text Widget built in WordPress.
- Highlight the terms in WPBakery - Select this option if you want to highlight the glossary terms in the WPBakery shortcodes.
- Highlight the terms in Ninja Tables - Select this option if you want to highlight the glossary terms in the Ninja Tables. Note: this option was introduced in version 3.9.14.
- Highlight the terms on category/tag pages - Select this option if you want to highlight the glossary terms on category/tag pages.
- Exclude HTML tags from parsing - Select which tags you don't need to parse. Remove all if you need to parse all tags.
- Excluded HTML Classes - You can put here the comma separated list of IDs of the HTML classes you would like to exclude from being parsed. Example: h1, h2, p, div, header, div, container. Note: this option is available only in Pro+ and Ecommerce versions of the plugin.
- Excluded HTML tags - You can put here the comma separated list of tags you would like to exclude from being parsed. Note: this option is available only in Pro+ and Ecommerce versions of the plugin.
- Exclude hyphenated words - Select this option if you wish to exclude hyphenated words, for example: camera-ready, up-to-date and well-known.
- Exclude words in double quotes - Select this option if you wish to exclude words in double quotes.
- Highlight terms on it's own page - Select this option if you wish to highlight term on it's own page.


Advanced Custom Fields
Settings related to Advanced Custom Fields have their own section.
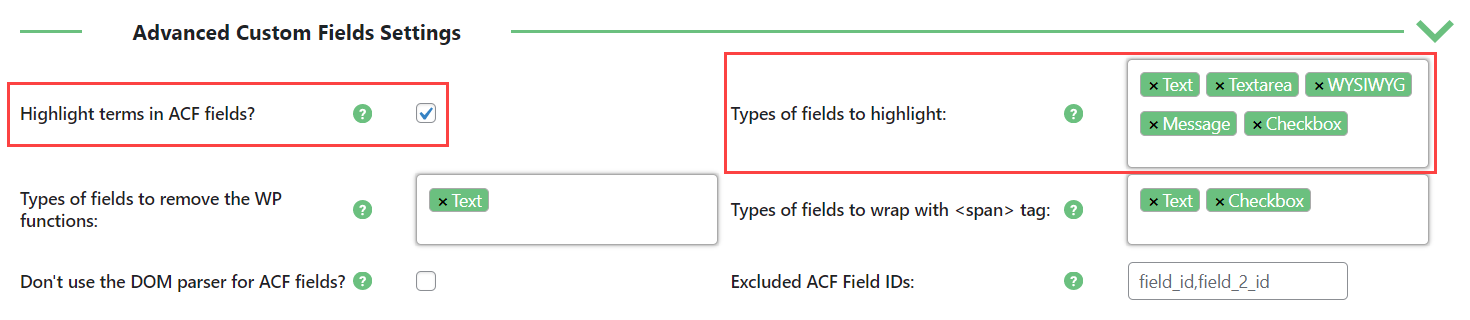
- Highlight terms in ACF fields? - Select this option if you wish to highlight Glossary Terms in ALL of the "Advanced Custom Fields" fields.
- Types of fields to highlight - Select the types of ACF fields in which you'd like the Glossary Terms to be highlighted.
- Types of fields to remove the WP functions - Select the types of ACF fields for which the built in WP filters adding paragraphs and newlines should be removed.
- Types of fields to wrap with <span> tag - Select the types of ACF fields which should be wrapped with <span> tag.
- Don't use the DOM parser for ACF fields? - Select this option if you want to parse the ACF fields using the simple parser (preg_replace) instead of DOM parser. Warning: May break the content.
- Excluded ACF Field IDs - You can put here the comma separated list of IDs of the ACF fields you would like to exclude from being parsed.
Mobile Options
You can also enable/disable the tooltip depending on the device.
Check the article WordPress Glossary Plugin (CMTG) - Extras - Mobile Support for more details.
Controlling On Term Pages
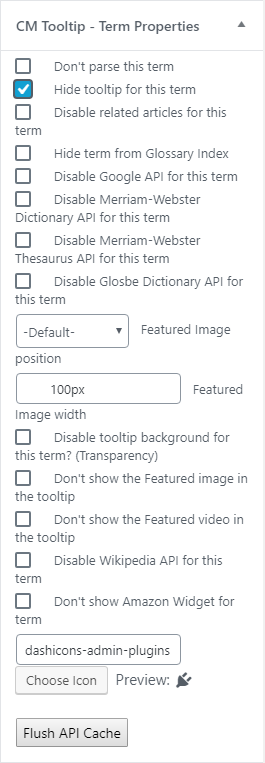
Also, when you edit a term, you can find a metabox that controls if a tooltip will appear for the term:
Controlling On Individual Pages/Posts
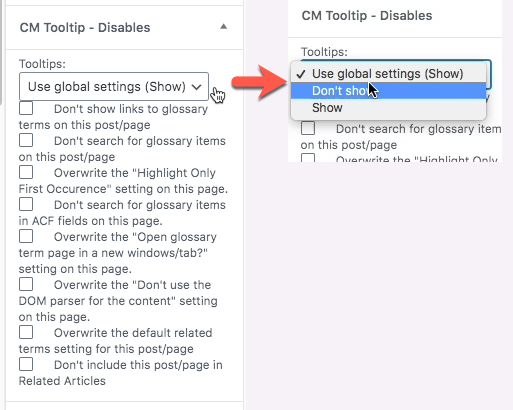
The rules you defined in the general plugin settings will apply to all pages and posts. However, they can be overridden by using the tooltips metabox located on the right side of the post once editing it.
Using this metabox, you can manually exclude some pages from being parsed by the plugin, as well as change the rules by which that particular page is parsed.
Learn more: WordPress Glossary Plugin (CMTG) - Index - Removing Tooltip Hover
No Metabox?
If the metabox is not being shown, ensure this setting is enabled:
Settings → General Settings tab → Edit Screen Elements section → "CM Tooltip Disables" metabox .
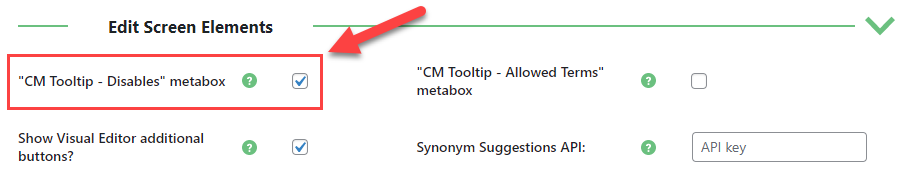
Note: this option is available only in Pro+ and Ecommerce versions of the plugin.
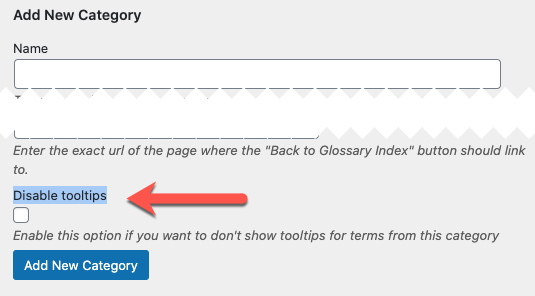
Controlling On Categories
To disable tooltips inside a term category, check the option Disable tooltips while creating/editing that category.
(Pro+ and eCommerce versions only)
Controlling Inside Post/Pages Content Using Shortcodes
You can also restrict the parsing of text inside a post or page by using the glossary_exclude shortcode in the following way:
[glossary_exclude] text [/glossary_exclude]
 |
More information about the WordPress Glossary Plugin Other WordPress products can be found at CreativeMinds WordPress Store |
 |
Let us know how we can Improve this Product Documentation Page To open a Support Ticket visit our support center |